Skip to content
Stirred Recipes
  • Home
  • Appetizers
  • Desserts
  • Salads
  • Breakfast
  • Dinner
  • Privacy Policy
  • Contact
  • About

Chef Luca

Minute Garlic Chicken Gnocchi Skillet Recipe Delight

November 14, 2025January 17, 2025 by Chef Luca
- 1 lb chicken breast, diced - 1 package gnocchi (16 oz) - 3 tablespoons olive oil - 4 cloves garlic, minced - 1 cup cherry tomatoes, halved - 1 cup fresh spinach - 1 teaspoon Italian seasoning - Salt and pepper to taste - 1/2 cup grated Parmesan cheese - Fresh basil leaves, for garnish This dish shines because of its fresh and simple ingredients. Each one plays a key role. Chicken Breast: I use one pound of diced chicken. It adds protein and makes the dish filling. Gnocchi: A 16-ounce package of gnocchi brings a soft and chewy texture that pairs well with the sauce. Garlic and Olive Oil: The garlic gives a strong flavor. Three tablespoons of olive oil help cook everything and adds richness. Vegetables: I add one cup of halved cherry tomatoes and one cup of fresh spinach. The tomatoes burst with juice, and the spinach wilts perfectly. Seasonings: I use one teaspoon of Italian seasoning, salt, and pepper. They enhance all the other flavors. Cheese and Garnish: Finally, I sprinkle half a cup of grated Parmesan cheese on top and add fresh basil leaves for a pop of color and flavor. These ingredients combine to create a quick, tasty meal. It’s perfect for busy weeknights, and the flavors are amazing! {{ingredient_image_1}} Heating the Skillet Start by heating 2 tablespoons of olive oil in a large skillet. Use medium-high heat to get the oil nice and hot. This step is key for a good sear on the chicken. Seasoning and Browning Chicken Next, add 1 pound of diced chicken breast to the skillet. Season it with salt, pepper, and 1 teaspoon of Italian seasoning. Cook this chicken for about 5 to 7 minutes. You want it browned and fully cooked. Stir it occasionally for even cooking. Boiling Gnocchi While the chicken cooks, bring a pot of salted water to a boil. Add a package of 16 ounces of gnocchi to the water. Cook it for about 2 to 3 minutes, or until the gnocchi floats to the top. This means they are ready! Draining Process Once the gnocchi float, quickly drain them in a colander. Set them aside for later use in the dish. Sautéing Garlic and Adding Vegetables When the chicken is done, add 4 minced garlic cloves to the skillet. Sauté the garlic for 1 minute until it smells great. Then, stir in 1 cup of halved cherry tomatoes. Cook for another 2 to 3 minutes until the tomatoes soften. Mixing in Gnocchi and Cheese Now, add 1 cup of fresh spinach and the cooked gnocchi to the skillet. Mix everything well to combine. Drizzle the last tablespoon of olive oil over the dish. Sprinkle 1/2 cup of grated Parmesan cheese on top. Stir gently until all the ingredients are warm and coated. Remove from heat and let it sit for a minute to melt the cheese. Garnish with fresh basil leaves before serving. Timing the Cooking Steps Timing is key in this dish. Start with the chicken. Cook it for 5-7 minutes until it is golden. While it cooks, boil your gnocchi. They take only 2-3 minutes to float. This way, both will finish at the same time. Keeping Ingredients Fresh Use fresh spinach and ripe cherry tomatoes. They add color and taste. Look for bright green spinach and vibrant tomatoes. Store them in the fridge until you’re ready to cook. This keeps them crisp and tasty. Additional Seasoning Ideas You can add a pinch of red pepper flakes for heat. A squeeze of lemon juice brightens the whole dish. Fresh herbs like thyme or oregano work well too. Try different seasonings to find what you love. Suggestions for Cheese Variations Parmesan is great, but you can mix it up. Use feta for a tangy twist. Mozzarella melts beautifully if you want a cheesy pull. Experiment with different cheeses to enhance your dish. Pro Tips Marinate the Chicken: For extra flavor, marinate the diced chicken in olive oil, garlic, and Italian seasoning for at least 30 minutes before cooking. Use Fresh Gnocchi: If possible, use fresh gnocchi instead of packaged ones for a lighter and more authentic texture. Customize Veggies: Feel free to add other vegetables like bell peppers or zucchini for added nutrition and color. Serve Immediately: This dish is best enjoyed fresh, so serve it right after cooking to maintain the gnocchi's texture and the vibrant flavors. {{image_2}} Using Different Proteins I love to switch up the chicken in this dish. You can use shrimp or tofu instead. Shrimp cooks fast and adds a nice touch. Tofu adds a great texture and absorbs flavors well. Both give a fun twist to the recipe. Alternative Vegetables You can also change the veggies in your skillet. Zucchini works great when sliced thin. It adds a nice crunch. Bell peppers are another option. Their sweetness can brighten the dish. Feel free to mix and match your favorite vegetables. Oven-Baked Version If you prefer baking, try this oven-baked method. Start by cooking the chicken in a skillet. Then, layer the cooked chicken, gnocchi, and veggies in a baking dish. Top it with cheese and bake at 375°F for about 20 minutes. This gives the dish a crispy top and rich flavor. One-Pot Variations For a quick clean-up, use a one-pot method. Start by cooking the chicken in a large pot. Add the gnocchi and veggies directly to the pot with some broth. Cook until everything is tender. This method keeps all the flavors together and saves time. After you enjoy your Minute Garlic Chicken Gnocchi Skillet, you may have some left. Here’s how to store it: - Refrigeration Tips: Allow the dish to cool first. Then, transfer it to an airtight container. Store it in the fridge for up to three days. This keeps the flavors fresh and tasty. - Freezing Recommendations: If you want to save it for longer, you can freeze it. Place the cooled dish in a freezer-safe container. It can last up to three months in the freezer. When ready, let it thaw in the fridge overnight before reheating. When it’s time to eat your leftovers, follow these steps to reheat: - Best Methods to Reheat: The best way to reheat is on the stove. Place the skillet on medium heat. Add a splash of water or broth to help with moisture. Stir often until it’s heated through. You can also use a microwave. Place it in a microwave-safe bowl. Heat in 30-second intervals, stirring in between. - Maintaining Texture and Flavor: To keep the gnocchi soft, avoid overheating. You want to warm it gently. Adding a little olive oil can help if it seems dry. This keeps the dish as delicious as when you first made it. Can I use frozen gnocchi? Yes, you can use frozen gnocchi. Just cook them for about 3-4 minutes until they float. This way, they will be soft and ready to mix with the rest of your dish. How long does it take to cook chicken in a skillet? Cooking chicken breast in a skillet takes about 5-7 minutes. Make sure it is browned and cooked through. Always check that the inside is no longer pink. What can I serve with garlic chicken gnocchi? You can serve garlic chicken gnocchi with a fresh salad or some crusty bread. A light, zesty side dish pairs well with the flavors of the skillet. Can I make this dish without garlic? Yes, you can skip the garlic. You might miss the flavor, but you can add onion or herbs for taste. This blog post explored a tasty chicken gnocchi dish. You learned about the key ingredients, like chicken breast, gnocchi, and vegetables. I shared step-by-step cooking instructions to help you prepare it perfectly. You discovered useful tips and tricks to enhance flavor and adapt the dish with ingredient swaps. Whether storing leftovers or reheating, you now have the know-how to enjoy this meal multiple times. Remember, cooking is all about having fun and experimenting. Enjoy making this dish your own!

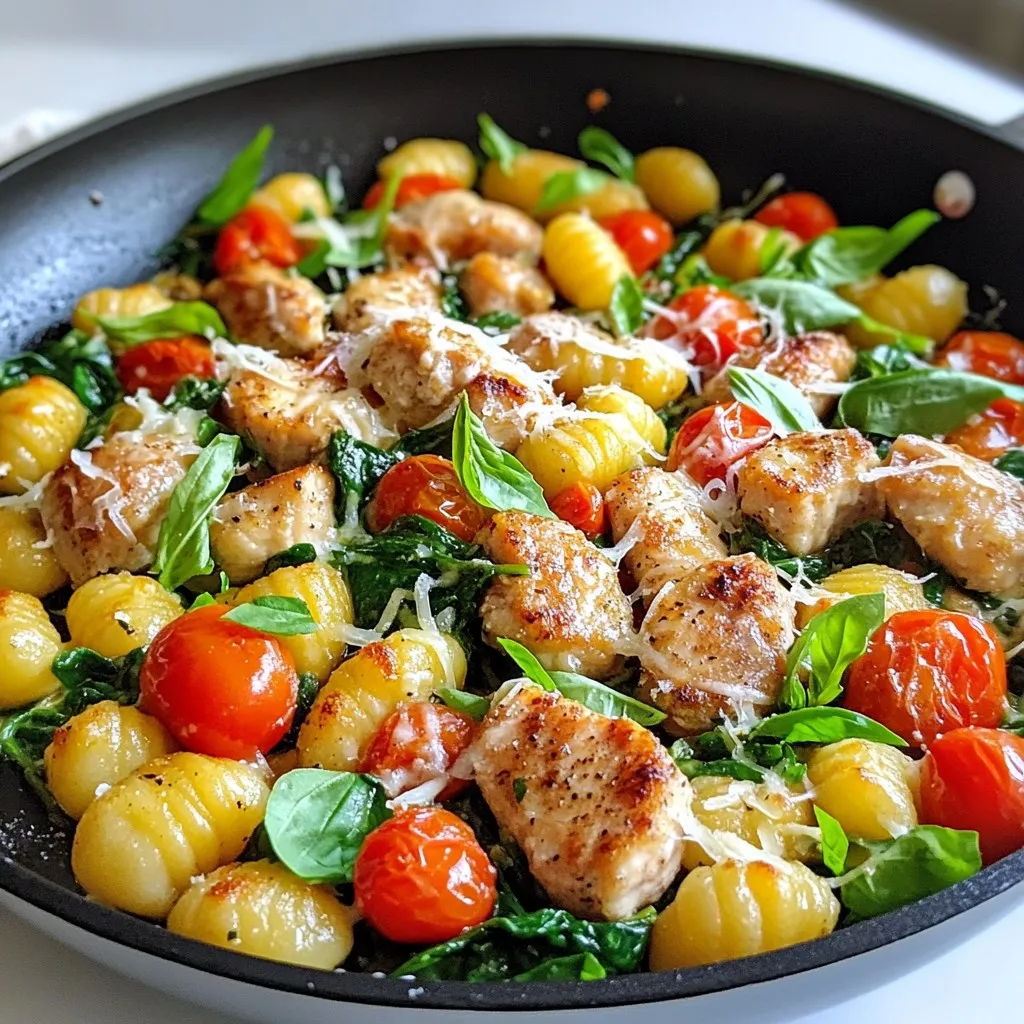
Looking for a quick and delicious meal? I’ve got you covered with my Minute Garlic Chicken Gnocchi Skillet Recipe Delight! This dish is not only easy to make, but it …

Read more

Categories Dinner

Honey Garlic Salmon Bowls Flavorful and Healthy Meal

January 5, 2026January 12, 2025 by Chef Luca
- 2 salmon fillets (about 6 oz each) - 3 tablespoons honey - 2 tablespoons soy sauce (or tamari for gluten-free) - 3 cloves garlic, minced - 1 teaspoon grated fresh ginger - 1 tablespoon olive oil - Salt and pepper to taste The main ingredients create a rich, sweet, and savory flavor. Salmon is a great source of protein and healthy fats. Honey adds sweetness, while soy sauce brings umami. Garlic and ginger give a fresh kick. The olive oil helps cook the salmon and adds richness. Salt and pepper enhance all these flavors. - 2 cups cooked quinoa - 1 cup steamed broccoli florets - 1 cup shredded carrots - ½ avocado, sliced - Sesame seeds for garnish - Chopped green onions for garnish The bowl components make this meal colorful and nutritious. Quinoa is a complete protein and full of fiber. Steamed broccoli adds vitamins and crunch. Shredded carrots bring sweetness and color. Sliced avocado gives creaminess and healthy fats. Sesame seeds and green onions add a nice finish and texture. Each bite is a blend of flavors and nutrients. {{ingredient_image_1}} To start, I prepare the marinade. I mix together 3 tablespoons of honey, 2 tablespoons of soy sauce, 3 minced garlic cloves, and 1 teaspoon of grated ginger in a small bowl. This mix gives the salmon a sweet and savory flavor. Next, I season the salmon fillets with salt and pepper. Then, I pour the marinade over the fillets. I let them sit for about 15-20 minutes. This time helps the fish soak up the flavors. While the salmon marinates, I heat 1 tablespoon of olive oil in a non-stick skillet over medium heat. Once the oil is hot, I carefully add the salmon fillets, skin side down. I cook them for about 4-5 minutes on each side. The salmon should flake easily with a fork when done. For extra flavor, I brush the salmon with the remaining marinade while it cooks. This technique enhances the taste and keeps it moist. Now it’s time to put the bowls together. I start with a base of 2 cups of cooked quinoa. I layer steamed broccoli florets and shredded carrots next to the quinoa. Then, I place a cooked salmon fillet on top of the veggies and quinoa. For a fresh finish, I garnish the dish with sliced avocado, sesame seeds, and chopped green onions. Finally, I drizzle any leftover marinade over the bowls. This adds a burst of flavor to each bite. To cook salmon to flaky perfection, start with the right heat. Use medium heat in a non-stick skillet. This lets the fish cook evenly without burning. Cook each fillet for about 4-5 minutes on each side. You want the salmon to flake easily with a fork. The marinade plays a big role in flavor. Mix honey, soy sauce, garlic, and ginger well. This blend gives a sweet and savory taste. Let your salmon soak in the marinade for 15-20 minutes. This time allows the flavors to soak in nicely. You can customize your bowls with various vegetables. Feel free to add bell peppers, snap peas, or spinach. Each veggie adds its own taste and nutrition. If you want a protein switch, try tofu. Tofu absorbs flavors well. Prepare it the same way as salmon. Marinate it and cook it until golden brown. Presentation matters! Start with a base of quinoa. This gives your bowl height. Then, add colorful vegetables like broccoli and carrots. The mix of colors makes the dish pop. For garnishing, slice an avocado and place it on top. Sprinkle sesame seeds and green onions. This adds texture and a fresh touch. The final look should be bright and inviting. Pro Tips Marinate Longer for More Flavor: If you have time, marinate the salmon for up to an hour. This allows the flavors to penetrate deeper into the fish, enhancing the taste. Use Fresh Ingredients: Fresh garlic and ginger will significantly elevate the flavors in your marinade. Avoid pre-minced options for the best results. Don’t Overcook the Salmon: Keep an eye on the cooking time. Salmon is best when it’s just cooked through and still moist, so aim for 4-5 minutes per side depending on the thickness. Customize Your Veggies: Feel free to mix in your favorite vegetables. Bell peppers, snap peas, or spinach can also work wonderfully in these bowls. {{image_2}} You can switch up the flavor of your honey garlic salmon bowls with different marinades. Try teriyaki sauce for a sweet and savory twist. Miso paste can also add a rich umami flavor. If you like heat, add chili flakes or sriracha to your marinade. For a fresh taste, mix in some citrus juice like lime or orange. This gives your dish a bright and zesty kick. You don’t have to stick with quinoa. You can use rice for a soft texture. Cauliflower rice is a great low-carb option too. It soaks up flavors well and adds a nice crunch. Choose the grain that fits your taste or diet; each option brings its own unique flair. The veggies you choose can change with the seasons. In spring, use fresh asparagus or peas. In summer, cherry tomatoes or bell peppers work well. In fall, roasted sweet potatoes or Brussels sprouts can add warmth. Fruits can also enhance your bowls. Try adding mango slices in summer or pomegranate seeds in winter. These toppings not only add flavor but also color and nutrition to your meal. After making honey garlic salmon bowls, store any leftovers in the fridge. Place them in airtight containers. This helps keep the food fresh and safe. Make sure to eat the leftovers within three days for the best taste. To reheat, use a microwave or an oven. If using the microwave, cover the bowl with a microwave-safe lid. Heat on medium power for about one to two minutes. For the oven, preheat it to 350°F (175°C). Place the food in an oven-safe dish and cover it. Heat for about 10-15 minutes. Be careful not to overcook the salmon. This keeps it moist and tender. Enjoy your meal just as delicious as when you first made it! In this post, we explored a delicious honey garlic salmon bowl. You learned about key ingredients like salmon, quinoa, and fresh veggies. I shared tips on marinating and cooking the salmon to perfection. Plus, we discussed customizing bowls with different toppings and grains. Remember, you can easily adapt this recipe to fit your taste. Don't be afraid to experiment with flavors and ingredients! Enjoy cooking and creating your perfect salmon bowl.

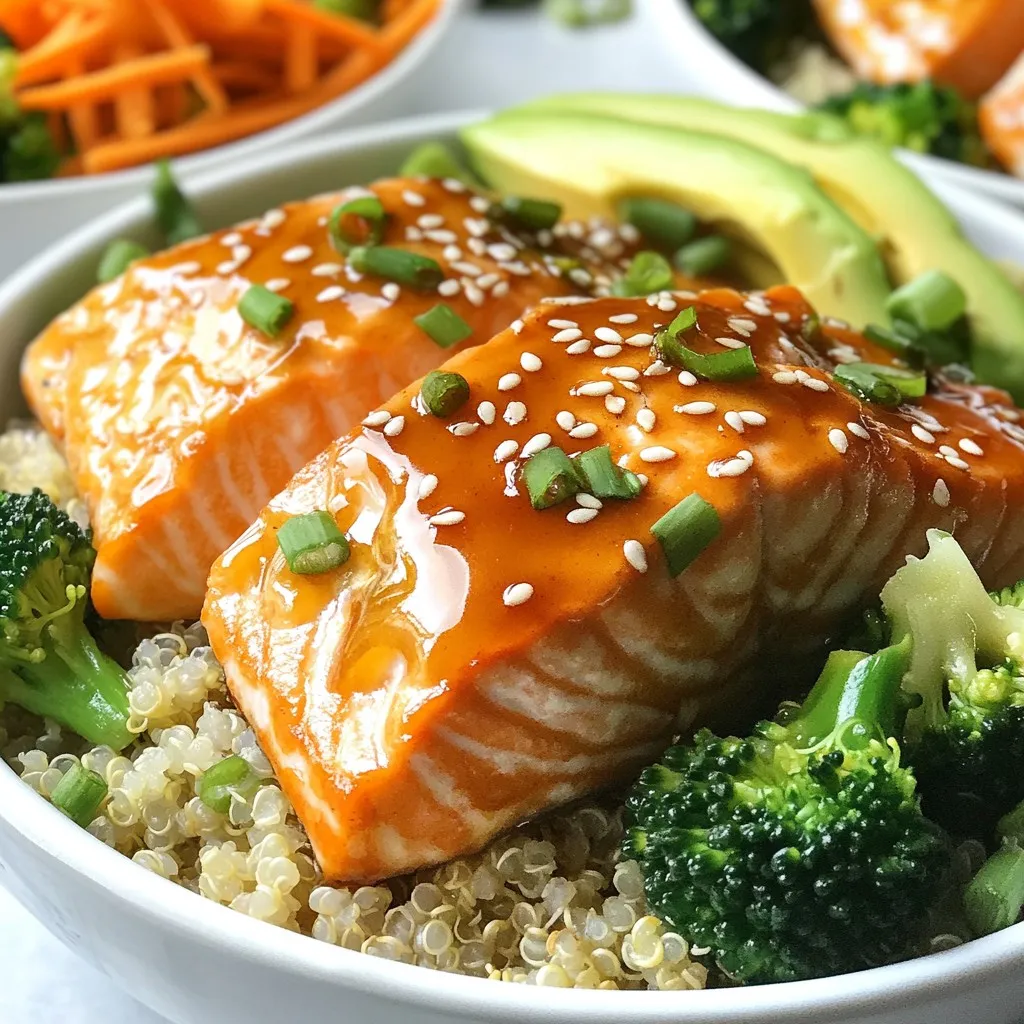
If you’re looking for a quick and healthy meal, let me introduce you to Honey Garlic Salmon Bowls. This dish packs flavor and nutrition in every bite. With tender salmon …

Read more

Categories Dinner

Hawaiian Roll Grilled Cheese Quick and Tasty Recipe

January 5, 2026January 10, 2025 by Chef Luca
- 6 Hawaiian rolls, split in half - 1 cup shredded sharp cheddar cheese - 1/2 cup shredded mozzarella cheese - 1/4 cup cream cheese, softened - 2 tablespoons butter, softened - 2 tablespoons fresh basil, chopped - 1 tablespoon honey - Salt and pepper to taste You can swap Hawaiian rolls for dinner rolls if needed. For cheese, use gouda or provolone. Cream cheese can be changed to ricotta for a lighter option. If you don’t have fresh basil, dried basil works too, but use less. Honey can be replaced with agave syrup or maple syrup for sweetness. Using high-quality ingredients makes a big difference. Fresh cheese melts better and tastes richer. Good rolls add a nice sweetness and soft texture. Fresh herbs like basil bring bright flavors to your dish. Always aim for the best quality you can find. Your grilled cheese will taste amazing! {{ingredient_image_1}} To start, gather your ingredients. You will need 1 cup of sharp cheddar cheese, 1/2 cup of mozzarella cheese, and 1/4 cup of softened cream cheese. In a medium bowl, mix the cheddar and mozzarella together. Then, add the cream cheese. Stir until the cheeses blend well. Next, add 2 tablespoons of chopped fresh basil and 1 tablespoon of honey. Season this mixture with salt and pepper to taste. Now, let’s cook! First, take your 6 Hawaiian rolls and split them in half. Spread a thin layer of softened butter on the cut sides of each roll. Heat a skillet over medium heat. Place the bottom halves of the rolls in the skillet. Spoon the cheese mixture onto each bottom half. Then, place the top halves back on. Grill for 3-4 minutes, pressing down gently with a spatula. This helps the cheese melt. When the bottoms are golden brown, carefully flip each sandwich. Grill the other side for another 3-4 minutes until both sides are golden and the cheese is melted. To serve, slice each sandwich in half. Place them on a colorful platter. For a nice touch, garnish with a sprig of basil and drizzle some honey on top. This not only looks good but adds extra flavor. Enjoy your Hawaiian Roll Grilled Cheese warm for the best taste! To get that perfect grilled cheese texture, use a skillet over medium heat. Avoid high heat; it burns the bread. Spread butter on both sides of the rolls. This helps them crisp up nicely. Use a mix of sharp cheddar and mozzarella for flavor and stretch. Press down gently with a spatula while grilling. This helps the cheese melt evenly. Flip the sandwich carefully for even browning. Hawaiian Roll Grilled Cheese pairs great with dips. Try a simple marinara sauce. It adds a nice, tangy flavor. You can also use ranch or a creamy garlic dip. For sides, fresh fruit works well. Pineapple or melon add a sweet touch. Chips or a small salad also make good options. They balance the richness of the cheese. One common mistake is not using enough cheese. Too little cheese makes the sandwich dry. Another mistake is not letting the skillet heat enough. This leads to soggy bread. Avoid flipping too soon; let it brown first. Lastly, don’t skip seasoning. A pinch of salt and pepper makes a big difference in taste. Pro Tips Use Fresh Ingredients: Always opt for fresh basil and quality cheeses to enhance the flavor of your grilled cheese. Control the Heat: Cook on medium heat to ensure the cheese melts perfectly without burning the bread. Add a Twist: Experiment with different cheese combinations or add vegetables like spinach or tomatoes for extra flavor. Perfect the Grill: Use a cast-iron skillet for even heat distribution, resulting in perfectly golden, crispy sandwiches. {{image_2}} You can make your Hawaiian Roll Grilled Cheese even better by adding proteins or veggies. Try adding cooked bacon or sliced turkey for extra flavor. Grilled chicken works well too. If you want some crunch, add thin slices of bell peppers or spinach. These additions give you more taste and nutrition. Mix and match to find your favorite combo! While sharp cheddar and mozzarella are great, feel free to explore other cheese options. Gouda adds a nice smoky flavor, while pepper jack gives a spicy kick. For a creamy twist, try brie or fontina. You can also mix different cheeses for a richer taste. With so many choices, you can create a new grilled cheese each time! Don’t forget about seasonings and sauces to boost flavor. A sprinkle of garlic powder or red pepper flakes can add a nice zing. You can drizzle some balsamic glaze or sriracha on top for an exciting twist. Honey, which you already use, adds sweetness. The right sauce can turn a simple sandwich into something special. Experiment with flavors to find what you love! To store leftover grilled cheese, let it cool first. Wrap each sandwich in plastic wrap or foil. Place them in an airtight container. This keeps them fresh and prevents drying. Store in the fridge for up to three days. For the best reheating, use a skillet. Heat it over medium-low heat. Place the sandwich in the skillet and cover it with a lid. This keeps the cheese melting while the bread warms. Grill each side for about three minutes. You can also use a toaster oven for a crispy finish. If you want to freeze grilled cheese, wrap each sandwich well. Use plastic wrap and then foil. This helps prevent freezer burn. You can freeze them for up to three months. To reheat, let them thaw in the fridge overnight. Then, use the skillet method for a fresh taste. Yes, you can use other rolls. Try brioche or dinner rolls if you want. These types are soft, sweet, and work great. Each roll adds a unique taste. Just ensure they can hold the filling well. You can use ricotta or goat cheese instead. They both offer a creamy texture. If you seek a lighter option, try Greek yogurt. It adds a tangy flavor while keeping it creamy. Grilled cheese can last up to three days in the fridge. Wrap them well in plastic wrap or foil. This keeps them fresh and tasty. When ready to eat, reheat in a skillet for best results. We explored the key ingredients for great grilled cheese and discussed high-quality options. I shared detailed steps for preparation, cooking, and serving fun ideas. You learned tips for perfect texture, pairing sides, and avoiding common mistakes. We've covered tasty variations with proteins, vegetables, and flavor boosts. Finally, I provided storage info and answered your common grilled cheese questions. Now you're ready to make the best grilled cheese ever! Enjoy every bite!

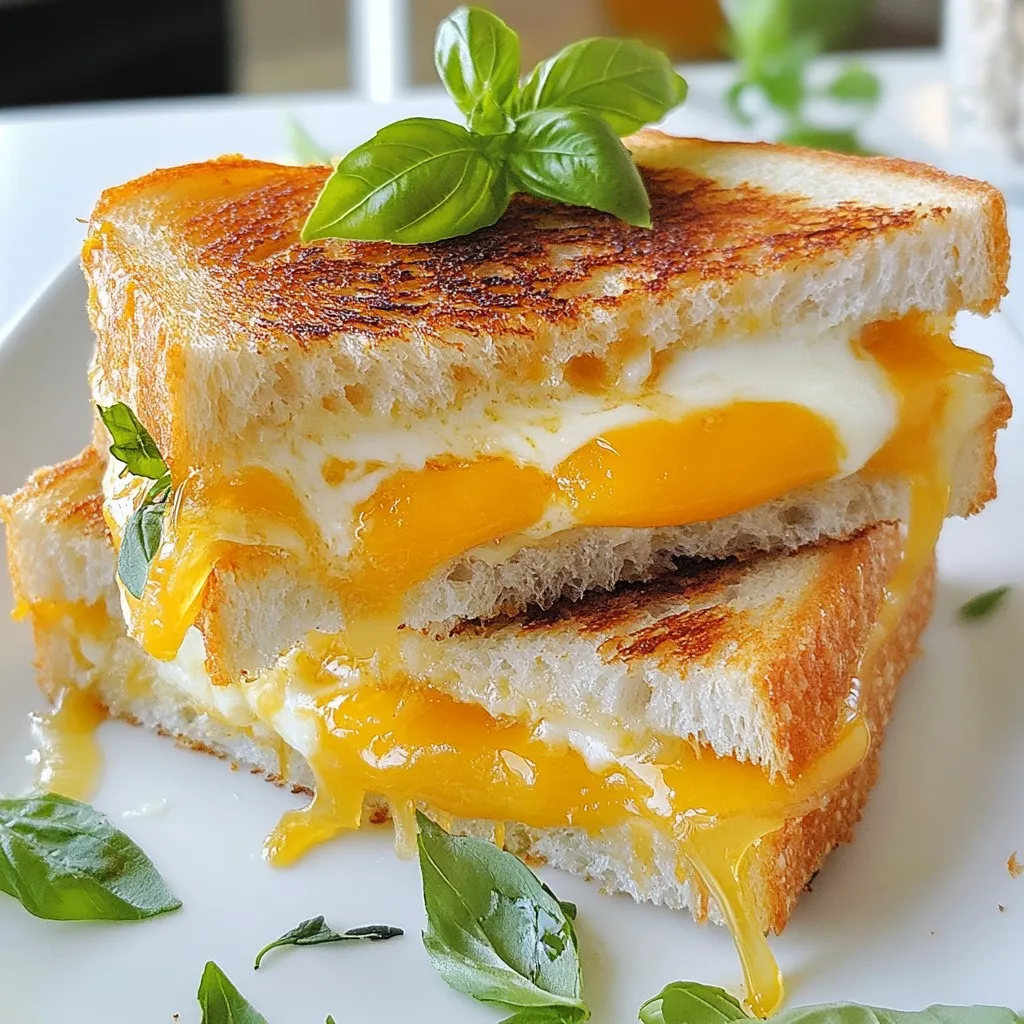
If you’re craving a fun twist on a classic, Hawaiian Roll Grilled Cheese is a must-try! This quick and tasty recipe pairs sweet rolls with gooey cheese for an incredible …

Read more

Categories Appetizers

Chicken Onigiri Delightful and Nutritious Recipe

November 12, 2025December 8, 2024 by Chef Luca
- 2 cups sushi rice - 2 ½ cups water - 1 cup cooked chicken breast, shredded - 1 teaspoon salt - 4 sheets of nori, cut into strips You need sushi rice for its stickiness. This helps the onigiri hold its shape. The water is essential for cooking the rice to fluffy perfection. Shredded chicken adds protein and flavor. The salt helps enhance the taste of all the ingredients. - 2 tablespoons soy sauce - 1 tablespoon sesame oil - 1 tablespoon mirin (optional) - 1 tablespoon furikake - 1 green onion, finely chopped Soy sauce adds a savory kick. Sesame oil brings a nutty flavor. Mirin is sweet and can enhance your dish if you choose to use it. Furikake adds a delicious finish, while green onion offers a fresh bite. - Rice cooker or pot - Mixing bowl - Measuring cups - Plastic wrap (optional) - Sharp knife for cutting nori Using a rice cooker makes cooking easier. A mixing bowl is perfect for blending your chicken and seasonings. Measuring cups ensure you get the right amounts. Plastic wrap can help shape your onigiri. A sharp knife will help cut the nori cleanly. {{ingredient_image_1}} Start by rinsing the sushi rice. Use cold water until it runs clear. This step removes extra starch. Then, cook the rice with 2 ½ cups of water. You can use a rice cooker or a pot. Follow the package instructions until the rice is fluffy. Once cooked, let it cool for a short time. In a medium bowl, mix the shredded chicken with soy sauce, sesame oil, and salt. If you have mirin, add it too. This mix adds flavor to the chicken. Set the mixture aside to marinate for about ten minutes. This allows the flavors to blend well. Now, dampen your hands with water. This prevents the rice from sticking. Take about 1/3 cup of rice and make a small dent in the center. Add a spoonful of the chicken mix into the dent. Gently mold the rice around the filling. Shape it into a triangle by pressing the rice together. Repeat this until you use all the rice and filling. Sprinkle some furikake on top for extra taste. Wrap a strip of nori around the bottom of each onigiri. This makes it easy to hold. Lastly, add a sprinkle of chopped green onion for a fresh touch. To stop sushi rice from sticking, rinse it well. Use cold water until the water runs clear. This step removes excess starch. After cooking, let the rice cool a bit. Dampen your hands with water before handling the rice. This helps keep it from sticking to your fingers. For the best onigiri shape, take about 1/3 cup of rice. Use your fingers to make a small dent in the center. Add a spoonful of the marinated chicken in the dent. Gently mold the rice around the filling. Press it firmly but not too hard. A triangle shape is classic for onigiri. Repeat until you finish the rice and chicken. When serving, arrange the onigiri on a bright plate. Add some extra nori strips for a nice look. You can also sprinkle sesame seeds for color. Serve with pickled ginger or soy sauce on the side. These add a tasty touch and enhance the meal. Enjoy your delightful and nutritious chicken onigiri! Pro Tips Rinse Thoroughly: Ensure you rinse the sushi rice well until the water runs clear to achieve that perfect fluffy texture. Marinating Time: Allow the chicken to marinate for at least 10 minutes to enhance the flavor, but don’t oversoak it. Shaping Tips: When shaping the onigiri, keep your hands slightly damp to prevent the rice from sticking and to help mold it easily. Serving Suggestions: For a beautiful presentation, serve the onigiri on a colorful plate with garnishes like sesame seeds or pickled ginger. {{image_2}} You can change the filling in onigiri to match your taste. Try using cooked salmon, tuna, or even pickled vegetables for a twist. You can also use avocado for a creamy texture. For a spicy kick, mix sriracha with your protein. The options are endless and fun to explore! While sushi rice is great, you can use other rice types too. Brown rice adds a nutty flavor and more fiber. Jasmine rice gives a fragrant aroma. Remember to adjust water levels based on the rice type you choose. Each rice type offers a unique taste and texture. To make gluten-free onigiri, choose gluten-free soy sauce. You can also swap out mirin for a rice vinegar or a gluten-free alternative. The fillings can be made with chicken, shrimp, or veggies. These options keep your onigiri tasty and safe for those avoiding gluten. Store onigiri in an airtight container. This keeps them fresh and moist. If you leave them out, they can dry out. You can also wrap them in plastic wrap. This method helps keep their shape and flavor. To freeze onigiri, wrap each piece in plastic wrap. Place them in a freezer bag. They stay good for up to three months. When you want to eat them, take out what you need. Let them thaw in the fridge overnight. This keeps the texture nice. Reheat onigiri in the microwave. Place them on a plate and cover with a damp paper towel. Heat for about 30 seconds. This keeps them from getting too dry. You can also pan-fry them for a crispy outside. Just heat a little oil in a pan and cook until warm. Onigiri is a popular Japanese snack. It often shows love and care in cooking. Families make these rice balls for picnics and special occasions. Onigiri also connects people through shared meals. The triangle shape symbolizes harmony in Japan. This comfort food is easy to carry and eat. It represents simple, wholesome cooking. Yes, you can use other proteins! Chicken is just one option. You can try tuna, shrimp, or tofu. These proteins can add different flavors. Just make sure to season them well. You can mix them with soy sauce or spices. This way, you can make your onigiri unique. To make vegan or vegetarian onigiri, swap the chicken for veggies. Cooked mushrooms or seasoned tofu work well. You can also use avocado for creaminess. Add spices and sauces for more flavor. This way, you can enjoy onigiri while keeping it plant-based. Remember to keep the rice and nori for that classic taste! In this post, I covered how to make chicken onigiri. We discussed the main ingredients, seasoning options, and helpful tools for preparation. I shared step-by-step instructions for rice prep, chicken filling, and shaping the onigiri. Tips included preventing sticking and proper serving. We explored delicious variations and best storage practices. Onigiri is fun to make and enjoy. With these ideas, you can create tasty meals or snacks. Dive into this delicious dish and let your creativity shine!

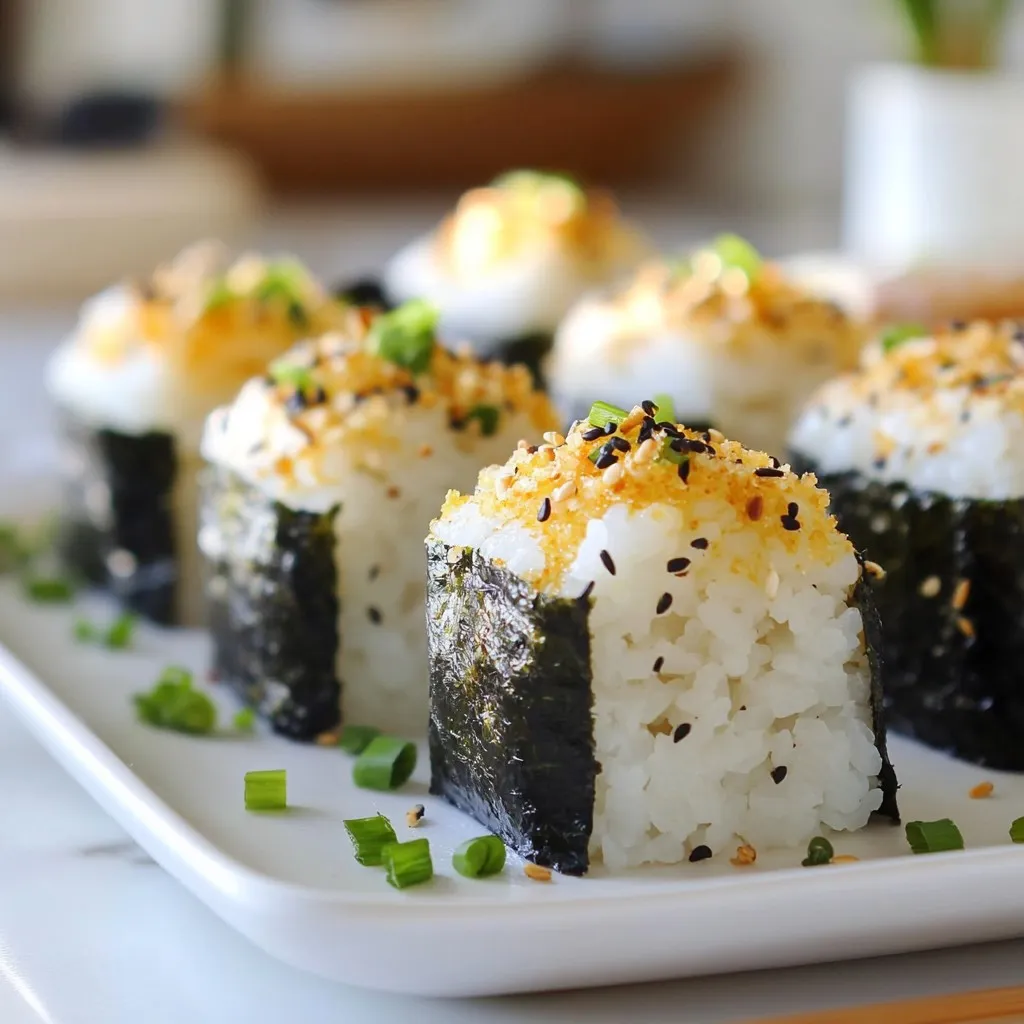
Are you ready to elevate your lunch game? Chicken Onigiri is a tasty and fun treat that packs flavor in every bite. This delightful recipe is not just simple to …

Read more

Categories Dinner

Cheeseburger Casserole Irresistible Family Meal Idea

November 14, 2025November 25, 2024 by Chef Luca
- 1 lb ground beef - 1 small onion, diced - 2 cloves garlic, minced - 1 cup cherry tomatoes, halved - 1 cup pickles, diced - 1 cup shredded cheddar cheese - 1 cup macaroni pasta - 2 cups beef broth - 1 tablespoon Worcestershire sauce - 1 teaspoon mustard (yellow or Dijon) - Salt and pepper, to taste - 1 tablespoon olive oil - Fresh parsley for garnish When making cheeseburger casserole, each ingredient plays a key role. Ground beef gives it that hearty base. The onion and garlic add a nice flavor. Cherry tomatoes and pickles bring freshness and a bit of zest. Shredded cheddar cheese melts beautifully and adds creaminess. Macaroni pasta acts as a comforting filler. Beef broth ties everything together, making it rich and savory. Worcestershire sauce and mustard add an extra punch. Finally, salt and pepper enhance all the flavors. Don’t forget the fresh parsley! It makes the dish look pretty and adds a touch of brightness. Gather these ingredients before you start cooking. This will make the process smooth and fun. Plus, you can get the kids involved in measuring or mixing. Enjoy the family time as much as the meal! {{ingredient_image_1}} 1. Preheat your oven to 350°F (175°C). This helps the casserole cook evenly. 2. In a large skillet, heat 1 tablespoon of olive oil over medium heat. Add 1 small diced onion and 2 minced garlic cloves. Sauté for 3-4 minutes until soft. 3. Next, add 1 pound of ground beef to the skillet. Break it up with a spatula. Cook for 5-7 minutes until browned. Drain any excess fat if you see it. 1. In a large pot, combine 1 cup of macaroni and 2 cups of beef broth. Bring this to a boil. Then, lower the heat and let it simmer for 7-8 minutes. The pasta should be tender when done. 2. Stir in 1 cup of halved cherry tomatoes, 1 cup of diced pickles, and half of the 1 cup of shredded cheddar cheese into the beef mixture. This adds great flavor. 3. Transfer the beef and macaroni mixture into a greased 9x13 baking dish. Spread it out evenly. 1. Sprinkle the remaining cheddar cheese evenly on top of the casserole. This will give it a nice cheesy crust. 2. Bake the casserole in your preheated oven for 20-25 minutes. Look for the cheese to be bubbly and golden. 3. After baking, let it rest for 5 minutes before serving. This helps the layers set. You can sprinkle fresh parsley on top for a nice touch. - Choosing the right ground beef I prefer using 80/20 ground beef. This mix has enough fat for flavor, yet it keeps the dish moist. If you choose leaner beef, the casserole might come out dry. - Ensuring even cheese melting Spread the cheese evenly across the top. This helps it melt uniformly. You can also mix some cheese into the casserole before baking for extra flavor. - Preventing overcooked pasta Cook the macaroni just until it's tender but still firm. This way, it won’t turn mushy in the oven. Remember, it will cook more while baking. - Accompanying side dishes Serve your casserole with a fresh garden salad or steamed veggies. The crunch complements the creamy casserole well. You can also pair it with garlic bread for a hearty meal. - Creative toppings ideas Try adding crispy bacon bits or jalapeños for a kick. Even crushed potato chips can add a fun crunch on top. Experiment with your favorite flavors! - Garnishing with fresh parsley A sprinkle of fresh parsley adds color and freshness. It brightens the dish and makes it look appealing. Just chop a little and scatter it on top before serving. Pro Tips Use Lean Ground Beef: Opt for lean ground beef to reduce excess grease in the casserole while still maintaining flavor. Mix Up the Cheeses: For a more complex flavor, try combining cheddar with mozzarella or pepper jack cheese. Add More Veggies: Feel free to sneak in additional vegetables like bell peppers or spinach for added nutrition and color. Let It Rest: Allow the casserole to rest for a few minutes before serving; this helps it set and makes serving easier. {{image_2}} You can easily make this cheeseburger casserole your own. Here are some simple swaps: - Ground turkey or chicken: Swap out ground beef for ground turkey or chicken. This change lowers the fat and adds a lighter taste. - Vegan cheese options: If you want a plant-based dish, use vegan cheese. It melts well and still tastes great. - Adding vegetables: Boost nutrition by adding vegetables. Bell peppers or spinach work well and add color and crunch. Want to try different cooking methods? Here are a couple of ideas: - Slow cooker version: For a slow cooker, brown the beef on the stove first. Then, add all ingredients to the slow cooker. Cook on low for 4-6 hours. - Instant Pot adaptation: Use an Instant Pot for a quick meal. Sauté the beef and veggies, then add broth and pasta. Cook on high pressure for 4 minutes. You can change the flavors to fit your taste. Here are some fun ideas: - Southwest style cheeseburger casserole: Add black beans, corn, and taco seasoning for a zesty twist. Top with jalapeños for some heat. - Italian-inspired variations: Mix in Italian sausage, diced tomatoes, and oregano. Use mozzarella cheese for a delicious Italian flavor. These variations make your cheeseburger casserole exciting and new every time! To store your leftover cheeseburger casserole, let it cool first. Place it in an airtight container. This helps keep it fresh. It will last in the fridge for about three to four days. I recommend using glass or BPA-free plastic containers. These materials help preserve taste and texture. Avoid using metal containers, as they can react with food. You can freeze cheeseburger casserole for up to three months. First, cool the casserole completely. Then, cut it into portions. Wrap each piece tightly in plastic wrap. Place them in a freezer-safe bag or container. When you're ready to eat, thaw it in the fridge overnight. For reheating, place it in the oven at 350°F (175°C) until heated through. This keeps the flavors and texture nice. Enjoy your delicious meal again! How long does cheeseburger casserole last in the fridge? Cheeseburger casserole lasts about 3 to 5 days in the fridge. Store it in a sealed container to keep it fresh. Can I make cheeseburger casserole ahead of time? Yes, you can make it ahead. Prepare the casserole, cover it, and refrigerate overnight. Bake it the next day for a quick meal. What can I substitute for macaroni? You can use small shells or penne pasta as a substitute. Zucchini noodles are a great low-carb option too. Is it possible to make this recipe gluten-free? Absolutely! Use gluten-free pasta and ensure the beef broth is gluten-free. This way, everyone can enjoy it. How do I adjust serving sizes for larger families? To serve more people, simply double the recipe. Use a larger baking dish and increase the cooking time if needed. This casserole offers a tasty and easy meal option. We covered the main ingredients, like ground beef, cheese, and veggies. I shared simple steps for prep and cooking, along with helpful tips to make it shine. Variations let you explore different flavors, and I explained storage and reheating for leftovers. Whether you follow the original recipe or make it your own, I hope you enjoy every bite. This dish is perfect for any gathering or family dinner. Get cooking and have fun!

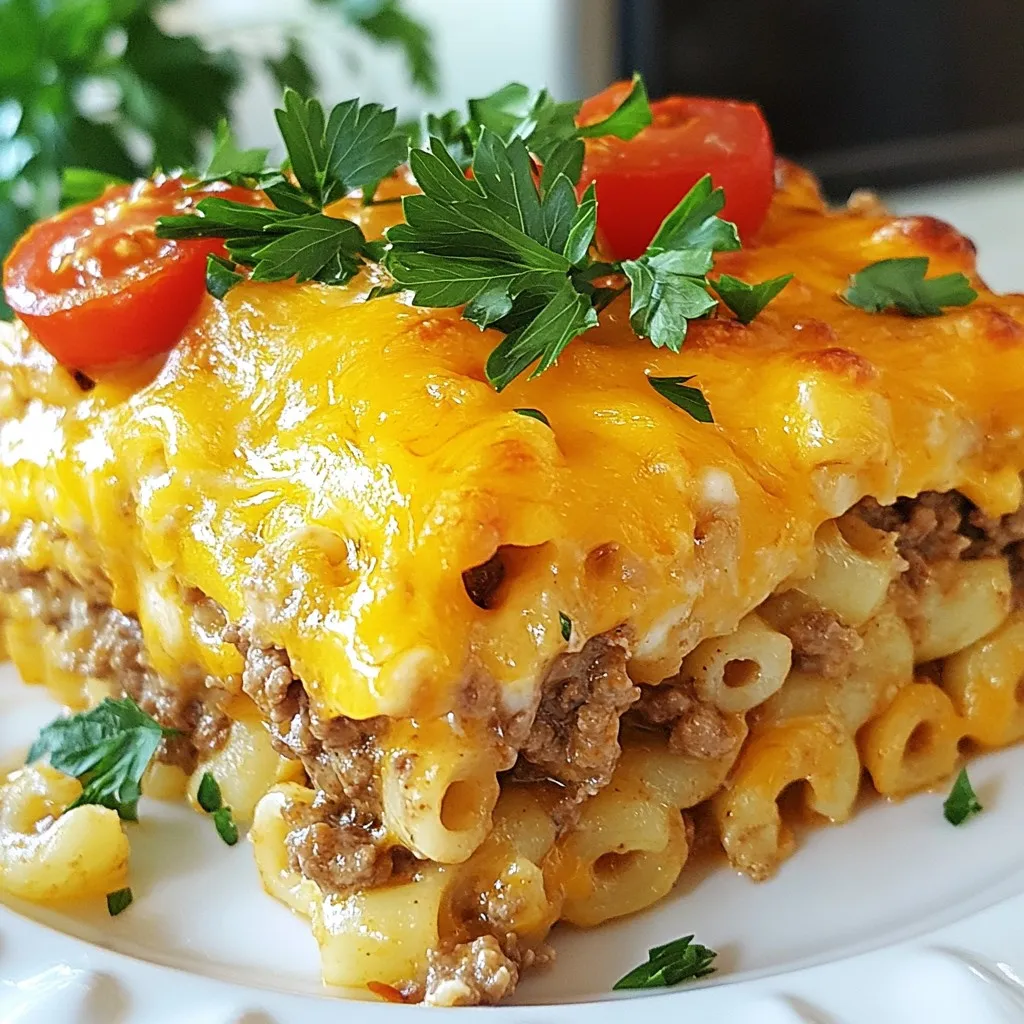
Looking for a meal that your family will love? Try my cheeseburger casserole! This dish is packed with flavor and comfort. It’s simple to make and brings everyone to the …

Read more

Categories Dinner
Newer posts
← Previous Page1 … Page121 Page122

STIRRED RECIPES

Where every dish begins with a stir! 🍲✨

PAGES

Home About Contact Privacy Policy Terms & Conditions Cookie Policy GDPR Policy Copyright Policy Disclaimer

CATEGORIES

Appetizers Desserts Salads Breakfast Dinner

Contact

  • Pinterest
  • Mail
Copyright © 2026 Stirred Recipes. All rights reserved.