Skip to content
Stirred Recipes
  • Home
  • Appetizers
  • Desserts
  • Salads
  • Breakfast
  • Dinner
  • Privacy Policy
  • Contact
  • About

Chef Luca

Southern Banana Pudding Cobbler Simple and Sweet Delight

November 11, 2025March 14, 2025 by Chef Luca
To make Southern Banana Pudding Cobbler, you need simple and fresh ingredients. Here’s what you'll gather: - 4 ripe bananas, sliced - 1 box vanilla pudding mix (3.4 oz) - 2 cups milk - 1 teaspoon vanilla extract - 1 cup crushed vanilla wafers, plus extra for topping - 1 cup all-purpose flour - 1 cup sugar - 1 tablespoon baking powder - ½ teaspoon salt - ½ cup unsalted butter, melted - 1 cup buttermilk (or 1 cup milk with 1 tablespoon vinegar) - Whipped cream for serving These ingredients work together to create layers of creamy goodness. The ripe bananas add a sweet, fruity taste. The vanilla pudding mix makes it rich and smooth. The crushed vanilla wafers give it a nice crunch. You can use any milk you have on hand, or buttermilk for a richer flavor. The sugar adds sweetness, while the flour helps bind everything. Baking powder makes it rise, giving it a lovely texture. Gather all your ingredients before starting. This way, you stay organized and have everything at your fingertips. The right mix of these elements makes your cobbler a true Southern delight. {{ingredient_image_1}} First, preheat your oven to 350°F (175°C). This step is key to getting a nice, even bake. In a medium bowl, take your vanilla pudding mix. Add 2 cups of milk and 1 teaspoon of vanilla extract. Stir well until the mixture is smooth. Set this pudding aside for now. In another large bowl, combine the dry ingredients. You will need 1 cup of crushed vanilla wafers, 1 cup of all-purpose flour, 1 cup of sugar, 1 tablespoon of baking powder, and ½ teaspoon of salt. Mix these dry ingredients well until they are fully blended. Now it’s time to add your wet ingredients. Pour in ½ cup of melted unsalted butter and 1 cup of buttermilk. If you don’t have buttermilk, mix 1 cup of milk with 1 tablespoon of vinegar. Stir everything together until you get a smooth batter. Next, grab a greased 9x13 inch baking dish. Pour the batter into the dish, spreading it evenly. On top of the batter, layer 4 ripe bananas, sliced. Make sure to space them out nicely. Then, spoon your prepared vanilla pudding over the bananas. Cover them completely for a rich flavor. Before baking, sprinkle extra crushed vanilla wafers on top. This adds a nice crunch. Place your cobbler in the preheated oven and bake for 30-35 minutes. Keep an eye on it—when the top is golden, and a toothpick comes out clean, it’s done! Let it cool for a few minutes before serving. Enjoy it warm or at room temperature with whipped cream on top. To get the best pudding, mix it well. Use cold milk and vanilla extract. Stir until smooth and creamy. Let it sit for a few minutes. This helps it thicken up nicely. If it seems too runny, add a touch more pudding mix. Always taste for sweetness. You want it to be just right. A great cobbler is soft and moist. Make sure to mix your dry ingredients well. This includes flour, sugar, and baking powder. Then, add your melted butter and buttermilk. Mix until it's smooth but don’t overmix. The batter should be thick, but pourable. Spread it evenly in your baking dish for the best results. Serve your Southern Banana Pudding Cobbler warm. Top it with a big dollop of whipped cream. You can also add extra crushed vanilla wafers on top. This adds a nice crunch. Pair it with a scoop of vanilla ice cream for a treat. Enjoy it with friends or family for a sweet ending to any meal. Pro Tips Choose Ripe Bananas: Make sure your bananas are perfectly ripe for the sweetest flavor and best texture in your cobbler. Homemade Buttermilk Substitute: If you don’t have buttermilk, mix regular milk with vinegar or lemon juice and let it sit for 5-10 minutes before using. Layering Techniques: For a more even distribution of flavors, layer the bananas and pudding gently so they don’t mix too much. Serving Suggestions: Serve with a generous scoop of whipped cream or a scoop of vanilla ice cream for an extra treat! {{image_2}} You can change the bananas in this recipe. Try using ripe peaches or berries. They add a nice twist. For a tropical vibe, use sliced mango or pineapple. Each fruit brings its own flavor. Just remember to slice them thin. This helps them cook well. While vanilla pudding shines here, feel free to mix it up. Try chocolate pudding for a rich treat. Or use butterscotch pudding for a sweet twist. You can even go for a strawberry pudding. Each flavor changes the taste, making it fun to explore. For gluten-free, swap all-purpose flour with a gluten-free blend. This keeps the texture nice. You can also use gluten-free vanilla wafers. If you need a dairy-free version, use almond milk instead of regular milk. Coconut milk works well too. It adds a unique taste. These swaps help everyone enjoy this dessert. Store your Southern Banana Pudding Cobbler in the fridge. Use an airtight container to keep it fresh. It can last up to five days. The cold helps maintain the texture of the pudding and keeps the bananas from browning too quickly. If you notice the bananas changing color, cover them with a bit of whipped cream. This adds sweetness and keeps them looking great. You can freeze this cobbler if you have leftovers. Cut it into portions and wrap each piece tightly in plastic wrap. Place the wrapped portions in a freezer bag. It will stay good for about two months. When you're ready to eat it, thaw it in the fridge overnight. Avoid refreezing once it has thawed to keep the taste and texture nice. To reheat, place individual servings in the microwave. Heat for about 30 seconds, then check if it's warm. If not, heat again in short bursts. You can also reheat the whole dish in the oven. Preheat to 350°F (175°C) and cover it with foil. Bake for about 15-20 minutes. Add whipped cream on top after reheating for extra creaminess. Enjoy every delicious bite! Yes, you can use different bananas. Look for ripe bananas for the best taste. They should be yellow with some brown spots. You can also use plantains, but they will change the flavor a bit. The sweetness and softness of ripe bananas work best here. Cobbler and pudding are both delicious, but they are different. Cobbler has a cake-like base with fruit on top. It often has a crunchy layer from baked dough or cookies. Pudding, on the other hand, is creamy and smooth. It usually has a custard base. In Southern Banana Pudding Cobbler, you get both textures, which is what makes it special! You can store Southern Banana Pudding Cobbler for up to three days. Keep it in the fridge for the best taste. Cover it with plastic wrap or foil to keep it fresh. If you want to enjoy it later, you can freeze it for up to a month. Just thaw it in the fridge overnight before serving. This blog post covered all the key steps to make a Southern Banana Pudding Cobbler. We discussed ingredients, step-by-step baking instructions, and tips for perfecting your dessert. You learned about variations to try, storage options, and answered common questions. Creating this dessert can be fun and tasty. With ripe bananas and crunchy wafers, you can impress anyone. Enjoy making your cobbler, and remember to share your delicious results!

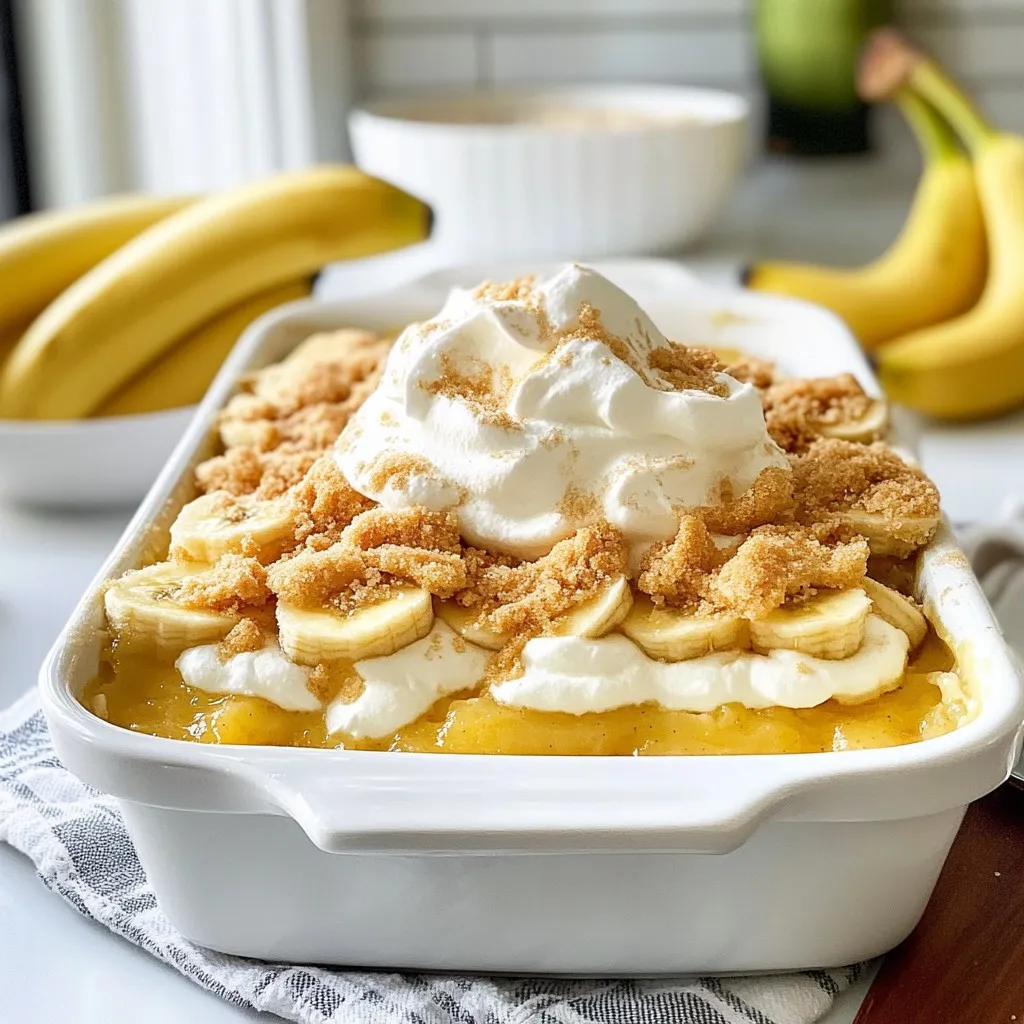
If you’re craving a sweet treat that brings home the warmth of the South, I have just the recipe for you: Southern Banana Pudding Cobbler. This dish combines creamy vanilla …

Read more

Categories Desserts

Honey Garlic Salmon Bowls Flavorful and Healthy Meal

January 5, 2026March 13, 2025 by Chef Luca
- 2 salmon fillets (about 6 oz each) - 3 tablespoons honey - 2 tablespoons soy sauce (or tamari for gluten-free) - 3 cloves garlic, minced - 1 teaspoon grated fresh ginger - 1 tablespoon olive oil - Salt and pepper to taste The main ingredients create a rich, sweet, and savory flavor. Salmon is a great source of protein and healthy fats. Honey adds sweetness, while soy sauce brings umami. Garlic and ginger give a fresh kick. The olive oil helps cook the salmon and adds richness. Salt and pepper enhance all these flavors. - 2 cups cooked quinoa - 1 cup steamed broccoli florets - 1 cup shredded carrots - ½ avocado, sliced - Sesame seeds for garnish - Chopped green onions for garnish The bowl components make this meal colorful and nutritious. Quinoa is a complete protein and full of fiber. Steamed broccoli adds vitamins and crunch. Shredded carrots bring sweetness and color. Sliced avocado gives creaminess and healthy fats. Sesame seeds and green onions add a nice finish and texture. Each bite is a blend of flavors and nutrients. {{ingredient_image_1}} To start, I prepare the marinade. I mix together 3 tablespoons of honey, 2 tablespoons of soy sauce, 3 minced garlic cloves, and 1 teaspoon of grated ginger in a small bowl. This mix gives the salmon a sweet and savory flavor. Next, I season the salmon fillets with salt and pepper. Then, I pour the marinade over the fillets. I let them sit for about 15-20 minutes. This time helps the fish soak up the flavors. While the salmon marinates, I heat 1 tablespoon of olive oil in a non-stick skillet over medium heat. Once the oil is hot, I carefully add the salmon fillets, skin side down. I cook them for about 4-5 minutes on each side. The salmon should flake easily with a fork when done. For extra flavor, I brush the salmon with the remaining marinade while it cooks. This technique enhances the taste and keeps it moist. Now it’s time to put the bowls together. I start with a base of 2 cups of cooked quinoa. I layer steamed broccoli florets and shredded carrots next to the quinoa. Then, I place a cooked salmon fillet on top of the veggies and quinoa. For a fresh finish, I garnish the dish with sliced avocado, sesame seeds, and chopped green onions. Finally, I drizzle any leftover marinade over the bowls. This adds a burst of flavor to each bite. To cook salmon to flaky perfection, start with the right heat. Use medium heat in a non-stick skillet. This lets the fish cook evenly without burning. Cook each fillet for about 4-5 minutes on each side. You want the salmon to flake easily with a fork. The marinade plays a big role in flavor. Mix honey, soy sauce, garlic, and ginger well. This blend gives a sweet and savory taste. Let your salmon soak in the marinade for 15-20 minutes. This time allows the flavors to soak in nicely. You can customize your bowls with various vegetables. Feel free to add bell peppers, snap peas, or spinach. Each veggie adds its own taste and nutrition. If you want a protein switch, try tofu. Tofu absorbs flavors well. Prepare it the same way as salmon. Marinate it and cook it until golden brown. Presentation matters! Start with a base of quinoa. This gives your bowl height. Then, add colorful vegetables like broccoli and carrots. The mix of colors makes the dish pop. For garnishing, slice an avocado and place it on top. Sprinkle sesame seeds and green onions. This adds texture and a fresh touch. The final look should be bright and inviting. Pro Tips Marinate Longer for More Flavor: If you have time, marinate the salmon for up to an hour. This allows the flavors to penetrate deeper into the fish, enhancing the taste. Use Fresh Ingredients: Fresh garlic and ginger will significantly elevate the flavors in your marinade. Avoid pre-minced options for the best results. Don’t Overcook the Salmon: Keep an eye on the cooking time. Salmon is best when it’s just cooked through and still moist, so aim for 4-5 minutes per side depending on the thickness. Customize Your Veggies: Feel free to mix in your favorite vegetables. Bell peppers, snap peas, or spinach can also work wonderfully in these bowls. {{image_2}} You can switch up the flavor of your honey garlic salmon bowls with different marinades. Try teriyaki sauce for a sweet and savory twist. Miso paste can also add a rich umami flavor. If you like heat, add chili flakes or sriracha to your marinade. For a fresh taste, mix in some citrus juice like lime or orange. This gives your dish a bright and zesty kick. You don’t have to stick with quinoa. You can use rice for a soft texture. Cauliflower rice is a great low-carb option too. It soaks up flavors well and adds a nice crunch. Choose the grain that fits your taste or diet; each option brings its own unique flair. The veggies you choose can change with the seasons. In spring, use fresh asparagus or peas. In summer, cherry tomatoes or bell peppers work well. In fall, roasted sweet potatoes or Brussels sprouts can add warmth. Fruits can also enhance your bowls. Try adding mango slices in summer or pomegranate seeds in winter. These toppings not only add flavor but also color and nutrition to your meal. After making honey garlic salmon bowls, store any leftovers in the fridge. Place them in airtight containers. This helps keep the food fresh and safe. Make sure to eat the leftovers within three days for the best taste. To reheat, use a microwave or an oven. If using the microwave, cover the bowl with a microwave-safe lid. Heat on medium power for about one to two minutes. For the oven, preheat it to 350°F (175°C). Place the food in an oven-safe dish and cover it. Heat for about 10-15 minutes. Be careful not to overcook the salmon. This keeps it moist and tender. Enjoy your meal just as delicious as when you first made it! In this post, we explored a delicious honey garlic salmon bowl. You learned about key ingredients like salmon, quinoa, and fresh veggies. I shared tips on marinating and cooking the salmon to perfection. Plus, we discussed customizing bowls with different toppings and grains. Remember, you can easily adapt this recipe to fit your taste. Don't be afraid to experiment with flavors and ingredients! Enjoy cooking and creating your perfect salmon bowl.

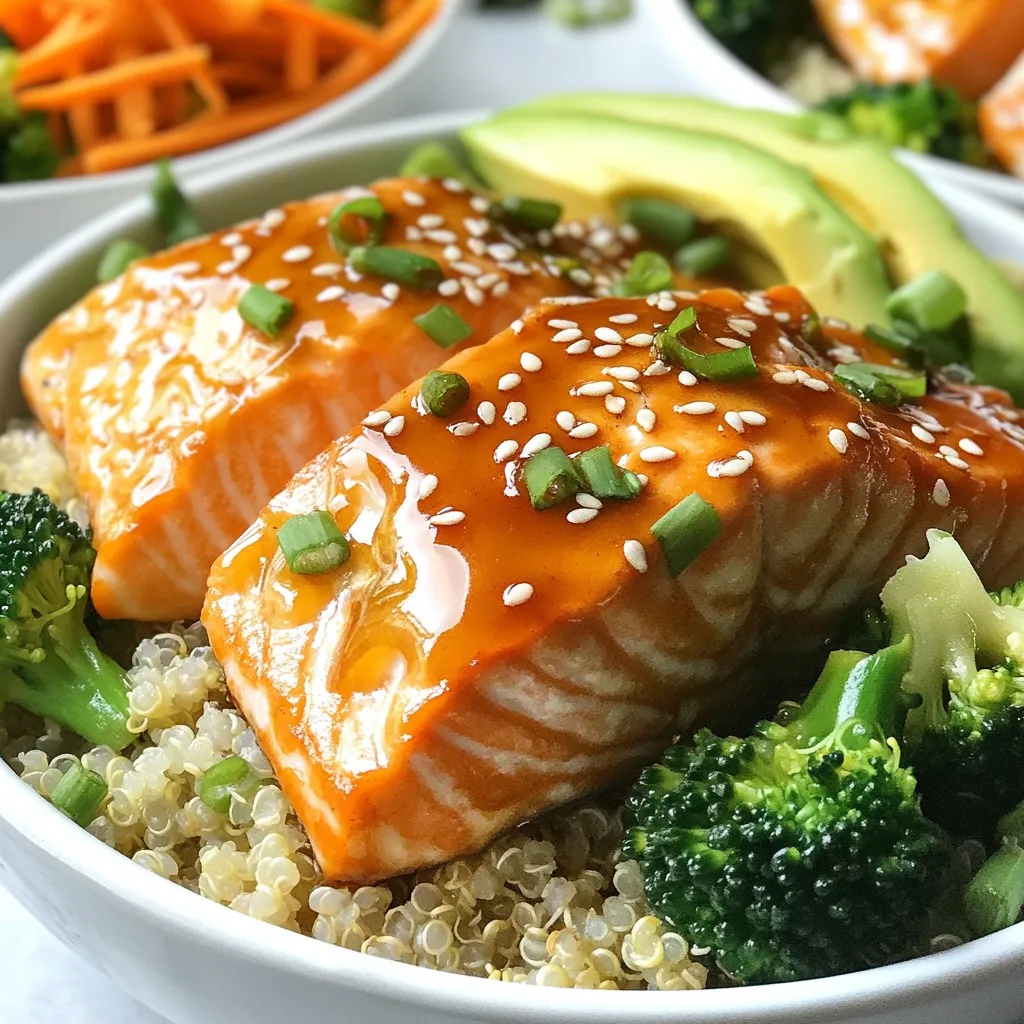
If you’re looking for a quick and healthy meal, let me introduce you to Honey Garlic Salmon Bowls. This dish packs flavor and nutrition in every bite. With tender salmon …

Read more

Categories Dinner

Vegan Cucumber Pasta Salad Fresh and Tasty Dish

January 12, 2026March 11, 2025 by Chef Luca
To make this vibrant salad, you need these key ingredients: - 8 ounces whole wheat pasta (fusilli or rotini works well) - 1 large cucumber, diced - 1 cup cherry tomatoes, halved - 1 bell pepper, diced (any color) - ½ red onion, finely chopped - 1 cup corn (fresh, canned, or frozen) - ½ cup black olives, sliced - 2 tablespoons fresh dill, chopped These ingredients blend together to create a fresh and colorful dish. The whole wheat pasta adds a nutty flavor and great texture. The cucumber and tomatoes provide crunch and juiciness, while the bell pepper adds sweetness. The red onion gives a nice bite, and the corn adds a pop of color. Feel free to get creative! Here are some optional ingredients you might enjoy: - Avocado, diced - Fresh parsley, chopped - Feta cheese or vegan cheese, crumbled - Spinach or arugula Adding avocado gives a creamy texture. Fresh parsley adds a bright note, while feta brings a salty touch. Spinach or arugula adds more greens and nutrition. You can easily swap ingredients to fit your taste: - Use gluten-free pasta if needed. - Replace cucumber with zucchini for a different crunch. - Try quinoa instead of pasta for a protein boost. - Use lime juice instead of lemon for a zesty twist. These substitutions keep the salad fresh and exciting. They also allow you to cater to different diets or preferences. {{ingredient_image_1}} Start by boiling water in a large pot. Add a pinch of salt for taste. Cook 8 ounces of whole wheat pasta for about 8 to 10 minutes. Check the package for exact times. When it's done, drain the pasta. Rinse it under cold water to stop the cooking. This keeps the pasta firm and tasty. While the pasta cooks, wash and dice the vegetables. Take 1 large cucumber and chop it into small pieces. Cut 1 cup of cherry tomatoes in half. Dice any color bell pepper. Use ½ red onion and chop it finely. If you have corn, use 1 cup. Fresh, canned, or frozen corn all work. Slice ½ cup of black olives. Finally, chop 2 tablespoons of fresh dill. It adds a nice flavor! Grab a small bowl and add 3 tablespoons of olive oil. Then, squeeze in 2 tablespoons of lemon juice. Add salt and pepper to taste. Whisk it all together until it's mixed well. This dressing adds a fresh zing to the salad. In a large mixing bowl, add all your diced vegetables. Toss in the cooled pasta and pour the dressing on top. Mix everything together gently. Make sure the pasta and veggies are well coated with the dressing. Taste the salad and add more salt, pepper, or lemon juice if needed. Once combined, cover the bowl with plastic wrap. Chill the salad in the fridge for at least 30 minutes. This helps the flavors blend together. When ready to serve, take it out and enjoy your Vegan Cucumber Pasta Salad chilled. It’s perfect for a hot day or as a side dish! To make perfect pasta, start with a large pot of water. Use enough water to let the pasta move freely. Add a generous amount of salt to the water. This adds flavor to the pasta. Bring the water to a rolling boil before adding the pasta. Cook the pasta according to the package instructions. I suggest checking it a minute or two early for al dente texture. Once cooked, drain and rinse the pasta under cold water. This stops the cooking and cools it down quickly. You can boost flavors in your salad in a few easy ways. First, always taste your dressing before adding it. This helps you adjust salt, pepper, and lemon juice. Fresh herbs like dill add a bright taste. If you want more zing, add a pinch of red pepper flakes. For depth, try mixing in a bit of garlic powder. Don't forget to let the salad chill in the fridge. This allows all the flavors to blend beautifully. When serving your Vegan Cucumber Pasta Salad, think about color and texture. Use a large, shallow bowl to show off the bright veggies. You can garnish with extra dill or sliced olives on top. For a fun twist, serve in mason jars for individual portions. This makes a great picnic dish, too. Pair with some crusty bread or fresh greens for a complete meal. Pro Tips Use Fresh Ingredients: For the best flavor, choose fresh, in-season vegetables. They enhance the salad's taste and texture. Adjust to Your Taste: Feel free to customize the vegetables based on your preference or what you have on hand. This salad is versatile! Let It Chill: Allowing the salad to chill for at least 30 minutes helps the flavors meld together, making each bite more delicious. Add Protein: For a heartier meal, consider adding chickpeas or tofu to boost the protein content and make it more filling. {{image_2}} You can switch up the pasta shape in this salad. I recommend using fusilli or rotini, as they hold dressing well. Penne works nicely too. If you want something fun, try bowtie or even spiral pasta. Each shape adds a unique twist to your salad. Want to make your salad heartier? You can add protein. Chickpeas are a great choice. They add texture and flavor. Try adding diced tofu for a different taste. You could also use tempeh or vegan sausage. These options boost protein and keep your meal filling. Don’t be shy about mixing flavors! Fresh herbs really brighten the dish. Basil or parsley pairs well with the cucumber. You can also add a touch of spice with jalapeños or red pepper flakes. For a tangy twist, try adding capers or pickles. Each ingredient brings its own flair to your salad. To keep your Vegan Cucumber Pasta Salad fresh, store it in an airtight container. Place the salad in the fridge. This method helps prevent it from drying out. If you add extra dressing, mix it well before storing. For best flavor, consume leftovers within three days. This salad is best enjoyed cold. If you prefer warm pasta, reheat only the pasta. You can do this in a microwave or on the stove. Avoid reheating the salad with the vegetables, as they lose their crunch and taste. After reheating, mix in fresh veggies for added flavor. - Whole wheat pasta: lasts 1-2 years if kept dry. - Cucumber: fresh for about 1 week in the fridge. - Cherry tomatoes: good for about 5-7 days. - Bell pepper: can last 1 week in the fridge. - Red onion: stays fresh for up to 2 weeks. - Corn: if canned, lasts 1-2 years; fresh corn lasts about 3 days. - Black olives: last for about 1-2 weeks once opened. - Fresh dill: usually stays fresh for about 1 week. - Olive oil: can last 1-2 years if stored in a cool place. - Lemon juice: fresh juice lasts about 1 week; bottled can last much longer. By knowing this info, you can enjoy your salad longer and waste less food! Yes, you can make this salad ahead of time. Prepare it a day before serving. Store it in the fridge. This allows the flavors to blend. Just give it a quick stir before serving. I do not recommend freezing this salad. The cucumber will lose its crunch. The pasta may also become mushy. It’s best enjoyed fresh or stored in the fridge. This recipe contains wheat from the pasta. It also includes olives, which can cause allergies. Always check labels for other allergens. Use fresh ingredients to keep everyone safe. To make this salad gluten-free, swap whole wheat pasta for gluten-free pasta. Many brands offer good options. Just make sure to cook it according to package instructions. I like a light vinaigrette with this salad. You can use balsamic or a lemon-herb dressing. A tahini dressing can also add creaminess. Experiment to find your favorite flavor! This vegan cucumber pasta salad is a fresh and tasty dish. You learned about the key ingredients, how to prepare them, and steps for a perfect mix. I provided tips to enhance flavors and suggestions for serving. We explored variations and storage tips to keep your salad fresh. Overall, this dish is simple to make and can please anyone. Enjoy experimenting with flavors and textures that work for you!

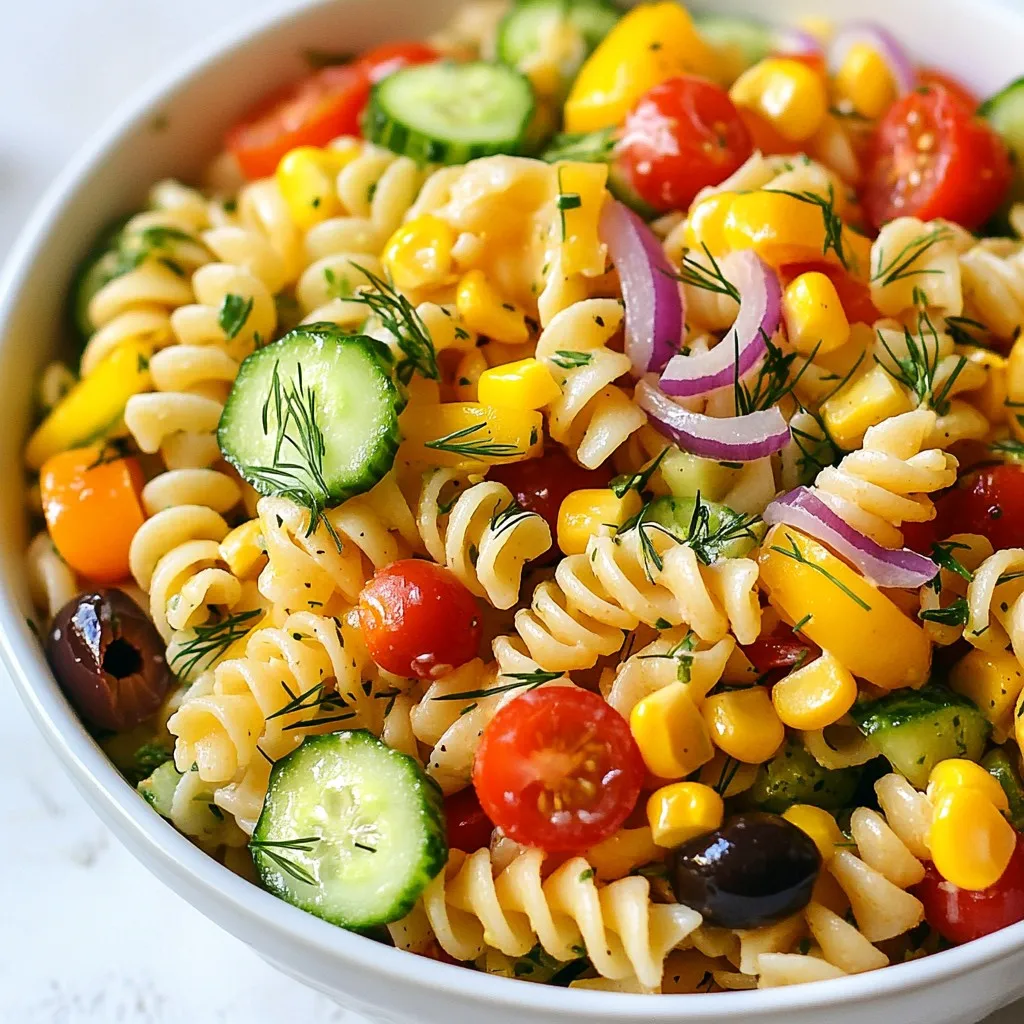
Looking for a fresh dish that’s easy to make? My Vegan Cucumber Pasta Salad is just what you need! This tasty recipe combines crisp cucumbers, your choice of pasta, and …

Read more

Categories Salads

Sweet & Sour Chicken Flavorful and Simple Recipe

January 12, 2026March 9, 2025 by Chef Luca
To make sweet and sour chicken, you need these simple ingredients: - 1 lb (450g) boneless, skinless chicken breast, cut into bite-sized pieces - 1/2 cup cornstarch - 2 tablespoons olive oil - 1 bell pepper (red or green), chopped into bite-sized pieces - 1 cup pineapple chunks (fresh or canned, drained) - 1/2 cup sugar - 1/3 cup ketchup - 1/3 cup apple cider vinegar - 1 tablespoon soy sauce (low-sodium if preferred) - 1 teaspoon garlic powder - 1 teaspoon ginger, minced - Salt and pepper to taste - Green onions, chopped for garnish - Sesame seeds for garnish You can swap some ingredients if needed. Here are a few ideas: - Chicken: Use tofu or shrimp for a different protein. - Cornstarch: Try flour or arrowroot powder for coating. - Olive oil: Any vegetable oil works well, like canola or sunflower. - Bell pepper: Use any color you like or substitute with carrots or broccoli. - Pineapple: If fresh is not available, canned works perfectly. Just drain it well. - Sugar: Honey or agave syrup can replace sugar for a natural sweetener. - Soy sauce: Tamari or coconut aminos work as gluten-free options. Fresh pineapple adds a bright flavor and texture. It’s juicy and sweet. Cutting fresh pineapple can take time. Canned pineapple is convenient. It’s already cut and ready to use. Just make sure to drain it well. The flavor is still good, but it may taste a bit sweeter. Both options work for this dish, so use what you have! {{ingredient_image_1}} Start by seasoning your chicken pieces with salt and pepper. This simple step adds flavor. Next, take 1/2 cup of cornstarch and toss your chicken in it. Make sure each piece is well-coated. This coating helps the chicken get crispy when cooked. Grab a large skillet or wok and heat 2 tablespoons of olive oil over medium-high heat. When the oil is hot, add the chicken in batches. Cook the chicken for about 5 to 7 minutes. You want it to turn golden brown and be fully cooked. After cooking, remove the chicken from the skillet and set it aside. In the same skillet, add a chopped bell pepper. Sauté it for 2 to 3 minutes until it gets a little soft. Then, mix in 1 cup of pineapple chunks and stir for another minute. Now, let's make the sweet and sour sauce. In a bowl, combine 1/2 cup of sugar, 1/3 cup of ketchup, 1/3 cup of apple cider vinegar, and 1 tablespoon of soy sauce. Add 1 teaspoon of garlic powder and 1 teaspoon of minced ginger. Stir this mixture until it is well combined. Pour the sweet and sour sauce over the chicken and vegetables in the skillet. Stir gently so everything gets coated. Let it simmer for about 3 to 4 minutes. This will thicken the sauce a bit and fuse all those amazing flavors together. To get that perfect crunch, start with cornstarch. Coat your chicken pieces well. This will help them fry up nice and crispy. Use a good amount of oil in the pan. Heat it until it's hot, but not smoking. Cook the chicken in batches. This keeps the oil hot and helps the chicken crisp up better. You want a thick sauce for your sweet and sour chicken. Start by letting it simmer. The longer it cooks, the thicker it gets. If you want it even thicker, mix a bit of cornstarch with water. Add this mixture slowly to the sauce. Stir well as it heats. It will thicken up quickly! Seasoning is key to great flavor. You can add more garlic or ginger for a stronger taste. A splash of soy sauce gives a nice umami kick. Try adding a pinch of red pepper flakes for heat. If you like it sweeter, add a little more sugar or pineapple juice. Taste as you go! Adjust until it’s just right for you. Pro Tips Perfectly Crispy Chicken: Ensure the chicken is evenly coated with cornstarch and avoid overcrowding the skillet to achieve a wonderfully crispy texture. Fresh vs. Canned Pineapple: While canned pineapple works well, using fresh pineapple will enhance the flavor and provide a more vibrant texture to your dish. Adjusting Sweetness: Feel free to tweak the sugar amount based on your taste preference. If you like it less sweet, reduce the sugar by a couple of tablespoons. Garnish with Style: For an extra burst of flavor, consider adding a sprinkle of chopped cilantro along with green onions and sesame seeds when serving. {{image_2}} You can make a tasty vegetarian version of sweet and sour chicken. Use tofu or seitan instead of chicken. Cut them into bite-sized pieces and coat them in cornstarch. Cook them until golden brown. This gives your dish a nice, crispy texture. Adding more veggies can make this dish even better. Try bell peppers, carrots, or broccoli. Chop them into small pieces so they cook quickly. Add them to the skillet with the pineapple. This not only boosts flavor but also adds color and nutrition. You can switch up the sauce for more fun. Try using orange juice for a fruity twist. You could also add chili paste for heat. Mix some soy sauce with a sweetener for a different taste. Experimenting with sauces can give you new flavors to enjoy. To keep your sweet and sour chicken fresh, place it in an airtight container. Make sure to let it cool to room temperature first. This helps to avoid steam buildup, which can make the chicken soggy. Store the container in the fridge. It will last for about three to four days. For best results, keep it separate from rice or other sides. When you're ready to enjoy leftovers, reheat the chicken gently. You can use the microwave or a skillet. If using the microwave, place the chicken on a microwave-safe plate. Cover it with a damp paper towel to keep moisture in. Heat in short bursts, about one minute at a time, until warm. If using a skillet, heat over medium heat. Stir the chicken often to avoid burning. You can freeze sweet and sour chicken for later. Just make sure it is completely cool before freezing. Place it in a freezer-safe container or bag. Remove as much air as you can to prevent freezer burn. It can stay frozen for up to three months. When you’re ready to eat, thaw it in the fridge overnight before reheating. This way, your meal will taste fresh and delicious. You can pair Sweet & Sour Chicken with several sides. Some great options include: - Steamed white rice: This absorbs the sauce well. - Fried rice: A tasty twist that adds flavor. - Noodles: Lo-mein or rice noodles work well. - Vegetable stir-fry: Adds more colors and nutrients. - Spring rolls: A crunchy side that complements the dish. Each side brings a unique flavor and texture to your meal. Yes, you can prepare Sweet & Sour Chicken in advance. Here’s how: - Cook the chicken: Follow the recipe, but stop before adding the sauce. - Store: Place the chicken in an airtight container in the fridge for up to two days. - Make the sauce: Prepare the sauce separately and store it in another container. When ready to eat, just heat the chicken and sauce together. This makes for an easy meal any day. Sweet & Sour Chicken has both healthy and less healthy aspects. Here are some points to consider: - Chicken: It’s a good source of protein. - Pineapple: This fruit adds vitamins and fiber. - Sugar: The recipe calls for sugar, which adds calories. - Cornstarch: This helps with crispiness but adds carbs. To make it healthier, you can reduce the sugar or use less cornstarch. Enjoying it with veggies also boosts the meal's nutrition. This guide covered all you need for sweet and sour chicken. We talked about ingredients, cooking steps, and tips for the best taste. You learned how to customize your dish and store it safely. Making this meal can bring joy to any table. Try out different variations to keep it fresh. With practice, your sweet and sour chicken will impress everyone. Enjoy your cooking adventure!

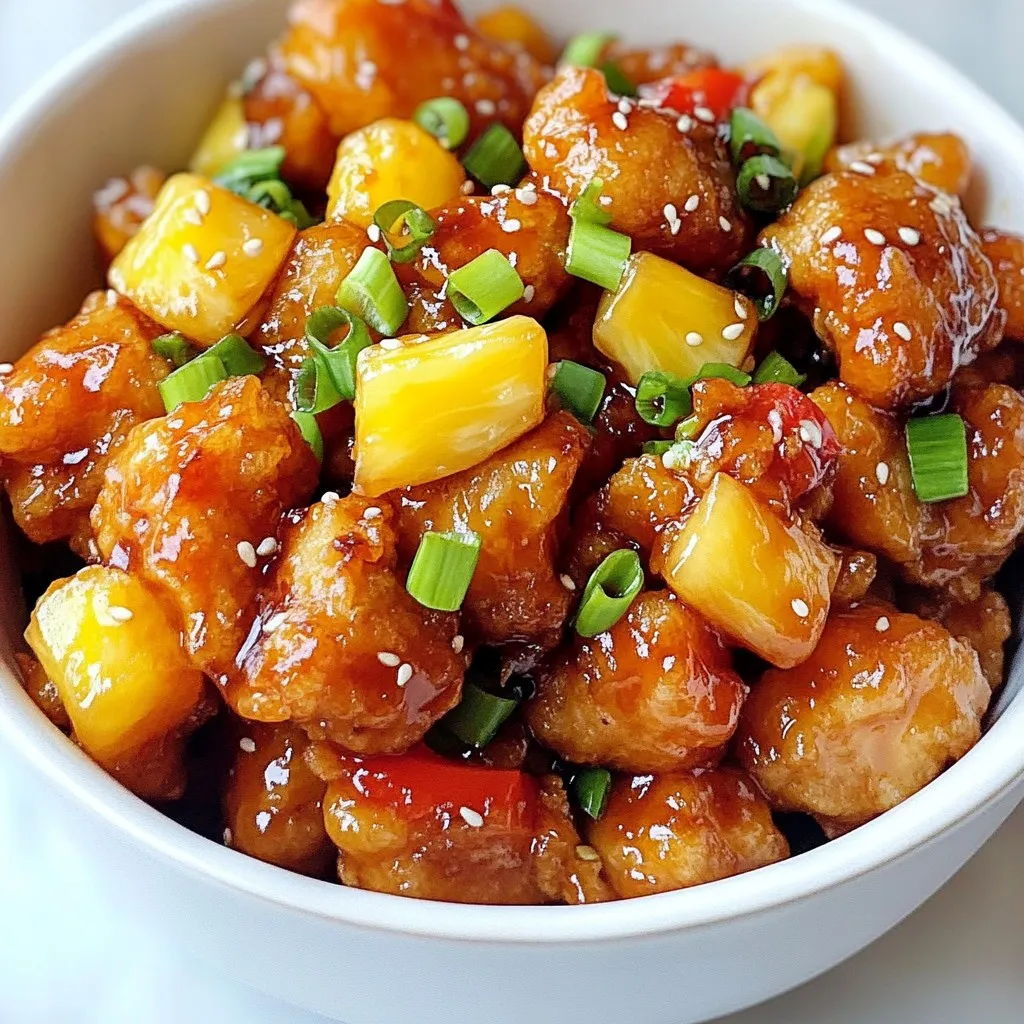
Are you ready to impress your family with a dish that’s both sweet and savory? My Sweet & Sour Chicken recipe is simple yet packed with flavor. It uses easy …

Read more

Categories Dinner

Cheesy Taco Pasta Simple and Flavorful Comfort Dish

November 14, 2025March 4, 2025 by Chef Luca
- 8 oz (about 2 cups) pasta: penne or rotini - 1 lb ground beef or ground turkey - 1 packet taco seasoning - 1 can (15 oz) black beans, rinsed and drained - 1 can (10 oz) diced tomatoes with green chilies - 1 cup corn, frozen or canned - 1 cup shredded cheddar cheese - 1/2 cup cream cheese, softened - 1 cup chicken or vegetable broth - Salt and pepper to taste These ingredients create the perfect balance of flavors. You can choose your pasta type based on what you like best. Penne offers a fun bite, while rotini holds sauce well. Ground beef gives a rich taste, but ground turkey is lighter. The canned goods are super handy. Black beans add protein and fiber. Diced tomatoes bring a nice tang. Corn adds sweetness and texture. Now, let's talk cheese! Cheddar gives a sharp, yummy flavor. Cream cheese makes the dish creamy and dreamy. Don't forget seasoning! Taco seasoning brings all those tasty spices together. Salt and pepper are your best friends here. A pinch of these enhances all flavors. - Fresh cilantro - Jalapeños, diced for heat For a fresh touch, add chopped cilantro on top. It brightens up the dish. If you like heat, diced jalapeños are a great choice. They add a nice kick. You can mix and match these toppings to make the dish your own! {{ingredient_image_1}} Start by boiling water in a large pot. Add salt to the water for flavor. Cook the pasta until it is al dente, which means it’s firm but not hard. This usually takes about 8-10 minutes. Stir the pasta often to prevent it from sticking. Once done, drain the pasta in a colander. Set it aside to cool slightly while you prepare the meat. In a large skillet, heat over medium heat. Add the ground beef to the skillet. Use a wooden spoon to break the beef apart as it cooks. This helps it brown evenly. Cook until the meat is no longer pink. Season the beef with salt and pepper to enhance its flavor. Browning the meat well adds a rich taste to the dish. Once the beef is cooked, stir in the taco seasoning. Add the canned diced tomatoes, black beans, corn, and chicken broth. Mix everything well. Bring the mixture to a simmer. This allows the flavors to blend. Next, add the softened cream cheese. Stir until it melts and creates a creamy base. This step is key for a rich, cheesy sauce. Now it’s time to combine everything! Add the cooked pasta into the skillet. Stir gently to mix the pasta with the sauce. Sprinkle the shredded cheddar cheese on top. Stir until the cheese melts and becomes gooey. If needed, cook for another 2-3 minutes. This warms the dish through. Taste and adjust seasoning if needed, then serve hot! To make the best Cheesy Taco Pasta, you can adjust the flavors with spices. If you like it spicy, add more taco seasoning or some chili powder. A pinch of cumin can add depth too. Taste as you go to find what you like best. Choosing the right pasta also matters. I prefer penne or rotini because they hold sauce well. Their shapes grab the cheesy goodness and taco flavors perfectly. One common mistake is overcooking the pasta. Cook it until it's al dente, so it stays firm. If you overcook it, the pasta becomes mushy and loses its bite. Another mistake is not browning the meat enough. You want to cook the ground beef well. This step adds flavor and texture to your dish. You can enhance flavor and texture with fun add-ins. Try bell peppers or onions for extra crunch and taste. Sauté them with the meat for the best results. Using different cheeses can also change the dish. Swap cheddar for pepper jack for a spicy kick. You could even add cream cheese for extra creaminess. Try mixing cheeses for a tasty twist! Pro Tips Cook Pasta Perfectly: Always cook your pasta al dente to prevent it from becoming mushy when mixed with the sauce. Customize Your Heat: Adjust the level of spiciness by adding more or fewer jalapeños based on your preference. Use Leftovers Wisely: This dish is great for using up leftover meats or beans from other meals; just chop them up and add. Garnish for Freshness: Always add fresh herbs like cilantro just before serving to enhance flavor and presentation. {{image_2}} For a vegetarian twist, swap the ground beef with lentils or mushrooms. Both options add great texture. You can also use tofu for protein. Instead of cream cheese, try cashew cream or a vegan cream cheese substitute. These options keep the dish rich and creamy. Add more veggies to boost nutrition. Consider bell peppers, zucchini, or spinach. These add color and flavor, making the dish even heartier. You can mix in your favorites to suit your taste. If you need a gluten-free dish, opt for gluten-free pasta. There are many great options made from rice, quinoa, or chickpeas. These pastas cook well and hold up nicely. To thicken the creamy base, use cornstarch or arrowroot powder mixed with water. This gives you the creamy texture without gluten. You can also try using a gluten-free flour to help thicken the sauce. Want to add some heat? Toss in diced jalapeños or a splash of hot sauce while cooking. You can also add red pepper flakes for a kick. Adjust the amount based on your heat tolerance. For a cheesy twist, try using spicy cheese, like pepper jack. You can also use taco seasoning that has added spice. This adds layers of flavor to your dish. To keep Cheesy Taco Pasta fresh, place it in an airtight container. Make sure it cools down before sealing. Store it in the fridge for up to three days. If you want to save it for later, you can freeze it too. Use a freezer-safe container and label it with the date. It will last up to three months in the freezer. To reheat Cheesy Taco Pasta, you can use the microwave or the stovetop. For the microwave, place the pasta in a bowl and cover it. Heat it for one to two minutes, stirring halfway through. On the stovetop, add a splash of broth to a skillet and heat over low. Stir gently until hot. To keep that creamy texture, add a little broth or cream cheese if needed. Stir well to mix everything evenly. This will help avoid a dry meal, making it just as tasty as when you first made it. You can easily adapt this recipe for a slow cooker. Here’s how: - Cook the meat: Brown the ground beef in a skillet first, then transfer it to the slow cooker. - Combine ingredients: Add the taco seasoning, diced tomatoes, black beans, corn, and chicken broth to the slow cooker. - Set the cooker: Cook on low for about 4 to 6 hours or on high for 2 to 3 hours. - Add cream cheese: Stir in the softened cream cheese about 30 minutes before serving. - Finish it off: Cook the pasta separately, then mix it into the slow cooker just before serving. Yes, you can prepare this dish ahead of time. Here are some tips: - Cook and cool: Make the entire dish, then cool it completely before storing. - Store properly: Keep it in an airtight container in the fridge for up to 3 days. - Freeze for later: You can also freeze the pasta for up to 2 months. Just thaw it before reheating. To add heat to your Cheesy Taco Pasta, consider these options: - Add jalapeños: Mix in diced jalapeños for a fresh kick. - Use spices: Try adding cayenne pepper or chili powder to boost the spice level. - Spicy cheese: Choose a spicy cheese blend for extra flavor. Yes, you can make a dairy-free version. Here are some substitutes: - Cream cheese: Use a dairy-free cream cheese alternative. - Cheddar cheese: Opt for a plant-based shredded cheese. - Broth: Ensure your broth is free from dairy. This blog post covered how to make Cheesy Taco Pasta, from the main ingredients to tips and tricks. You learned about cooking pasta, preparing meat, and combining flavors. I shared options for different diets, storage tips, and answers to common questions. In the end, this dish offers flexibility and fun for every palate. Enjoy making it your own and delight in the taste!

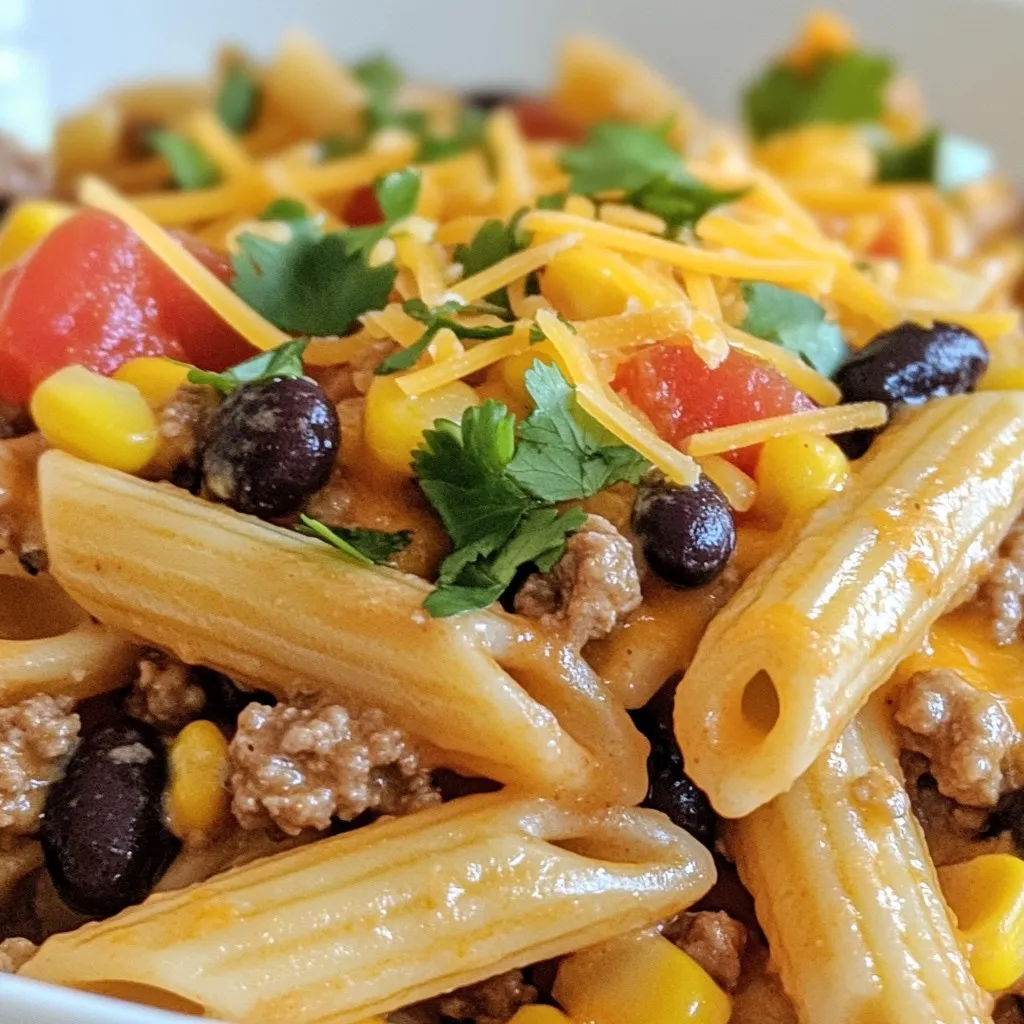
Looking for a quick and tasty dinner? This Cheesy Taco Pasta is your go-to comfort dish! Packed with savory flavors, it combines pasta with ground beef, beans, and creamy cheese, …

Read more

Categories Dinner

Mini Chicken Pot Pies Savory and Simple Meal Idea

November 11, 2025March 3, 2025 by Chef Luca
- 2 cups cooked chicken, shredded - 1 cup frozen mixed vegetables (peas, carrots, corn) - 1/2 cup onion, diced - 2 cloves garlic, minced - 1 cup chicken broth - 1 cup heavy cream - 1 package (1 sheet) puff pastry, thawed In this recipe, I use cooked chicken. You can use any leftover chicken. Shred it into bite-sized pieces. I love adding frozen mixed vegetables. They bring color and flavor. Peas, carrots, and corn work best. You need onion and garlic too. Dice the onion finely and mince the garlic. Both add great taste to the filling. For the base, chicken broth and heavy cream are key. The broth gives depth. The cream makes the filling rich and smooth. Lastly, you need puff pastry. This is what makes the pot pies crispy and flaky. - 1 teaspoon dried thyme - 1 teaspoon dried rosemary - Salt and pepper to taste - 1 egg (for egg wash) To season your filling, use dried thyme and rosemary. These herbs elevate the flavor. Add salt and pepper to taste. This simple mix makes the dish shine. Finally, the egg wash is important. It helps the pastry turn golden brown. Just beat an egg and brush it on top before baking. This gives your mini chicken pot pies a lovely finish. Enjoy the rich flavors and warm comfort of this dish! {{ingredient_image_1}} - Preheat oven to 400°F (200°C). - Grease muffin tin to prevent sticking. - In a skillet, heat olive oil over medium heat. - Add diced onion and minced garlic, sauté for 3-4 minutes. - Stir in shredded chicken and mixed vegetables, cooking for 2-3 minutes. - Pour in chicken broth and heavy cream. Add thyme, rosemary, salt, and pepper. - Bring to a simmer and cook for 5-7 minutes, stirring often, until thick. - Roll out puff pastry on a floured surface. Cut into 5-inch circles. - Press pastry circles into muffin tin cups, leaving extra hanging over the edges. - Spoon chicken filling into each pastry-lined muffin cup. - Use extra pastry to create tops or lattice patterns. Press edges to seal. - Beat egg in a bowl and brush tops with egg wash. - Bake for 20-25 minutes or until pastries are golden brown and puffed. - Let cool for a few minutes before removing from the muffin tin. To roll puff pastry evenly, start on a clean and lightly floured surface. Use a rolling pin and apply gentle pressure. Be sure to roll from the center outwards. This helps keep the thickness uniform. For avoiding soggy bottoms, place the pastry in the fridge for a few minutes before filling. This keeps it firm when baking and helps it stay crisp. You can easily boost flavor by adding herbs or spices. For example, fresh thyme or parsley can brighten your dish. Try adding a pinch of cayenne for a slight kick. If you want extra fillings, consider mushrooms or diced potatoes. These add texture and depth to the mix. To ensure even browning, rotate your muffin tin halfway through baking. This helps all the pies cook evenly. Checking for doneness is easy; look for a golden brown color on top. You can also insert a knife into the center. If it comes out hot, your mini pot pies are ready to serve. Pro Tips Use Rotisserie Chicken: For a quicker option, use store-bought rotisserie chicken. It saves time and adds great flavor to your pot pies. Customize Vegetables: Feel free to swap out the frozen mixed vegetables for your favorites or whatever you have on hand, like broccoli or bell peppers. Puff Pastry Handling: Keep your puff pastry cold until you're ready to use it. This helps it puff up beautifully in the oven. Make Ahead: You can prepare the filling and pastry ahead of time. Assemble and bake when ready to serve for a fresh meal. {{image_2}} You can change mini chicken pot pies into muffin-style bites. This makes them fun and easy to eat. Use a muffin tin to hold the puff pastry. You can adapt the filling by using leftover turkey or beef instead of chicken. You can also add more veggies, like spinach or mushrooms, for extra flavor. These swaps keep your meal fresh and exciting! Instead of puff pastry, try phyllo or shortcrust pastry for a different look. These options add a crispy texture. You can make mini pots for a party or appetizer. Fill them with your chicken mix and serve warm. They are great for gatherings! You can also top them with a dollop of sour cream or fresh herbs for added taste. For gluten-free eaters, use gluten-free puff pastry or a gluten-free pie crust. You can find these in most stores. For a vegetarian version, swap the chicken for cooked lentils or chickpeas. Add more veggies, like zucchini or bell peppers, to make up for the protein. This way, everyone can enjoy delicious mini pot pies! You can freeze mini chicken pot pies before or after baking. If you freeze them before baking, wrap each pie tightly in plastic wrap. Place the wrapped pies in a freezer bag. This keeps them fresh. You can also freeze them after baking. Let them cool first. Then, wrap and bag them. You can freeze mini chicken pot pies for up to three months. They stay tasty and safe during this time. When you're ready to eat, just thaw and reheat. You can reheat mini chicken pot pies in the oven or microwave. The oven gives the best results. Preheat it to 350°F (175°C). Place the pies on a baking sheet. Heat for about 15-20 minutes. This keeps the crust crispy. If you use the microwave, heat each pie for about 1-2 minutes. The crust may get soft, so this is not the best choice. If you want to keep them crispy, try the oven. To store leftovers, place them in an airtight container. Keep them in the fridge. They will stay fresh for up to four days. Make sure they cool down before storing. This helps keep moisture out. If you notice any signs of spoilage, discard them. Always trust your senses. If they smell off, do not eat them. Enjoy your mini chicken pot pies while they're fresh! Yes, you can use rotisserie chicken. It makes this recipe faster and easier. Here are some benefits of using store-bought cooked chicken: - Saves time: No need to cook or shred chicken yourself. - Adds flavor: Rotisserie chicken is often seasoned well. - Less waste: You can use leftover chicken for other meals. You can mix it up with different veggies or proteins. Here are some ideas: - Vegetables: Try mushrooms, bell peppers, or spinach. - Proteins: Use turkey, beef, or even tofu for a twist. - Seasoning: Add your favorite herbs or spices for extra flavor. Mini chicken pot pies pair well with various sides and drinks. Here are some suggestions: - Side dishes: A fresh green salad or roasted veggies work great. - Beverages: Serve with iced tea, lemonade, or a light wine. In this blog post, we explored how to make delicious mini chicken pot pies. We covered key ingredients like chicken, mixed veggies, and puff pastry. The step-by-step instructions helped you prep, cook, and assemble your pies. Tips also showed you how to enhance flavors and avoid soggy bottoms. Plus, we discussed fun variations and storage tips for leftovers. Now you can make these tasty treats at home with confidence. Enjoy your cooking adventure and share your mini pot pies with friends!

Looking for a quick and tasty meal? Mini chicken pot pies are the answer! This savory dish combines tender chicken, colorful veggies, and a flaky puff pastry crust that everyone …

Read more

Categories Dinner

Cowboy Butter Steak Linguine Flavorful Dinner Delight

January 9, 2026February 25, 2025 by Chef Luca
- 8 oz linguine pasta - 2 ribeye steaks (about 1-inch thick) - 4 tablespoons unsalted butter - 4 cloves garlic, minced - 1 tablespoon fresh parsley, chopped - 1 tablespoon fresh rosemary, chopped - 1 tablespoon fresh thyme, chopped - 1 teaspoon smoked paprika - 1 teaspoon lemon juice - 1 teaspoon red pepper flakes (optional for spice) - Salt and freshly ground black pepper, to taste - Grated Parmesan cheese, for serving - Lemon wedges, for serving {{ingredient_image_1}} Using a meat thermometer is key. It tells you when the steak is ready. For medium-rare, aim for 130°F. Insert the probe into the thickest part of the steak. This method ensures that your steak is juicy and tender. Resting the steak is just as important. Let it sit for at least five minutes. This helps the juices redistribute, making every bite flavorful. When you slice the steak, cut against the grain. This technique makes the meat easier to chew. To make your sauce just right, use reserved pasta water. Start with a few tablespoons and mix. If the sauce is too thick, add more water until it’s creamy. This water adds starch, which helps the sauce cling to the pasta. Balancing flavors is essential. Taste your sauce as you go. If it’s too salty, add a squeeze of lemon juice. If you want more depth, sprinkle in extra smoked paprika. For extra flavor, consider toppings. Grated Parmesan cheese is a must. You can also add chopped green onions or crispy bacon bits. They add a nice crunch and a burst of flavor. If you want to switch up the pasta, try fettuccine or spaghetti. Both work well with the cowboy butter sauce. Feel free to experiment with different shapes to find your favorite! If you want to try a different cut of steak, many options exist. You can use sirloin or flank steak instead of ribeye. These cuts are tasty and often more affordable. Here are some cooking times for various cuts: - Sirloin: Cook for about 5-6 minutes per side for medium-rare. - Flank: Cook for 4-5 minutes per side for medium-rare. - T-bone: Cook for 6-7 minutes per side for medium-rare. Each cut has its own unique flavor and texture. Choose what you prefer! If you're looking for a vegan or vegetarian version, many options work well. Instead of steak, try plant-based proteins like tofu or tempeh. You can marinate and grill them just like steak for extra flavor. To replace the butter, consider using plant-based butters or olive oil. Both options add richness without the dairy. You can easily change the flavors in this dish. Adding spices like cumin or chili powder can give it a kick! Fresh herbs like basil or cilantro can also add a new twist. Don’t forget about veggies! You can toss in bell peppers, spinach, or mushrooms to boost the dish's nutrition and color. Just sauté them in the cowboy butter sauce before mixing in the pasta. Pro Tips Rest the Steaks: After cooking, let the steaks rest for at least 5 minutes. This allows the juices to redistribute, resulting in a more flavorful and tender bite. Use Fresh Herbs: Fresh herbs elevate the flavor of the cowboy butter. Always opt for fresh parsley, rosemary, and thyme for a more aromatic and vibrant dish. Customize the Spice Level: Adjust the amount of red pepper flakes based on your heat preference. You can also add a pinch of cayenne for an extra kick. Save Some Pasta Water: Reserve a cup of pasta water before draining. It can help adjust the consistency of the sauce and make it cling better to the pasta. {{image_2}} To keep your Cowboy Butter Steak Linguine fresh, use airtight containers. Glass containers work well, as they don’t absorb smells. Store leftovers in the fridge for up to three days. Always label your containers with the date. This way, you know how long they have been stored. For reheating, the skillet method is best. Heat a little olive oil in a pan. Add the pasta and steak, stirring gently. This keeps the flavors intact. If the sauce seems thick, add a splash of reserved pasta water. This helps restore that creamy texture. You can freeze Cowboy Butter Steak Linguine, but it’s best to freeze the pasta and sauce separately. Use freezer-safe bags or containers. Squeeze out all the air to prevent freezer burn. For best results, freeze it for no longer than three months. To thaw, leave it in the fridge overnight. Reheat it gently in a skillet, adding a bit of water to keep it moist. Cowboy butter is a rich, flavorful sauce made with butter, herbs, and spices. It's perfect for adding a kick to steaks and pasta. You can use it on grilled meats, seafood, or even veggies. This sauce gives a tasty twist to any dish. Yes, you can use gluten-free pasta for this recipe. Look for options made from rice, quinoa, or chickpeas. These alternatives cook well and blend nicely with the cowboy butter sauce. Just make sure to follow the package instructions for cooking times. To spice up your Cowboy Butter Steak Linguine, add more red pepper flakes. You can also include diced jalapeños or a splash of hot sauce. Stir these in while you make the cowboy butter sauce. Adjust the heat to your taste. Great sides for this dish include a fresh green salad or garlic bread. Steamed asparagus or roasted vegetables also complement the flavors. You could even serve it with a side of creamy mashed potatoes for a hearty meal. This blog post shared how to make a tasty Cowboy Butter Steak Linguine. We covered the key ingredients, from ribeye steaks to fresh herbs. You learned step-by-step instructions for cooking pasta and preparing the steaks. Tips and tricks helped you perfect your dish, while variations showed you how to customize it. Lastly, we discussed storage info to keep leftovers fresh. Enjoy trying this recipe at home. It's simple and will impress everyone at your table. Happy cooking!

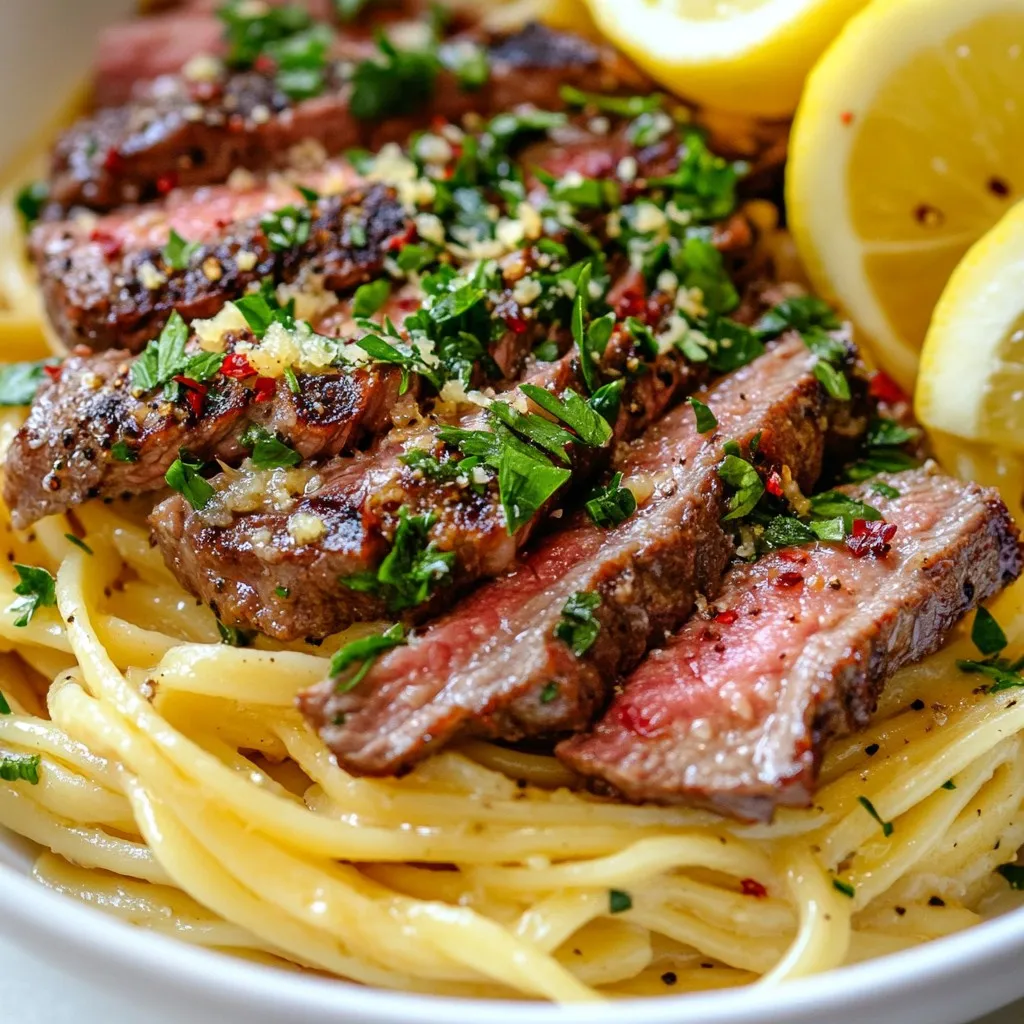
Get ready for a flavor explosion with Cowboy Butter Steak Linguine! This dish combines tender ribeye steaks, rich cowboy butter, and perfectly cooked linguine for a meal that stands out. …

Read more

Categories Dinner

Quick Homemade Butter Chicken Tasty and Simple Recipe

January 9, 2026February 22, 2025 by Chef Luca
- 500g boneless chicken thighs - 1 cup plain yogurt - 2 tablespoons garam masala - 1 teaspoon turmeric - 1 teaspoon chili powder - 1 can (400g) crushed tomatoes - 1 cup heavy cream These are the key ingredients you need to make butter chicken. The boneless chicken thighs make the dish tender. The yogurt helps to marinate the chicken, adding flavor and moisture. The spices are very important. Garam masala adds warmth, turmeric gives a nice color, and chili powder brings some heat. Crushed tomatoes create a rich sauce, while heavy cream makes it creamy and smooth. - Fresh cilantro - Additional cream Garnishes are not just for looks; they add flavor too. Fresh cilantro brightens up the dish. A drizzle of cream adds a touch of richness. You can choose to use one or both, depending on your taste. Enjoy your cooking! {{ingredient_image_1}} First, grab a bowl. Combine 500g of boneless chicken thighs, 1 cup of plain yogurt, 2 tablespoons of garam masala, 1 teaspoon of turmeric, and 1 teaspoon of chili powder. Add a pinch of salt to the mix. This marinade makes the chicken tender and flavorful. I like to marinate for at least 30 minutes. If you have time, let it sit for a few hours. This really helps the flavors soak in. Now, heat 2 tablespoons of vegetable oil in a large skillet over medium heat. Add 1 finely chopped onion. Sauté until the onion turns golden brown; this takes about 5 to 7 minutes. Next, stir in 3 minced garlic cloves and 1 grated inch piece of ginger. Cook for another 2 minutes until it smells amazing. Add the marinated chicken to the skillet. Cook it until the chicken is browned on all sides, which takes about 6 to 8 minutes. After that, pour in 1 can of crushed tomatoes and 1 tablespoon of sugar. Stir it all together, then let it simmer for 10 minutes. This helps the flavors blend. Lower the heat and add 1 cup of heavy cream. Stir until the sauce looks rich and creamy. Let it cook for an additional 5 minutes. After that, taste the sauce and adjust the seasoning with salt as needed. I always garnish with fresh cilantro before serving. It adds a nice touch! - Optimal marination duration: Marinate your chicken for at least 30 minutes. For the best taste, aim for a few hours. This helps the spices soak in and makes the chicken juicy. - Cooking techniques for tender chicken: Cook the chicken on medium heat. This keeps it tender without drying it out. Stir it gently to ensure even cooking. - Overcooking the chicken: Keep an eye on your chicken. Overcooking makes it tough and dry. Aim for a nice golden-brown color. - Skipping the marination: Marination is key. If you skip it, your chicken will lack flavor. Take the time to marinate for great taste. - Serving suggestions: Serve your butter chicken over fluffy basmati rice. You can also use warm naan bread for a perfect dip. - Garnishing tips: Add fresh cilantro on top. A drizzle of cream makes it look even better. These simple touches enhance the dish's appeal. Pro Tips Marination Matters: Allowing the chicken to marinate for a few hours or overnight enhances the flavor and tenderness, making your butter chicken even more delicious. Spice Level Control: Adjust the amount of chili powder to suit your spice preference. For a milder dish, reduce the chili powder or add a dollop of yogurt on top when serving. Use Fresh Ingredients: Fresh garlic and ginger provide a more vibrant flavor compared to dried or powdered versions. Always opt for fresh whenever possible for the best taste. Perfect Creaminess: For an extra creamy sauce, use full-fat heavy cream. If you prefer a lighter option, you can substitute with half-and-half, but the richness will be slightly reduced. {{image_2}} You can change the protein in this dish. If you want a meat-free option, use tofu or paneer. They soak up flavors well and add a nice texture. For a dairy-free version, try coconut cream instead of heavy cream. It gives a tropical twist and keeps it rich. You can mix up the spices for different tastes. Try adding cumin, coriander, or even a pinch of cinnamon. These spices can give the dish a new vibe. You can also add veggies like bell peppers or spinach. They add color, nutrients, and make your meal more filling. If you want to mimic Indian restaurant style, try adding a bit of fenugreek leaves. This ingredient gives a special aroma. For a fusion twist, serve it with pasta instead of rice. This brings a fun Italian flavor to a classic dish. You can also try adding some lime juice for a zesty kick. To keep your butter chicken fresh, you must store it right. - Refrigeration tips: Let the butter chicken cool. Place it in an airtight container. It stays good for about 3-4 days in the fridge. - Freezing guidance: For longer storage, freeze it. Use a freezer-safe container. It can last up to 3 months. Make sure to label it with the date. You want your butter chicken to taste great even when reheated. - Best methods for reheating butter chicken: The oven is best for even heating. Preheat it to 350°F (175°C). Place the butter chicken in a dish, cover it, and heat for about 20 minutes. You can also use the stovetop. Simply heat it in a pan over low heat, stirring often. Add a splash of cream or water if it gets too thick. Butter chicken can last about 3 to 4 days in the fridge. Store it in an airtight container. This keeps it fresh and safe to eat. Yes, you can make butter chicken in advance. It actually gets better after sitting. Prepare it a day or two ahead of time. Just keep it in the fridge until you're ready to eat. The best way to reheat butter chicken is on the stove. Use low heat to warm it gently. Stir often to avoid burning. You can also use a microwave. Heat in short bursts and stir in between. Yes, you can use chicken breast instead of thighs. However, chicken thighs are more tender and flavorful. If you choose breasts, cook them carefully to keep them moist. Making homemade butter chicken is simple and rewarding. We covered the key ingredients, including chicken, yogurt, and spices. I shared how to marinate the chicken, cook it, and finish with cream for a rich flavor. You learned tips to avoid mistakes, variations to try, and storage advice for leftovers. Now, you can create a delicious butter chicken at home. Experiment with different flavors and enjoy this classic dish your way.

Craving a rich, flavorful meal but short on time? You’re in luck! I’ll show you how to make Quick Homemade Butter Chicken that’s both tasty and simple. With tender chicken, …

Read more

Categories Dinner

Minute Lo Mein Fast and Flavorful Dinner Recipe

January 4, 2026February 19, 2025 by Chef Luca
- 8 oz lo mein noodles - 2 tablespoons vegetable oil - 1 cup shredded carrots - 1 cup snap peas - 1 red bell pepper, julienned - 3 green onions, sliced - 2 cloves garlic, minced - 1 tablespoon ginger, grated - 3 tablespoons soy sauce - 1 tablespoon sesame oil - 1 tablespoon rice vinegar - Optional: 1 tablespoon chili paste for heat - Sesame seeds and fresh cilantro for garnish To make Minute Lo Mein, you need fresh and colorful ingredients. The lo mein noodles are the star of the dish. They soak up all the tasty sauce. You can find these noodles in most grocery stores. Next, the vegetables add crunch and color. Shredded carrots, snap peas, and red bell pepper work great. They bring a mix of flavors and textures. The green onions, garlic, and ginger are essential for aroma and taste. The sauces are what make this dish special. Soy sauce gives it a savory kick. Sesame oil adds a nutty flavor. Rice vinegar brings a slight tang. If you like heat, add chili paste for spice. Finally, garnish with sesame seeds and fresh cilantro for a pop of flavor. This dish is quick, easy, and full of flavor. Perfect for a fast dinner! {{ingredient_image_1}} First, bring a large pot of water to a boil. Once the water is bubbling, add 8 oz of lo mein noodles. Cook them for about 3-4 minutes, or until they are tender. Make sure to stir them so they don’t stick together. When done, carefully drain the noodles in a colander and set them aside. This step is key to getting the right texture for your lo mein. Next, grab a large skillet or wok and heat 2 tablespoons of vegetable oil over medium-high heat. Once the oil is hot, add 2 cloves of minced garlic and 1 tablespoon of grated ginger. Stir them quickly for about 30 seconds until they smell great. This helps to build a strong flavor base. After that, add 1 cup of shredded carrots, 1 cup of snap peas, and 1 julienned red bell pepper to the skillet. Stir-fry these veggies for about 3-4 minutes. You want them tender but still crisp for the best bite. Now, it’s time to bring everything together. Toss the cooked lo mein noodles into the skillet with the vegetables. Mix well so the noodles and veggies combine. In a small bowl, whisk together 3 tablespoons of soy sauce, 1 tablespoon of sesame oil, 1 tablespoon of rice vinegar, and 1 tablespoon of chili paste if you want some heat. Pour this sauce over the noodles and veggies. Stir-fry everything for an additional 2 minutes. This will coat the noodles and heat them through. Lastly, remove the skillet from the heat and fold in the sliced green onions. Your Minute Lo Mein is ready to serve! To get the best lo mein, avoid overcooking the noodles. Cook them just until soft. If you leave them too long, they can become mushy. Follow the package instructions closely. Look for noodles that take about 3-4 minutes to cook. If you can't find lo mein noodles, try these alternatives: - Spaghetti - Udon noodles - Rice noodles These options work well and will still taste great. To boost the flavor, add some spices. Here are a few ideas: - Crushed red pepper for heat - A dash of black pepper for depth - Garlic powder for extra flavor Using fresh herbs can make your dish pop. Consider adding: - Chopped cilantro - Sliced green onions - Fresh basil for an aromatic touch Chop your veggies quickly to save time. Here are some tips: - Use a sharp knife for easy cutting. - Cut vegetables into similar sizes for even cooking. - Try a food processor for fast chopping. Using kitchen tools can speed up your prep time. A good skillet or wok heats up fast. A timer can help keep track of cooking times. This way, you can focus on each step without worry. Pro Tips Use Fresh Ingredients: Fresh vegetables enhance the flavor and texture of your lo mein. Opt for seasonal produce for the best taste. Customize Your Protein: Feel free to add your choice of protein, such as chicken, shrimp, or tofu, to make the dish more filling. Control the Heat: Adjust the amount of chili paste according to your spice preference. You can also add sliced fresh chili for an extra kick. Garnish for Flavor: Don’t skip the sesame seeds and fresh cilantro as they add not just visual appeal but also a burst of flavor. {{image_2}} You can add protein to your Minute Lo Mein for a heartier meal. Chicken, shrimp, or tofu all work great. - Chicken: Cut chicken into thin strips. Sauté in the skillet until cooked through. Then, add it with the noodles. - Shrimp: Use peeled shrimp. Cook them in the skillet until they turn pink. Toss them in with the noodles. - Tofu: For a vegetarian option, use firm tofu. Cube it and sauté until golden brown before adding. If you want to keep it vegetarian or vegan, stick with tofu or add more veggies. If you like spice, you can easily adjust the heat. - Chili Paste: Add chili paste while mixing the sauce. Start with one tablespoon, then taste and add more if needed. - Fresh Peppers: Slice fresh jalapeños or red chili peppers. Toss them in with the veggies for extra heat. For mild options, skip the chili paste and add more veggies instead. This way, everyone can enjoy the dish. If you need a gluten-free meal, you can still make this dish tasty. - Gluten-Free Noodles: Look for gluten-free lo mein noodles. Many brands offer great options that taste delicious. - Gluten-Free Sauce: Choose gluten-free soy sauce. It has the same flavor but fits your diet. These simple swaps keep your meal flavorful and safe for your needs. Enjoy experimenting with these variations! To keep your Minute Lo Mein fresh, use an airtight container. Store it in the fridge. It will stay good for about 3 to 4 days. When you want to reheat, use a microwave or a pan on low heat. Add a splash of water or soy sauce to keep it moist. Stir well to warm it evenly. Cooking in bulk is a great way to save time. You can make a bigger batch of Minute Lo Mein for the week. Just follow the recipe and store it in portions. For freezing, let the dish cool first. Then, use freezer-safe containers. It can last up to 3 months in the freezer. When ready to eat, thaw it overnight in the fridge before reheating. To make Minute Lo Mein, you need some basic ingredients. Here’s what you’ll need: - 8 oz lo mein noodles - 2 tablespoons vegetable oil - 1 cup shredded carrots - 1 cup snap peas - 1 red bell pepper, julienned - 3 green onions, sliced - 2 cloves garlic, minced - 1 tablespoon ginger, grated - 3 tablespoons soy sauce - 1 tablespoon sesame oil - 1 tablespoon rice vinegar - Optional: 1 tablespoon chili paste for heat - Sesame seeds and fresh cilantro for garnish The cooking process is simple. First, boil water and cook the lo mein noodles for 3-4 minutes. Drain and set them aside. In a skillet, heat vegetable oil. Add minced garlic and grated ginger, cooking them until fragrant. Then, stir-fry the carrots, snap peas, and bell pepper for 3-4 minutes. Combine the cooked noodles with the veggies, add your sauce, and stir-fry for 2 more minutes. Finally, fold in the green onions and serve with garnishes. If you don’t have lo mein noodles, there are great alternatives. You can use: - Spaghetti - Udon noodles - Rice noodles - Soba noodles All these options will work well. Just make sure to adjust the cooking time based on the noodle type you choose. To add some heat to your Lo Mein, you can use a few simple ingredients. Here are some options: - Chili paste (1 tablespoon) - Sriracha sauce (to taste) - Red pepper flakes (a pinch or more) - Fresh chopped chili peppers Start with small amounts, then taste and adjust to your liking. These additions will give your dish a nice kick! Yes, you can make Minute Lo Mein ahead of time. Here are some tips: - Cook and cool the noodles before storing them. - Store the veggies and cooked noodles separately in airtight containers. - Keep your sauce in a small jar. When you're ready to eat, just reheat everything in a skillet. Add the sauce and stir until hot. It’s easy, and your meal will taste fresh! In this blog post, we explored making delicious lo mein. We covered key ingredients like noodles, vegetables, and sauces. I walked you through simple step-by-step cooking instructions, sharing tips to perfect your dish. We also discussed protein options, spice variations, and how to store leftovers. With these insights, you can create a satisfying meal in no time. Enjoy experimenting and making lo mein fit your taste. Happy cooking!

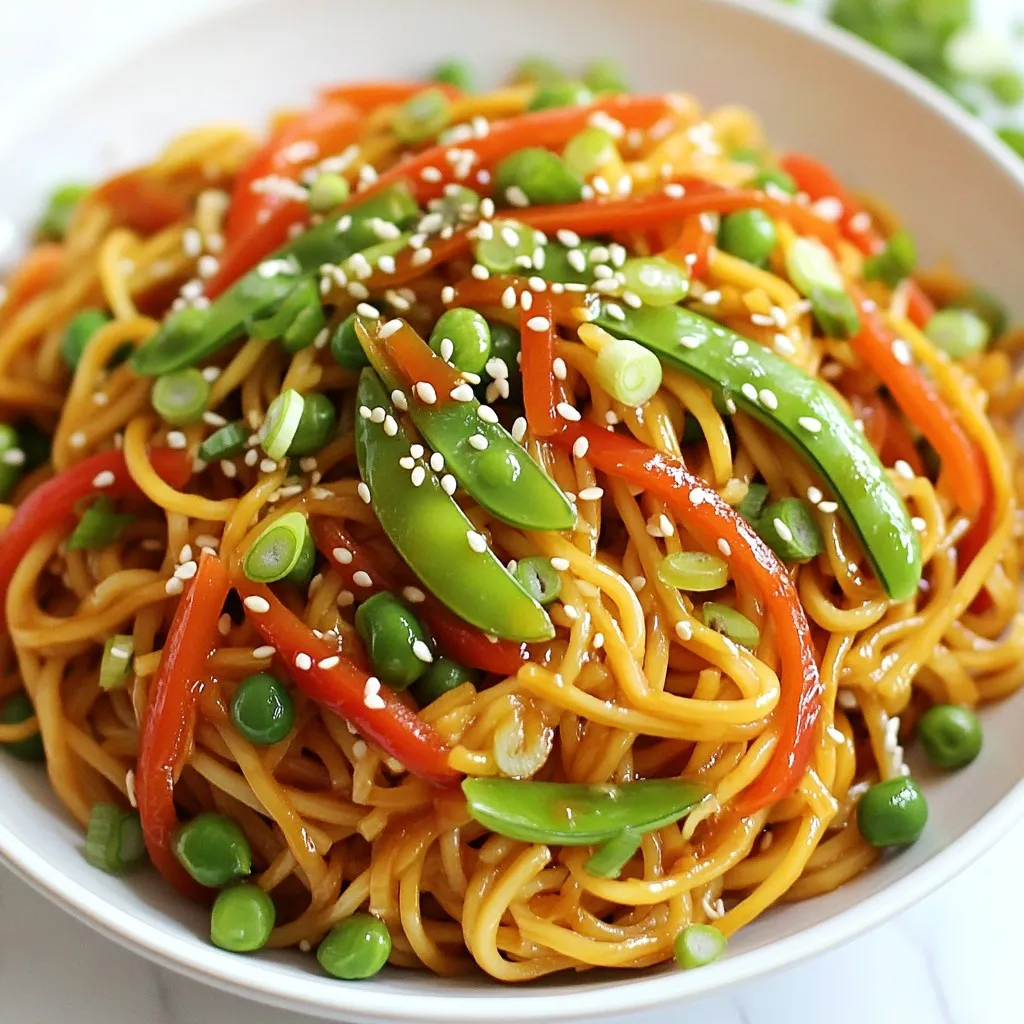
Are you looking for a quick dinner that bursts with flavor? Look no further than Minute Lo Mein! This dish is easy to make and perfect for busy weeknights. With …

Read more

Categories Dinner

Barbecue Meatball Bowls Flavorful and Easy Meal

January 5, 2026February 16, 2025 by Chef Luca
- 1 lb ground beef or turkey - 1/2 cup breadcrumbs - 1/4 cup grated Parmesan cheese - 1 large egg - 2 tablespoons fresh parsley, chopped - 1 tablespoon garlic powder - 1 teaspoon onion powder - 1/2 teaspoon black pepper - 1 cup barbecue sauce (store-bought or homemade) - 2 cups cooked rice (white, brown, or cauliflower rice) - 1 cup cherry tomatoes, halved - 1 avocado, sliced - Fresh cilantro for garnish To make Barbecue Meatball Bowls, you'll need a few key ingredients. Start with ground beef or turkey. Both work great and bring good flavor. The breadcrumbs and Parmesan cheese help bind the meatballs. An egg adds moisture and keeps them tender. For seasoning, fresh parsley makes a nice pop. Garlic and onion powder give depth to the taste. A bit of black pepper adds a mild kick. When it's time to serve, choose your barbecue sauce. You can buy it or make it yourself. Pair the meatballs with cooked rice. You can use white, brown, or even cauliflower rice for a low-carb option. Top your bowls with halved cherry tomatoes and slices of avocado. Fresh cilantro adds color and a burst of flavor. Together, these ingredients create a meal that looks as good as it tastes. {{ingredient_image_1}} Set your oven to 400°F (200°C). This heat will help cook the meatballs evenly. In a large bowl, combine the following ingredients: - 1 lb ground beef or turkey - 1/2 cup breadcrumbs - 1/4 cup grated Parmesan cheese - 1 large egg - 2 tablespoons fresh parsley, chopped - 1 tablespoon garlic powder - 1 teaspoon onion powder - 1/2 teaspoon black pepper Mix these items together. Be careful not to overwork the meat. This keeps the meatballs tender. Shape the mixture into 1-inch meatballs. Place them on a baking sheet lined with parchment paper. This helps with easy cleanup. Bake the meatballs for about 20 minutes. They should turn golden brown and be fully cooked. Take the meatballs out of the oven. Brush them generously with barbecue sauce. This adds flavor and a nice glaze. Put them back in the oven for 5-10 minutes. This step caramelizes the sauce nicely. While the meatballs finish baking, prepare the bowls. Start with a layer of cooked rice at the bottom. Add a generous serving of the barbecue meatballs on top. Add halved cherry tomatoes and sliced avocado on top of the meatballs. These fresh ingredients add color and taste. Finally, garnish each bowl with fresh cilantro. You can also drizzle more barbecue sauce for extra flavor. Enjoy! To make the best meatballs, you should not overwork the meat mixture. Overmixing can make the meatballs tough. Gently combine your ingredients until they just hold together. For even cooking, aim for meatballs that are about 1 inch in size. This size allows them to cook evenly and stay juicy. If you want to mix things up, consider using ground chicken or pork instead of beef or turkey. Both add a new flavor twist. You can also swap your rice type. Try white rice, brown rice, or even cauliflower rice for a low-carb meal. Each option gives your bowl a different texture and taste. For a bolder taste, make your own barbecue sauce. Blend ketchup, brown sugar, vinegar, and spices for a quick sauce. You can also create unique spice blends. Try adding smoked paprika or chili powder to the meatball mixture. These small changes can really elevate your dish and impress your guests. Pro Tips Use Lean Meat: Opt for lean ground beef or turkey to keep your meatballs juicy without excess fat. Add Spice: Feel free to customize your meatball mixture with extra spices like smoked paprika or cayenne for added heat. Cook Rice Ahead: Prepare your rice in advance to save time and ensure it's warm when assembling your bowls. Fresh Toppings Matter: Don't skip the fresh herbs and vegetables; they add brightness and texture to your dish. {{image_2}} You can use different meats for your meatballs. Ground turkey or chicken works well. These options are leaner and still tasty. If you prefer beef, that’s great too. For a plant-based option, try vegetarian or vegan meatballs. You can make them with beans, lentils, or chickpeas. These choices are healthy and packed with flavor. The sauce makes a big difference in taste. You can pick from many barbecue sauces. A spicy sauce adds a kick. If you like sweet flavors, try a honey or maple BBQ sauce. A smoky sauce can give a rich depth. Mix and match to find your favorite flavor. Don't be afraid to experiment! You can serve your meatball bowls with tasty sides. A fresh salad adds crunch and color. Grilled veggies bring out smoky flavors. Coleslaw offers a nice contrast with its creaminess. These sides balance the meal and make it more fun. Choose what you love and enjoy! To keep your meatballs fresh, store them in an airtight container. Place them in your fridge for up to three days. Make sure they cool down before sealing. This helps to avoid moisture build-up. You can also pair them with rice or other sides in the same container. For longer storage, freeze the meatballs and rice separately. Place the cooled meatballs in a single layer on a baking sheet. After they freeze, transfer them to a freezer bag. This prevents them from sticking together. For rice, use a freezer-safe container. It will last up to three months in the freezer. When it’s time to enjoy your meal, reheat without losing moisture. Use a microwave-safe dish and cover it with a damp paper towel. Heat in short intervals, stirring in between. This keeps the meatballs juicy. You can also reheat them in a skillet over low heat. Add a splash of water to keep everything tender. Yes, you can make these meatballs ahead of time. I often prepare a big batch. Just mix the meat, breadcrumbs, cheese, egg, and spices. Form the meatballs and bake them. Once they cool, store them in an airtight container. They last in the fridge for up to three days. You can also freeze them for up to three months. Just thaw them in the fridge before reheating. If you want a rice substitute, you have many options. Quinoa works well. It’s healthy and has a nice texture. Cauliflower rice is a great low-carb choice. You can also try farro or barley for a different flavor. Each option offers its own unique taste and texture. Making your own barbecue sauce is simple. Start with these ingredients: - 1 cup ketchup - 1/4 cup brown sugar - 2 tablespoons apple cider vinegar - 1 tablespoon Worcestershire sauce - 1 teaspoon garlic powder - 1 teaspoon onion powder Mix these together in a bowl. Adjust the sweetness or tanginess to your taste. This sauce adds a personal touch to your meatballs. Yes, you can cook these meatballs on the stovetop. Just heat some oil in a large pan over medium heat. Add the meatballs, cooking them until they are browned on all sides. This usually takes about 10-12 minutes. Ensure they reach an internal temperature of 165°F (74°C). Adjust the cooking time as needed based on the meat size. In this post, we covered how to make delicious barbecue meatball bowls. We talked about key ingredients like ground meat, breadcrumbs, and barbecue sauce. I also shared steps to ensure perfect meatballs and tasty bowl assembly. You can try various ingredients or sauces for fun twists. Don't forget about storage tips for leftovers. Enjoy your cooking adventure, and amaze your friends and family with these easy, flavorful bowls. You will impress everyone with your skills!

Craving a quick, tasty meal that impresses? Look no further! Barbecue Meatball Bowls combine juicy meatballs, flavorful barbecue sauce, and fresh toppings. Perfect for busy weeknights or laid-back weekends, this …

Read more

Categories Dinner
Older posts
Newer posts
← Previous Page1 … Page119 Page120 Page121 Page122 Next →

STIRRED RECIPES

Where every dish begins with a stir! 🍲✨

PAGES

Home About Contact Privacy Policy Terms & Conditions Cookie Policy GDPR Policy Copyright Policy Disclaimer

CATEGORIES

Appetizers Desserts Salads Breakfast Dinner

Contact

  • Pinterest
  • Mail
Copyright © 2026 Stirred Recipes. All rights reserved.