Skip to content
Stirred Recipes
  • Home
  • Appetizers
  • Desserts
  • Salads
  • Breakfast
  • Dinner
  • Privacy Policy
  • Contact
  • About

Chef Luca

Strawberry Shortcake Fluff Salad Delightful and Easy

November 11, 2025April 6, 2025 by Chef Luca
To make Strawberry Shortcake Fluff Salad, you will need: - 2 cups fresh strawberries, hulled and sliced - 1 package (8 oz) cream cheese, softened - 1 cup marshmallow fluff - 1/2 cup powdered sugar - 1 teaspoon vanilla extract - 1 cup whipped topping (or cool whip) - 1 cup crushed graham crackers (about 5 graham crackers) - Mint leaves for garnish (optional) These simple ingredients come together to create a light and sweet treat. To keep your salad fresh, use ripe strawberries. Look for bright red berries with no soft spots. Store them in the fridge until you are ready to use them. For the cream cheese, make sure it is at room temperature. This helps it blend smoothly. Keep the whipped topping chilled until you need it. This keeps it fluffy and light. If you do not have cream cheese, you can use mascarpone cheese. It adds a nice creamy texture. Instead of marshmallow fluff, you can use whipped cream for a lighter mix. If you want a sweeter taste, add more powdered sugar or honey. You can swap out strawberries for other fruits like blueberries or peaches. Each fruit gives a unique flavor to the salad. {{ingredient_image_1}} First, gather all your ingredients. You will need fresh strawberries, cream cheese, marshmallow fluff, powdered sugar, vanilla, whipped topping, and crushed graham crackers. Make sure your cream cheese is soft. It helps make the mixture smooth. You can prepare the strawberries while you mix the cream cheese. This keeps the process quick and easy. In a large bowl, beat the cream cheese until it is smooth. Use an electric mixer for the best results. Next, add the marshmallow fluff, powdered sugar, and vanilla extract. Mix everything together until it is fluffy. Now, gently fold in the whipped topping. Use a spatula to combine the two mixtures. Be careful not to deflate the whipped topping. This keeps your salad light and airy. Now it's time to assemble your salad. Take another bowl and mix the sliced strawberries with a tablespoon of powdered sugar. This step makes the strawberries sweeter. Let them sit for about 10 minutes. After that, fold the strawberries into the cream cheese mixture. Make sure they are evenly mixed. For serving, layer the fluff and crushed graham crackers in a large bowl or small cups. Start with graham crackers, then fluff, and repeat layers. Top with more crushed graham crackers for a crunchy finish. Finally, chill the salad in the fridge for at least 30 minutes. This helps the flavors blend together beautifully. For the best texture in your Strawberry Shortcake Fluff Salad, use softened cream cheese. This helps it blend smoothly. Beat it well until creamy. Then, mix in marshmallow fluff and powdered sugar. This creates a light, fluffy base. When you fold in the whipped topping, do it gently. This keeps the mixture airy. Avoid over-mixing; you want it light and fluffy. Presentation matters! Serve the salad in clear glass bowls. This shows off the lovely layers of fluff and strawberries. It looks pretty and inviting. Sprinkle some crushed graham crackers on top for crunch. Add a mint leaf for a pop of color. This makes your dish look fresh and fun. You can make this salad ahead! It tastes even better after chilling. Prepare it up to a day in advance. Just cover it and store it in the fridge. When ready to serve, layer it up in bowls. You can also serve it in individual cups for a fun touch. This way, everyone gets their own serving. Enjoy the easy prep and tasty results! Pro Tips Use Fresh Strawberries: Always opt for fresh, ripe strawberries to enhance the flavor and texture of your salad. Chill Before Serving: Allow the salad to chill for at least 30 minutes before serving; this helps the flavors meld beautifully. Customize the Sweetness: Adjust the powdered sugar according to your taste preference or the sweetness of the strawberries. Presentation Matters: Use clear glass bowls to showcase the lovely layers of the salad for an appealing presentation. {{image_2}} You can easily change up this dessert to fit your taste. Try adding a splash of almond extract for a nutty flavor. You can also mix in some lemon zest for a fresh twist. If you love chocolate, fold in mini chocolate chips. They add a sweet touch to the fluff. You can even use flavored whipped cream for extra flair. Choose your favorite flavor to make it your own! While strawberries are a classic choice, feel free to experiment with other fruits. Blueberries, raspberries, and diced peaches work well too. Slice bananas for a creamy addition that pairs well with the fluff. You can even use mixed berries for a colorful look. Just remember to adjust the sweetness based on the fruit you choose. This keeps the salad tasty and balanced. To make this dessert gluten-free, swap regular graham crackers for gluten-free ones. Many brands offer tasty options that taste just as good. You can also use crushed gluten-free cookies or even oats as a base. Always check labels to ensure all your ingredients are gluten-free. This way, everyone can enjoy this delightful treat! To keep your Strawberry Shortcake Fluff Salad fresh, store it in the fridge. Use an airtight container to prevent any odors from other foods. Layer the mixture gently to avoid smashing the strawberries. If you have extra graham crackers, store them separately to keep them crunchy. You can keep the salad in the fridge for up to three days. After that, the strawberries may start to lose their freshness. Always check for any signs of spoilage before serving. If the smell or color changes, it’s best to toss it out. This salad tastes best cold, so there's no need to reheat it. If it seems a bit thick after a day, add a splash of milk or cream. Stir gently to freshen it up. You can also fold in a few fresh strawberries to enhance the flavor and texture. Enjoy it as a cool treat! Yes, you can use frozen strawberries. Just thaw them first. Drain any extra juice to avoid a watery salad. This keeps your fluff salad light and fluffy. Fresh strawberries taste best, but frozen ones work well in a pinch. This recipe contains dairy and gluten. The cream cheese and whipped topping are dairy products. If you have a gluten allergy, you can use gluten-free graham crackers. Always check labels to ensure they fit your needs. To make this salad dairy-free, swap cream cheese with a dairy-free alternative. Look for options made from nuts or soy. Use dairy-free whipped topping too. These swaps keep the taste and texture nice while avoiding dairy. This blog post covered salad ingredients, mixing techniques, and storage tips. You learned how to choose fresh ingredients and make substitutions. I shared ways to improve texture and presentation. You can customize your salad and store leftovers properly. In summary, with these steps, you can make a great salad. Enjoy experimenting and creating your perfect dish!

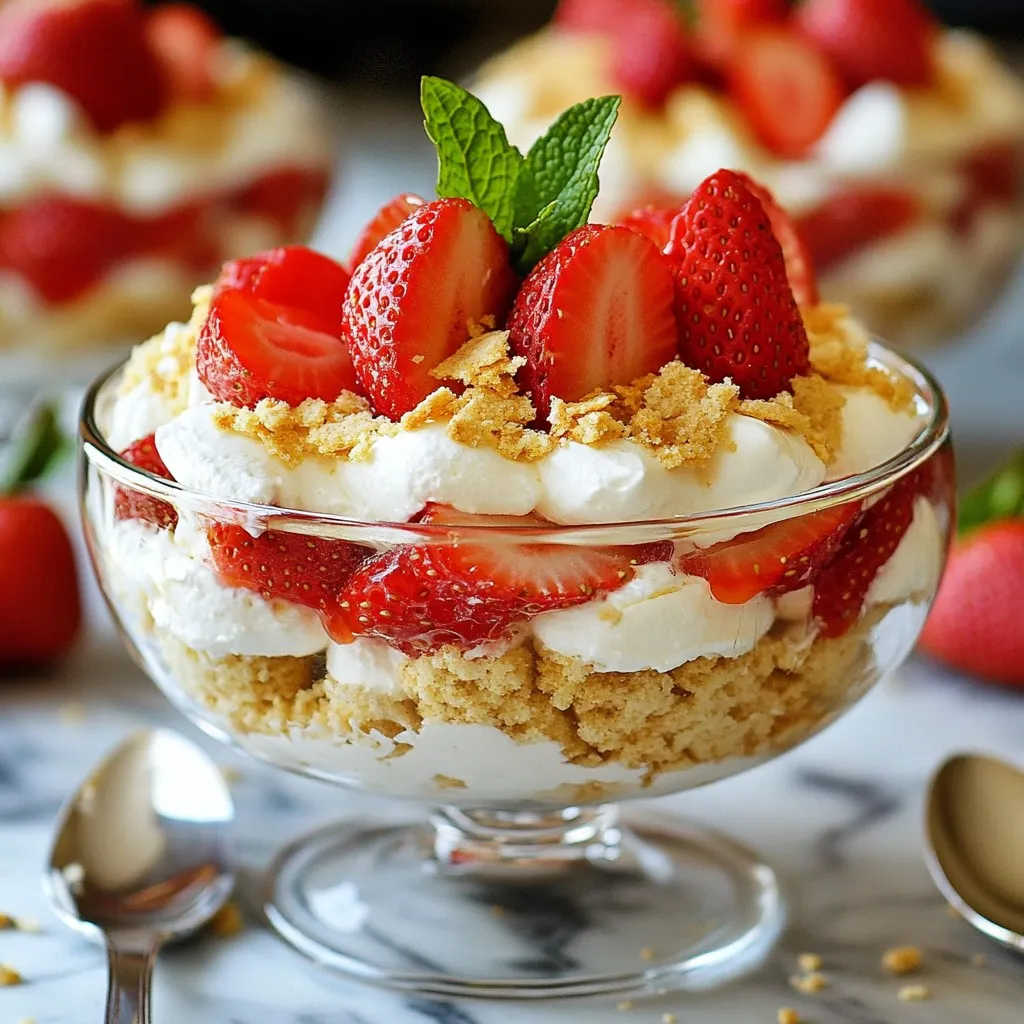
Are you ready to make a dessert that wows everyone? My Strawberry Shortcake Fluff Salad is the perfect blend of sweet and creamy goodness. It’s easy to whip up and …

Read more

Categories Desserts

S’Mores Hand Pies Irresistible Dessert Recipe

November 12, 2025March 31, 2025 by Chef Luca
To make delicious S'Mores hand pies, gather these key ingredients: - 2 cups all-purpose flour - 1/4 cup granulated sugar - 1/2 teaspoon salt - 1/2 cup unsalted butter, cold and cubed - 1/4 cup cold water - 1 cup mini marshmallows - 1/2 cup semi-sweet chocolate chips - 1/2 cup crushed graham crackers - 1 egg, beaten (for egg wash) - 1 teaspoon vanilla extract These items create the perfect blend of sweet and crunchy flavors in your hand pies. You can add fun twists to your S'Mores hand pies. Consider these optional ingredients: - White chocolate chips for a different chocolate flavor - Peanut butter for a creamy filling - Cinnamon for a warm spice kick Feel free to mix and match to suit your taste! If you need alternatives, here are some swaps you can make: - Use whole wheat flour instead of all-purpose flour for a nutty taste. - Swap unsalted butter with coconut oil for a dairy-free option. - Try using dark chocolate chips if you prefer a richer flavor. These substitutions help you create a hand pie that fits your dietary needs or personal preferences. {{ingredient_image_1}} To start, gather your ingredients. You will need flour, sugar, salt, cold butter, and water. In a large bowl, mix together the flour, sugar, and salt. This gives your dough a nice base. Next, add the cold, cubed butter. Use your fingers or a pastry cutter to mix it until it looks like coarse crumbs. This step is key for a flaky crust. Slowly add cold water, one tablespoon at a time. Mix until the dough forms. Be gentle; overworking it can make it tough. Once ready, divide the dough into two disks, wrap them in plastic, and chill for at least 30 minutes. After chilling, preheat your oven to 375°F (190°C) and prepare two baking sheets with parchment paper. Roll out one disk of dough on a floured surface until it is about 1/8-inch thick. Use a cookie cutter or a glass to cut out 3-inch circles. On one half of each circle, place a few mini marshmallows, a sprinkle of crushed graham crackers, and some chocolate chips. Fold the other half over the filling. Press the edges firmly to seal them. For a fun touch, use a fork to crimp the edges. This helps keep the filling inside. Place the assembled hand pies onto your baking sheets. Brush the tops with the beaten egg for a golden finish. Bake them in the oven for 20 to 25 minutes. Keep an eye on them until they turn golden brown. Once they are done, take them out and let them cool slightly. This waiting time makes them easier to handle. Enjoy your delicious S'Mores Hand Pies warm or at room temperature! For a flaky crust, use cold butter. Cold butter creates small pockets that make your crust light. Mix the butter into the flour until it looks like coarse crumbs. Don’t overwork the dough; this helps keep it tender. After mixing, chill the dough for 30 minutes. This step firms up the butter and helps the crust stay flaky when baked. To get that perfect gooey filling, use mini marshmallows and chocolate chips. These melt well inside the pie. Make sure to add a sprinkle of crushed graham crackers. They add texture and help absorb some of the liquid. Don’t overfill the pies; too much filling can spill out while baking. Just a few marshmallows, chocolate chips, and graham cracker crumbs will do. For a beautiful presentation, serve your hand pies warm. Place them on a rustic wooden board. Dust the tops with powdered sugar for a sweet touch. A side of melted chocolate for dipping adds a fun element. You can also arrange fresh berries around the pies. This adds color and freshness to your dish. Pro Tips Chill Your Dough: Make sure to keep your dough cold while working with it. This helps maintain a flaky texture in your hand pies. Use High-Quality Chocolate: Opt for semi-sweet chocolate chips from a reputable brand for a richer flavor in your filling. Experiment with Flavors: Try adding a pinch of cinnamon or a dash of sea salt to the filling for an extra depth of flavor. Serve with Dipping Sauce: Pair your hand pies with a side of melted chocolate or caramel for an indulgent treat. {{image_2}} You can switch up the chocolate for your S'Mores hand pies. Try dark chocolate for a rich flavor. Milk chocolate gives a sweeter taste. You can even use white chocolate for a creamy twist. Each type adds a unique touch to the pie. Have fun mixing and matching! Want to give your hand pies a boost? Consider adding some flavor add-ins. A dash of cinnamon can bring warmth and spice. You might also try a spoonful of peanut butter for creaminess. Want a fruity touch? Add some raspberry or strawberry jam inside. These add-ins will make your pies stand out. If you're looking for healthier options, I have some ideas for you. Use whole wheat flour instead of all-purpose flour. This adds fiber and nutrients. You can use natural sweeteners like honey or maple syrup in place of sugar. Swap out mini marshmallows for homemade, healthier versions. These changes keep the fun while making them more nutritious! To keep your S'Mores hand pies fresh, store them in an airtight container. This helps prevent them from drying out. Place a piece of parchment paper between layers if you stack them. Store at room temperature for up to two days. If you want them to last longer, refrigerate them. They can stay fresh for up to a week in the fridge. When you're ready to enjoy leftovers, reheat them in the oven. Preheat your oven to 350°F (175°C). Place the hand pies on a baking sheet and warm them for about 10 minutes. This keeps them crispy. You can also use a microwave for quick reheating, but they may lose some crispiness. Heat them for about 20 seconds, checking to avoid overheating. Freezing these treats is an easy way to save them for later. First, let the hand pies cool completely. Then, wrap each pie in plastic wrap. Place them in a freezer-safe bag or container. They can last up to three months in the freezer. When you’re ready to eat, thaw them in the fridge overnight. Then, reheat them as mentioned above for that fresh-baked taste. Yes, you can make the dough ahead of time. Prepare it and wrap it in plastic wrap. Chill it in the fridge for up to two days. This way, you can save time when you are ready to bake. Just roll it out when you want to make the hand pies. To prevent the filling from spilling out, don't overfill the pies. Use a small amount of mini marshmallows, chocolate chips, and graham crackers. Make sure to seal the edges well. Crimp them with a fork to ensure they are tight. This keeps the gooey filling inside while baking. You can serve S'Mores Hand Pies with melted chocolate for dipping. A scoop of vanilla ice cream goes well too. For a fun touch, add some fresh strawberries or raspberries. These sides make the dessert even more enjoyable and delicious. You learned how to make delicious S'Mores Hand Pies. We covered the ingredients, step-by-step prep, and baking. I shared tips for a flaky crust and gooey filling. You can even customize flavors and learn storage tips. Try new chocolate types or healthier options for fun twists. With what you know now, you'll create tasty treats and impress friends. Enjoy baking these pies and make tasty memories!

Get ready to indulge in a sweet treat that’s portable and fun! S’Mores hand pies combine classic flavors of chocolate, marshmallow, and graham crackers, all in a flaky crust. These …

Read more

Categories Desserts

Cheesy Pepperoni Pizza Roll Ups Tasty Snack Idea

November 11, 2025March 31, 2025 by Chef Luca
- 1 package of pizza dough (store-bought or homemade) - 1 cup shredded mozzarella cheese - 1 cup sliced pepperoni - 1/2 cup marinara sauce (for dipping) - 1 teaspoon garlic powder - 1 teaspoon Italian seasoning - 1 tablespoon olive oil - Cornmeal (for dusting) These ingredients come together to create a tasty treat. You can use store-bought pizza dough for easy prep. Or, if you like, make your own. The mozzarella cheese melts perfectly, adding a gooey texture. Pepperoni adds that classic pizza flavor. The garlic powder and Italian seasoning give it a lovely aroma. You will also need marinara sauce for dipping. This adds a nice touch to each bite. Olive oil helps the spices stick to the dough and gives it a nice sheen. Cornmeal helps prevent sticking and adds crunch to the bottom. Gather these ingredients, and you are ready to make Cheesy Pepperoni Pizza Roll Ups! {{ingredient_image_1}} 1. Preheat your oven to 400°F (200°C). This step gets the oven hot for nice, crispy roll-ups. 2. On a lightly floured surface, roll out the pizza dough into a rectangle. Aim for about ¼ inch thick. This thickness helps with even cooking. 3. Brush the entire surface of the dough with olive oil. This adds flavor and helps the spices stick. 4. Sprinkle garlic powder and Italian seasoning evenly over the dough. These spices add a great taste. 1. Layer the sliced pepperoni across the dough. Leave a small border around the edges to avoid spills. 2. Sprinkle the shredded mozzarella cheese evenly over the pepperoni. This cheese will melt and bind everything together. 3. Starting from one long side, carefully roll the dough tightly into a log shape. Pinch the edges to seal well. This helps keep the filling inside. 4. Cut the rolled dough into 1 to 1.5-inch sections. These are your individual pizza roll-ups. 1. Arrange the roll-ups on a baking sheet lined with parchment paper. Leave some space between each piece for even cooking. 2. Bake in the preheated oven for about 15-20 minutes. Look for a golden brown color and bubbly cheese. This shows they are done! To make perfect pizza roll-ups, start by preheating your oven to 400°F (200°C). This ensures even cooking and a golden color. - Roll the dough to about ¼ inch thick for the best texture. - Brush the dough with olive oil for flavor and crispiness. - Use garlic powder and Italian seasoning to enhance the taste. When rolling, start from one long side. Roll the dough tightly to keep the filling inside. Pinch the edges well to seal them. This step is key to avoid any leaks during baking. For dipping, choose a good marinara sauce. Some popular brands are Rao’s, Classico, and Prego. These offer great flavors that match well with your roll-ups. Pair your roll-ups with a fresh salad or a light drink like lemonade or soda. This makes a perfect snack or meal combo. One common mistake is overstuffing the roll-ups. Too much filling can cause them to explode in the oven. Stick to a light hand when adding pepperoni and cheese. Another mistake is not preheating the oven properly. If the oven isn’t hot enough, the roll-ups won’t cook evenly. Always check that the oven reaches 400°F before baking. Pro Tips Use Cold Dough: Chilling your pizza dough for about 30 minutes before rolling it out can make it easier to handle and shape. Don’t Overfill: While it’s tempting to stuff the roll-ups with more cheese and pepperoni, overfilling can cause them to burst while baking. Brush with Egg Wash: For an extra golden and glossy finish, brush the tops of the roll-ups with an egg wash (beaten egg with a splash of water) before baking. Experiment with Fillings: Feel free to get creative with your fillings! Try adding veggies like bell peppers or mushrooms, or switch up the cheese for a different flavor. {{image_2}} You can make cheesy pepperoni pizza roll-ups even better with different fillings. Here are some ideas: - Veggie options: Adding bell peppers or mushrooms can make these roll-ups tasty and colorful. Just chop them small and spread them on the dough. - Different cheeses: Try using cheddar or provolone instead of mozzarella. Each cheese brings a new flavor that can surprise your taste buds. If you need to avoid gluten or carbs, don't worry! There are easy swaps: - Using gluten-free pizza dough: Many stores sell good gluten-free dough. It works just like regular dough and tastes great. - Cauliflower crust variation: You can also use cauliflower crust for a low-carb choice. Just make sure to shape it well so it holds the filling. Make your roll-ups unique with some fun flavor changes. Here’s how: - Adding extra spices or sauces: A pinch of red pepper flakes or a drizzle of hot sauce can give your snack an extra kick. Mix in herbs like basil for fresh taste. - Experimenting with different meats: Swap out pepperoni for salami, ham, or even cooked sausage. Each meat adds its own yummy flavor to the roll-ups. These variations can help you create a snack that fits your taste and diet. Get creative and enjoy your cooking! To store your pizza roll-ups, let them cool first. Place them in an airtight container. You can keep them in the fridge for about 3 to 4 days. This keeps the flavors fresh and tasty. For best results, separate layers with parchment paper to avoid sticking. If you want to freeze pizza roll-ups, wrap them tightly in plastic wrap. Then place them in a freezer-safe bag. They can last up to 2 months in the freezer. To enjoy them later, thaw them in the fridge overnight. For reheating, bake in a preheated oven at 350°F (175°C) for about 10-15 minutes. This method keeps them nice and crispy. Fresh pizza roll-ups are warm and soft. The cheese is gooey, and the pepperoni is flavorful. When reheated, they can lose some of that fresh taste. To keep them tasting great, cover them with foil while reheating. This helps retain moisture and flavor. Enjoying them fresh is best, but reheating can still be delicious! If you want to switch up the dough, consider these options: - Puff pastry: This gives a flaky texture. - Flatbreads: Use naan or lavash for quick roll-ups. - Biscuits: Store-bought biscuit dough makes a tasty twist. - Cauliflower crust: A great low-carb choice, too! - Tortillas: Perfect for a fun, crunchy version. These substitutes can change the flavor and texture of your roll-ups. Each option adds its flair! Yes, you can prep these roll-ups in advance! Here’s how: - Assemble the roll-ups: Follow the recipe and cut them, but don’t bake yet. - Store them: Place them on a baking sheet and cover with plastic wrap. Refrigerate for up to 24 hours. - Freeze for later: You can also freeze them. Just wrap each roll-up in foil. When you’re ready to bake, pop them in the oven straight from the fridge or freezer. Add a few extra minutes to the baking time if they're frozen. To check if your roll-ups are ready, look for these signs: - Color: They should be golden brown. - Cheese: It should be bubbly and slightly crispy. - Sound: Gently tap one; it should feel firm. For a precise check, use a food thermometer. The inside should reach 165°F (74°C). Enjoy that cheesy goodness! Making pizza roll-ups is simple and fun. We covered all the steps, from gathering the right ingredients to baking the perfect roll-ups. You learned how to assemble them and avoid common mistakes. Don’t forget the tips for storage and reheating. In the end, this dish is versatile. You can customize it to fit your taste. Whether you prefer classic or gluten-free, pizza roll-ups are a tasty treat. Enjoy experimenting and sharing this dish with friends and family!

Are you craving a cheesy snack that’s easy to make and full of flavor? Look no further! My Cheesy Pepperoni Pizza Roll Ups are the perfect treat for any occasion. …

Read more

Categories Appetizers

Creamy Butter Chicken Flavorful Delight in Minutes

November 12, 2025March 29, 2025 by Chef Luca
To make creamy butter chicken, you need a few key items. Here’s your shopping list: - 1.5 lbs boneless chicken thighs, cut into bite-sized pieces - 1/2 cup plain yogurt - 2 tablespoons ginger-garlic paste - 2 tablespoons vegetable oil - 1 large onion, finely chopped - 1 can (14 oz) crushed tomatoes - 1 cup heavy cream - 2 tablespoons butter - Salt to taste - Fresh cilantro for garnish Spices bring your butter chicken to life. Here are the spices you will use: - 1 teaspoon ground cumin - 1 teaspoon ground coriander - 1 teaspoon garam masala - 1 teaspoon turmeric powder - 1 teaspoon red chili powder (adjust for spice level) These spices work together to create a warm, rich flavor. To enjoy your butter chicken, consider adding these sides: - Steamed basmati rice - Naan bread These options soak up the creamy sauce and complement the dish perfectly. Enjoy your meal! {{ingredient_image_1}} Start by taking 1.5 lbs of boneless chicken thighs. Cut them into bite-sized pieces. In a mixing bowl, add the chicken. Pour in 1/2 cup of plain yogurt and 2 tablespoons of ginger-garlic paste. Mix well until the chicken is coated. Cover the bowl and let it marinate for at least 30 minutes. For the best taste, marinate for 1-2 hours. Heat 2 tablespoons of vegetable oil in a large pan over medium heat. Add 1 large finely chopped onion. Sauté the onion until it turns golden brown and soft. This usually takes about 5-7 minutes. Next, stir in 1 teaspoon of ground cumin, 1 teaspoon of ground coriander, 1 teaspoon of garam masala, 1 teaspoon of turmeric powder, and 1 teaspoon of red chili powder. Cook the spices for about 2 minutes. This will bring out their rich flavors. Now, add the marinated chicken to the pan. Cook for 5-7 minutes, stirring occasionally. Ensure the chicken is no longer pink on the outside. Pour in one 14 oz can of crushed tomatoes and season with salt to taste. Bring the mixture to a simmer. Cover the pan and let it cook on low heat for about 15 minutes. After that, reduce the heat to low again. Pour in 1 cup of heavy cream while stirring gently. Let it simmer for an additional 10 minutes. This will make the sauce thick and creamy. Just before serving, stir in 2 tablespoons of butter until it melts. Adjust the seasoning if needed. Garnish with fresh cilantro and serve with steamed basmati rice or naan. To get the best flavor in your creamy butter chicken, marinate the chicken in yogurt. The yogurt adds tanginess and tenderizes the meat. Use ginger-garlic paste for a bold taste. Let the chicken sit for at least 30 minutes. For deeper flavor, aim for 1-2 hours. This step makes a big difference. Cook the chicken over medium heat. This helps it cook evenly and stay juicy. Stir the chicken often while it cooks. You want it to turn white, not brown. After adding the crushed tomatoes, let it simmer. This lets the flavors blend well. Finally, add the cream and butter on low heat. This makes the sauce rich and creamy. You can swap chicken thighs for breasts if you prefer. Just remember that breasts may dry out faster. For a lighter sauce, use half-and-half instead of heavy cream. Greek yogurt can replace plain yogurt. If you want less spice, reduce the red chili powder. Fresh cilantro adds a nice touch at the end. If you don’t have it, parsley works too. Pro Tips Marination Magic: Allowing the chicken to marinate for longer (up to 2 hours) will enhance the flavor and tenderness significantly. Perfectly Browned Onions: Ensure the onions are golden brown before adding spices; this step builds a deeper flavor base for your sauce. Spice Level Control: Adjust the red chili powder according to your spice preference; start with less and add more if needed. Richness Boost: Stirring in the butter just before serving elevates the creaminess of the dish, making it extra indulgent. {{image_2}} You can easily make a vegetarian version of butter chicken. Replace the chicken with paneer or tofu. These options soak up flavors well. You can follow the same steps in the recipe. Just marinate the paneer or tofu in yogurt and ginger-garlic paste. Sauté onions and spices as usual. Add crushed tomatoes and cream to make a rich sauce. The result is a creamy delight everyone will love! If you crave more heat, try the extra spicy butter chicken. Increase the red chili powder to suit your taste. You might also add fresh green chilies while cooking the onions. For an extra kick, include cayenne pepper. Just remember, spice can quickly become too much. Adjust slowly to find your perfect heat level. The extra heat brings a bold flavor to this dish. You can make healthy swaps for a lighter butter chicken. Use skinless chicken breasts instead of thighs to cut fat. Swap heavy cream for coconut milk or light cream. This keeps the dish creamy but reduces calories. Consider using less oil when sautéing onions. You can also add more veggies, like bell peppers or spinach, for extra nutrition. These changes keep the dish tasty yet healthier! After you enjoy your creamy butter chicken, store leftovers in an airtight container. Make sure to let it cool to room temperature first. Keep it in the fridge for up to three days. If you want to store it longer, consider freezing it. When reheating, do it slowly. Use a pan over low heat to warm it up. Add a splash of cream or water if the sauce is too thick. Stir it well to keep the flavors rich and creamy. You can also microwave it, but use short bursts to avoid drying it out. If you plan to freeze your creamy butter chicken, here are some tips to follow: - Do let it cool completely before freezing. - Do use a freezer-friendly container or bag. - Don't freeze it with rice or naan. They don’t freeze well. - Don't keep it in the freezer for more than three months. When you're ready to eat, thaw it overnight in the fridge. Reheat as mentioned above for the best flavor. Butter Chicken, also known as Murgh Makhani, comes from India. It started in the 1950s at the Moti Mahal restaurant in Delhi. The chefs made it to use leftover chicken. They mixed it with a rich, creamy sauce. Soon, it became very popular. People loved the flavors. Now, Butter Chicken is a favorite dish worldwide. Yes, you can use chicken breasts. They will work well in this dish. However, chicken thighs keep more moisture. This makes the dish richer. Breasts can dry out if cooked too long. If you use breasts, cook them carefully. They should be juicy and tender. Creamy Butter Chicken can be mild to spicy. It depends on how much red chili powder you add. The recipe calls for one teaspoon, but you can adjust it. If you want less heat, use less chili powder. For more spice, add more. Taste as you go to find your perfect level. Butter chicken is a rich dish made with tender chicken and creamy sauce. We learned about its key ingredients, spices, and side dishes. The steps include marinating, cooking, and simmering to create the perfect meal. I shared tips for the best flavor and cooking techniques, plus some delicious variations. You can also store leftovers and reheat them well. Now you have all you need to make this dish special. Enjoy your cooking and delight your taste buds with this creamy classic!

Are you ready to dive into a dish that’s a true crowd-pleaser? My Creamy Butter Chicken recipe brings you rich flavors in just minutes. With easy-to-follow steps, you’ll create a …

Read more

Categories Dinner

Chicken and Broccoli Alfredo Bake Flavorful Dinner Dish

November 11, 2025March 28, 2025 by Chef Luca
To make a tasty Chicken and Broccoli Alfredo Bake, you need some key ingredients. Here’s what you should gather: - 2 cups cooked rotini pasta - 1 pound boneless, skinless chicken breasts, diced - 2 cups fresh broccoli florets - 2 tablespoons olive oil - 3 cloves garlic, minced - 2 cups Alfredo sauce (you can buy it or make your own) - 1 cup shredded mozzarella cheese - 1/2 cup grated Parmesan cheese - Salt and pepper to taste - 1 teaspoon Italian seasoning These items create the base for this creamy, cheesy dish that you will love. You can add a few optional items to boost the taste even more: - 1/4 cup breadcrumbs (for a crispy topping) - Fresh chopped parsley or basil (for garnish) These additions can give your dish a fun twist, adding texture and color. You may want to adjust some ingredients based on your taste or what you have at home. Here are some common swaps: - You can use any pasta shape you love, like penne or fusilli. - For a leaner meal, you can swap chicken for turkey or tofu. - If you want more veggies, add bell peppers, spinach, or carrots. These changes can help you create a dish that fits your preferences and pantry. {{ingredient_image_1}} First, preheat your oven to 350°F (175°C). This step is key for even baking. While the oven heats, prepare the broccoli. In a large pot, bring water to a boil. Add salt to the water. Once it boils, add the fresh broccoli florets. Blanch them for 2-3 minutes. You want them bright green and tender-crisp. After that, drain the broccoli and set it aside. Next, we cook the chicken. In the same pot, add 2 tablespoons of olive oil. Heat it over medium heat. Add the diced chicken and sauté for about 6-8 minutes. Cook until the chicken is no longer pink. This gives it a nice flavor. After the chicken is cooked, add 3 minced garlic cloves. Sauté for one more minute. The garlic will smell great! Season with salt, pepper, and 1 teaspoon of Italian seasoning. This adds depth to the dish. Now, it's time to mix everything together. Stir in the cooked rotini pasta and the blanched broccoli. Pour in 2 cups of Alfredo sauce. Mix well until everything is coated in sauce. This step makes the dish rich and creamy. Transfer the mixture to a greased 9x13 inch baking dish. Next, sprinkle 1 cup of shredded mozzarella cheese on top. Add 1/2 cup of grated Parmesan cheese as well. For extra crunch, sprinkle 1/4 cup of breadcrumbs on top, if desired. Bake in the oven for 25-30 minutes. Look for bubbly and golden cheese as a sign it's done. Once baked, let it cool for a few minutes before serving. Enjoy your flavorful Chicken and Broccoli Alfredo Bake! To make the best Alfredo sauce, you can use store-bought or homemade. I like to use fresh ingredients for rich flavor. If you go with homemade, use heavy cream, butter, and cheese. Cook the sauce over low heat. Stir it often to keep it smooth. For added depth, try mixing in garlic or herbs. This makes the sauce special and tasty. To keep broccoli crisp, blanch it quickly. Boil water and add salt first. Cook the broccoli for just 2-3 minutes. It should be bright green and tender-crisp. After cooking, drain and rinse it in cold water. This stops the cooking process. You want it to stay firm in the bake. When layering the bake, start with the pasta and sauce mix. Spread it evenly in the dish. Next, add the broccoli and chicken. Make sure they are well-distributed. This helps every bite have good flavor. Finally, top it with cheese and breadcrumbs. This adds a nice crunch and a cheesy finish. Pro Tips Cook Chicken Thoroughly: Ensure the chicken is cooked until it reaches an internal temperature of 165°F (75°C) for food safety. Customize Your Veggies: Feel free to add other vegetables such as bell peppers or spinach for added flavor and nutrition. Make It Ahead: Prepare the dish in advance, cover it, and refrigerate. Just pop it in the oven when you're ready to serve. Perfect the Cheese Top: For an extra crispy topping, broil the bake for a few minutes after baking to achieve a golden brown crust. {{image_2}} You can make this dish healthier. For a low-carb version, swap the rotini pasta for zucchini noodles. This keeps the meal light and fresh. For a gluten-free option, use gluten-free pasta. There are many good brands available now. Check the package to ensure it fits your needs. You can also try a cauliflower mash instead of pasta. It gives a nice texture and flavor. You can change the cheeses to fit your taste. Instead of mozzarella, use gouda for a smoky flavor. Cheddar also works great for a sharper taste. If you want more veggies, try adding bell peppers or spinach. Both add color and nutrients. You can even mix in some mushrooms for an earthy taste. Have fun with different combinations! Adding herbs or spices can really change your dish. Fresh basil or parsley adds a bright flavor. You can sprinkle them on top right before serving. For a little heat, add red pepper flakes. If you enjoy Italian flavors, use more Italian seasoning. A squeeze of lemon juice can also brighten the entire dish. Don’t be afraid to experiment with what you love! To keep your Chicken and Broccoli Alfredo Bake fresh, let it cool first. Once cooled, place it in an airtight container. It will last in the fridge for about three to four days. Make sure to label the container with the date. If you have more leftovers, consider dividing them into smaller portions. This way, you can grab a serving easily. For the best taste, reheat your Chicken and Broccoli Alfredo Bake in the oven. Preheat your oven to 350°F (175°C). Place the dish in the oven for about 15-20 minutes. Cover it with foil to keep it moist. You can also reheat it in the microwave. Use a microwave-safe dish and cover it loosely. Heat it in one-minute bursts until it's hot all the way through. If you want to keep it longer, you can freeze the bake. First, let it cool completely. Then, wrap it tightly in plastic wrap and foil. This helps prevent freezer burn. It can last for up to three months in the freezer. When you are ready to eat, thaw it overnight in the fridge. Then, reheat it in the oven for a delicious meal. Yes, you can use different types of pasta. Rotini works well, but so do penne or fusilli. Choose a pasta shape that holds sauce well. This way, each bite tastes great. To make this dish vegetarian, replace chicken with more veggies. You can add mushrooms, bell peppers, or zucchini. Use vegetable broth in place of any chicken broth. This keeps the flavor rich without meat. To reheat, use an oven for even heating. Preheat to 350°F (175°C). Place the bake in a dish, cover with foil, and heat for about 15-20 minutes. This keeps it moist and cheesy. You can also use a microwave, but check often to avoid drying it out. This blog post covered how to make a delicious Chicken and Broccoli Alfredo Bake. You learned about essential and optional ingredients, with tips for perfect sauce and avoiding mushy broccoli. We also discussed various healthy alternatives and how to store and reheat leftovers. Cooking can be simple and fun. With these steps, you can enjoy a tasty meal any time!

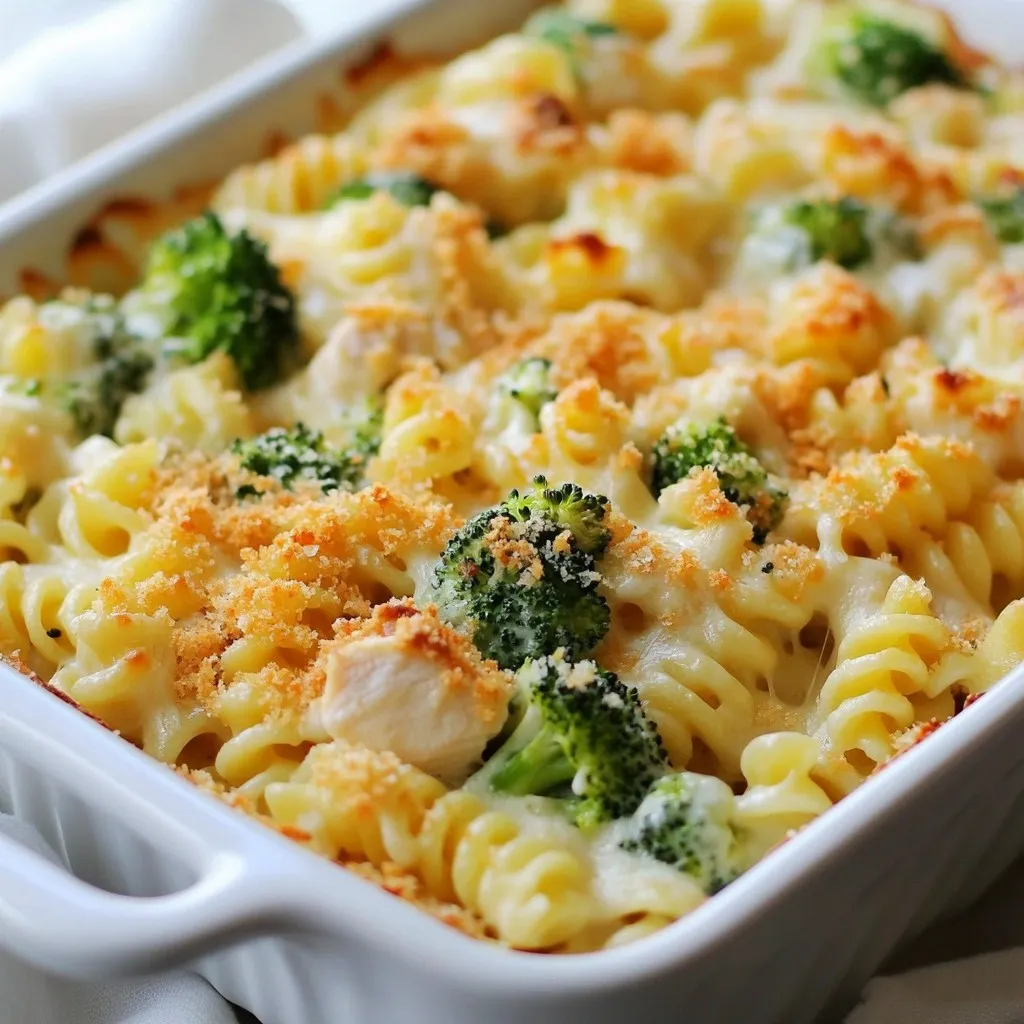
Looking for a simple yet delicious dinner? Your search ends here! My Chicken and Broccoli Alfredo Bake combines tender chicken, fresh broccoli, and creamy Alfredo sauce in a warm, cheesy …

Read more

Categories Dinner

Savory One-Pot Garlic Parmesan Chicken Pasta Recipe

January 4, 2026March 24, 2025 by Chef Luca
- 2 tablespoons olive oil - 1 pound boneless, skinless chicken breasts, cut into bite-sized pieces - 4 cloves garlic, minced - 1 teaspoon Italian seasoning - Salt and pepper to taste - 8 ounces uncooked penne pasta - 3 cups chicken broth - 1 cup heavy cream - 1 cup grated Parmesan cheese - 1 cup fresh spinach, roughly chopped - 1/2 cup sun-dried tomatoes, chopped (optional) - Fresh parsley for garnish I love using fresh ingredients for this dish. The olive oil gives a great base. Chicken breasts add protein and flavor. Minced garlic brings a strong, lovely aroma. Italian seasoning makes this dish sing. Penne pasta cooks well and absorbs all the tasty broth. Chicken broth is key for flavor. Heavy cream creates a rich sauce. Grated Parmesan cheese adds depth. Spinach adds color and nutrients. If you like, add sun-dried tomatoes for a sweet touch. Fresh parsley gives a nice finish. Gather these ingredients, and you are ready to cook a delicious meal! {{ingredient_image_1}} First, heat 2 tablespoons of olive oil in a large pot over medium heat. Add 1 pound of boneless, skinless chicken breasts, cut into bite-sized pieces. Season the chicken with 1 teaspoon of Italian seasoning, salt, and pepper to taste. Cook for about 5 to 7 minutes. The chicken should turn golden brown. Make sure to stir it often for even cooking. Next, add 4 cloves of minced garlic to the pot. Sauté the garlic for about one minute until it smells amazing. This step adds depth to your dish and makes it extra tasty. Now, pour in 3 cups of chicken broth and bring it to a simmer. Add 8 ounces of uncooked penne pasta to the pot. Stir well to ensure the pasta is fully submerged in the broth. Cover the pot and cook for about 10 to 12 minutes. The pasta should be tender and absorb most of the broth. Stir occasionally to keep it from sticking. Once the pasta is cooked, lower the heat. Mix in 1 cup of heavy cream and 1 cup of grated Parmesan cheese. Stir until the cheese melts and the sauce becomes creamy. This step is key for that rich and comforting flavor. Gently fold in 1 cup of roughly chopped fresh spinach. If you like, you can also add 1/2 cup of chopped sun-dried tomatoes. Cook for another 2 to 3 minutes until the spinach wilts. Taste your dish and adjust the seasoning if needed. Add more salt or pepper to your liking. To prevent sticking, stir the pasta often as it cooks. This keeps it loose and helps it absorb the flavors. Timing is key for perfect pasta texture. Cook it until it's al dente, meaning it should still have a slight bite. This usually takes about 10-12 minutes. If you want a lighter dish, use half-and-half instead of heavy cream. You can also try plain yogurt for a tangy twist. For pasta shapes, penne works great, but you can use rotini or farfalle too. Each shape holds the sauce well and adds variety. To complement this meal, serve a simple salad or garlic bread. A fresh green salad adds crunch. For garnishing, sprinkle fresh parsley on top. You can also add extra grated Parmesan for a richer taste. This makes the dish look great too! Pro Tips Cook Chicken to Perfection: Ensure your chicken pieces are cut uniformly for even cooking. This helps them brown nicely and cook through at the same time. Don't Skip the Garlic: Sauté the garlic until it's just fragrant to avoid bitterness. Adding it too early can lead to burnt flavors. Stir Occasionally: Stir the pasta occasionally while cooking to prevent it from sticking together and ensure it absorbs all the flavors from the broth. Use Fresh Ingredients: Fresh spinach and high-quality Parmesan cheese can elevate the dish significantly, providing better flavor and texture. {{image_2}} You can switch up the protein in this dish easily. Shrimp adds a nice twist. Just sauté it until pink and then follow the same steps. Sausage is another great choice. Slice it up and brown it before adding garlic. If you want a vegetarian option, use firm tofu. Cut the tofu into cubes and pan-fry until golden. This will give you a tasty and hearty meal. To boost flavor, add herbs like thyme or basil. You can also use spices like red pepper flakes for heat. Try mixing in different cheeses. A creamy goat cheese or tangy feta can change the whole dish. Experimenting with flavors keeps the meal exciting. Fresh veggies are a great way to make this dish seasonal. In spring, add asparagus or peas. In summer, try zucchini or bell peppers. For fall, roasted butternut squash works well. During the holidays, consider adding cranberries or nuts for a festive touch. These fresh ingredients can brighten up your pasta and make it special for any occasion. To keep your One-Pot Garlic Parmesan Chicken Pasta fresh, store it in an airtight container. Before sealing, let the pasta cool to room temperature. This helps avoid moisture build-up. The pasta lasts about 3-5 days in the fridge. Always check for any off smells before eating. You can freeze this dish for later use. First, let it cool completely. Then, scoop out servings into freezer-safe containers. Leave some space at the top for expansion. This pasta can last about 2-3 months in the freezer. I recommend using glass containers or heavy-duty freezer bags to prevent freezer burn. When you’re ready to enjoy your frozen pasta, the best way to reheat it is on the stove. Add a little water or broth to the pot. Heat it gently over medium heat. Stir often to keep it moist. If you microwave, use a microwave-safe dish and cover it to trap steam. This prevents your dish from drying out. Enjoy your creamy pasta just as good as the first time! Yes, you can prep some parts ahead. Cook the chicken and store it in the fridge. You can also chop the garlic and spinach in advance. Just keep the pasta and sauce separate until you’re ready to eat. This way, the pasta stays fresh and does not get mushy. This recipe is not gluten-free as it uses penne pasta. However, you can use gluten-free pasta instead. Many brands offer tasty gluten-free options. Just cook it as directed on the package. Adjust the cooking time to ensure it stays firm and not mushy. Absolutely! You can add a variety of veggies. Consider bell peppers, broccoli, or zucchini. Just chop them small and toss them in with the chicken. This adds color and nutrients. You can even use frozen veggies for convenience. This blog post covers a delicious pasta dish perfect for any meal. We discussed key ingredients like chicken, garlic, and spinach. I shared step-by-step cooking instructions to guide you through each phase easily. You learned tips on cooking, ingredient swaps, and serving suggestions to enhance your meal. Plus, I offered creative variations and storage advice. Remember, cooking should be fun! Experiment and make this dish your own. Enjoy making it again and again!

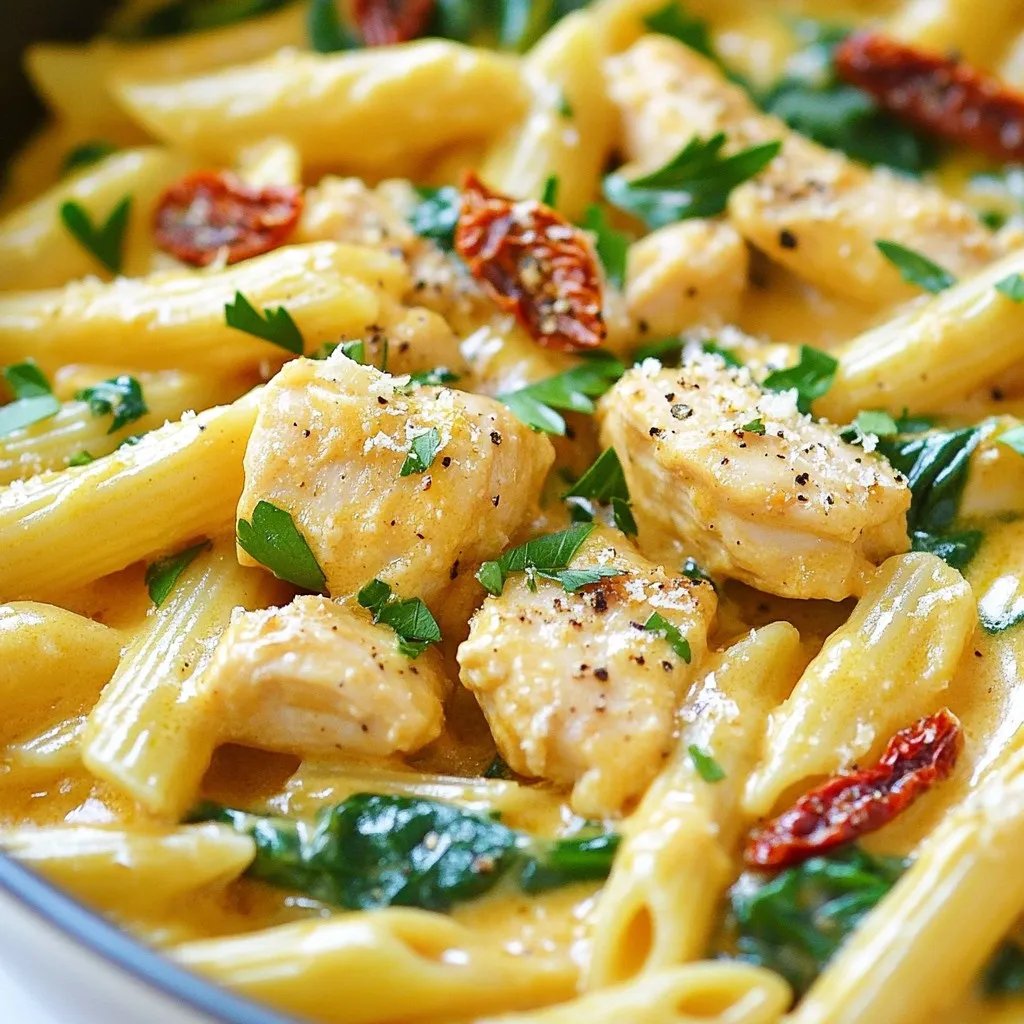
Looking for a simple, hearty dish that delights the taste buds? Try this Savory One-Pot Garlic Parmesan Chicken Pasta! With just one pot, you’ll create a creamy, flavorful meal packed …

Read more

Categories Dinner

Philly Cheesesteak Gordon Ramsay Style Bold Flavor Dish

November 11, 2025March 23, 2025 by Chef Luca
- 1 lb flank steak, thinly sliced - 2 tablespoons olive oil - 1 medium onion, thinly sliced - 1 medium green bell pepper, thinly sliced - 4 slices provolone cheese (or cheese of your choice) - 4 hoagie rolls - 1 teaspoon garlic powder - 1 tablespoon Worcestershire sauce (optional) - Salt and pepper to taste - Fresh parsley, chopped - Additional cheese choices When creating a Philly cheesesteak, I focus on bold flavors. Start with flank steak. It’s perfect for this dish. Slice it thinly. This makes it tender and easy to cook. Use olive oil to sauté the veggies. I like mixing onions and bell peppers. Their sweetness pairs well with the beef. Olive oil adds a nice touch. Cheese is key. Provolone melts beautifully. You can also try other cheeses, like cheese whiz or mozzarella. Don’t forget the hoagie rolls! They should be soft yet sturdy. The rolls hold all the goodness inside. Seasonings bring everything together. Garlic powder enhances the flavor. Worcestershire sauce adds depth. Don’t skip salt and pepper. They balance the dish. For garnishing, I love fresh parsley. It adds color and freshness. You can also sprinkle more cheese on top for extra flavor. With these ingredients, you’re set to make a delicious Philly cheesesteak Gordon Ramsay style! {{ingredient_image_1}} Start by marinating the flank steak. In a bowl, mix the thinly sliced steak with garlic powder, salt, pepper, and Worcestershire sauce if you want extra flavor. Let this sit for about 15-20 minutes. This will help the steak soak up all those tasty spices. When it’s time to cook, heat a skillet over high heat. Add one tablespoon of olive oil. Once hot, add the marinated steak. Cook for 2-3 minutes, stirring often, until it’s browned and reaches your preferred doneness. Remember, you want it juicy and tender. While the steak marinates, slice your onion and green bell pepper. After that, it’s time to sauté. In the same skillet, heat the last tablespoon of olive oil over medium heat. Add the sliced onion and bell pepper. Cook for 5-7 minutes until they soften and caramelize. This makes them sweet and adds great flavor. To get the best caramelization, don’t rush this step. Let them cook until they have a nice golden color. This will add depth to your cheesesteak. Now, let’s bring it all together. Add the cooked vegetables back into the skillet with the steak. Mix everything well and cook for an extra minute. This helps all the flavors combine. Next, place your cheese slices on top of the steak and veggies. Cover the skillet with a lid. This will help the cheese melt perfectly in just 1-2 minutes. It should be gooey and delicious. Once the cheese is melted, you’re ready to assemble your Philly cheesesteaks! For a great Philly cheesesteak, flank steak is the best choice. It is tender and flavorful. You want to slice it thin for the best bite. A sharp knife helps you cut against the grain. This keeps the meat tender and juicy. To boost the taste, use garlic powder, salt, and pepper. These classic seasonings add depth. You can also use Worcestershire sauce for extra umami. Mix the seasonings into the meat while marinating. This gives the flavors time to soak in. Layering the sautéed onions and bell peppers with the steak adds complexity. When serving, choose a long hoagie roll. This lets you stuff it full with your cheesy filling. Toasting the rolls gives them a nice crunch. For plating, you can sprinkle chopped parsley on top. This adds a pop of color and freshness. Serve with a side of chips or a simple salad for a full meal. Pro Tips Slice Against the Grain: For the most tender slices, make sure to cut the flank steak against the grain. This helps break down the fibers, resulting in a more enjoyable texture. Choose the Right Cheese: While provolone is traditional, adding a mix of cheeses like mozzarella or cheddar can elevate the flavor profile of your cheesesteak. Don’t Skip the Toast: Lightly toasting the hoagie rolls adds a delightful crunch and prevents them from becoming soggy once filled with the steak and cheese mixture. Experiment with Toppings: Customize your cheesesteak by adding toppings like jalapeños, mushrooms, or hot peppers for an extra kick of flavor. {{image_2}} You can choose many cheeses for your Philly cheesesteak. Provolone is classic, but there are great alternatives. You might try mozzarella for a milder taste. Cheddar adds a sharp flavor that many love. Swiss cheese melts nicely and adds a nutty taste. Mix cheeses for fun flavors. Combining provolone and cheddar gives a rich, creamy bite. Enhance your cheesesteak with tasty toppings. Mushrooms bring an earthy flavor. Sliced jalapeños add heat for spice lovers. Sweet peppers can balance the savory taste. Try adding crispy bacon for extra crunch. You can also layer on fresh herbs like basil or cilantro for freshness. Adjust spice levels by adding hot sauce or pepper flakes. You can cook your cheesesteak in different ways. Grilling gives a smoky flavor that many enjoy. Use a cast-iron grill pan for great results. Stovetop cooking is quick and easy. It allows you to control the heat well. For a slow cooker, combine ingredients and let them simmer. This method makes the meat super tender and flavorful. To keep your Philly cheesesteak fresh, follow these tips: - Refrigeration: Cool leftovers to room temperature before storing. - Containers: Use airtight containers to prevent moisture loss. Glass or plastic works well. To reheat without losing flavor, consider these methods: - Skillet Method: Heat a skillet over medium heat. Add a splash of water and cover. This helps steam the meat. - Microwave: Use a microwave-safe dish. Add a damp paper towel over the cheesesteak. Heat in short bursts to avoid sogginess. You can freeze Philly cheesesteaks for later. Here’s how: - Freezing: Wrap each cheesesteak tightly in foil or plastic wrap. Place in a freezer bag to protect from freezer burn. - Thawing and Reheating: Thaw in the fridge overnight. Reheat in the oven for better texture. Aim for a warm, crispy roll. The best cheese for Philly cheesesteaks is provolone. It melts well and adds a rich flavor. Some people prefer Cheez Whiz for a creamier texture. Others like American cheese for its smoothness. You can mix cheeses for a unique taste. Just remember, the key is to choose a cheese that melts nicely. Yes, you can use chicken or turkey. Thinly sliced chicken breast or turkey works well. These alternatives can be just as tasty if seasoned right. Adjust the cooking time as needed. Chicken or turkey offers a lighter option while keeping the same great flavors. To make a healthier Philly cheesesteak, use leaner cuts of meat. Flank steak is a good choice, or try turkey. Load up on veggies like peppers and onions. You can use whole-grain rolls for added fiber. Limit cheese or choose lower-fat options to cut calories. The best bread for cheesesteaks is a hoagie roll. It’s soft yet sturdy enough to hold the filling. Look for rolls that are fresh and slightly crusty. You can also use Italian bread or Amoroso rolls for an authentic taste. The right bread enhances the overall experience. In this blog post, we explored how to create a delicious Philly cheesesteak. We covered key ingredients like flank steak, cheese, and hoagie rolls. I shared step-by-step cooking instructions and tips for perfecting flavors and textures. You can also customize your cheesesteak with various cheeses and toppings. These insights should help you make an amazing meal. Enjoy experimenting with recipes and personal touches. A tasty cheesesteak awaits!

If you crave bold, mouthwatering flavors, you’re in for a treat. I’m excited to share my Gordon Ramsay-style Philly cheesesteak recipe. This dish combines juicy flank steak, melty provolone, and …

Read more

Categories Dinner

Healthy Chicken Pot Pie Simple and Tasty Recipe

November 11, 2025March 22, 2025 by Chef Luca
- 2 cups cooked chicken, shredded - 1 cup carrots, diced - 1 cup peas (fresh or frozen) - 1 cup celery, diced - 1 medium onion, chopped - 3 cups low-sodium chicken broth - 1/2 cup plain Greek yogurt - 1/4 cup whole wheat flour - 1 teaspoon garlic powder - 1 teaspoon thyme - 1/2 teaspoon black pepper - 1 tablespoon olive oil - 1 pre-made whole grain pie crust or phyllo dough - 1 egg (for egg wash, optional) - Chicken: Great protein source. It helps build muscles and keeps you full. - Carrots: High in beta-carotene. This helps with vision and boosts immunity. - Peas: Packed with vitamins. They provide fiber and aid digestion. - Celery: Low in calories. It adds crunch and helps hydrate your body. - Onion: Rich in antioxidants. They support heart health and add flavor. - Chicken broth: Low-sodium options reduce salt intake. It adds a savory base. - Greek yogurt: Adds creaminess and protein. It also has probiotics for gut health. - Whole wheat flour: Provides fiber and is more nutritious than white flour. - Garlic powder: Known for its health benefits. It can boost your immune system. - Thyme: Adds flavor and has anti-inflammatory properties. - Black pepper: Helps digestion and adds a mild heat. - Olive oil: Heart-healthy fat. It can lower bad cholesterol levels. - Whole grain pie crust: Contains more fiber than regular crusts. - Egg: Adds shine and color to the crust when used for egg wash. - For chicken, use turkey or tofu for a different protein. - Replace Greek yogurt with silken tofu for a dairy-free option. - Use vegetable broth instead of chicken broth for a vegetarian dish. - If you dislike onions, try leeks or omit them entirely. - Swap whole wheat flour with almond flour for a gluten-free option. - For those avoiding peas, use corn or green beans as a substitute. - If you want a lighter crust, use phyllo dough instead of pie crust. {{ingredient_image_1}} Start by preheating your oven to 375°F (190°C). In a large skillet, add one tablespoon of olive oil. Heat it over medium heat until warm. Next, add one chopped onion, one cup of diced carrots, and one cup of diced celery. Sauté the veggies for about 5-7 minutes until they soften. This step builds flavor. Next, stir in one teaspoon of garlic powder, one teaspoon of thyme, and half a teaspoon of black pepper. Cook for one more minute to blend the spices. Now, sprinkle a quarter cup of whole wheat flour over the veggies. Mix well to coat everything. Cook for another minute. This helps to thicken the filling later. Slowly pour in three cups of low-sodium chicken broth while stirring. This will help avoid lumps. Bring the mixture to a simmer and let it thicken for about 5-10 minutes. Once thickened, take it off the heat. Stir in two cups of shredded chicken and one cup of peas. Lastly, add half a cup of plain Greek yogurt. Make sure everything is well combined. Now, roll out your pre-made whole grain pie crust. Place it into a pie dish. Pour the chicken filling into the crust. If you choose to use phyllo dough, layer several sheets on top, brushing each with a little olive oil. If you have extra pie crust, cover the filling with another layer. Seal the edges and cut a few slits on top to let steam escape. If you want a golden finish, beat one egg and brush it over the top crust. Place the pot pie in the preheated oven. Bake it for 25-30 minutes or until the crust is golden brown. This will give your pot pie a lovely color and texture. Once done, let it cool for a few minutes before serving. This helps the filling set and makes it easier to slice. For a nice touch, serve slices on plates with a sprinkle of fresh parsley. Enjoy your delicious and healthy chicken pot pie! To keep the filling moist, use low-sodium chicken broth. The broth adds flavor and moisture. Greek yogurt also helps. It makes the filling creamy and rich. Stir it in after you thicken the mix. Avoid cooking it too long. Overcooking can dry out your filling. For a flaky crust, use whole grain pie crust or phyllo dough. These options add fiber. If using phyllo, layer it well. Brush each layer with olive oil for crispiness. Make sure to cut slits in the top. This lets steam escape and helps the crust stay flaky. You can reduce calories by using less oil. Instead of frying, try steaming or sautéing. Use less chicken and add more veggies. This keeps the dish light and healthy. You can also skip the egg wash on top. It will still taste great without it! Pro Tips Use Leftover Chicken: This recipe is perfect for using leftover rotisserie chicken, saving time and adding flavor. Customize Your Veggies: Feel free to add other vegetables like corn or green beans for additional flavor and nutrition. Make It Ahead: You can prepare the filling a day in advance and assemble the pie right before baking for a quick meal. Experiment with Spices: Add a pinch of nutmeg or a dash of cayenne pepper to the filling for a unique flavor twist. {{image_2}} You can easily make a vegetarian pot pie. Just swap the chicken for hearty veggies. Use mushrooms, zucchini, and bell peppers for a rich taste. For a vegan version, replace Greek yogurt with coconut yogurt. This adds creaminess without dairy. You can also use vegetable broth instead of chicken broth. Chicken is great, but you can try other proteins. Turkey works well and has a similar flavor. For a plant-based option, tofu is a fantastic choice. Press and cube the tofu, then sauté it until golden. This adds a nice texture and flavor to your pot pie. Herbs and spices can transform your dish. Fresh herbs like parsley or basil add brightness. You can also try adding a pinch of nutmeg for warmth. If you like heat, sprinkle in some cayenne pepper. This gives your pot pie a fun twist! To store leftovers, wait until the chicken pot pie cools down. Use an airtight container. You can keep it in the fridge for up to three days. Make sure to seal it well to keep it fresh. If you have extra filling, store it separately. When you want to reheat your chicken pot pie, preheat your oven to 350°F (175°C). Place the pie on a baking sheet. Bake for about 15 to 20 minutes. This will warm it through and keep the crust crisp. If you use a microwave, heat it in short bursts. Check often to avoid soggy crusts. Freezing is a great option for meal prep. To freeze, let the pie cool completely. Wrap it tightly in plastic wrap, then in foil. This helps prevent freezer burn. You can freeze the pot pie for up to three months. When ready to eat, thaw it overnight in the fridge. Then, bake it at 350°F (175°C) until hot. Yes, you can use a store-bought pie crust. It saves time and effort. Look for whole grain options for a healthier choice. Follow the package instructions for best results. This way, you can focus on making the filling taste great. To make this recipe gluten-free, choose a gluten-free pie crust. You can also swap whole wheat flour with a gluten-free flour blend. Make sure the broth and Greek yogurt are gluten-free too. This keeps your dish tasty and friendly for those with gluten allergies. Serve your chicken pot pie with a fresh salad. A simple green salad with vinaigrette works well. You can also pair it with steamed vegetables or a light soup. These sides balance the meal and add more nutrients. This blog post covered how to make a tasty, healthy pot pie. We explored its key ingredients and their benefits. I shared simple steps for preparing the filling and baking. Tips for keeping it moist and making a flaky crust were also given. You can try different proteins and flavors for variety. Finally, I included storage tips to save leftovers. You now have everything you need to enjoy a delicious pot pie that suits your tastes and needs.

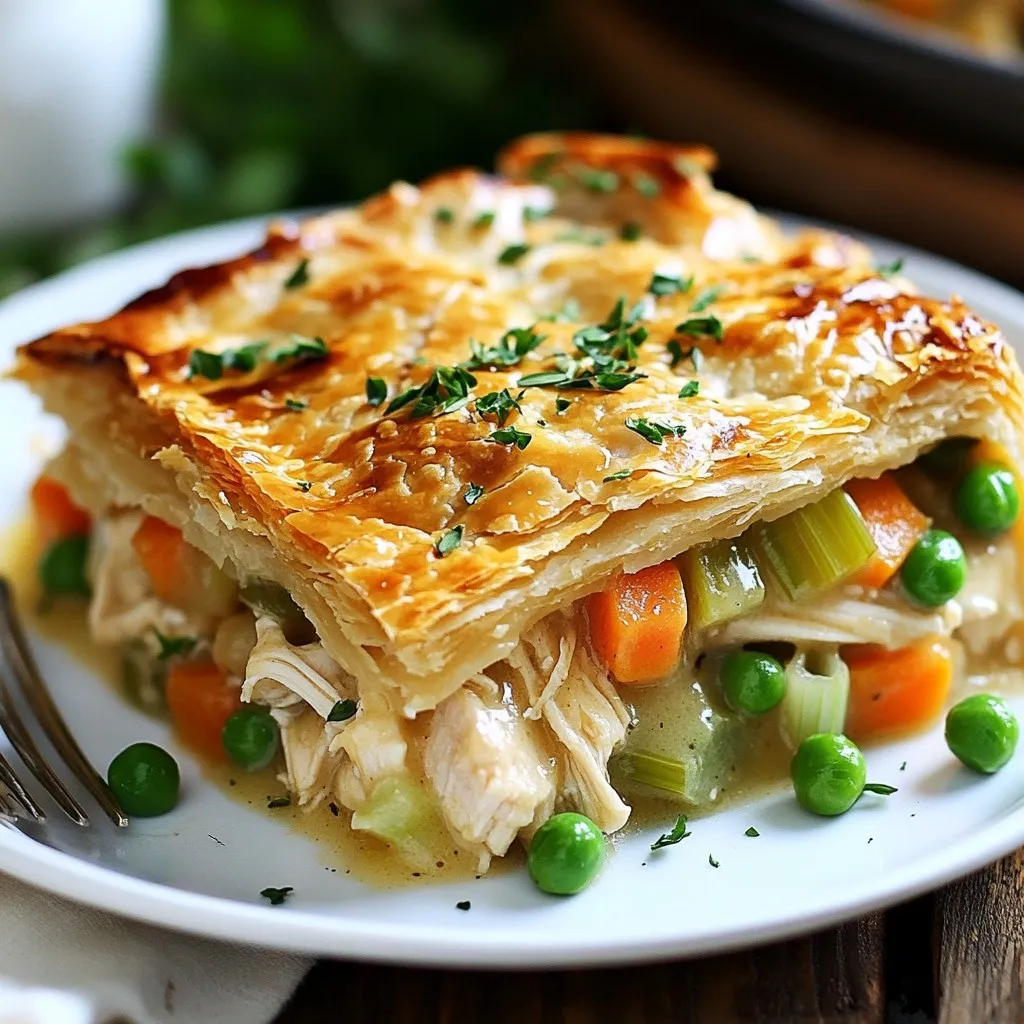
Looking for a healthy twist on a classic comfort food? This simple and tasty Chicken Pot Pie recipe is your answer! Packed with wholesome ingredients, it delivers flavor without the …

Read more

Categories Dinner

Italian Grinder Sliders Delightful and Easy Recipe

January 9, 2026March 19, 2025 by Chef Luca
- 1 lb ground beef - 1 lb Italian sausage, casing removed - 1 small onion, finely chopped - 2 cloves garlic, minced - 1 cup marinara sauce For these sliders, I use two types of meat. The ground beef adds heartiness, while the Italian sausage gives it a nice spice. Next, I chop a small onion and mince two cloves of garlic. These will add great flavor to the dish. Then, I include a cup of marinara sauce to bind it all together and add richness. - 1 cup shredded mozzarella cheese - 1/2 cup grated Parmesan cheese - 12 slider buns Cheese makes this dish extra yummy. I use a cup of shredded mozzarella for its meltiness and a half-cup of grated Parmesan for depth. Slider buns are the vessel for all this deliciousness. They should be soft and fresh. - 1 teaspoon dried oregano - 1 teaspoon Italian seasoning - 1/2 teaspoon red pepper flakes (optional, for heat) Herbs and spices are key to flavor. I sprinkle in a teaspoon of dried oregano and Italian seasoning. If you like heat, add red pepper flakes. They give the sliders a nice kick. {{ingredient_image_1}} 1. Start by heating a large skillet on medium heat. 2. Add 1 lb of ground beef and 1 lb of Italian sausage to the skillet. 3. Cook the meat for about 8-10 minutes. Break it up with a wooden spoon as it cooks. 4. Once the meat is browned, add 1 small chopped onion and 2 minced garlic cloves. 5. Sauté for 3-4 minutes until the onion is soft. 1. Now, add 1 teaspoon of dried oregano, 1 teaspoon of Italian seasoning, and 1/2 teaspoon of red pepper flakes if you like heat. 2. Cook for 1 minute to let the spices bloom. 3. Pour in 1 cup of marinara sauce. Stir to mix everything well. 4. Let the mixture simmer for about 5 minutes. This helps all the flavors come together. 1. Preheat your oven to 375°F (190°C). 2. Slice the slider buns in half. Place the bottom halves in a baking dish. 3. Spoon the meat mixture over the bottom buns. Spread it evenly. 4. Sprinkle 1 cup of shredded mozzarella cheese and 1/2 cup of grated Parmesan cheese on top of the meat. 5. Place the top halves of the buns over the cheese and press down gently. 1. Cover the baking dish with aluminum foil. 2. Bake for 15 minutes. 3. After 15 minutes, remove the foil and bake for an additional 10 minutes. 4. Look for golden tops and bubbly cheese. 5. Once done, let them cool for a few minutes. Garnish with fresh basil leaves before serving. To make the best Italian Grinder Sliders, cook your meat well. Heat the skillet to medium and mix the ground beef and Italian sausage. Break up clumps as you cook for about 8-10 minutes. This ensures the meat is fully browned. Simmering is key for flavor. After adding marinara sauce, let the mixture simmer for 5 minutes. This step blends all the flavors together. Blooming your spices makes a huge difference. When you add oregano, Italian seasoning, and red pepper flakes, let them cook for a minute. This helps release their full flavor. For marinara sauce, try using a homemade version. Fresh herbs and a dash of crushed tomatoes can enhance the taste. You can also use store-bought, but look for good-quality options. Pair your sliders with classic sides. Crispy fries or a fresh salad work well. You can also serve them with roasted veggies for a healthy touch. For garnishing, fresh basil leaves add color and flavor. You can sprinkle some extra cheese on top for that extra touch. Enjoy your sliders with a side that complements their rich taste! Pro Tips Choose Quality Meat: Using high-quality ground beef and sausage will elevate the flavor of your sliders significantly. Customize the Heat: Adjust the amount of red pepper flakes to suit your spice preference. You can also add diced jalapeños for an extra kick. Make Ahead: Prepare the meat mixture in advance and store it in the refrigerator. Assemble and bake the sliders just before serving for a quick meal. Experiment with Cheeses: While mozzarella and Parmesan are classic choices, try adding provolone or fontina for a unique flavor profile. {{image_2}} You can switch out the meats in Italian grinder sliders. Using ground turkey is a great idea. It makes the sliders lighter but still tasty. You can also use chicken or pork for a different flavor. For a vegetarian option, try using meat substitutes like lentils or mushrooms. Both add a savory bite without meat. Cheese can change the whole taste of your sliders. You can add provolone or gouda for a new twist. If you like heat, add jalapeños to the meat mix. They bring a spicy kick that many enjoy. You can also mix in some roasted red peppers for added flavor and color. You have many choices for buns. Gluten-free buns work well if needed. Whole grain buns add a nutty flavor and more texture. For a fun twist, use pita bread or wraps. They can hold all the delicious fillings while being easy to eat. Each choice can change your slider experience. You can keep your Italian grinder sliders in the fridge for up to 3 days. To store them well, place the sliders in an airtight container. If you use plastic wrap, make sure it covers them tightly. This helps keep the flavors fresh and prevents the buns from getting soggy. To freeze prepared sliders, wrap each slider in plastic wrap. Then, place the wrapped sliders in a freezer bag. This way, they stay safe from freezer burn. You can freeze them for up to 2 months. When you're ready to eat, take the sliders out of the freezer. Let them thaw in the fridge overnight. To reheat, place them in a preheated oven at 350°F (175°C) for about 15 minutes. This warms them through and keeps the buns soft. Enjoy your tasty sliders again! Italian Grinder Sliders are tasty mini sandwiches filled with seasoned meat. They combine ground beef and Italian sausage for a rich flavor. The sliders also have onion, garlic, and marinara sauce for extra taste. Each slider is topped with melty mozzarella and Parmesan cheese. Fresh basil adds a nice touch. These sliders are perfect for parties or casual meals. Yes, you can prepare these sliders ahead of time. Cook the meat mixture and let it cool. Store it in the fridge for up to two days. When ready, assemble the sliders with buns and cheese. Bake them just before serving for the best taste. This makes meal prep easy and saves time. There are many great sides to pair with Italian Grinder Sliders. Consider serving them with: - Crispy potato wedges - Fresh garden salad - Garlic bread - Coleslaw For drinks, try soda, iced tea, or a light beer. These options balance the rich flavors of the sliders. Enjoy your meal! In this post, we explored how to make delicious Italian Grinder Sliders. We covered key ingredients like beef, sausage, and cheeses. I also shared step-by-step instructions. Don't forget those important tips to enhance flavor and texture. You can even customize your sliders with different meats or bread. These tasty bites are easy to make and perfect for any gathering. Enjoy crafting them your way, and make mealtime special!

If you’re craving a tasty meal that’s both fun and easy to make, you’ve found it! Italian Grinder Sliders are a fantastic treat for any occasion. Picture warm, cheesy sliders …

Read more

Categories Dinner

Garlic Butter Chicken & Broccoli Flavorful Dish

January 5, 2026March 16, 2025 by Chef Luca
- 2 boneless, skinless chicken breasts, cut into bite-sized pieces - 2 cups broccoli florets - 4 tablespoons unsalted butter - 4 cloves garlic, minced In this dish, the chicken offers a tender base. The broccoli adds a pop of green and crunch. Butter gives us a rich, creamy flavor. Garlic brings a warm, savory taste that makes everything better. - 1 teaspoon fresh rosemary, finely chopped - 1 teaspoon fresh thyme, finely chopped - 1 tablespoon soy sauce - 1 tablespoon lemon juice Fresh herbs like rosemary and thyme lift the flavor. Soy sauce adds a savory note, while lemon juice brightens the whole dish. Together, they make every bite special and balanced. - Cooked rice - Quinoa Serving this dish over rice or quinoa adds heartiness. Both options help soak up all the tasty garlic butter sauce. You can choose what you like best! {{ingredient_image_1}} Start by cutting the chicken breasts into bite-sized pieces. This helps them cook evenly. Next, season the chicken with salt and pepper. Heat olive oil in a large skillet over medium heat. Add the chicken pieces and cook for about 5 to 7 minutes. You want them golden and fully cooked. When done, remove the chicken and set it aside. In the same skillet, toss in the broccoli florets. Sauté them for about 3 to 4 minutes. You want them to turn bright green and get slightly tender. This method keeps the broccoli crisp and tasty. Now, it’s time to mix things up! Add unsalted butter, minced garlic, fresh rosemary, thyme, soy sauce, and lemon juice to the skillet. Stir until the butter melts and the garlic smells great. This should take about 1 to 2 minutes. Return the cooked chicken to the skillet. Toss everything together for another 2 to 3 minutes. You can adjust the seasonings with extra salt, pepper, or lemon juice to taste. Serve warm over rice or quinoa for a delicious meal. To avoid overcooking the chicken, keep an eye on the heat. Cook on medium heat for about 5-7 minutes. Use a meat thermometer to ensure it reaches 165°F. This way, your chicken stays juicy. For a golden sear, don't overcrowd the pan. Let the chicken cook undisturbed for a few minutes before flipping. Herbs add great taste. I recommend using fresh rosemary and thyme. These herbs pair well with garlic and butter. If you only have dried herbs, use less. Fresh herbs are strong, so adjust according to your taste. Garnishing makes your dish pop. Sprinkle fresh parsley or cilantro on top for a nice touch. Lemon wedges on the side add color and flavor. Serve in a large bowl for a family-style meal. This makes sharing easy and fun. Pro Tips Use Fresh Herbs: Fresh rosemary and thyme enhance the flavor significantly compared to dried herbs. Always opt for fresh when possible for a more vibrant taste. Don't Overcook the Broccoli: To maintain a bright green color and crisp texture, cook the broccoli until just tender. It will continue to cook slightly once combined with the chicken. Adjust Seasoning to Taste: Before serving, taste the dish and adjust the salt, pepper, or lemon juice to your liking. This ensures the flavors are perfectly balanced. Serve Immediately: This dish is best enjoyed fresh. Serve it right after cooking to keep the flavors and textures at their peak. {{image_2}} You can switch up the broccoli for other veggies. Try green beans, bell peppers, or snap peas. These choices add color and crunch. Feel free to use what's fresh at your local market. Seasonal produce often tastes better and adds variety. If you want a change, use shrimp instead of chicken. Shrimp cooks quickly and adds a nice flavor. For a vegetarian option, use tofu or chickpeas. They soak up the garlic butter well and keep the dish hearty. To make this dish gluten-free, use tamari instead of soy sauce. This keeps the flavor rich without the gluten. For a low-carb twist, serve it over cauliflower rice or skip the grains entirely. This way, you still enjoy a filling meal without the carbs. After cooking Garlic Butter Chicken & Broccoli, let it cool. This helps keep the food safe. Place the chicken and broccoli in a shallow dish. Cover it tightly with plastic wrap or a lid. Store it in the fridge. This dish stays fresh for about 3 days. If you want to keep it longer, consider freezing it. When you reheat, keep the chicken moist. Use a microwave-safe dish to warm it up. Add a splash of water or broth for steam. Cover the dish with a lid or a damp paper towel. Heat at medium power. This method helps prevent drying out. Aim for about 2-3 minutes. Stir halfway through. You can also use a skillet over low heat. This method adds a nice texture. To freeze leftovers, first cool them down. Portion the chicken and broccoli into airtight containers. Leave some space for expansion. You can also use freezer bags. Squeeze out excess air before sealing. This helps avoid freezer burn. When you’re ready to eat, thaw in the fridge overnight. Reheat using the microwave or skillet, as mentioned above. Enjoy your tasty meal even later! Garlic Butter Chicken & Broccoli lasts about 3 to 4 days in the fridge. Store it in an airtight container to keep it fresh. The flavors blend well, making leftovers taste even better. Yes, you can use frozen broccoli. Just thaw it and drain excess water before cooking. Frozen broccoli cooks faster, so watch it closely to avoid mushiness. You can use olive oil or dairy-free margarine. Both options keep the dish rich and tasty. If you want a different flavor, try using ghee or coconut oil. Yes, this recipe is great for meal prep. It stores well and reheats nicely. Make a big batch, divide it into portions, and enjoy it throughout the week. To add spice, include red pepper flakes or sriracha. You can also add a dash of hot sauce or fresh chopped chili peppers. Adjust the amount to fit your taste. This article covered a simple and tasty garlic butter chicken and broccoli recipe. We explored the main ingredients and helpful tips for cooking and flavor. I also shared fun variations and storage tips for leftovers. Cooking can be fun and easy. Use this guide to create a delicious meal. Enjoy experimenting with flavors and ingredients, and make this dish your own!

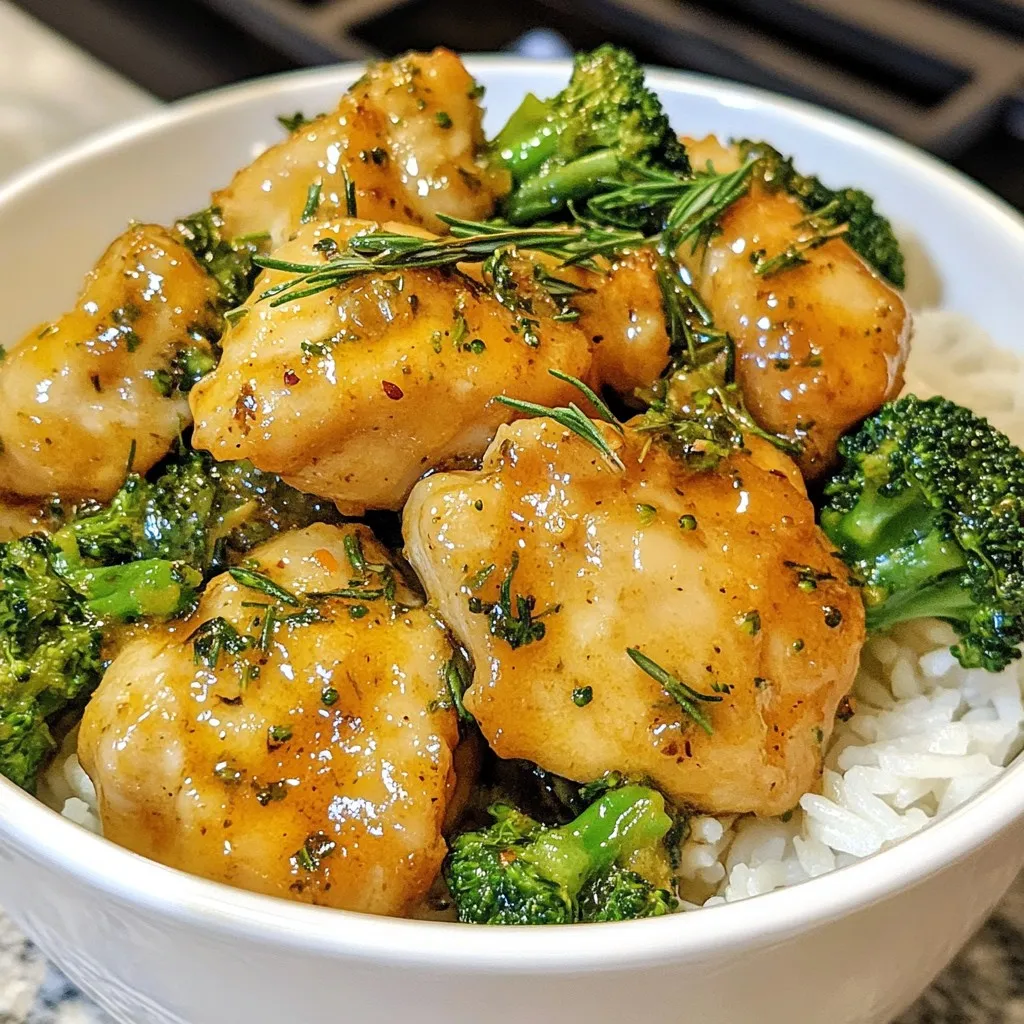
Are you ready to enjoy a tasty and simple meal? Garlic Butter Chicken & Broccoli is here to satisfy your cravings. This dish combines juicy chicken, tender broccoli, and garlic-infused …

Read more

Categories Dinner
Older posts
Newer posts
← Previous Page1 … Page118 Page119 Page120 … Page122 Next →

STIRRED RECIPES

Where every dish begins with a stir! 🍲✨

PAGES

Home About Contact Privacy Policy Terms & Conditions Cookie Policy GDPR Policy Copyright Policy Disclaimer

CATEGORIES

Appetizers Desserts Salads Breakfast Dinner

Contact

  • Pinterest
  • Mail
Copyright © 2026 Stirred Recipes. All rights reserved.