Skip to content
Stirred Recipes
  • Home
  • Appetizers
  • Desserts
  • Salads
  • Breakfast
  • Dinner
  • Privacy Policy
  • Contact
  • About

Chef Luca

Ground Beef and Potato Taco Bowl Flavorful Delight

May 28, 2025 by Chef Luca
- 1 lb ground beef - 2 medium potatoes, peeled and diced - 1 tablespoon olive oil - 1 small onion, chopped - 2 cloves garlic, minced - 1 tablespoon chili powder - 1 teaspoon cumin - 1 teaspoon paprika - 1 cup beef broth - 1 cup corn (frozen or fresh) - 1 red bell pepper, diced - 1 cup black beans, rinsed and drained - Fresh cilantro, for garnish - Lime wedges, for serving - 1 avocado, diced - Shredded cheese (cheddar or Mexican blend) When I create my Ground Beef and Potato Taco Bowl, I start with key items. The ground beef is a must for its rich flavor. The potatoes add a hearty touch, making the dish filling. Olive oil helps cook the meat and veggies without sticking. Next, I like to include onion and garlic. They bring great aroma and taste. Chili powder, cumin, and paprika add warmth and spice. Beef broth gives the bowl a savory base that ties it all together. For toppings, the options are endless! Corn adds a sweet crunch, while bell peppers give color. Black beans bring protein and a creamy texture. Fresh cilantro brightens the dish, and lime wedges are perfect for squeezing over the top. If I have an avocado, I’ll chop it up for creaminess. A sprinkle of cheese ties everything together. You can find the Full Recipe online, which guides you through making this flavorful delight. - Start by heating olive oil in a skillet over medium heat. - Sauté onion and garlic until the onion becomes translucent, about 3-4 minutes. - Brown the ground beef in the skillet, breaking it apart with a spatula. - Drain any excess fat from the skillet. - Stir in the diced potatoes. Cook for about 5 minutes, stirring occasionally, until they soften. - Add the chili powder, cumin, paprika, salt, and pepper to the beef and potatoes. Mix well. - Pour in the beef broth and bring the mixture to a simmer. - Cover the skillet and let it cook for about 10-15 minutes, or until the potatoes are tender. - Stir in the corn, diced bell pepper, and black beans. Cook for an additional 5 minutes to heat through. This recipe is a savory delight, perfect for any meal. You can find the full recipe [here](#). To brown ground beef well, use a hot skillet. Heat olive oil first, then add the beef. Break it apart with a spatula. Cook until it’s brown all over. This helps lock in flavor. Check if the potatoes are done by piercing them with a fork. They should be soft and easy to poke. If you feel resistance, give them more time. Properly cooked potatoes add great texture to the dish. To add depth, use spices like oregano or cayenne. A pinch of smoked paprika can also enhance the flavor. Experiment with these spices to find your favorite mix. Top your taco bowl with fresh cilantro and diced avocado. These toppings add freshness and creaminess. A drizzle of lime juice brightens up the flavors. You can also use your favorite hot sauce for a spicy kick. Serve your taco bowl in deep plates or colorful bowls. This adds a fun touch to the meal. Layer ingredients carefully. Start with the beef and potatoes at the bottom. Then, add corn, beans, and bell peppers. Finally, top with cheese and avocado. This makes the bowl look appealing and delicious. For a little extra flair, garnish with lime wedges and a sprig of cilantro. Your meal will not only taste good but look great too! For the full recipe, check out the detailed guide above. {{image_2}} You can switch up the ground beef in this taco bowl. Ground turkey or chicken works great. These meats are leaner and still pack a punch in flavor. If you want something meatless, consider using lentils or mushrooms. Lentils add protein and a hearty texture. Mushrooms bring umami and a nice chew. Feel free to play with the ingredients! Different types of beans, like pinto or kidney, can add unique flavors. You can also mix in other vegetables, like zucchini or corn. Want to spice it up? Use smoked paprika or taco seasoning for a twist. This way, you can create a flavor that suits your taste. If you have dietary needs, this dish can adapt. For a gluten-free version, just check your spices. Most are gluten-free, but always read labels. If you’re low-carb, swap the potatoes for cauliflower. Cauliflower rice is a great substitute. It keeps the dish light while still being filling. To store your leftover taco bowl, cool it down first. Transfer it to airtight containers. Glass or plastic containers work well. This keeps the flavors fresh. Make sure to seal them tightly. Your taco bowl can last up to three days in the fridge. For longer-term storage, freezing is a great option. Divide the taco bowl into smaller portions. Use freezer-safe bags or containers. Squeeze out any extra air before sealing. This helps prevent freezer burn. When ready to eat, thaw the bowl in the fridge overnight. Alternatively, you can thaw it in the microwave on low heat. The shelf life of your taco bowl depends on its ingredients. Generally, it stays good for about three days in the fridge. In the freezer, it can last up to three months. Watch for signs of spoilage like off smells or changes in color. If you see any mold, it’s best to throw it away. Always trust your senses to keep your meals safe and tasty. Yes, you can make this taco bowl ahead. It’s great for meal prep! To store, let it cool completely. Then, place it in an airtight container. You can keep it in the fridge for about 3 to 4 days. For longer storage, freeze it. Use a freezer-safe container and it will stay good for up to 3 months. When you are ready to eat, just thaw it in the fridge overnight. This makes your meal quick and easy. Reheating is simple. You have a few options. You can use the microwave, stovetop, or oven. For the microwave, place a portion in a bowl and cover it. Heat for 1 to 2 minutes, stirring halfway through. This keeps the meat and potatoes moist. If you choose the stovetop, add a splash of water in a pan. Heat on low, stirring often until warm. The oven method is great for larger portions. Preheat it to 350°F (175°C), cover the dish with foil, and heat for about 20 minutes. There are many great side dishes to serve with your taco bowl. Fresh guacamole adds creaminess. You can also serve tortilla chips for crunch. A simple green salad with lime dressing pairs well too. If you want more flavor, try some salsa or hot sauce. For drinks, a light Mexican beer or refreshing lemonade works nicely. These sides will make your meal even more enjoyable! This blog post showed you how to make a tasty Ground Beef and Potato Taco Bowl. We covered the main and additional ingredients, as well as optional toppings for extra flavor. I shared step-by-step instructions, helpful tips, and variations to suit different diets. Make this dish your own with fun toppings and spice choices. Enjoy every bite, and remember, meal prep can save you time. Happy cooking!

Looking to spice up your dinner routine? The Ground Beef and Potato Taco Bowl is a flavorful delight that packs a punch! With just a few simple ingredients, you can …

Read more

Categories Dinner

Grilled Shrimp Bowl with Asparagus & Creamy Garlic Sauce

May 28, 2025 by Chef Luca
To make a tasty grilled shrimp bowl, gather these key ingredients: - 1 lb large shrimp, peeled and deveined - 1 bunch asparagus, trimmed and cut into thirds - 2 tablespoons olive oil - 1 teaspoon smoked paprika - 1 teaspoon garlic powder - Salt and pepper to taste - 1/2 cup Greek yogurt - 2 cloves garlic, minced - 1 tablespoon lemon juice - 1 tablespoon chopped fresh parsley These ingredients give the dish its flavor and freshness. The shrimp bring a sweet, briny taste. The asparagus adds crispness, and the creamy garlic sauce ties it all together. You can customize your grilled shrimp bowl with these optional ingredients: - Cherry tomatoes for sweetness - Cooked quinoa or rice for added texture - Avocado for creaminess - Red pepper flakes for some heat These add-ons let you create a bowl that fits your taste. Feel free to mix and match based on what you love. If you need to swap ingredients, here are some ideas: - Use chicken or tofu instead of shrimp for a different protein. - Try green beans or broccoli in place of asparagus. - Swap Greek yogurt for sour cream or a dairy-free alternative. These substitutions keep the dish tasty while accommodating dietary needs. You can still enjoy a flavorful meal without missing out on the fun. For the full recipe, check out the instructions in the next section. To start, you need to marinate the shrimp. In a bowl, mix 1 pound of peeled and deveined shrimp with 2 tablespoons of olive oil, 1 teaspoon each of smoked paprika and garlic powder, plus salt and pepper. Toss the shrimp well until they are fully coated. Let them sit for at least 15 minutes. This step adds deep flavor to the shrimp. While the shrimp marinates, it’s time to prepare the asparagus. Boil a pot of water. Once it boils, add 1 bunch of trimmed asparagus cut into thirds. Blanch them for 2-3 minutes. You want them tender yet crisp. After blanching, drain the asparagus and plunge them into ice water. This stops the cooking and keeps their color bright. Next, let’s make the creamy garlic sauce. In a small bowl, combine 1/2 cup of Greek yogurt, 2 minced garlic cloves, 1 tablespoon of lemon juice, and a pinch of salt. Add 1 tablespoon of chopped fresh parsley for extra taste. Mix everything well. Adjust the seasoning to your liking and set aside. This sauce will add a rich, tangy flavor to your bowl. Now it’s time to grill the shrimp. Preheat your grill or grill pan over medium-high heat. Thread the marinated shrimp onto skewers. Grill them for 2-3 minutes on each side. Look for the shrimp to turn pink and opaque. This shows they are perfectly cooked. For added flavor, you can sauté the blanched asparagus. Heat a bit of olive oil in a pan over medium heat. Add the asparagus and cook for a couple of minutes. This brings out their natural sweetness and adds a nice texture. Finally, it’s time to assemble your bowl. In a serving bowl, place a generous portion of grilled shrimp next to the asparagus. Drizzle the creamy garlic sauce over the top or serve it on the side for dipping. For a beautiful presentation, arrange the shrimp and asparagus artfully. You can garnish with more parsley and a lemon slice. Enjoy your colorful and tasty Grilled Shrimp Bowl with Asparagus & Creamy Garlic Sauce! For the full recipe, refer back to the beginning of this article. To get the best flavor in your grilled shrimp bowl, focus on your marinade. I like to use smoked paprika and garlic powder. These spices give shrimp a nice depth. Use fresh garlic in the creamy sauce for a bold kick. Fresh parsley adds a bright finish. You can even add lemon zest for extra zing. Grilling shrimp takes just a few minutes. Preheat your grill or grill pan over medium-high heat. Once hot, thread the shrimp onto skewers. Grill for 2-3 minutes on each side. Watch for the shrimp to turn pink and opaque. Don't overcook them; they will become tough. If you like, grill the asparagus for a few minutes too. This adds a nice charred flavor. To make your dish even better, think about presentation. Arrange the shrimp and asparagus nicely in the bowl. Drizzle the creamy garlic sauce on top or serve it on the side for dipping. A slice of lemon beside the bowl adds a pop of color and freshness. You can also sprinkle extra parsley on top for a touch of green. For the full recipe, check the complete cooking guide. {{image_2}} You can switch shrimp for other proteins. Chicken, scallops, or firm tofu work well. Just adjust the cooking time. For veggies, try zucchini, bell peppers, or broccoli. Each choice adds a new taste to your bowl. Spice can change the flavor. If you like heat, add cayenne pepper or red pepper flakes. Start with a pinch, then taste. You can always add more. For a milder taste, skip the spices or use sweet paprika. To make this dish vegetarian, remove shrimp. Use chickpeas or lentils for protein. These options give a hearty feel. Add more veggies like spinach or mushrooms for variety. This way, you can enjoy a fresh and colorful bowl without meat. For the full recipe, check the detailed steps to craft your perfect grilled shrimp bowl with asparagus and creamy garlic sauce. To keep your grilled shrimp bowl fresh, store leftovers in an airtight container. Make sure to separate the shrimp, asparagus, and creamy garlic sauce to prevent sogginess. If you have extra sauce, store it in a small jar or bowl. This will help keep the flavors intact. When ready to eat, gently reheat the shrimp and asparagus. Use a microwave-safe dish and cover it with a damp paper towel. Heat in short bursts of 30 seconds until warm. Avoid overheating, as this can make the shrimp tough. If you prefer, you can reheat them in a skillet over low heat for better texture. - Grilled Shrimp: Store for up to 2 days in the fridge. - Asparagus: Lasts about 3 days when stored properly. - Creamy Garlic Sauce: Keep for up to 5 days in the fridge. Always check for any signs of spoilage before consuming leftovers. Enjoy your delicious meal even after cooking! For the full recipe, check out the detailed instructions. Yes, you can use frozen shrimp. Just thaw them first. Place them in cold water for about 15-20 minutes. Once thawed, dry them well before marinating. This helps the shrimp soak up the flavors better. If you don’t have Greek yogurt, try sour cream instead. It gives a similar creamy texture. You can also use plain regular yogurt, but it may be thinner. For a dairy-free option, use coconut cream or silken tofu blended smooth. Shrimp cook quickly. They are done when they turn pink and opaque. This usually takes about 2-3 minutes per side. You can also check if they curl into a "C" shape. If they curl too tightly, they may be overcooked. Yes, you can prepare parts of this dish ahead. Marinate the shrimp and store it in the fridge for up to 2 hours. You can also blanch the asparagus earlier. Just remember to cool them in ice water to keep them crisp. For the sauce, mix it and store it in the fridge. It stays fresh for a few days. For the full recipe details, be sure to check out the [Full Recipe]. This blog post covered all you need for a tasty grilled shrimp bowl. You learned key ingredients, marinating tips, and grilling methods. I shared ideas to customize your dish and provided storage tips for leftovers. Remember, grilling shrimp is quick and easy, so timing matters. Enjoy making this dish your own. Experiment with flavors and ingredients. Happy cooking!

Get ready to spice up your dinner routine with my mouth-watering Grilled Shrimp Bowl! This dish combines juicy shrimp, tender asparagus, and a rich creamy garlic sauce. In just a …

Read more

Categories Dinner

Cookies and Cream Cake Jar Irresistible Dessert Treat

May 27, 2025 by Chef Luca
To make a delicious Cookies and Cream Cake Jar, gather these ingredients: - 1 cup chocolate cake crumbs - 1 cup crushed chocolate sandwich cookies (like Oreos) - 1 cup heavy whipping cream - 1/2 cup powdered sugar - 1 teaspoon vanilla extract - 1/4 cup cream cheese, softened - 1/2 cup mini chocolate chips - Extra crushed cookies for garnish These simple items create layers of flavor and fun. You can customize your cake jar by adding: - Different cake flavors like vanilla or red velvet - Flavored whipped cream, like mint or coffee - Nuts or sprinkles for extra crunch - Fresh fruit, like strawberries or raspberries Feel free to experiment to find your perfect mix! Here's a quick look at the nutrition for one serving of the Cookies and Cream Cake Jar: - Calories: 400 - Total Fat: 25g - Saturated Fat: 15g - Cholesterol: 90mg - Sodium: 200mg - Total Carbohydrates: 42g - Dietary Fiber: 2g - Sugars: 28g - Protein: 5g This treat is sweet and rich. Enjoy it in moderation! To make this fun dessert, start with the chocolate cake. If you don’t have any, bake a chocolate cake. You can use a box mix or your favorite recipe. Once it cools, crumble it into small pieces. Next, make the whipped cream. In a large bowl, add heavy whipping cream, powdered sugar, and vanilla. Beat it on medium speed. Keep going until soft peaks form. This means it should hold its shape but not be too stiff. Now, add cream cheese. Take the softened cream cheese and gently fold it into the whipped cream. This makes your cream smooth and tasty. Get your clear jars or cups ready. Start with a layer of chocolate cake crumbs at the bottom. Next, add the whipped cream mixture on top. Use a spoon to smooth it out. After that, sprinkle a layer of crushed chocolate sandwich cookies over the whipped cream. Repeat the layering. Alternate between chocolate cake crumbs, whipped cream, and crushed cookies. Keep going until your jars are full. Finish with a layer of whipped cream on top. For the final touch, garnish your jars. Sprinkle some mini chocolate chips and extra crushed cookies on top. Finally, chill the jars in the fridge for at least 2 hours. This helps all the flavors mix well. - When baking your cake, let it cool completely. This helps you crumble it easily. - Use a hand mixer for the whipped cream for best results. - Be gentle when folding in the cream cheese. This keeps the whipped cream light and airy. - Use a clear jar to show off the beautiful layers. It makes the dessert look more appealing. I recommend looking for a video tutorial online. Watching someone make this dessert can help you understand each step better. You can see how the layers form and the finished look. A visual guide makes cooking easier and more fun! Check out the Full Recipe for more details. Layering makes your Cookies and Cream Cake Jar look great. Start with a solid base. Use chocolate cake crumbs first. This gives a nice foundation. Follow with whipped cream. Spread it evenly for a smooth layer. Then add crushed cookies. This adds crunch and flavor. Repeat these steps until you fill the jar. Finish with a layer of whipped cream on top. This keeps the dessert fresh and creamy. One big mistake is overfilling the jars. Leave some space at the top. This helps when you add the lid. Another mistake is not chilling them long enough. Chilling lets the flavors mix well. If you skip this step, the jars may taste flat. Also, be careful when folding in the cream cheese. Don’t stir too hard. You want a light and fluffy texture. To make your jars shine, try these tips. Use clear jars to show off the layers. This makes them look more inviting. Add a small spoon tied with a ribbon around each jar. It adds a cute touch. Place the jars on a tray with whole cookies around them. This creates a fun display. For added flair, you can sprinkle mini chocolate chips on top. This makes your dessert even more tempting. For the full recipe, check out the instructions above. {{image_2}} You can switch things up with different cake and cream flavors. For the cake, try red velvet or vanilla. Both add a fun twist to your dessert. Instead of chocolate cookies, use vanilla or peanut butter cookies. This change gives a whole new taste to your cake jar. You can also add flavors to the cream. A bit of mint extract or almond extract can create a unique spin. If you have dietary needs, don’t worry! You can make this treat work for you. For gluten-free options, use gluten-free chocolate cake and cookies. There are many great brands that offer these. For a dairy-free version, replace heavy cream with coconut cream. You can also use dairy-free cream cheese or whipped topping. These swaps keep the creamy texture while meeting your needs. You can adapt this dessert for holidays and special days. For Halloween, add orange food coloring to the cream or use spooky cookie shapes. At Christmas, try using gingerbread cookies and add some cinnamon to the whipped cream. For birthdays, layer in colorful sprinkles or use funfetti cake. Each season offers a chance to be creative with your cake jar. To keep your Cookies and Cream Cake Jars fresh, seal them tightly. Use lids or plastic wrap to cover the jars. Store them in the fridge. This keeps the whipped cream fluffy and the cake moist. Always check for any signs of spoilage before serving leftovers. When stored properly, your Cookies and Cream Cake Jar lasts about 3 to 5 days in the fridge. The flavors blend well over time, making it even tastier. However, for the best texture, enjoy them within the first few days. This ensures that the whipped cream stays light and airy. If you want to save the cake jars for later, freezing works well. First, prepare the jars as usual. Then, avoid adding the whipped cream layer. Instead, freeze the cake and cookie layers in jars for up to 2 months. When you're ready to enjoy them, thaw overnight in the fridge. Once thawed, add fresh whipped cream before serving. This keeps the dessert delicious and fresh! For the full recipe, check the detailed instructions on how to make these delightful treats. Yes, you can use store-bought ingredients. It saves time and effort. You can buy chocolate cake crumbs or even pre-made whipped cream. Just ensure the flavors match what you want. To make this dessert healthier, you can swap some ingredients. Use whole wheat flour for the cake. You can also use yogurt instead of cream cheese. For sweetness, replace powdered sugar with a natural sweetener like honey or maple syrup. You’ll still enjoy the same great taste with fewer calories. If you need a substitute for heavy whipping cream, use coconut cream or a non-dairy alternative. These options work well and give a nice flavor. Just make sure it is thick enough to whip. You can find pre-made Cookies and Cream Cake Jars at local bakeries or dessert shops. Some grocery stores may also stock them. Check the refrigerated section where they keep other desserts. Look for them online as well; many companies offer delivery. To serve this dessert at parties, use clear jars. They show off the layers and look pretty. Tie a small spoon with ribbon around each jar for a nice touch. You can also place your jars on a decorative tray with some whole cookies. This adds charm and invites guests to dig in. You learned how to make a Cookies and Cream Cake Jar, from the ingredients to storage. We explored optional ingredients to fit your taste and dietary needs. With tips for layering and avoiding mistakes, your cake will impress anyone. Use our variations for seasonal fun or to shake things up. Try this easy dessert at your next event. It's a crowd-pleaser and will wow your friends. Enjoy your delicious creation!

If you love dessert, you’re in for a treat! The Cookies and Cream Cake Jar is an easy, fun way to indulge in a classic flavor. Layers of rich cake …

Read more

Categories Desserts

Chipotle Ranch Grilled Chicken Burrito Delight

May 27, 2025 by Chef Luca
- 2 boneless, skinless chicken breasts - 1 cup cooked brown rice - 1 cup black beans, drained and rinsed - 1 cup corn kernels (fresh or frozen) - 1 tablespoon chipotle seasoning - 1/2 cup ranch dressing - 4 large burrito-sized flour tortillas - Fresh cilantro for garnish - Sliced avocado - Shredded lettuce and diced tomatoes When making your Chipotle Ranch Grilled Chicken Burrito, use fresh and high-quality ingredients. The chicken breasts serve as the star of the show. They soak in the chipotle seasoning, bringing a smoky flavor. Next, cooked brown rice adds a hearty base. It makes the burrito filling and satisfying. Black beans are rich in protein and fiber. They blend well with the rice and corn for extra texture. You can choose fresh corn or frozen corn kernels. Both options taste great. They add a sweet crunch to the mix. For the dressing, ranch gives a creamy finish. The chipotle seasoning adds a nice kick. Together, they create a rich flavor you won’t forget. Grab large burrito-sized tortillas to wrap everything up. These will hold all the tasty ingredients without tearing. Feel free to add optional garnishes. Fresh cilantro adds a bright flavor. Avocado brings creaminess, while lettuce and tomatoes add freshness. For the full recipe, check it out. You will love creating this delicious burrito! - Combine olive oil, chipotle seasoning, salt, and pepper in a bowl. - Coat the chicken breasts well with the mixture. - Let the chicken marinate for 20 minutes. This helps the flavors soak in. - Preheat your grill or grill pan to medium-high heat. - Grill the chicken for 6-7 minutes on each side. - Make sure the chicken is fully cooked. The inside should reach 165°F (74°C). - While the chicken grills, mix cooked brown rice, black beans, and corn in a large bowl. - Lay out the tortillas on a clean surface. - Spoon the rice and bean mixture into the center of each tortilla. - Top with sliced grilled chicken, avocado, shredded lettuce, diced tomatoes, cheese, and ranch dressing. - Roll and fold the burritos securely to keep the filling inside. For full details on the cooking process, check the Full Recipe. To get juicy chicken, use a meat thermometer. Cook until the internal temperature hits 165°F (74°C). After grilling, let your chicken rest for five minutes. This step keeps the juices inside and makes each bite tender. Your burrito can be unique! Swap the chicken for tofu or beef. You can also try different toppings. Add grilled peppers, onions, or even spicy salsa. There are many sauces to explore. Ranch dressing is great, but chipotle mayo also adds a nice kick. For a crunchy burrito, toast it! Heat a skillet over medium heat. Place the burrito seam side down. Toast for 2-3 minutes on each side until golden brown. You can serve your burrito with chips and salsa on the side. This adds flavor and fun to your meal. For the full recipe, check the earlier sections. Enjoy your cooking adventure! {{image_2}} You can easily make a vegetarian burrito. Just switch the chicken for grilled vegetables or a bean mix. Bell peppers, zucchini, and mushrooms work great. You can also use a mix of black beans and pinto beans for a hearty filling. To keep it plant-based, use a vegan ranch dressing. It adds creaminess without dairy. This version tastes just as good and is packed with flavor. If you love heat, try a spicy twist on your burrito. Add sliced jalapeños or your favorite hot sauce. Both boost the spice level nicely. For even more kick, incorporate spicy black beans. These beans add a smoky flavor that pairs well with the chipotle seasoning. You will feel the heat but still enjoy the taste. For a low-carb option, swap the tortillas for lettuce wraps. Romaine or butter lettuce works best. It gives you a fresh crunch. You can also use cauliflower rice instead of brown rice. This makes the burrito lighter while keeping it filling. Enjoy a delicious meal without the extra carbs! Store any leftovers in an airtight container in the fridge. They will stay fresh for up to 3 days. This helps keep the flavors intact. You can enjoy your tasty burritos later without losing quality. If you want to keep your burritos longer, freeze them. First, cool them fully. Then, wrap each burrito tightly in plastic wrap. Place them in a freezer-safe bag. This will help avoid freezer burn. When you're ready to eat, just reheat them in the oven or microwave. For crispy burritos, use an air fryer. Set it to 350°F and heat for about 5-7 minutes. If you need a quick meal, use the microwave. Heat for about 1-2 minutes or until warm. Both methods work well, so choose what fits your time! To add heat, you can try a few tips. First, add diced jalapeños inside the burrito. They bring a nice crunch and spice. You can also mix some hot sauce with the ranch dressing for a kick. Another option is to use spicy chipotle seasoning instead of regular. If you want more flavor, try pepper jack cheese instead of cheddar. Yes, you can! Whole wheat tortillas add a nutty taste. Corn tortillas are gluten-free and have a nice texture. If you want something lighter, try using lettuce wraps instead. Each type of tortilla gives a different flavor and feel to the burrito. Making this burrito ahead is easy. Cook the chicken and rice in advance. Store them in separate containers in the fridge. When ready to eat, just warm them up. Then, assemble your burrito with fresh ingredients like lettuce and tomatoes. This keeps everything crisp and tasty. Many sides go great with this burrito! Try tortilla chips with salsa for crunch. A side of guacamole adds creaminess. You could also serve a fresh salad with lime vinaigrette. For drinks, try a cold soda or a refreshing iced tea. These sides will balance the flavors of your burrito perfectly. In this article, we explored how to make delicious Chipotle Ranch Grilled Chicken Burritos. We covered the ingredients, grilling instructions, and tips for customizing your burrito. Whether you prefer a vegetarian version or want to spice things up, options are available. Remember, storing your burritos correctly helps maintain their taste. Enjoy experimenting with flavors and sides. Making this meal at home brings joy and satisfaction. Give it a try; you won’t regret it!

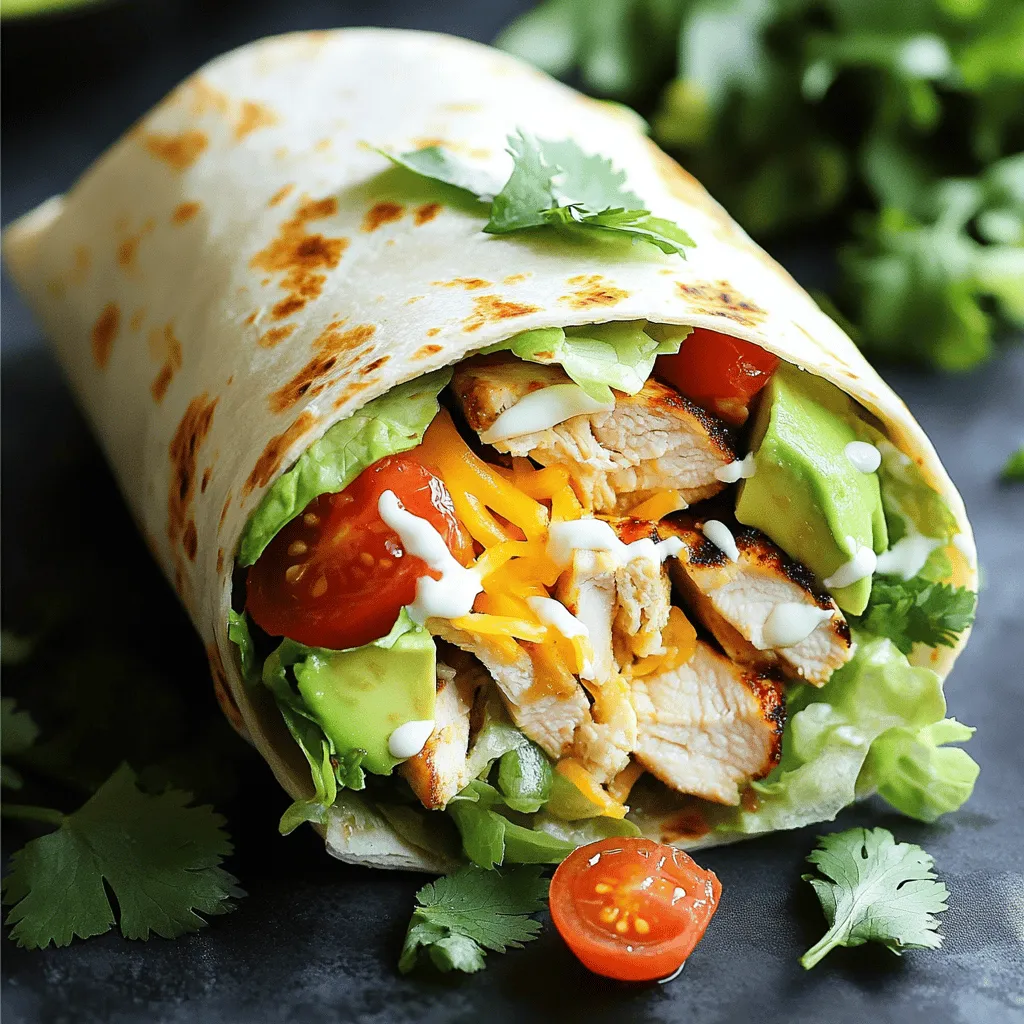
If you crave a burst of flavor in every bite, the Chipotle Ranch Grilled Chicken Burrito Delight is your answer! Juicy chicken, hearty beans, and zesty ranch make this burrito …

Read more

Categories Dinner

Strawberry Lemonade Layer Cake Delightful Summer Treat

May 27, 2025 by Chef Luca
- 2 ½ cups all-purpose flour - 1 ½ cups granulated sugar - ½ cup unsalted butter, softened - 1 cup buttermilk - 3 large eggs - 1 tablespoon baking powder - 1 teaspoon baking soda - ½ teaspoon salt - Zest of 1 lemon - ½ cup fresh lemon juice - 2 cups fresh strawberries, hulled and diced - ½ cup granulated sugar - 1 tablespoon lemon juice - 2 tablespoons cornstarch - 2 tablespoons water - 1 cup unsalted butter, softened - 4 cups powdered sugar - 2 tablespoons fresh lemon juice - 1 teaspoon lemon zest - Pinch of salt In this delightful summer treat, each ingredient plays a special role. The cake uses flour for structure and sugar for sweetness. Butter adds richness, while buttermilk keeps it moist. Eggs bind everything and help it rise. The baking powder and soda create a light texture, and the salt enhances flavor. The strawberry filling brings a fruity burst. Fresh strawberries give it a sweet and tangy taste. Lemon juice brightens it, while cornstarch helps it thicken. The water makes it easier to cook. The lemon frosting is creamy and sweet. Butter is key for smoothness. Powdered sugar adds sweetness, while lemon juice and zest give it a zesty kick. A pinch of salt balances the flavors. For the full recipe, check out the detailed steps. Get ready to make a cake that everyone will love! - Preheat oven to 350°F (175°C). - Grease and flour the cake pans. - In a large bowl, cream the butter and sugar. Mix until light and fluffy. - Add the eggs one at a time. Mix well after each egg. - Stir in the lemon zest and lemon juice. - In a separate bowl, whisk the flour, baking powder, baking soda, and salt. - Gradually add the dry mixture to the wet ingredients. Alternate with buttermilk. - Mix until just combined. Don’t overmix! - Divide the batter evenly among the prepared pans. - Bake for 25-30 minutes or until a toothpick comes out clean. - Let the cakes cool in the pans for 10 minutes. After that, transfer them to wire racks. For all the details and measurements, check the Full Recipe. - Avoid overmixing the batter. Mixing too much can make the cake dense. - Use room temperature ingredients. This helps the batter mix evenly and rise well. - Ensure butter is softened for smooth frosting. Cold butter makes it hard to spread. - Chill the cake before serving for the best presentation. A chilled cake holds frosting better and looks lovely. - Ideal for special occasions like birthdays or summer gatherings. This cake makes any event feel festive. - Pair with lemonade or iced tea for a refreshing treat. The flavors complement each other perfectly. For the complete recipe, check the Full Recipe section above. {{image_2}} You can switch up the flavors in your Strawberry Lemonade Layer Cake. Try using different fruit fillings. Raspberries or blueberries add a nice twist. You can also swap lime juice for lemon juice. This gives the cake a zesty kick. If you want a vegan cake, you can make some easy swaps. Use plant-based butter and replace eggs with flaxseeds or applesauce. For a gluten-free option, use gluten-free flour. This way, everyone can enjoy a slice. The frosting can change the whole cake experience too. Use cream cheese frosting for a richer taste. You can also add food coloring to make it bright and fun. This makes your cake even more appealing for a summer gathering. Keep your Strawberry Lemonade Layer Cake covered at room temperature for 2-3 days. This helps maintain its fresh flavor and soft texture. If you notice the cake drying out, simply cover it with plastic wrap or place it in a cake dome. You can refrigerate the cake for up to a week. Just make sure it’s well covered to keep it moist. If you want to store it longer, freeze individual slices for up to 3 months. This is great for when you want a sweet treat later. Use an airtight container to keep your cake fresh. Wrapping the cake in plastic wrap before freezing helps prevent freezer burn. This way, you can enjoy your cake at its best, even after some time. For added flavor, consider making a simple syrup to brush on the cake layers before frosting. This keeps it moist and enhances the taste. Yes, just thaw and drain excess liquid before use. Frozen strawberries work well. They add great flavor and sweetness. Make sure to chop them into small pieces for even distribution. This keeps the filling nice and smooth. Ensure you’re not overbaking and consider adding a simple syrup for extra moisture. To check for doneness, use a toothpick. If it comes out clean, your cake is ready. If you want more moisture, brush a simple syrup on the layers after baking. This adds flavor and keeps your cake soft. It's perfect for summer parties, birthdays, and celebrations! This cake is a crowd-pleaser. Its bright colors and flavors make it festive. Serve it at picnics, family gatherings, or just because! Everyone will love a slice of this delightful treat. Chill the cake before frosting and store in a cool area until ready to serve. Start with a cold cake to help the frosting hold its shape. If it's hot outside, keep the cake in the shade. This helps the frosting stay firm and look great. This blog post shows how to make a delicious Strawberry Lemonade Layer Cake. You learned about fresh ingredients for the cake, filling, and frosting. I shared step-by-step instructions for mixing, baking, and cooling. You now have tips for the perfect texture and presentation. Remember, variations and storage tips help you customize the cake. Enjoy making this treat at home for any occasion. Your friends and family will love it!

Looking for a dessert that screams summer? Try this Strawberry Lemonade Layer Cake! This delicious cake combines zesty lemon and sweet strawberries for a refreshing treat. Perfect for birthdays, picnics, …

Read more

Categories Desserts

Grits Breakfast Bowl Flavorful and Hearty Meal

May 27, 2025 by Chef Luca
To make a great grits breakfast bowl, you need a few key items. These ingredients make it tasty and filling. Here is what you will need: - 1 cup white or yellow grits - 4 cups water or vegetable broth - 1 cup shredded sharp cheddar cheese - 2 tablespoons butter - 4 large eggs - ½ cup cooked and crumbled turkey sausage or plant-based sausage - 1 avocado, sliced - ¼ cup green onions, chopped - Salt and pepper to taste - Hot sauce (optional) These items create a rich base for your bowl. The grits provide creaminess, while the cheese adds flavor. You can use water for a simple dish, or broth for more depth. Grits are very versatile. You can customize them with your favorite toppings. Some great options include: - Sautéed mushrooms - Spinach or kale - Diced tomatoes - Black beans Each mix-in adds a new taste and texture. Feel free to get creative! You can even add leftovers from last night’s dinner for extra flavor. Choosing the right cheese and sausage is key. For cheese, sharp cheddar works well, but you can try: - Gouda - Pepper jack - Cream cheese Each choice gives a different flavor profile. For sausage, turkey sausage is a great option. You can also use: - Plant-based sausage for a vegetarian twist - Andouille sausage for a spicy kick These options help you make the dish your own. With the right ingredients, your grits breakfast bowl will shine. For a full recipe, check the details above. Enjoy your cooking! Start by boiling water or vegetable broth in a medium saucepan. Once it boils, whisk in the grits slowly. Stir to keep lumps away. Lower the heat and let them cook. Stir every now and then for about 20-25 minutes. You want them creamy. When almost done, mix in butter and shredded cheddar cheese. Add salt and pepper to taste. In a non-stick skillet, cook the eggs sunny-side up or over-easy. It’s all about what you like best. In the same skillet, toss in the crumbled sausage. Cook it until it's warm and a bit crispy. This adds flavor and texture to your bowl. Grab your favorite bowls. Spoon the creamy grits into the bottom of each bowl. Next, add the cooked sausage and place a fried egg on top. Slice the avocado and arrange it nicely. Finish with chopped green onions and a dash of hot sauce if you like a little heat. For the full recipe, refer to the earlier section. Enjoy your hearty meal! To make creamy grits, start with good quality grits. Use white or yellow grits based on your taste. Always rinse the grits before cooking. This helps remove any dust and makes them smoother. Use a mix of water and broth for rich flavor. Boil the liquid first, then whisk in the grits. Stir well to avoid lumps. Cook them on low heat for about 20-25 minutes. Stir occasionally to keep them creamy. Add butter and cheese at the end for extra creaminess. Eggs are key to a great Grits Breakfast Bowl. You can fry, scramble, or poach them. For sunny-side-up eggs, heat a non-stick pan and crack the eggs in. Cook gently for a few minutes until the whites set. If you like scrambled eggs, whisk them in a bowl with some salt. Cook in a pan over medium heat, stirring constantly until they are fluffy. Poached eggs are another tasty option. Bring water to a gentle simmer, crack in the egg, and cook for 3-4 minutes. Each method adds a unique touch. To improve texture, use more broth for a thinner consistency. If you prefer thicker grits, reduce the liquid. For flavor, add spices like garlic powder or smoked paprika during cooking. Fresh herbs like thyme or parsley can also enhance taste. Don’t forget to season your grits with salt and pepper. Top your bowl with green onions for a nice crunch. Optional hot sauce can add a spicy kick. Mix and match these tips for the perfect Grits Breakfast Bowl. Check out the Full Recipe for more details! {{image_2}} You can easily make a vegetarian or vegan grits breakfast bowl. Start with the basic recipe, but swap the meat for plant-based sausage. For a vegan version, use olive oil instead of butter. Replace cheese with a vegan cheese option or nutritional yeast for a cheesy taste. You can also add sautéed veggies like spinach or mushrooms for more flavor and nutrition. Grits fit into many global cuisines. For a Mexican twist, mix in black beans, corn, and pico de gallo. You can add spices like cumin and chili powder for extra kick. In Italy, try adding marinara sauce and a sprinkle of Parmesan cheese for a comforting meal. In the South, stir in collard greens and hot sauce to keep things classic. Seasonal ingredients can elevate your grits bowl. In spring, add fresh asparagus or peas for a bright touch. Summer is perfect for ripe tomatoes and basil, giving a fresh burst of flavor. In fall, consider roasted squash or pumpkin to add warmth. Winter calls for hearty greens like kale or Swiss chard, giving you a robust, filling dish. To store leftover grits, let them cool first. Place them in an airtight container. You can keep them in the fridge for up to three days. If you want to store them longer, freeze the grits. They will stay good in the freezer for up to three months. Just remember to label the container with the date. When you're ready to eat the leftover grits, you can reheat them easily. For the best results, add a splash of water or broth to the grits. This helps bring back their creamy texture. Heat them in a saucepan over low heat. Stir often until they warm through. You can also use the microwave. Place the grits in a bowl, cover it, and heat for 1-2 minutes. Stir halfway for even heating. Meal prep makes mornings easier. You can cook a big batch of grits ahead of time. Store them in individual containers for quick meals. Pre-cook the sausage and eggs too. Store them separately until you are ready to eat. When it's time for breakfast, just heat everything up and assemble your bowl. This method saves time and keeps your breakfast fresh and tasty. For the full recipe, check out the Grits Breakfast Bowl Delight. The best types of grits are white or yellow. White grits are smooth and creamy. Yellow grits have a nuttier flavor. Both types work well in a grits breakfast bowl. I often use white grits for their rich texture. However, yellow grits add a nice color to the dish. Choose based on your taste and preference. Yes, you can make the grits breakfast bowl ahead of time. Cook the grits and store them in the fridge. They will last about three days. When you are ready to eat, reheat them on the stove. Add a splash of water or broth for moisture. Cook the eggs and sausage fresh for the best taste. This way, you enjoy a hot meal without much fuss. You can swap cheese and sausage for many options. For cheese, you can use mozzarella or feta. These options give different flavors and textures. For sausage, try diced ham or bacon. For a vegetarian choice, use mushrooms or beans. You can even use plant-based sausage for a vegan option. Get creative and mix flavors you love! This article covered how to make a tasty grits breakfast bowl. We discussed the key ingredients, cooking tips, and various fun toppings. You learned how to cook grits and combine them with eggs and sausage. Remember, you can customize it with different flavors and styles. Try out vegetarian or international versions to keep it fresh. Now, with these easy steps and ideas, enjoy creating your perfect breakfast bowl!

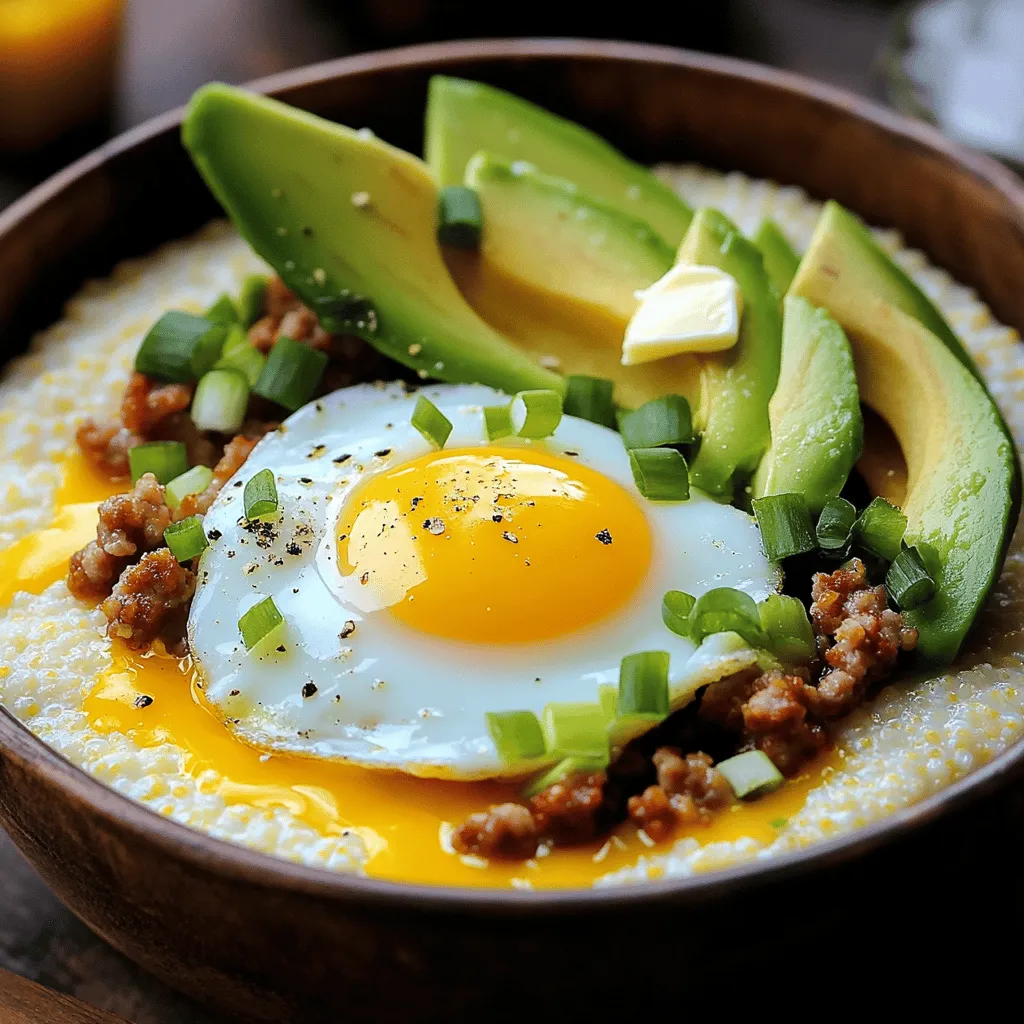
Start your day with a warm, tasty Grits Breakfast Bowl! This hearty meal is perfect for those busy mornings when you need a yummy boost. In this guide, I’ll walk …

Read more

Categories Breakfast

Meat Lovers Pizza Casserole Flavorful Family Favorite

May 27, 2025 by Chef Luca
- 1 lb ground beef - 1 lb Italian sausage, casings removed - 1 cup pepperoni slices - 1 cup diced ham - 2 cups shredded mozzarella cheese - 1 cup shredded cheddar cheese - 1 red bell pepper, diced - 1 medium onion, diced - 3 cups marinara sauce - 12 oz pasta (cavatappi or penne work well) - Olive oil for sautéing - 1 tablespoon Italian seasoning - Salt and pepper to taste When I create my Meat Lovers Pizza Casserole, I always start with fresh, high-quality ingredients. The meat is the star here. I use ground beef and Italian sausage for rich flavor. The pepperoni and diced ham add a nice touch of saltiness and variety. For dairy, I love a mix of mozzarella and cheddar cheese. Mozzarella melts beautifully, while cheddar gives a tangy punch. This combo creates a gooey, delicious layer on top. Next, I include fresh veggies. Diced red bell pepper and onion add sweetness and crunch. They also bring color to the dish, making it more appealing. Don't forget the pantry staples! Marinara sauce ties everything together. I choose a good brand or make my own for the best taste. The pasta is vital too; I prefer cavatappi or penne. These shapes hold sauce well and add texture. Finally, I season with Italian herbs, salt, and pepper. A drizzle of olive oil helps sauté the vegetables and meat, adding depth to the flavor. All these ingredients come together to create a comforting dish that my family loves. For the complete list, check the Full Recipe. 1. Preheat your oven to 375°F (190°C). This sets the stage for cooking. 2. Cook the pasta according to the package directions until it's al dente. Drain it and set it aside. The right pasta texture matters for a great casserole. 3. Prepare the meat mixture in a skillet. Heat a splash of olive oil over medium heat. Add 1 lb of ground beef and 1 lb of Italian sausage, breaking them apart with a wooden spoon. Cook until browned. 1. Mix the pasta with the meat sauce. Add the diced onion and bell pepper, sautéing for about 5 minutes until softened. Stir in 1 cup of pepperoni and 1 cup of diced ham, heating them through for about 2-3 minutes. 2. Transfer to a baking dish. Pour in 3 cups of marinara sauce, combining everything well. In a large bowl, mix the cooked pasta with this meaty sauce. Fold in half of the mozzarella and half of the cheddar cheese. 3. Add cheese on top. Transfer this mixture into a greased 9x13-inch baking dish. Evenly spread the remaining mozzarella and cheddar cheese over the top for a cheesy finish. 1. Bake until cheese is melted. Place your dish in the preheated oven and bake for 25-30 minutes. Keep an eye on it until the cheese bubbles and turns golden. 2. Cooling and serving recommendations. Once done, remove the casserole from the oven. Let it cool slightly before serving. For added flair, garnish with fresh basil or parsley. Enjoy the flavors of your Meat Lovers Pizza Casserole with friends and family! For the complete recipe, check out the Full Recipe. - Choosing the right pasta: I love using cavatappi or penne for this dish. These shapes hold the sauce well. They add a fun twist to each bite. You can also try rigatoni if you want. - Importance of not overcooking pasta: Cook the pasta until it is al dente. This means firm to the bite. If you overcook it, the pasta will get mushy in the oven. Aim for about 8-10 minutes of cooking time. Drain it and set it aside right away. - Suggestions for additional toppings: You can add sliced olives or mushrooms for extra flavor. Crushed red pepper will give it some heat. If you want a smoky taste, try adding bacon bits. - Using fresh herbs for garnish: Fresh basil or parsley makes a great garnish. Not only does it look nice, but it also adds fresh flavor. Add it just before serving for the best taste. - Best ways to serve and present the casserole: Serve the casserole hot from the oven. Use a large spoon to scoop it out. For a beautiful touch, sprinkle some fresh herbs on top. You can also drizzle a little olive oil over it for extra flavor. Serve it with a side salad or garlic bread for a complete meal. {{image_2}} You can switch up the meats in this casserole. If you like chicken, use shredded rotisserie chicken. Ground turkey also works well. For a bit of a kick, try adding spicy sausage. If you want to go meatless, replace the meat with mushrooms or zucchini. You can also use chickpeas for protein. These swaps still give you a hearty dish. Cheese makes this dish creamy and rich. While mozzarella and cheddar are favorites, you can play around with cheese blends. Try using provolone for a smooth texture. Parmesan adds a nice salty flavor. If you want some tang, goat cheese can be a fun option. If you are dairy-free, there are many plant-based cheeses available. Look for options made from nuts or soy for a tasty twist. The type of pasta you use can change the dish's texture. Cavatappi and penne are great choices, but you can try rotini or fusilli too. If you need a gluten-free option, use gluten-free pasta made from rice or quinoa. This will still give you that hearty feel. You can also choose whole wheat pasta for added fiber. Each type adds its unique flavor and texture, so don’t be afraid to experiment. When I make Meat Lovers Pizza Casserole, I always have leftovers. To store them properly, let the casserole cool to room temperature. Then, cover it tightly with plastic wrap or foil. You can also use an airtight container. This keeps it fresh and tasty. In the fridge, the casserole lasts about 3 to 4 days. If you want to freeze the casserole, first cool it completely. Then, cut it into portions. Wrap each piece in plastic wrap and foil. This prevents freezer burn. Store the wrapped portions in a freezer bag. When stored this way, it can last up to 3 months. To reheat, you have a few choices. The oven gives the best results. Preheat it to 350°F (175°C). Place the casserole in a baking dish and cover it with foil. Bake for 20-30 minutes. You can also use the microwave. Place a portion in a microwave-safe dish, cover it, and heat for 2-3 minutes. Lastly, you can reheat on the stovetop. Just warm it in a skillet over low heat, stirring often. Enjoy your delicious casserole! A Meat Lovers Pizza Casserole is a hearty dish packed with meats, cheese, and pasta. It pulls flavors from classic pizza. You get ground beef, Italian sausage, pepperoni, and diced ham all in one pan. This dish is perfect for family gatherings and game nights. Its origins come from combining the best of pizza and pasta into a comforting meal. Yes, you can prepare this dish ahead of time. Make the casserole, cover it, and store it in the fridge for up to 24 hours. When you are ready to bake, just add about 10-15 minutes to the cooking time. You can also store leftovers in the fridge. They will last about 3-4 days. For longer storage, freeze it. Wrap it well and it can last up to 3 months. To add heat, you have many options. Consider using spicy Italian sausage instead of regular. You can also add crushed red pepper flakes or diced jalapeños to the meat mix. For an extra kick, mix in some hot sauce with the marinara sauce. Another fun idea is to top the casserole with spicy pepper jack cheese before baking. This blog post shared a recipe for a Meat Lovers Pizza Casserole. We discussed key ingredients like meats, cheeses, and fresh produce. I provided step-by-step cooking instructions, easy tips, and variations to suit different tastes. This dish is great for family meals and gatherings. Experiment with different meats and toppings to make it your own. With its rich flavors and simple prep, you’re sure to impress everyone at the table. Enjoy your cooking!

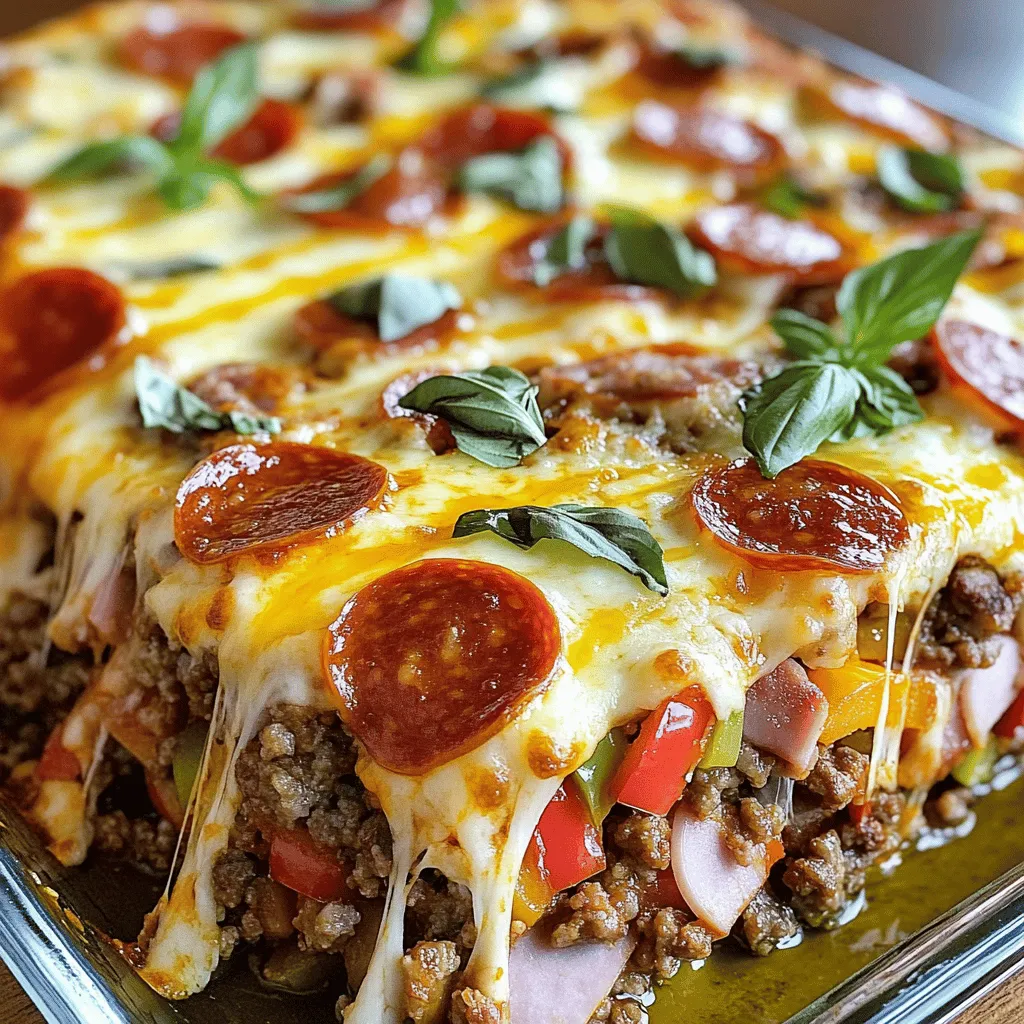
Craving a hearty meal that your whole family will love? Look no further! This Meat Lovers Pizza Casserole is packed with savory meats, gooey cheese, and bold flavors. It’s easy …

Read more

Categories Dinner

Cajun Chicken Sloppy Joes Easy and Flavorful Recipe

May 27, 2025 by Chef Luca
To make Cajun Chicken Sloppy Joes, you will need: - 1 lb ground chicken - 1 small onion, diced - 1 green bell pepper, diced - 2 cloves garlic, minced - 1 tablespoon Cajun seasoning - 1 tablespoon Worcestershire sauce - 1 can (8 oz) tomato sauce - 1 tablespoon brown sugar - Salt and pepper to taste - 4 hamburger buns - Fresh parsley, chopped (for garnish) These ingredients work together to create a dish full of flavor. When choosing fresh ingredients, focus on a few key points: - Chicken: Look for bright pink and moist ground chicken. Avoid any that appears grey or dry. - Vegetables: Choose firm onions and bell peppers. They should feel heavy and have no soft spots. - Garlic: Pick bulbs that are firm and have no sprouting. Fresh garlic has a strong smell and should not be dry. - Parsley: Select vibrant green parsley. It should be fresh and not wilted or yellowed. Fresh ingredients lead to a more tasty meal. If you have dietary needs, you can make some changes: - Ground Chicken: Use ground turkey or lean beef for a different taste. - Worcestershire Sauce: Swap with soy sauce for a gluten-free option. - Tomato Sauce: Try using diced tomatoes or marinara for a chunkier texture. - Buns: Choose lettuce wraps for a low-carb version or gluten-free buns for gluten sensitivity. These swaps help everyone enjoy this dish. For the full recipe, check the detailed instructions. Start by heating a large skillet over medium heat. Add 1 pound of ground chicken. Cook it until it turns brown, which should take about 5-7 minutes. Use a spatula to break the chicken into small pieces. This helps it cook evenly. Next, add in the diced onion, green bell pepper, and minced garlic. Stir these in and cook them until they soften, which takes about 3-4 minutes. This mix adds great flavor to the dish. Then, sprinkle in 1 tablespoon of Cajun seasoning and 1 tablespoon of Worcestershire sauce. Mix well to coat all the chicken and veggies. The seasoning gives your dish that Cajun kick. Now, pour in 1 can of tomato sauce and add 1 tablespoon of brown sugar. Stir everything together, then season with salt and pepper to taste. Let this mixture simmer for about 10 minutes. Stir occasionally until it thickens slightly. While your chicken mixture cooks, you can prepare your buns. Take 4 hamburger buns and toast them. You can use a separate skillet or your oven. Toasting them gives a nice crunch and warmth. To toast in a skillet, just place the buns cut side down for a few minutes until golden brown. If using the oven, broil them for about 1-2 minutes. Keep an eye on them to prevent burning. Once the chicken mixture is ready, it’s time to assemble! Grab your toasted hamburger buns. Spoon the delicious chicken mixture generously onto each bun. Make it look nice by garnishing with chopped fresh parsley. The green color adds freshness and makes your dish pop. Now you're ready to serve! Enjoy these tasty Cajun Chicken Sloppy Joes with your favorite sides. For the full recipe, check the details above. You can make this dish a day early. Just follow the full recipe and let it cool. Store it in a sealed container in the fridge. When you are ready to eat, reheat it on the stove over low heat. Stir often to warm it evenly. You can also use a microwave if you prefer. Just heat it for a minute, then stir and heat again if needed. Want to boost the taste? You can add more spices. A dash of hot sauce gives it a kick. You might also try diced tomatoes for some freshness. Or, mix in some corn for a sweet taste. Adding a spoonful of cream cheese can make it creamy and rich. Each of these will add a fun twist to your Cajun Chicken Sloppy Joes. Think about what to serve with your sloppy joes. A fresh salad pairs well and adds crunch. Sweet potato fries give a nice balance to the meal. You could also try coleslaw for a creamy touch. If you want something simple, chips are great too. They add a nice crunch alongside your flavorful dish. {{image_2}} If you love heat, add more spice to your Cajun Chicken Sloppy Joes. Try using a spicier Cajun seasoning or add diced jalapeños. You can also mix in some hot sauce for extra kick. This will give your dish a fiery twist that spice lovers will adore. You can easily make a vegetarian version of this dish. Use plant-based ground meat, like lentils or chickpeas. These options offer great texture and flavor. Season them with the same Cajun spices. This way, everyone can enjoy a tasty meal, no matter their diet. For gluten-free options, swap regular buns for gluten-free ones. You can also serve the chicken mix over lettuce wraps or cauliflower rice. This keeps the flavors intact while lowering carbs. Feel free to get creative with your toppings to keep it fun and fresh. This recipe allows for plenty of twists, so check out the Full Recipe for more ideas! To keep your Cajun Chicken Sloppy Joes fresh, store them in an airtight container. This method helps prevent drying out. Let the dish cool to room temperature before sealing it. You can keep it in the fridge for up to three days. If you have leftover buns, store them separately to avoid sogginess. Freezing is a great option for longer storage. Place the cooled chicken mixture in a freezer-safe container. Make sure it is tightly sealed to avoid freezer burn. You can freeze it for up to three months. When you're ready to eat, thaw it overnight in the fridge. This keeps the flavors fresh and vibrant. When it's time to reheat, use the stovetop for the best results. Place the chicken mixture in a skillet over low heat. Stir it often to heat evenly and prevent sticking. If it seems dry, add a splash of water or broth. For buns, you can toast them lightly in the oven. This method restores their crunch and enhances your meal. For the complete recipe, refer to the Full Recipe section. Cajun Chicken Sloppy Joes pair well with many sides. Try serving them with: - Crispy potato fries - Coleslaw for crunch - A fresh garden salad - Sweet corn on the cob These sides enhance the meal and balance the rich flavors. You can also serve pickles or chips for a fun crunch. To spice up your Cajun Chicken Sloppy Joes, add more Cajun seasoning. You can also try these tips: - Mix in diced jalapeños for heat - Add a splash of hot sauce - Use spicy mustard in the sauce Adjust the spice to your taste. Start with a little and add more as you go. This way, you can find your perfect kick! Yes, you can make Cajun Chicken Sloppy Joes ahead of time. Here’s how: - Cook the chicken mixture and let it cool. - Store it in an airtight container in the fridge for up to three days. - Reheat it on the stove or microwave before serving. Making it in advance saves time on busy nights. Just toast your buns right before serving for that fresh touch. For the complete recipe, check the Full Recipe section. In this blog post, you learned how to create delicious Cajun Chicken Sloppy Joes. We covered ingredients, cooking steps, and tips to enhance the dish. You can choose fresh items or make substitutions for diets. We explored fun variations, like spicy options or vegetarian choices. Remember to store leftovers properly and use reheating methods for the best taste. Armed with this knowledge, you can impress friends and family with your cooking. Enjoy your Cajun Chicken Sloppy Joes, and don’t hesitate to get creative!

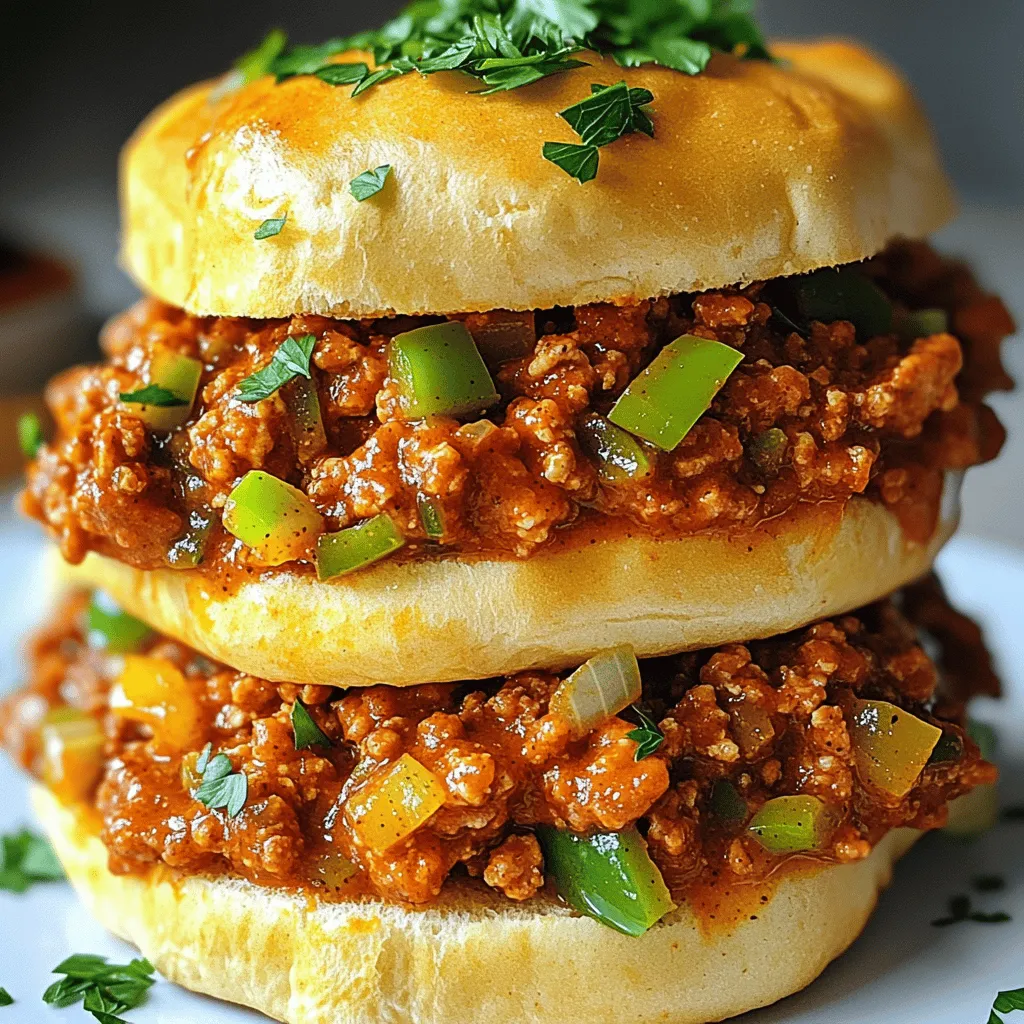
Are you ready for a flavor blast? These Cajun Chicken Sloppy Joes combine spicy goodness with ease. In this post, I’ll share simple steps to make a meal that impresses. …

Read more

Categories Dinner

20 Minute Honey Garlic Shrimp & Rice Bowl Delight

May 27, 2025 by Chef Luca
- Shrimp: You need 1 pound of shrimp. Make sure they are peeled and deveined. Fresh shrimp works best, but frozen shrimp is fine too. - Jasmine rice: Use 2 cups of cooked jasmine rice. It’s fragrant and pairs well with shrimp. - Honey and soy sauce: You’ll need 1/4 cup of honey and 2 tablespoons of soy sauce. These give the dish its sweet and savory taste. - Garlic and ginger: Use 4 cloves of minced garlic and 1 tablespoon of minced ginger. They add depth and flavor. - Olive oil, salt, and pepper: You need 1 tablespoon of olive oil. Season with salt and pepper to taste. This helps cook the shrimp perfectly. - Broccoli florets and green onions: Add 1 cup of steamed broccoli for color and health. Top with 1/4 cup of sliced green onions for a fresh crunch. This 20 Minute Honey Garlic Shrimp & Rice Bowl is quick to make. You can find the full recipe for more details. Enjoy your cooking! First, grab a medium bowl. In this bowl, combine the shrimp with honey, soy sauce, minced garlic, and ginger. Toss everything together to coat the shrimp well. This mix will give the shrimp its sweet and savory flavor. Let the shrimp rest for about 5 minutes. This short time lets the shrimp soak up all that yummy flavor. Now, heat a tablespoon of olive oil in a large skillet over medium heat. Once the oil is hot, add the marinated shrimp to the skillet. Cook the shrimp for about 2-3 minutes on each side. You know they are done when they turn pink and opaque. Be careful not to overcook them, or they will get tough. After that, season the shrimp with salt and pepper to taste. If you have any marinade left in the bowl, pour it over the shrimp. Give it one more minute to heat through and blend the flavors. While the shrimp cook, prepare your jasmine rice if it isn’t cooked yet. In serving bowls, layer the cooked jasmine rice at the bottom. Next, add the sautéed shrimp on top. Don’t forget to include a generous scoop of steamed broccoli florets. This adds a nice crunch and color to your dish. To finish, garnish with sliced green onions and sprinkle some sesame seeds for extra flavor and texture. This step makes your meal look as good as it tastes! For the full recipe, check above. To make great shrimp, avoid overcooking. Cook them just until they turn pink and opaque. This keeps them tender and juicy. Using fresh ingredients helps a lot, too. Fresh shrimp taste better than frozen. If you can, buy shrimp that are wild-caught. They have a richer flavor. You can enhance the flavor by trying new spices. A pinch of red pepper flakes adds heat. If you like, add a squeeze of lime juice for brightness. You can also add more veggies. Bell peppers, snap peas, or carrots can be great. They give extra color and crunch to your bowl. Pair your bowl with a side of edamame or a simple salad. This adds freshness and makes your meal more filling. Serve the dish warm. The rice and shrimp taste best hot. For a lovely touch, add a few lime wedges on the side. They give a nice zest when squeezed over the bowl. You can find the full recipe to make this dish here. {{image_2}} You can easily swap out shrimp for chicken or tofu. Chicken gives a hearty bite. It cooks well in the same marinade. Use bite-sized pieces and cook until golden brown. Tofu is perfect for a plant-based option. Press it first to remove water. Cut it into cubes and marinate just like the shrimp. Cook until crispy and golden. If you want a change, try teriyaki or sweet chili sauce. Teriyaki adds a rich, savory flavor. Just replace honey and soy sauce with teriyaki. Sweet chili sauce brings a sweet and spicy kick. Use it alone or mix it with soy sauce. This keeps your meal fresh and exciting. You can easily adjust this recipe for more servings. Just double or triple the ingredients. Keep the same cooking times, but watch the shrimp closely. For meal prep, make extra shrimp and rice. Store them separately in airtight containers. This way, you can enjoy this dish throughout the week. Just reheat when ready to eat. Enjoy the flavors any day! For the full recipe, check the earlier section. To store leftovers, let the dish cool first. Place the shrimp and rice in an airtight container. You should keep it in the fridge. This helps the shrimp stay fresh. Use the leftovers within three days for best taste. If you want to freeze portions, separate the shrimp and rice. Use freezer-safe bags or containers. Squeeze out as much air as possible before sealing. Label the bags with the date. You can freeze them for up to three months. For reheating, you have a few good options. Use a microwave for quick heating. Place the food in a safe dish and cover it. Heat it in short bursts, stirring in between. You can also reheat in a skillet. Warm it on medium heat until hot. This method keeps the texture nice. Always check to make sure it’s heated through. This dish is quick. You can make it in just 20 minutes. The prep takes about 10 minutes. Cooking the shrimp and rice takes around 10 minutes. If you follow the steps, you will have a tasty meal fast. Yes, you can use frozen shrimp. Just thaw them first. You can run them under cold water for a few minutes. After thawing, pat them dry. This helps them cook evenly. Add them to your marinade as usual. If you don’t have jasmine rice, don’t worry! You can use other rice types. Basmati rice is a great choice. Brown rice also works well but takes longer to cook. Quinoa is another healthy option. Each will give a different flavor, but they all pair well with the shrimp. For this recipe, just adjust the cooking time as needed. For the full recipe, refer to the [Full Recipe]. This blog post covered a quick and tasty honey garlic shrimp and rice bowl. We explored the main ingredients like shrimp, jasmine rice, and essential seasonings. I shared step-by-step instructions for marinating and cooking the shrimp, along with tips for perfecting flavor and serving. We also discussed variations, storage, and answered common questions. Now, you can whip up this dish with ease. Enjoy mixing flavors and making it your own!

Ready for a quick and tasty meal? This 20 Minute Honey Garlic Shrimp & Rice Bowl is your answer! Packed with shrimp, jasmine rice, and a sweet garlic sauce, it’s …

Read more

Categories Dinner

Spicy Shrimp Tacos with Mango Salsa Delightfully Fresh

May 27, 2025 by Chef Luca
This recipe for spicy shrimp tacos with mango salsa is bright and full of flavor. It takes just 30 minutes to make. You will love the fresh taste and the spicy kick. The combination of shrimp and mango salsa is truly delightful. - Shrimp and Marinade Components - 1 lb shrimp, peeled and deveined - 2 teaspoons olive oil - 1 teaspoon paprika - 1 teaspoon cumin - ½ teaspoon cayenne pepper (adjust to taste) - 1 tablespoon lime juice - Salt and pepper to taste - Tropical Salsa Ingredients - 1 ripe mango, diced - 1 avocado, diced - ½ red onion, finely chopped - 1 jalapeño, minced (deseeded for less heat) - 2 tablespoons fresh cilantro, chopped - 1 tablespoon lime juice (for salsa) - Tortilla Options - 8 small corn tortillas This list includes all you need for a tasty meal. Use fresh ingredients for the best flavor. The shrimp and salsa together create a perfect bite. Start by gathering your shrimp. You want 1 pound of shrimp, peeled and deveined. Place the shrimp in a bowl. Add 2 teaspoons of olive oil for moisture. Sprinkle in 1 teaspoon of paprika and 1 teaspoon of cumin for depth. If you like it spicy, add ½ teaspoon of cayenne pepper. Squeeze in 1 tablespoon of lime juice. Season with salt and pepper to taste. Mix it all well. Make sure each shrimp gets coated in the spices. Let it sit for a few minutes while you prepare the salsa. Take a ripe mango and dice it into small pieces. You need about one mango for this recipe. Next, chop one avocado into small cubes. Finely chop ½ of a red onion. If you like heat, take one jalapeño, deseed it, and mince it. Combine the mango, avocado, red onion, and jalapeño in a bowl. Add 2 tablespoons of fresh cilantro for a burst of flavor. Finally, squeeze in 1 tablespoon of lime juice. Mix gently and set aside. This salsa adds a sweet and spicy touch to your tacos. Heat a skillet over medium-high heat. Once it’s hot, add the shrimp to the skillet. Cook them for 2-3 minutes on each side. They will turn pink and opaque when done. While the shrimp cooks, warm 8 small corn tortillas in another pan or the microwave. This makes them soft and easy to fold. Now, it’s time to assemble. Place a few shrimp in the center of each tortilla. Top with a generous scoop of mango salsa. For an extra kick, serve with lime wedges on the side. Enjoy your flavorful creation! For the full recipe, check out the details above. To cook shrimp just right, follow these tips: - Use fresh shrimp. Fresh shrimp taste better and cook more evenly. - Don’t overcook. Cook shrimp for only 2-3 minutes per side. They should turn pink and opaque. - High heat matters. Use medium-high heat for quick cooking. This keeps the shrimp juicy. - Marinate well. Let the shrimp sit in the spice mix for at least 15 minutes. This adds more flavor. To make your mango salsa shine, keep these tips in mind: - Choose ripe mangoes. A ripe mango gives the salsa a sweet and juicy base. - Add lime juice. Fresh lime juice brightens the flavors. It makes the salsa zesty. - Balance textures. Include creamy avocado and crunchy red onion for a mix of textures. - Use fresh herbs. Fresh cilantro adds a pop of flavor. Use it generously for the best taste. Warming tortillas is key for tasty tacos. Here’s how to do it right: - Use a dry skillet. Heat a skillet on medium heat. No oil needed! - Warm one at a time. Place each tortilla in the pan for about 30 seconds. Flip it over to warm the other side. - Cover to keep warm. Place warmed tortillas in a cloth. This keeps them soft and warm until ready to serve. - Microwave option. Alternatively, wrap tortillas in a damp paper towel and microwave for 15-20 seconds. For the full recipe, check out the details above. Enjoy making your spicy shrimp tacos with mango salsa! {{image_2}} You can switch the shrimp for chicken or fish. Both options work well with the same spices. If you want a plant-based option, try jackfruit or tofu. Just make sure to marinate them in the same spices for great flavor. You can change the mango for pineapple or peach for a sweet twist. Add diced bell peppers for extra crunch. If you like heat, include more jalapeños or even a dash of hot sauce. Each change makes the salsa your own. Use corn tortillas for a gluten-free choice. For a vegan taco, skip the shrimp and use roasted veggies or beans. You can still enjoy all the flavors with your custom mango salsa. Enjoy experimenting with these options! For the full recipe, check out the full recipe section. To keep leftover shrimp tacos fresh, first separate the shrimp and salsa from the tortillas. Store the shrimp and salsa in airtight containers. Keep the tortillas in a separate bag. This way, you avoid sogginess. Use them within two days for the best taste. For reheating shrimp, use a pan on medium heat. Add the shrimp and warm them for about 2-3 minutes. This keeps them juicy. For the tortillas, heat them in a dry skillet for about 30 seconds on each side. This makes them soft and warm again. If you want to freeze shrimp or salsa, do so separately. Place shrimp in a freezer bag. Remove as much air as possible. For salsa, use a container that seals well. You can freeze both for up to three months. When ready, thaw them in the fridge overnight before reheating. Yes, you can use frozen shrimp. Just thaw them first. Place the shrimp in cold water for about 10-15 minutes. Drain and pat them dry. This helps them cook evenly. Make sure they are peeled and deveined before marinating. Many toppings work great with spicy shrimp tacos. Here are some ideas: - Shredded cabbage for crunch - Sliced radishes for a pop of color - Sour cream for creaminess - Feta cheese for a tangy kick - Extra lime wedges for zest Feel free to mix and match these toppings. They can enhance the taste and add fun textures. To adjust the spice level, change the amount of cayenne pepper. Use less for a milder taco. You can also remove the seeds from the jalapeño. This will lower the heat. If you crave more heat, add a dash of hot sauce or extra jalapeño. Make it as spicy as you like! Enjoy experimenting with the flavors. Check out the Full Recipe for more tips. In this blog post, I covered how to make delicious shrimp tacos with tropical salsa. You learned about the key ingredients and the step-by-step process. I shared tips for cooking shrimp just right and enhancing salsa flavor. Plus, I offered tasty alternatives and storage tips. Remember, experimenting with flavors adds fun. Enjoy making these shrimp tacos to share with friends and family. You’ll impress everyone with your cooking skills!

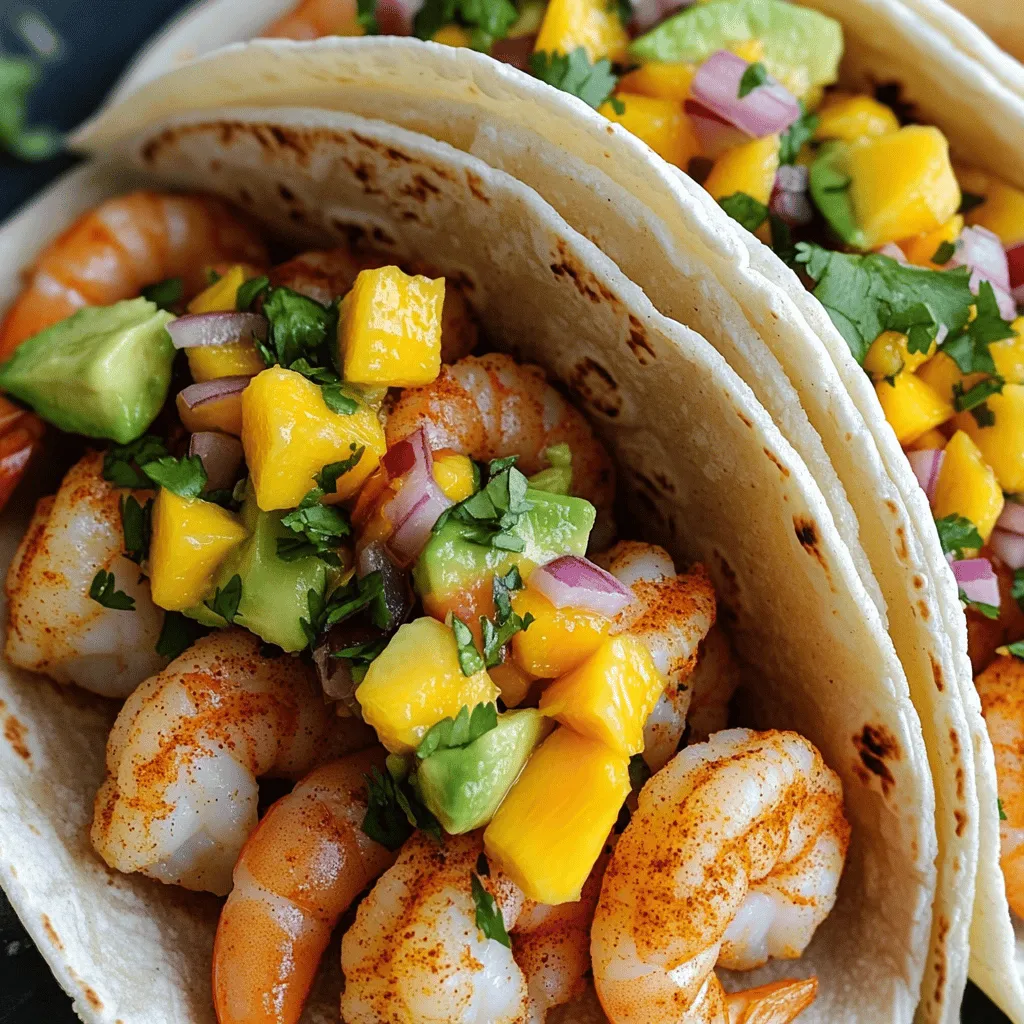
Get ready to elevate your taco night with my Spicy Shrimp Tacos topped with vibrant Mango Salsa! These tasty tacos burst with flavor and bring a tropical twist to your …

Read more

Categories Dinner
Older posts
Newer posts
← Previous Page1 … Page113 Page114 Page115 … Page122 Next →

STIRRED RECIPES

Where every dish begins with a stir! 🍲✨

PAGES

Home About Contact Privacy Policy Terms & Conditions Cookie Policy GDPR Policy Copyright Policy Disclaimer

CATEGORIES

Appetizers Desserts Salads Breakfast Dinner

Contact

  • Pinterest
  • Mail
Copyright © 2026 Stirred Recipes. All rights reserved.