Skip to content
Stirred Recipes
  • Home
  • Appetizers
  • Desserts
  • Salads
  • Breakfast
  • Dinner
  • Privacy Policy
  • Contact
  • About

Chef Luca

Shrimp Boil Foil Packs Quick and Flavorful Recipe

May 29, 2025 by Chef Luca
- 1 pound large shrimp, peeled and deveined - 2 cups baby potatoes, halved - 2 ears of corn, cut into thirds - 4 cloves garlic, minced - 1 tablespoon Old Bay seasoning - 1 teaspoon smoked paprika - 4 tablespoons olive oil - 1 lemon, juiced - Salt and pepper to taste - Fresh parsley, chopped for garnish Gathering these ingredients is simple, and you can find them at any local store. The large shrimp form the heart of this dish. They cook quickly and soak up all the fantastic flavors. Baby potatoes add a nice bite and help balance the meal. Sweet corn brings a pop of color and sweetness. Garlic boosts the flavor, while Old Bay seasoning adds that classic shrimp boil taste. For a touch of warmth, I like to add smoked paprika. It gives a rich flavor without being too spicy. Olive oil helps the shrimp and veggies cook evenly. A good squeeze of lemon juice brightens everything up. Lastly, salt and pepper enhance all the flavors. Don’t forget the fresh parsley! It adds a vibrant touch and freshness when you serve. You can find the complete recipe [Full Recipe]. This will guide you through the fun process of making Shrimp Boil Foil Packs! - Preheat your oven to 400°F (200°C) or heat your grill to medium-high. - Cut four large pieces of aluminum foil, about 12 inches long each. - In a large mixing bowl, combine the shrimp, halved baby potatoes, corn pieces, minced garlic, Old Bay seasoning, smoked paprika, olive oil, and lemon juice. - Toss well to ensure everything is coated evenly. - Divide the shrimp and vegetable mixture evenly among the four pieces of foil, placing them in the center. - Fold the edges of the foil up and over, sealing them tightly so no juices can escape. - Place the foil packs on a baking sheet if using the oven, or directly on the grill. - Cook for 15-20 minutes, until the shrimp are pink and cooked through and the potatoes are tender. These steps make it easy to create shrimp boil foil packs that are quick and flavorful. Enjoy the process and the delicious results! - Choosing the right shrimp: Select large, fresh shrimp for the best taste. Look for shrimp that are firm and have a mild scent. Frozen shrimp works too; just thaw them first. - Avoid overcooking: Shrimp cooks quickly. Keep an eye on them. When they turn pink, they are done. If you overcook shrimp, they become tough and rubbery. - Best ways to present the dish: Open the foil packs carefully. Let the steam escape slowly. You can serve right from the foil for a fun touch. Add fresh parsley on top for color. - Recommended sides to pair: Serve your shrimp boil with a crisp green salad or crusty bread. Both contrast nicely with the rich flavors of the shrimp and veggies. - Additional spices to enhance flavor: You can add cayenne pepper for heat. A sprinkle of lemon zest gives a fresh kick. Experiment with garlic powder or onion powder to enhance the taste. - Making it spicier or milder: For a spicier boil, add more Old Bay or some hot sauce. If you prefer mild flavors, skip the paprika. Adjust to suit your taste buds. Try the Full Recipe for a quick and tasty meal that brings everyone together! {{image_2}} You can swap shrimp for other seafood. Crab and lobster make great choices. Just adjust cooking times. They add richness and flavor. For a vegetarian version, skip the seafood. Use hearty vegetables like mushrooms or zucchini. Add chickpeas for protein. This way, everyone can enjoy a shrimp boil foil pack. You can make shrimp boil packs in a slow cooker. Just add all ingredients and cook on low for about four hours. The shrimp will stay juicy and tender. If you use an Instant Pot, add one cup of water. Cook on high pressure for three minutes. Quick and easy, right? Feel free to mix in different vegetables. Bell peppers, asparagus, or even carrots work well. They add color and taste. You can also try various herbs and spices. Fresh dill or thyme can brighten the dish. A pinch of red pepper flakes can add heat. Let your taste guide you! To store leftovers, first let the foil packs cool down. Then, carefully open the packs and transfer the shrimp and veggies to an airtight container. You can keep them in the fridge for up to three days. Make sure to check for any off smells before eating. If you want to keep them longer, consider freezing. In the freezer, they can last up to three months. The best way to reheat shrimp boil foil packs is in the oven. Preheat your oven to 350°F (175°C). Place the mixture in an oven-safe dish and cover it with foil. Heat for about 10-15 minutes until warmed through. You can also use a microwave, but it might not keep the same texture. Heat in short bursts and stir in between to ensure even warming. Always check the shrimp's doneness and avoid overcooking. This keeps your dish tasty and fresh! Cook shrimp boil foil packs for 15 to 20 minutes. This timing works well on both the grill and in the oven. The shrimp should turn pink and the potatoes must be tender. If you cook longer, the shrimp may become tough. Yes, you can use frozen shrimp. Just thaw them before cooking. Thaw shrimp by placing them in cold water for about 15 minutes. Fresh shrimp have a great taste, but frozen shrimp work well, too. They often come pre-cooked, so adjust your cook time if needed. Many sides pair nicely with shrimp boil. Here are a few ideas: - Coleslaw - Garlic bread - Cornbread - Salad - Grilled vegetables These sides add flavor and balance to your meal. Yes, you can easily make this recipe gluten-free. All listed ingredients are gluten-free. Just make sure your seasonings, like Old Bay, do not contain gluten. Always check labels to be safe. Enjoy your shrimp boil without worry! In this blog post, we explored how to make a delicious shrimp boil using simple ingredients. You learned about the main and additional components, plus step-by-step instructions to prepare the dish. We also shared tips for seasoning and serving, variations for different tastes, storage methods, and answered common questions. Try this recipe for a fun and tasty meal. Enjoy the flavors and make it your own!

If you’re craving a quick and tasty meal, try my Shrimp Boil Foil Packs! This recipe brings classic shrimp boil flavor straight to your grill or oven in just 20 …

Read more

Categories Dinner

Garlic Parmesan Bread Bites Irresistible Appetizer Treat

November 11, 2025May 28, 2025 by Chef Luca
When making Garlic Parmesan Bread Bites, you need simple but flavorful ingredients. Each one adds to the tasty result. Here’s what you’ll need: - Ciabatta bread cubes - Unsalted butter - Minced garlic - Grated Parmesan cheese - Fresh parsley - Italian seasoning - Salt and pepper Ciabatta bread gives the bites a nice texture. It holds up well to the garlic and butter. Using unsalted butter lets you control the salt in the dish. Minced garlic offers a bold flavor that blends well with the cheese. Grated Parmesan cheese adds richness and a savory taste. Fresh parsley brings a hint of color and freshness. Italian seasoning combines herbs for a balanced flavor. Lastly, salt and pepper enhance all the tastes. Gather these ingredients, and you're ready to create a delicious appetizer that everyone will love! {{ingredient_image_1}} 1. Preheat your oven to 375°F (190°C). Line a baking sheet with parchment paper. This helps to prevent sticking and makes cleanup easy. 2. In a large mixing bowl, melt the butter. Add the minced garlic to the butter. Stir well to mix them together. The garlic will give a great flavor to the bread. 3. Now, add the cheese and seasonings. Combine the grated Parmesan cheese, chopped parsley, Italian seasoning, and a pinch of salt and pepper. Mix until everything is well blended. This mixture will coat the bread perfectly. 1. Toss the bread cubes in the garlic-parmesan mixture. Make sure each cube gets a good coat of the mixture. This step is key for flavor. 2. Spread the coated bread bites on the baking sheet. Arrange them in a single layer. Avoid overcrowding the bread bites. This helps them bake evenly and get crispy. 1. Bake in the preheated oven for 12-15 minutes. Keep an eye on them. You want them golden brown and crispy on the edges. 2. Once done, remove from the oven. Let them cool slightly before serving. For a nice touch, garnish with extra chopped parsley. Serve with a small bowl of marinara sauce for dipping. Enjoy your tasty garlic parmesan bread bites! To get the best garlic flavor, adjust the garlic to your taste. You can add more or less garlic depending on how strong you like it. I love using fresh garlic, but if you need a quick option, dried garlic works too. Using fresh herbs like parsley enhances the dish. Fresh parsley brightens the flavor. Dried herbs are handy when fresh isn't available. Just remember, dried herbs are stronger. Use less if you're substituting. For crispy bread bites, the right baking time is key. Bake at 375°F (190°C) for 12-15 minutes. Keep an eye on them. Remove them when they turn golden brown. Do not overcrowd the baking sheet. Spread the bread bites in a single layer. This helps them crisp evenly. If they touch, they may steam instead of bake. These garlic Parmesan bread bites shine with dips. A small bowl of marinara sauce makes a great side. You can also pair them with a creamy ranch or tangy garlic aioli. Serve them warm for the best taste. A sprinkle of chopped parsley on top adds color and freshness. Enjoy these bites at parties or as a tasty snack! Pro Tips Use Fresh Garlic: Freshly minced garlic provides a more robust flavor compared to pre-minced or powdered garlic, enhancing the overall taste of the bread bites. Don't Overcrowd the Baking Sheet: Spacing the bread bites out on the baking sheet allows for even cooking and crisping, preventing them from steaming. Try Different Cheeses: Experiment with other cheeses like mozzarella or cheddar for a unique twist on the classic garlic bread flavor. Serve Immediately: For the best texture and flavor, serve these bread bites right out of the oven while they are still warm and crispy. {{image_2}} You can change the bread for these bites. Ciabatta is great, but you can try other types. Sourdough adds a tangy flavor. French bread gives a nice crust. Even whole wheat bread works well. Each option gives a unique taste and texture. Want to spice things up? You can add other cheeses or spices to the mix. Mozzarella melts beautifully and adds creaminess. Cheddar gives a sharp taste. For spices, try red pepper flakes for heat or smoked paprika for depth. Mixing flavors keeps things fun and fresh. If you need gluten-free bites, no worries! Substitute with gluten-free bread. Many stores sell good gluten-free options. Just check if they are soft enough to cube. The rest of the recipe stays the same. You can still enjoy all the cheesy, garlicky goodness! To keep your Garlic Parmesan Bread Bites fresh, store them in the refrigerator. Place them in an airtight container. This method will help maintain their flavor and texture. Leftovers can last for up to three days. If you notice any moisture, add a paper towel to absorb it. Reheating these bread bites is easy. You can use an oven or a microwave. For the oven, preheat it to 350°F (175°C). Place the bread bites on a baking sheet. Heat them for about 5-7 minutes until they are warm and crispy. If using a microwave, heat in short intervals of 20-30 seconds. This method may make them softer. Freezing is a great way to save these bites for later. To freeze, place the cooled bread bites in a freezer-safe bag. Remove as much air as possible before sealing. They can stay in the freezer for up to three months. To thaw, leave them in the refrigerator overnight. Reheat them in the oven for the best result. Garlic Parmesan Bread Bites last for about three days in the fridge. Store them in an airtight container. This keeps them fresh and safe to eat. If they smell off or look moldy, throw them away. Always check before eating leftovers. Yes, you can make these bread bites ahead. Prepare the garlic-parmesan mixture and coat the bread cubes. Store them in the fridge for up to a day. When you're ready, bake them as directed. This saves time when you have guests. These bread bites pair well with marinara sauce for dipping. You can also serve them with a fresh salad or a cheese platter. They make a great snack for parties or game nights. Enjoy them with a nice glass of wine, too! Garlic Parmesan bread bites are simple yet bursting with flavor. We covered the key ingredients, preparation steps, and baking tips to ensure you get crispy, tasty bites every time. Remember, adjusting garlic and herbs can elevate your dish to new heights. You can also explore variations using different breads or cheeses. With proper storage, these bites remain delicious, allowing you to savor them later. Try pairing them with your favorite dips for extra enjoyment. Enjoy your cooking adventure, and remember, the best flavors start in your kitchen!

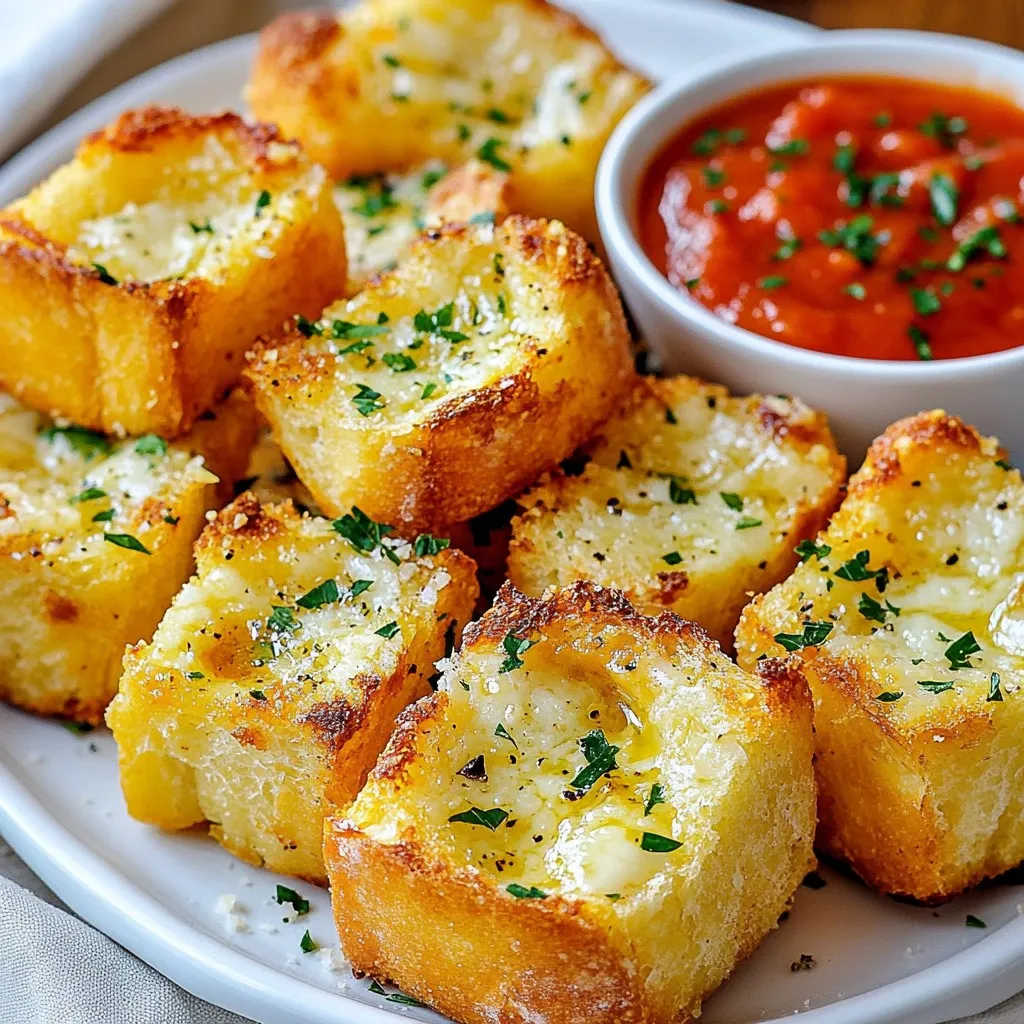
Get ready to impress your guests with Garlic Parmesan Bread Bites! This quick and easy appetizer will steal the show at your next gathering. Crispy, flavorful, and packed with garlic …

Read more

Categories Appetizers

Cheesy Pepperoni Pizza Roll-Ups Tasty and Easy Recipe

May 28, 2025 by Chef Luca
- 1 package of refrigerated pizza dough - 1 cup shredded mozzarella cheese - 1 cup pepperoni slices - 1/2 cup marinara sauce for dipping - Fresh basil for garnish - 1 tablespoon Italian seasoning - 1 garlic clove, minced - 1 tablespoon olive oil - Cornmeal for dusting (optional) When I create Cheesy Pepperoni Pizza Roll-Ups, I focus on fresh ingredients. The main ingredients are simple and easy to find. The pizza dough forms the base, while mozzarella cheese adds that gooey stretch. Pepperoni gives a classic taste that everyone loves. I also recommend some optional ingredients. Marinara sauce makes a great dip. Fresh basil adds a pop of color and flavor. You can skip these if you want, but they enhance the dish. Supporting ingredients play a key role too. Italian seasoning brings depth to the flavor. Minced garlic adds a savory kick. Olive oil helps the dough crisp up nicely. If you use cornmeal, it adds texture to the bottom of the roll-ups. For the full recipe, you can refer to the [Full Recipe]. Remember, the quality of your ingredients matters for the best taste. 1. Preheat your oven to 400°F (200°C). 2. Line a baking sheet with parchment paper. If you want, sprinkle some cornmeal on the parchment for a nice crunch. 3. On a lightly floured surface, roll out the pizza dough. Make it about 1/4 inch thick and try to get a rectangle shape. 4. Brush the dough with olive oil. Spread the minced garlic evenly over the surface. 1. Sprinkle the shredded mozzarella cheese on the dough. Leave a little space around the edges. 2. Layer the pepperoni slices over the cheese. Add a sprinkle of Italian seasoning for extra flavor. 3. Starting from one edge, roll the dough tightly into a log shape. Keep the fillings inside as you roll. 4. After rolling, slice the log into equal pieces, about 1.5 inches thick. You should end up with around 12-16 roll-ups. 1. Place the roll-ups on your prepared baking sheet. Make sure they are spaced apart. 2. Bake in the preheated oven for about 15-20 minutes. Look for them to turn golden brown and for the cheese to melt and bubble. 3. Once done, take them out and let them cool for a few minutes. This step helps avoid burning your mouth when you eat them. For the full recipe, refer to the previous section. Enjoy these tasty treats! To make your Cheesy Pepperoni Pizza Roll-Ups pop, focus on seasoning. Use fresh Italian seasoning for the best taste. You can easily mix dried basil, oregano, and thyme. Fresh ingredients also make a big difference. Use fresh mozzarella for a creamy bite. Fresh garlic adds a nice kick, too. Baking these roll-ups right is key. To ensure even cooking, place them spaced apart on the baking sheet. This helps heat flow evenly. To stop them from sticking, use parchment paper. You can also dust the paper with cornmeal. This adds texture and keeps them from sticking. Making your roll-ups look great is fun! You can garnish with fresh basil leaves. This adds color and a fresh taste. Serve them warm with marinara sauce for dipping. For a twist, try mixing in some parmesan cheese on top before baking. This gives a nice golden color and extra flavor. For the full recipe, check the detailed instructions above. {{image_2}} You can easily swap out cheese in this recipe. Try cheddar or provolone for a new taste. Both melt well and add great flavor. For meat substitutes, use turkey pepperoni or even salami. You can also try plant-based pepperoni for a healthier option. Adding vegetables can enhance your roll-ups. Consider bell peppers, mushrooms, or spinach. Chop them small, and layer them with the cheese and pepperoni. Different sauces can also change the game. Instead of marinara, try pesto, ranch, or even a spicy sriracha sauce for a kick. If you need a gluten-free option, use gluten-free pizza dough. Many brands now offer tasty choices in stores. For a vegetarian version, skip the pepperoni and add more cheese and veggies. You can even use olives or artichokes for extra flavor. Explore more ideas and find what you love! You can create a new favorite from this full recipe. To store leftovers, place them in an airtight container. Keep them in the refrigerator for up to three days. If you want to save them for later, you can freeze them. Wrap each roll-up tightly in plastic wrap and then place them in a freezer bag. They can last up to two months in the freezer. For reheating, use an oven for the best results. Preheat your oven to 350°F (175°C). Place the roll-ups on a baking sheet. Heat them for about 10-15 minutes or until hot. This method helps keep the roll-ups crispy. You can also use a microwave, but they may become soft. In the fridge, these roll-ups last about three days. If they sit longer, check for spoilage. Signs include a sour smell or a change in color. Always trust your nose! If you see any mold, throw them away. How to make Cheesy Pepperoni Pizza Roll-Ups from scratch? To make Cheesy Pepperoni Pizza Roll-Ups, you start with pizza dough. Roll it out flat on a floured surface. Brush olive oil and sprinkle minced garlic on the dough. Next, add shredded mozzarella cheese and pepperoni slices. Roll the dough tightly and slice it into pieces. Bake at 400°F (200°C) until golden brown. For the full recipe, check out the details above. Can I use other toppings besides pepperoni? Yes, you can customize your roll-ups! Try using cooked sausage, mushrooms, or veggies like bell peppers. Just keep in mind to chop or slice the toppings small so they fit well inside the roll-ups. Caloric content per serving Each serving of Cheesy Pepperoni Pizza Roll-Ups contains about 300-350 calories. The exact number may vary based on the toppings and dough used. Dietary considerations These roll-ups are high in protein and carbs. They are not gluten-free due to the pizza dough. For a healthier option, you can use whole wheat dough or add more vegetables for fiber. How long do Cheesy Pepperoni Pizza Roll-Ups take to cook? It takes about 15-20 minutes to bake the roll-ups. Make sure to keep an eye on them. You want them golden brown and bubbly. Prep time and total cooking time considerations The prep time is around 15 minutes. So, you can make these tasty roll-ups in about 35 minutes total. Perfect for a quick meal or snack! This guide covered making Cheesy Pepperoni Pizza Roll-Ups easily. You learned about ingredients, preparation, baking, and storage tips. I shared variations for taste and dietary needs. These roll-ups are fun to make and great to eat. You can adjust flavors to fit your cravings. With these steps, you'll enjoy a tasty treat anytime. Happy cooking!

Got a craving for a quick snack? Try my Cheesy Pepperoni Pizza Roll-Ups! This tasty recipe is super easy, taking just a few minutes to prep. You’ll use simple ingredients …

Read more

Categories Appetizers

Crispy Parmesan Chicken with Garlic Sauce Delight

May 28, 2025 by Chef Luca
To make crispy Parmesan chicken, gather these key ingredients: - 4 boneless, skinless chicken breasts - 1 cup all-purpose flour - 2 large eggs, beaten - 1 cup breadcrumbs - 1 cup grated Parmesan cheese These items form the base of our dish. The chicken provides protein, while flour and eggs help the coating stick. Breadcrumbs give the chicken its crunch, and Parmesan adds a rich flavor. Next, enhance the taste with these seasonings: - 1 teaspoon garlic powder - 1 teaspoon Italian seasoning - Salt and pepper to taste Garlic powder gives a nice boost of flavor. Italian seasoning adds a mix of herbs. Salt and pepper are must-haves for any dish, sharpening all the other flavors. To finish off the dish, consider these garnishes: - 1/2 cup olive oil, for frying - 4 cloves garlic, minced - 1/2 cup chicken broth - 1 tablespoon fresh lemon juice - Fresh parsley, chopped (for garnish) The olive oil helps fry the chicken to golden perfection. Minced garlic and chicken broth create a tasty sauce. Lemon juice adds brightness, while parsley gives a fresh look and flavor. For the full recipe, check the details above. Start with the chicken breasts. Place each one between two sheets of plastic wrap. Use a meat mallet to pound the chicken. Aim for about 1/2 inch thick. This helps the chicken cook evenly. It also keeps it juicy. Now, let’s set up your breading station. You’ll need three shallow bowls. In the first bowl, add the flour. Season it with salt and pepper. In the second bowl, beat the eggs until mixed. In the third bowl, combine breadcrumbs, Parmesan cheese, garlic powder, and Italian seasoning. Mix it well. This makes the crust flavorful and crispy. Heat olive oil in a large skillet over medium-high heat. Once the oil is hot, it’s time to fry. Take a chicken breast and dredge it in the flour. Shake off the extra flour. Next, dip it in the beaten eggs, coating it well. Now, coat the chicken in the breadcrumb mix. Press down gently to help the crumbs stick. Carefully place the breaded chicken in the skillet. Fry each piece for about 5-6 minutes. Look for a nice golden brown color. Flip the chicken to cook the other side. Once done, transfer the chicken to a paper towel-lined plate. This helps drain the excess oil. For the full recipe, check the instructions above. To get that ideal crisp on your chicken, follow a few key steps. First, make sure the oil is hot enough before frying. If it's too cool, the chicken will absorb oil and become soggy. Use a deep skillet or pan that allows ample space for each piece. This way, the heat stays even around the chicken. Flip the chicken only once. This helps keep the crumb coating intact. To boost the flavor, add fresh herbs to the breadcrumb mix. Chopped parsley or thyme can add a nice touch. You can also sprinkle a little extra garlic powder into the coating for a stronger taste. A pinch of crushed red pepper can give it a slight kick. This adds depth to every bite. Remember, you can adjust seasonings based on your taste. You can fry, bake, or air-fry the chicken. Frying gives the crispiest results but adds oil. Baking is healthier but may not yield that same crunch. If you choose to bake, set your oven to 400°F (200°C) and place the chicken on a wire rack. This allows air to circulate and helps keep it crisp. Air-frying is a great middle ground, providing crispiness with less oil. Experiment with these methods to find your favorite. For the full recipe, check the earlier section. {{image_2}} You can boost flavor by adding herbs to your breadcrumbs. Mix in dried oregano, thyme, or rosemary. These herbs give your chicken a fresh taste. You can adjust the amount based on your likes. Try a tablespoon of each for a nice mix. This variation makes every bite more exciting! While garlic sauce is a star, you can try other sauces. A creamy Alfredo sauce adds richness. A tangy marinara brings a fun twist. Simply pour your chosen sauce over the crispy chicken. Each sauce changes the dish into a new experience. Experimenting with sauces keeps your meals lively! Adding vegetables makes this dish more colorful and healthy. You can sauté spinach, bell peppers, or zucchini. Toss them in the pan after cooking the chicken. This method adds nutrients and texture. Plus, it makes your plate look great! Don’t shy away from mixing in your favorite veggies. It’s all about making this dish your own. To keep your crispy Parmesan chicken fresh, store it in the fridge. Place it in an airtight container. This helps keep moisture in and air out. It stays good for about 3 to 4 days. Make sure to let it cool to room temperature first. This helps prevent sogginess and keeps it crispy longer. If you want to save some for later, freezing is a great option. First, let the chicken cool completely. Wrap each piece in plastic wrap, then place them in a freezer bag. Label the bag with the date. Frozen crispy Parmesan chicken lasts for about 2 to 3 months. When you’re ready to eat it, just take it out of the freezer and thaw in the fridge overnight. To reheat, preheat your oven to 375°F (190°C). Place the chicken on a baking sheet. Bake for about 15 to 20 minutes. This warms it up without losing the crispiness. You can also reheat in a skillet over medium heat. Just add a little oil and cook for about 5 minutes on each side. This method adds some extra crispiness. If you want to add the garlic sauce again, heat it separately and drizzle it on top. For the full recipe, check the details provided above. Yes, you can bake the crispy Parmesan chicken. Preheat your oven to 400°F (200°C). After breading the chicken, place it on a baking sheet lined with parchment paper. Spray the tops with cooking spray for added crispness. Bake for 20-25 minutes or until golden brown. Baking gives you a lighter option without losing the crunch. This dish goes well with many sides. Here are some great options: - Garlic mashed potatoes - Steamed broccoli or green beans - Caesar salad - Rice pilaf - Roasted vegetables Each side adds a nice balance to the meal and enhances the flavors. To check if the chicken is done, use a meat thermometer. The internal temperature should reach 165°F (75°C). You can also cut into the thickest part of the chicken. The juices should run clear, not pink. If you follow the cooking times in the recipe, you should be fine. Use these tips for perfectly cooked chicken every time. This blog covered all you need for Crispy Parmesan Chicken. You learned the key ingredients, step-by-step cooking instructions, and tips for the best results. We shared recipe variations and storage advice. Remember, cooking is fun! Adjust flavors and try new methods. Whether you bake or fry, enjoy your tasty chicken. Trust your taste buds, and make it your own.

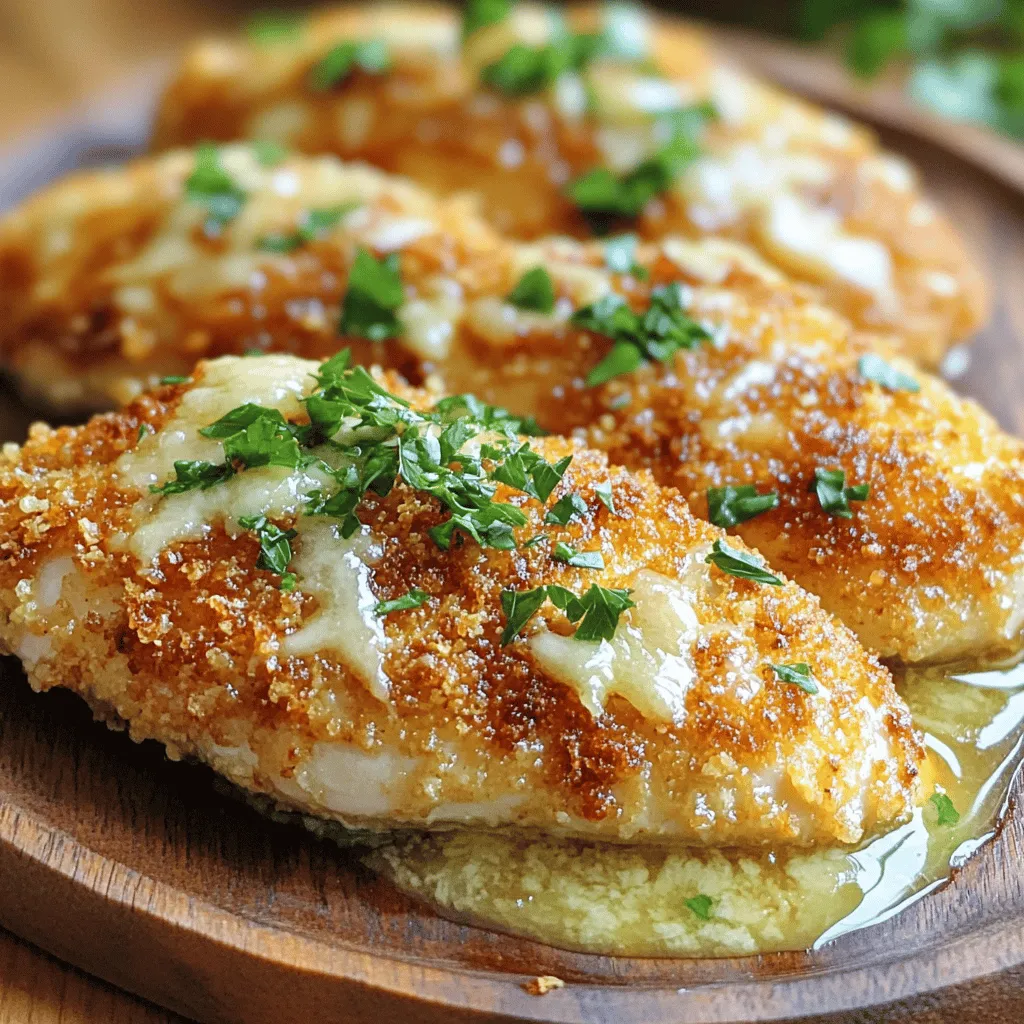
Get ready to make Crispy Parmesan Chicken with Garlic Sauce! You’ll love how crunchy and flavorful this dish is. With simple steps, you can cook a meal that impresses everyone. …

Read more

Categories Dinner

Chocolate Sugar Cookies Soft and Delicious Treats

May 28, 2025 by Chef Luca
To make chocolate sugar cookies, you need a few key items. These are the must-have ingredients: - 2 ½ cups all-purpose flour - ½ cup unsweetened cocoa powder - 1 tsp baking powder - ½ tsp baking soda - ¼ tsp salt - 1 cup unsalted butter, softened - 1 ½ cups granulated sugar - 1 large egg - 2 tsp vanilla extract These ingredients create a rich base for your cookies. The flour gives structure. Cocoa powder adds deep chocolate flavor. Baking powder and baking soda help the cookies rise. Butter makes them soft and yummy. Sugar adds sweetness, while the egg binds everything together. You can also add some fun extras to make your cookies even better: - ½ cup chocolate chips (optional) - Powdered sugar for dusting (optional) Chocolate chips are great for extra chocolate goodness. Dusting with powdered sugar gives a nice finish. Both options make your cookies look and taste amazing. If you need to swap something out, here are some ideas: - Use coconut oil instead of butter for a dairy-free option. - Replace all-purpose flour with gluten-free flour for a gluten-free treat. - You can use brown sugar instead of granulated sugar for a richer taste. These substitutes keep your cookies tasty while meeting your needs. Feel free to mix and match! For the complete recipe, check out the [Full Recipe]. To make chocolate sugar cookies, start by gathering your ingredients. You will need: - 2 ½ cups all-purpose flour - ½ cup unsweetened cocoa powder - 1 tsp baking powder - ½ tsp baking soda - ¼ tsp salt - 1 cup unsalted butter, softened - 1 ½ cups granulated sugar - 1 large egg - 2 tsp vanilla extract - ½ cup chocolate chips (optional) - Powdered sugar for dusting (optional) First, preheat your oven to 350°F (175°C). This helps the cookies bake evenly. Then, line your baking sheets with parchment paper. This step keeps the cookies from sticking. In a medium bowl, whisk the flour, cocoa powder, baking powder, baking soda, and salt together. This mix is the base of your cookies. Set this bowl aside. In a large mixing bowl, beat the softened butter and sugar together. Do this for about 3-4 minutes. The mix should look light and fluffy. Next, add the egg and vanilla extract. Beat until smooth. Now, gradually mix in your dry ingredients. Use low speed to combine them until a soft dough forms. If you want more chocolate, fold in chocolate chips. Using a tablespoon or cookie scoop, drop rounded balls of dough onto your baking sheets. Leave about 2 inches of space between each cookie. This space lets them spread while baking. Next, slightly flatten each cookie with a glass or your hands. This helps them bake evenly. Bake for 10-12 minutes. The edges should be set, but the centers need to stay soft. Once baked, let the cookies cool on the sheet for 5 minutes. Then, transfer them to a wire rack. This cooling step keeps them from getting soggy. For a fun touch, dust the cookies with powdered sugar before serving. This adds a great look and a hint of sweetness. Enjoy every bite of your delicious chocolate sugar cookies! For the complete recipe, check out the Full Recipe section. When making chocolate sugar cookies, a few mistakes can ruin your batch. Here are some to watch for: - Using cold butter: Always use softened butter. Cold butter makes it hard to mix and leads to tough cookies. - Not measuring flour correctly: Too much flour makes cookies dry. Use a spoon to scoop flour into your measuring cup, then level it off. - Skipping the cooling step: Let cookies cool before moving them. This helps them set properly. To get the perfect soft texture, follow these tips: - Do not over-mix the dough: Mix until just combined. Over-mixing can lead to tough cookies. - Use room temperature ingredients: Make sure your egg and butter are at room temperature. This helps create a smooth dough. - Flatten them slightly: Before baking, gently press each cookie down. This helps them spread evenly for a better bite. Proper storage keeps your cookies fresh. Here are some tips: - Store in an airtight container: Keep cookies in a container with a tight lid. This helps them stay soft longer. - Use parchment paper between layers: If stacking cookies, place parchment paper between them to prevent sticking. - Reheat gently: If you want warm cookies later, microwave them for just 10-15 seconds. This brings back their soft texture. For the full recipe, check out Decadent Chocolate Sugar Cookies. {{image_2}} You can change up chocolate sugar cookies in fun ways. Try adding spices like cinnamon for warmth. Mix in orange zest for a bright flavor. You can also experiment with flavored extracts, like almond or peppermint, to give your cookies a unique twist. Swapping half of the cocoa powder for espresso powder adds a rich depth to the chocolate. You can easily make these cookies gluten-free. Just use gluten-free flour instead of all-purpose flour. For a vegan option, replace the butter with coconut oil or vegan butter. Use a flax egg by mixing one tablespoon of ground flaxseed with three tablespoons of water and letting it sit for five minutes. This will bind your dough without eggs. Adding mix-ins can make cookies even more special. Chocolate chips are a classic choice, but you can try chopped nuts like walnuts or pecans for crunch. Dried fruit, such as cranberries or cherries, adds a sweet and chewy texture. You can also fold in toffee bits or shredded coconut for an extra treat. For the full recipe, check the details above. Store your chocolate sugar cookies in an airtight container. This keeps them soft and fresh. If you stack them, place parchment paper between layers. This prevents sticking. They stay good at room temperature for about a week. To freeze cookies, first let them cool completely. Then, arrange them in a single layer on a baking sheet. Freeze for about an hour. Once frozen, place them in a freezer bag. Remove as much air as possible. They can last up to three months in the freezer. When you want to eat them, just thaw at room temperature. Keep cookies away from light and heat. A cool, dry place is best. For added freshness, you can add a slice of bread to the cookie container. The cookies will absorb moisture from the bread. This keeps them soft longer. Enjoy your chocolate sugar cookies even days after baking! For the full recipe, check out the earlier section. To make chocolate sugar cookies from scratch, you need simple ingredients. Start by mixing flour, cocoa powder, baking powder, baking soda, and salt in a bowl. In another bowl, cream softened butter with sugar until fluffy. Add an egg and vanilla, then mix well. Gradually combine the dry and wet ingredients. The dough should be soft. Scoop dough onto a baking sheet and bake at 350°F for 10-12 minutes. For the full recipe, check the details above. The best way to decorate chocolate sugar cookies is fun and easy. I like to use simple icing or melted chocolate. You can also sprinkle colored sugar or edible glitter on top. For a classic look, dust with powdered sugar after baking. Let your cookies cool completely before decorating. This prevents the icing from melting. You can use stencils for fun shapes or even write messages on them. Get creative and enjoy! You can’t directly replace cocoa powder with chocolate syrup. Syrup has added sugar and liquid, which can change the dough. If you want a chocolatey flavor, use cocoa powder and add a bit of syrup. Adjust the liquid in your recipe to keep the right dough texture. Always keep the balance in mind to get the best cookie results. In this blog post, we explored how to make delicious chocolate sugar cookies. We covered key ingredients, baking steps, and helpful tips to avoid mistakes. You learned ways to store cookies and even create fun variations. Remember, practice makes perfect in baking. Experiment with flavors and have fun! Enjoy your cookies fresh or share them with friends. Your baking journey starts here. Happy baking!

Get ready to indulge in the sweet world of baking with my chocolate sugar cookies! These soft, delicious treats blend rich chocolate flavor with a classic cookie texture. Whether you’re …

Read more

Categories Desserts

Raspberry Cookies Delightful and Easy to Make

May 28, 2025 by Chef Luca
To make raspberry cookies, gather these key ingredients: - 1 cup unsalted butter, softened - 1 cup granulated sugar - 1 large egg - 2 teaspoons vanilla extract - 2 cups all-purpose flour - 1 teaspoon baking powder - 1/2 teaspoon baking soda - 1/4 teaspoon salt - 1 cup fresh raspberries (or thawed frozen raspberries) - 1/2 cup white chocolate chips (optional) - Powdered sugar for dusting (optional) These ingredients create a soft, sweet cookie that bursts with fruity flavor. You can swap some ingredients to fit your needs. For a dairy-free option, use vegan butter. If you need gluten-free cookies, use a gluten-free flour blend. You can also replace white chocolate chips with dark chocolate or leave them out. Fresh raspberries provide a bright, tart flavor. They also give the cookies a nice texture. Frozen raspberries work too. Just thaw them and drain extra juice before use. Both options add sweetness and a pop of color to your cookies. When choosing, always pick what you enjoy most for your raspberry cookies. To make the cookie dough, start by gathering all your ingredients. You need butter, sugar, an egg, and vanilla. Mix the softened butter and sugar in a large bowl. Beat them until the mix is light and fluffy. This step is key for soft cookies. Then, add the egg and vanilla. Keep mixing until everything blends well. Next, in another bowl, sift the flour, baking powder, baking soda, and salt. This helps make the cookies light. Gradually add this dry mix to the wet one. Stir gently until just combined. Don’t overmix! Now, it’s time for the star of the show: the raspberries. Gently fold them into the dough. If you like, you can add white chocolate chips too. Now, preheat your oven to 350°F (175°C). Line two baking sheets with parchment paper. This prevents the cookies from sticking. Scoop a tablespoon of dough for each cookie. Place them on the sheets, giving them space to spread. Bake the cookies for 12-15 minutes. Look for lightly golden edges. This shows they are ready! After baking, let the cookies cool on the baking sheets for about 5 minutes. This helps them set. Then, transfer them to a wire rack to cool completely. Store your cookies in an airtight container. They stay fresh longer this way. For a sweet touch, dust them with powdered sugar before serving. Enjoy your raspberry cookies! For the full recipe, check out the complete guide provided. When making raspberry cookies, some common mistakes can lead to less tasty results. Here are a few to watch out for: - Overmixing the dough: Mixing too much can make cookies tough. Stir just until combined. - Using cold butter: Cold butter does not cream well. Always use softened butter for the best texture. - Mashing raspberries: Be gentle when folding in raspberries. You want chunks, not mush. - Not measuring flour correctly: Too much flour can dry out the cookies. Use a spoon to scoop flour into your measuring cup, then level it off. To make your cookies delightfully chewy, keep these tips in mind: - Add an extra egg yolk: This increases moisture and helps create a chewy texture. - Chill the dough: Let the dough sit in the fridge for about 30 minutes. It helps the flavors meld and keeps cookies thick. - Use brown sugar: Swap half of the granulated sugar for brown sugar. Brown sugar adds moisture and depth of flavor. Having the right tools makes baking easier and more fun. Here’s what you need: - Mixing bowls: A set of different sizes helps with all stages of baking. - Electric mixer: This speeds up creaming butter and sugar, ensuring a fluffy base. - Cookie scoop: A scoop ensures your cookies are the same size, which helps them bake evenly. - Parchment paper: Lining your baking sheets with parchment paper prevents sticking and makes cleanup easy. With these tips and tools, your raspberry cookies will turn out delightful every time. Don’t forget to check the full recipe for detailed steps! {{image_2}} You can make vegan raspberry cookies by swapping a few ingredients. Use plant-based butter instead of regular butter. Replace the egg with a flax egg. To make a flax egg, mix one tablespoon of ground flaxseed with two and a half tablespoons of water. Let it sit for five minutes until it thickens. This simple swap keeps your cookies plant-based and tasty. For gluten-free cookies, you can use a gluten-free all-purpose flour blend. Make sure it has xanthan gum for the right texture. You can also try almond flour or coconut flour. These options add a nice nutty flavor. Just remember, gluten-free flours may change the cookie's texture a bit. Want to make your cookies even better? Try adding a touch of lemon zest for a zing. Chopped nuts like walnuts or pecans bring a crunchy twist. You can also mix in some oats for a chewy bite. If you love chocolate, try dark chocolate chips instead of white. Each of these options makes your raspberry cookies unique and fun. For the full recipe, check out the Raspberry Bliss Cookies section. To keep your raspberry cookies fresh, place them in an airtight container. You can use a zip-top bag or a sealed tin. Store them at room temperature for up to five days. If you want them to last longer, consider chilling them in the fridge. This helps maintain their soft texture and flavor. Freezing cookies is simple and fun! Allow your cookies to cool completely first. Line a baking sheet with parchment paper and place the cookies on it in a single layer. Freeze them for about an hour. After they are firm, transfer them to a freezer-safe bag. They can stay frozen for up to three months. When you want to enjoy a cookie, just pull one out! To revive your cookies, preheat your oven to 350°F (175°C). Place the cookies on a baking sheet and warm them for about five minutes. This brings back the soft texture. You can also use the microwave if you need a quick fix. Heat them for about 10 to 15 seconds. Enjoy the warmth and flavor of your raspberry cookies again! For the full recipe, check out the earlier sections. Yes, you can use frozen raspberries. Just thaw them first. This helps them mix well in the dough. Make sure to drain excess liquid to avoid soggy cookies. To make your Raspberry Cookies softer, use more butter. You can add an extra tablespoon of butter to the mix. Another tip is to underbake them slightly. Remove cookies when they look just set. They will continue to cook on the baking sheet. If you want to skip white chocolate chips, try dark chocolate chips. You can also use milk chocolate chips or chopped nuts. Dried fruit can add a nice touch too. Feel free to get creative with your mix-ins! For the complete process, don’t forget to check the Full Recipe for Raspberry Bliss Cookies! In this blog post, we covered how to make delicious raspberry cookies. You learned about key ingredients, from fresh berries to diet-friendly swaps. I guided you through the steps to prepare, bake, and store these treats. We discussed tips to avoid common mistakes and enhance flavors. Finally, I shared storage methods to keep your cookies fresh. I hope you feel ready to impress your friends and family with these tasty cookies. Enjoy the baking process and the tasty results!

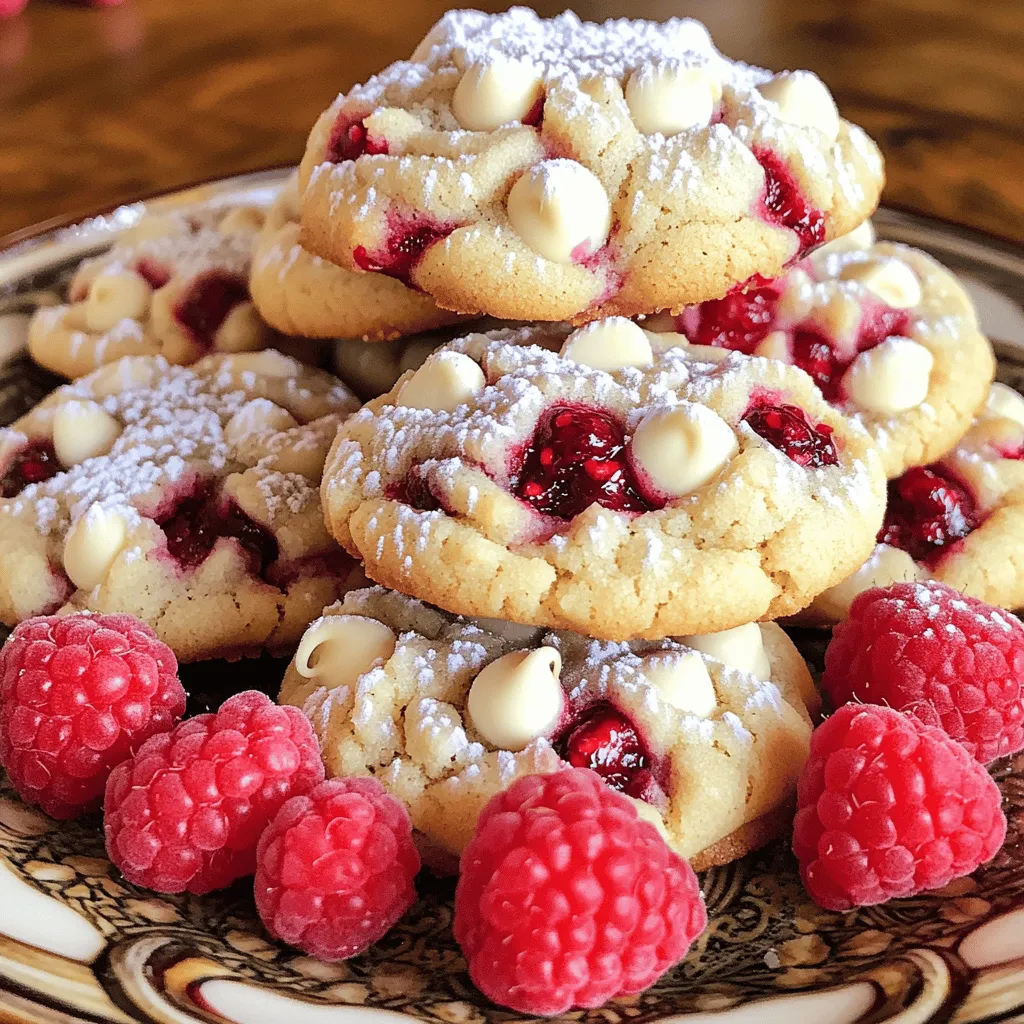
Are you ready to bake some yummy Raspberry Cookies? In this post, I’ll guide you through easy steps to make delicious treats that burst with flavor. Whether you want vegan …

Read more

Categories Desserts

Honey Chipotle Chicken Bowls Flavorful and Satisfying

May 28, 2025 by Chef Luca
For these delicious bowls, you need: - 2 chicken breasts, boneless and skinless - 2 tablespoons honey - 1 tablespoon chipotle peppers in adobo sauce, minced - 1 cup quinoa, rinsed - 1 cup corn (fresh or frozen) - 1 cup black beans, rinsed and drained - 1 cup cherry tomatoes, halved The chicken and honey bring a sweet and spicy flavor. The quinoa adds a nutty taste, while the beans and corn add texture. Don’t forget these extras: - 1 tablespoon olive oil - 1 teaspoon garlic powder - 1 teaspoon cumin - 1 teaspoon smoked paprika - Salt and pepper to taste - 1 avocado, sliced - Fresh cilantro for garnish - Lime wedges for serving These ingredients enhance the dish. Olive oil helps cook the chicken, and spices make it flavorful. The avocado adds creaminess, while lime gives a fresh kick. You can try different options if you want variety: - Use tofu or shrimp instead of chicken - For a low-carb meal, swap quinoa for cauliflower rice These substitutions can suit different diets. They keep the meal exciting and help you use what you have on hand. For the full recipe, you can find all the steps to create these Honey Chipotle Chicken Bowls. To bring out the best flavors in the chicken, you need a great marinade. Start by mixing together: - 2 tablespoons honey - 1 tablespoon minced chipotle peppers in adobo sauce - 1 tablespoon olive oil - 1 teaspoon garlic powder - 1 teaspoon cumin - 1 teaspoon smoked paprika - Salt and pepper to taste Coat the chicken breasts well in this mixture. Cover the bowl and place it in the fridge. Let it marinate for at least 30 minutes. If you want more flavor, let it sit for up to 2 hours. Next, let's make the quinoa. Combine 1 cup of rinsed quinoa with 2 cups of chicken or vegetable broth in a saucepan. Bring it to a boil over high heat. Once boiling, reduce the heat to low, cover the pot, and let it simmer for about 15 minutes. To get fluffy quinoa, avoid stirring it while it cooks. After 15 minutes, remove it from the heat and let it sit covered for another 5 minutes. Fluff it gently with a fork before serving. For grilling, preheat your grill pan or skillet over medium-high heat. Remove the chicken from the marinade and let any extra drip off. Grill the chicken for about 6-7 minutes on each side. The chicken is done when the juices run clear. After grilling, let the chicken rest for a few minutes. This keeps it juicy when you slice it. Now, you can build your bowls. Start by adding a scoop of fluffy quinoa to each serving bowl. Then layer on: - 1 cup corn (fresh or frozen) - 1 cup black beans, rinsed and drained - 1 cup cherry tomatoes, halved - 1 avocado, sliced Slice the grilled chicken and arrange it on top of the quinoa. For the best look, use colorful ingredients. Add fresh cilantro on top and serve with lime wedges for squeezing. This vibrant dish is not just a feast for your taste buds but also a feast for your eyes! Check the Full Recipe for more details. Marinating the chicken is key to adding flavor. The honey and chipotle create a sweet and spicy mix. For best results, marinate for at least 30 minutes. If you have time, let it sit for up to 2 hours. This gives the flavors time to soak in. You will taste the difference! You can cook the chicken in different ways. Grilling gives a nice char and smoky taste. If you prefer, oven baking works well too. Set your oven to 400°F and bake for about 25 minutes. Just make sure the chicken reaches 165°F inside. For the quinoa, a rice cooker is a great option. Just add rinsed quinoa and broth, and let it do the work. You’ll have fluffy quinoa without much fuss. A colorful bowl is a feast for the eyes. Layer the ingredients for a vibrant look. Start with quinoa, then add corn, black beans, and cherry tomatoes. Top with sliced avocado and chicken. For garnishing, sprinkle fresh cilantro on top. Add lime wedges for a zesty touch. This not only adds flavor but also makes your dish pop! Use these tips to make your Honey Chipotle Chicken Bowls look as good as they taste. {{image_2}} You can easily make a vegetarian version of Honey Chipotle Chicken Bowls. Just swap out the chicken for plant-based protein. Great options include tofu or tempeh. These proteins soak up flavor well. Adjust cooking times to ensure they cook through. For tofu, grill it for about 5-6 minutes on each side. If using tempeh, steam it first before grilling. This step will help it become tender and flavorful. Get creative with spices to change up the flavor. Adding cayenne gives a nice kick. If you prefer a smoky taste, try more smoked paprika. You can also mix in different beans. Black beans are popular, but pinto or kidney beans work too. Feel free to add extra veggies like bell peppers or zucchini. This not only adds flavor but also makes the bowls more colorful. Serving your Honey Chipotle Chicken Bowls with a side salad can be refreshing. A simple green salad or a corn salad pairs well. You can also drizzle homemade dressings on top for extra taste. A lime vinaigrette adds a zesty touch. You can experiment with different sauces, like a yogurt sauce or salsa. These additions can elevate your meal and make it even more satisfying. Check out the Full Recipe for more ideas on how to enjoy this dish! To keep your Honey Chipotle Chicken Bowls fresh, follow these tips: - Use airtight containers: Store your leftovers in airtight containers. This keeps them fresh longer. - Separate ingredients: If possible, store the chicken, quinoa, and veggies separately. This prevents sogginess. - Refrigerate promptly: Cool the bowls to room temperature before placing them in the fridge. To enjoy your leftovers, try these reheating methods: - Microwave: Place the bowl in the microwave. Heat for 1-2 minutes until warm. Stir halfway for even heating. - Stovetop: Heat a non-stick skillet over medium heat. Add a splash of water and cover. Cook for 3-5 minutes, stirring occasionally. - Oven: Preheat your oven to 350°F (175°C). Place the bowl in an oven-safe dish. Cover with foil and heat for about 10-15 minutes. Meal prep can save you time and effort. Here are some ideas: - Cook in batches: Prepare multiple servings of quinoa and chicken at once. Store them in the fridge for easy access. - Chop veggies ahead: Pre-chop your cherry tomatoes, avocado, and cilantro. Store in separate containers for quick assembly. - Mix and match: Create variations by mixing different beans or veggies. This keeps meals exciting throughout the week. For the complete recipe, check out the Full Recipe. To make Honey Chipotle Chicken Bowls gluten-free, swap quinoa for rice or use gluten-free grains like millet. Ensure the chicken broth is gluten-free. Check the honey and chipotle peppers for gluten-containing additives. This way, you keep the tasty flavor without gluten. Yes, you can freeze Honey Chipotle Chicken Bowls. I recommend freezing the chicken and quinoa separately. This helps keep textures nice. When you’re ready to eat, thaw in the fridge overnight. Reheat the chicken in a skillet and warm the quinoa in the microwave. If you don't have quinoa, try brown rice or farro. You can also use cauliflower rice for a low-carb option. Each substitute has its unique texture and flavor. Choose one that fits your dietary needs or what you have on hand. Honey Chipotle Chicken Bowls have a nice kick from the chipotle peppers. If you want less spice, reduce the amount you use. You can also add more honey to balance the heat. For those who enjoy spice, feel free to add extra chipotle or even cayenne pepper! These bowls pair well with a fresh side salad or roasted veggies. You could also serve them with tortilla chips and guacamole for crunch. A refreshing drink like iced tea or lemonade goes great with the meal. For more ideas, check out the Full Recipe for details. In this blog post, we explored how to create tasty Honey Chipotle Chicken Bowls. We covered the main ingredients like chicken, honey, chipotle, quinoa, and black beans. You learned step-by-step instructions for marinating and grilling chicken, as well as tips for prepping and storing meals. In conclusion, you can customize these bowls easily. Whether you prefer chicken or plant-based options, you can enjoy great flavors. Get creative with your ingredients and serve them fresh for delightful meals. Try these tips and enjoy your cooking adventure!

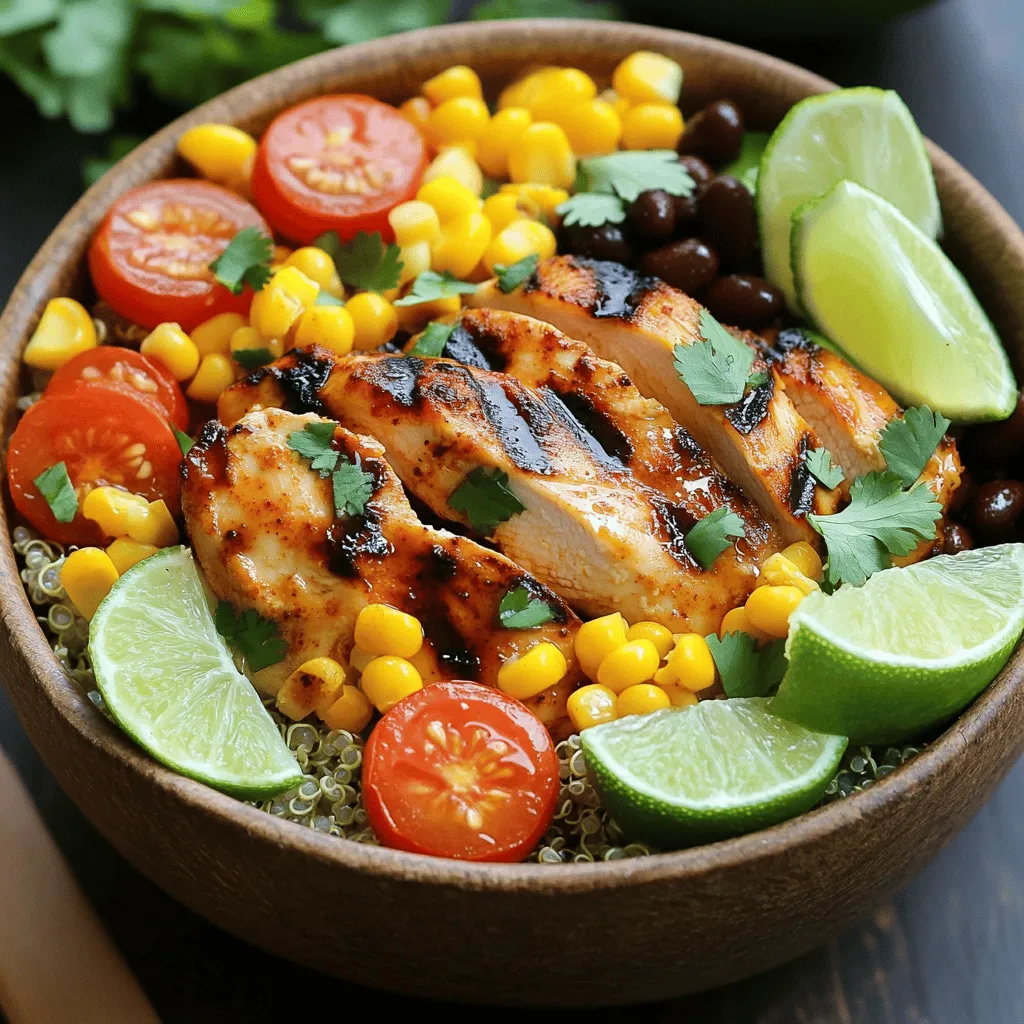
If you crave a dish packed with flavor and easy to make, Honey Chipotle Chicken Bowls are for you! This recipe combines tender chicken, sweet honey, and smoky chipotle for …

Read more

Categories Dinner

Cheesy Garlic Chicken Wraps Flavorful and Easy Meal

May 28, 2025 by Chef Luca
For Cheesy Garlic Chicken Wraps, you need: - 2 boneless, skinless chicken breasts - 1 teaspoon garlic powder - 1 teaspoon onion powder - 1 teaspoon smoked paprika - Salt and pepper to taste - 2 tablespoons olive oil - 1 cup shredded cheese (mozzarella or a blend) - 1/2 cup cream cheese, softened - 1/2 cup fresh spinach, chopped - 4 large flour tortillas - 1/4 cup fresh parsley, chopped (for garnish) These ingredients create a tasty base for the wraps. The chicken gives protein, while the cheese adds creaminess. Garlic and spices bring rich flavor. Spinach adds color and nutrition. You can add: - Sliced jalapeños for spice Adding jalapeños can give the wraps a nice kick. Adjust the amount based on your taste. If you love heat, go for it! If you need alternatives, try these: - Chicken can be swapped for turkey or tofu for a veggie option. - Use any cheese you like, such as cheddar or pepper jack. - Spinach can be replaced with kale or arugula. These swaps can help you use what's on hand. Don't hesitate to get creative! For the full recipe, follow the steps to make delicious wraps. To start, mix garlic powder, onion powder, smoked paprika, salt, pepper, and olive oil in a bowl. This mix adds great flavor. Coat the chicken breasts fully with the marinade. Let them sit for at least 15 minutes. This time helps the chicken absorb the flavors. Next, heat a skillet over medium heat. Place the marinated chicken breasts in the skillet. Cook them for about 6-7 minutes on each side. You want the chicken to be fully cooked and have nice grill marks. Once done, take the chicken out and let it rest for a few minutes. While the chicken rests, prepare the filling. In another bowl, mix shredded cheese, softened cream cheese, and chopped spinach. Stir this mixture until it is creamy and well combined. This filling adds a cheesy burst to each bite. Now it’s time to assemble the wraps. Slice the cooked chicken into thin strips. Take a tortilla and spread a good amount of the cheese and spinach mixture down the center. Add the chicken strips on top. If you like some heat, add sliced jalapeños for extra spice. Heat a clean skillet over medium heat again. Place the wraps seam-side down in the skillet. Toast them for about 2-3 minutes on each side. You want them to be golden brown and crispy. This step makes the wraps extra tasty. Once toasted, take the wraps out and slice them in half diagonally. Garnish with chopped parsley for a fresh touch. These wraps are great for lunch or dinner. You can serve them with a side salad or some chips for a complete meal. For the full recipe, check the details above. Toasting wraps makes them crispy and golden. Start with a hot skillet. A medium heat works best. Place the wraps seam-side down. This helps keep the filling inside. Toast each side for 2-3 minutes. Watch for a nice color. If they brown too fast, lower the heat. You can get creative with flavors. Try adding diced bell peppers for crunch. Black olives add a salty kick. Swap spinach for kale for a twist. For heat, sprinkle in some crushed red pepper. You can even use different cheese blends. Pepper jack gives a spicy twist. Avoid overfilling your wraps. Too much filling makes them hard to close. Don’t skip resting the chicken. It helps keep it juicy. Also, let the cheese mixture sit for a few minutes. This allows the flavors to blend. Finally, keep an eye on the skillet. Burnt wraps are not tasty! For the full recipe, check the details above. Enjoy your cooking! {{image_2}} You can easily make a vegetarian version of cheesy garlic chicken wraps. Instead of chicken, use grilled veggies. Great choices include zucchini, bell peppers, and mushrooms. Season them with the same garlic powder and smoked paprika. This adds flavor while keeping it plant-based. You can also add black beans for extra protein. The cheese and cream cheese will still work perfectly with these veggies. If you want a low-carb meal, use lettuce wraps. Instead of tortillas, use large lettuce leaves. Romaine or iceberg lettuce works well. Fill them with the cheesy mixture and cooked chicken. You can also swap the cream cheese for a low-fat cheese option. This keeps the wraps light but still tasty. For those who love heat, add sliced jalapeños to your wraps. You can mix them into the cheese filling or layer them on top of the chicken. Another option is to use spicy cheeses like pepper jack. A sprinkle of red pepper flakes can add a kick too. Experiment with these spicy options to find your perfect blend. Store any leftover Cheesy Garlic Chicken Wraps in an airtight container. They stay fresh in the fridge for up to three days. If you plan to eat them later, let them cool first. This helps keep the wraps from getting soggy. You can also wrap them tightly in foil for extra protection. To reheat the wraps, use a skillet for the best results. Heat the skillet over medium heat and place the wraps seam-side down. Cook for about 3-4 minutes on each side until they are warm and crispy. You can also use a microwave, but this may make the wraps softer. If using a microwave, heat them in short bursts of 30 seconds. You can freeze these wraps for later meals. After cooking and cooling, wrap each one in plastic wrap. Place them in a freezer-safe bag or container. They can stay in the freezer for up to two months. When ready to eat, thaw them in the fridge overnight and reheat as mentioned above. Enjoy these tasty wraps anytime! You can prepare the chicken ahead of time. Marinate the chicken in the spice blend. Store it in the fridge for up to a day. You can also mix the cheese and spinach filling early. Keep it in an airtight container. When ready to serve, just cook the chicken and assemble the wraps. These wraps taste great with simple sides. Try a fresh garden salad for crunch. You can also serve sweet potato fries for a sweet touch. Another option is a bowl of salsa with tortilla chips. These sides add color and flavor to your meal. Absolutely! You can use any cheese you love. Cheddar, pepper jack, or gouda work well. Each cheese brings a unique taste. Experiment with different blends to find your favorite. Just make sure it melts well for a creamy texture. To prevent sogginess, use dry ingredients in your filling. Make sure the chicken is cooled before adding to the wrap. It also helps to toast the wraps right before serving. This gives them a crispy outside while keeping the inside moist. For the full recipe, check the details above. It covers all the steps and ingredients needed. You’ll find everything you need to create these tasty wraps at home! In this blog post, we explored how to make Cheesy Garlic Chicken Wraps. We covered the key ingredients, how to prepare and cook them, and helpful tips for perfecting your wraps. You can also customize these wraps with various options to fit your taste. Remember to store leftovers properly and know how to reheat them. Enjoy your creation, and don't hesitate to try new flavors or variations. Happy cooking!

Looking for a quick and tasty meal? Cheesy Garlic Chicken Wraps are the answer! In this post, I’ll show you how to make these flavorful wraps with simple steps. You’ll …

Read more

Categories Dinner

High Protein Chickpea, Basil & Tomato Salad Delight

May 28, 2025 by Chef Luca
To make the High Protein Chickpea, Basil & Tomato Salad, gather these fresh and simple ingredients: - 1 can (15 oz) chickpeas, rinsed and drained - 1 cup cherry tomatoes, halved - 1/2 cup fresh basil leaves, torn - 1/4 cup red onion, finely chopped - 1/4 cup feta cheese, crumbled (optional for added protein) - 2 tablespoons olive oil - 1 tablespoon lemon juice - 1 teaspoon garlic powder - Salt and pepper to taste For extra protein and flavor, you can try adding: - 1/2 cup cooked quinoa - 1/4 cup sunflower seeds - 1/4 cup cooked and diced chicken breast When selecting fresh ingredients, look for: - Chickpeas: Choose canned chickpeas with no added salt for health. - Tomatoes: Pick bright, firm cherry tomatoes for sweetness. - Basil: Smell the basil. It should have a strong, fresh scent. - Onions: Use a red onion for a milder, sweeter taste. - Feta Cheese: Select a creamy feta for the best texture. Always wash your herbs and vegetables well to ensure freshness and safety. For the full recipe, check the instructions and enjoy making this tasty salad! To make the High Protein Chickpea, Basil & Tomato Salad, follow these simple steps. Preparation Steps 1. Mix the Ingredients: In a large mixing bowl, combine the rinsed and drained chickpeas, halved cherry tomatoes, torn basil leaves, and finely chopped red onion. This mix brings bright colors and flavors to the salad. 2. Add Feta Cheese: If you want extra protein, add the crumbled feta cheese to the bowl. This gives a creamy texture and a salty kick that pairs well with the other ingredients. 3. Make the Dressing: In a small bowl, whisk together the olive oil, lemon juice, garlic powder, salt, and pepper. Whisk until it blends well. This dressing adds a zesty flavor, enhancing the salad's overall taste. 4. Combine Everything: Drizzle the dressing over the chickpea mixture. Gently toss all the ingredients together until they are evenly coated. This step ensures that every bite is full of flavor. 5. Taste and Adjust: Take a moment to taste the salad. If you think it needs more seasoning, add a bit more salt or pepper to your liking. 6. Flavor Melding Process: Let the salad sit for about 10 minutes before serving. This allows the flavors to meld together, making each bite even more delicious. Serve it chilled or at room temperature for the best experience. For a detailed view of the ingredients, check out the Full Recipe. To make your High Protein Chickpea, Basil & Tomato Salad shine, adjust the seasoning. Start with a pinch of salt and pepper. Taste the salad before adding more. This ensures you find the perfect flavor. For the best flavor balance, use fresh ingredients. Fresh basil brings a bright taste. Cherry tomatoes add sweetness. Rinse the chickpeas well to remove any can taste. This simple step elevates your dish. When it comes to presentation, serve the salad in a large bowl. A platter also works well. This allows colors to pop. Garnish with extra basil leaves on top. A sprinkle of feta cheese adds a special touch. For extra flair, consider adding a drizzle of balsamic glaze. It creates a nice contrast. Remember, a beautiful dish makes it more inviting. Enjoy every bite of this vibrant salad! For the complete recipe, check the Full Recipe section. {{image_2}} You can switch up the chickpeas for other beans or legumes. White beans or black beans both work well. They add protein and taste. You can also try lentils for a different texture. Using seasonal veggies can change the salad’s flavor. Fresh corn in summer adds sweetness. In fall, roasted squash gives warmth. You can toss in diced cucumbers for a crisp bite or bell peppers for color. For dressings, olive oil and lemon juice are great, but you can try others. A balsamic vinaigrette adds a sweet tang. A tahini dressing brings a nutty flavor. You can mix herbs, like dill or parsley, to change the taste. With these swaps, you can keep the recipe fresh and exciting. Check out the Full Recipe for more ideas! To keep your High Protein Chickpea, Basil & Tomato Salad fresh, store it in the fridge. Use an airtight container to keep out air and moisture. This helps maintain the salad's flavor and texture. Recommended container types: - Glass containers with tight lids - Plastic food storage containers - Mason jars for single servings The salad stays fresh for up to three days in the fridge. If you want to keep it longer, consider freezing it. However, note that freezing may change the texture of the tomatoes and basil. Shelf life and freezing options: - In the fridge: 3 days - In the freezer: 1 month (for best quality) Remember, if you freeze the salad, it’s best to eat it fresh after thawing. Always check for signs of spoilage before eating. Enjoy your salad knowing it stays crisp and tasty for days! How can I make this salad vegan? To make this salad vegan, skip the feta cheese. You can use a vegan cheese or leave it out. The salad will still taste great without it. Can I prepare the salad a day ahead? Yes, you can prepare this salad a day ahead. Just store it in the fridge in an airtight container. This allows the flavors to blend well. What are the nutrition benefits of chickpeas? Chickpeas are high in protein and fiber. They help you feel full and support digestion. They also contain vitamins and minerals, like iron and folate. Is this salad suitable for meal prep? Absolutely! This salad is perfect for meal prep. It stays fresh in the fridge and serves as a quick lunch or snack throughout the week. How do I make it gluten-free? This salad is naturally gluten-free. Just ensure that any additional ingredients, like dressings, are also gluten-free. This way, you can enjoy it worry-free. For the full recipe, check out the detailed instructions above. Enjoy your delicious High Protein Chickpea, Basil & Tomato Salad! This blog post shared a tasty High Protein Chickpea, Basil & Tomato Salad recipe. You learned about the key ingredients and how to prepare them with step-by-step instructions. I offered tips to perfect the flavor and presentation. You also explored variations and found helpful storage info. In conclusion, this salad is simple, nutritious, and easy to adjust. Enjoy making your unique version and share it with friends!

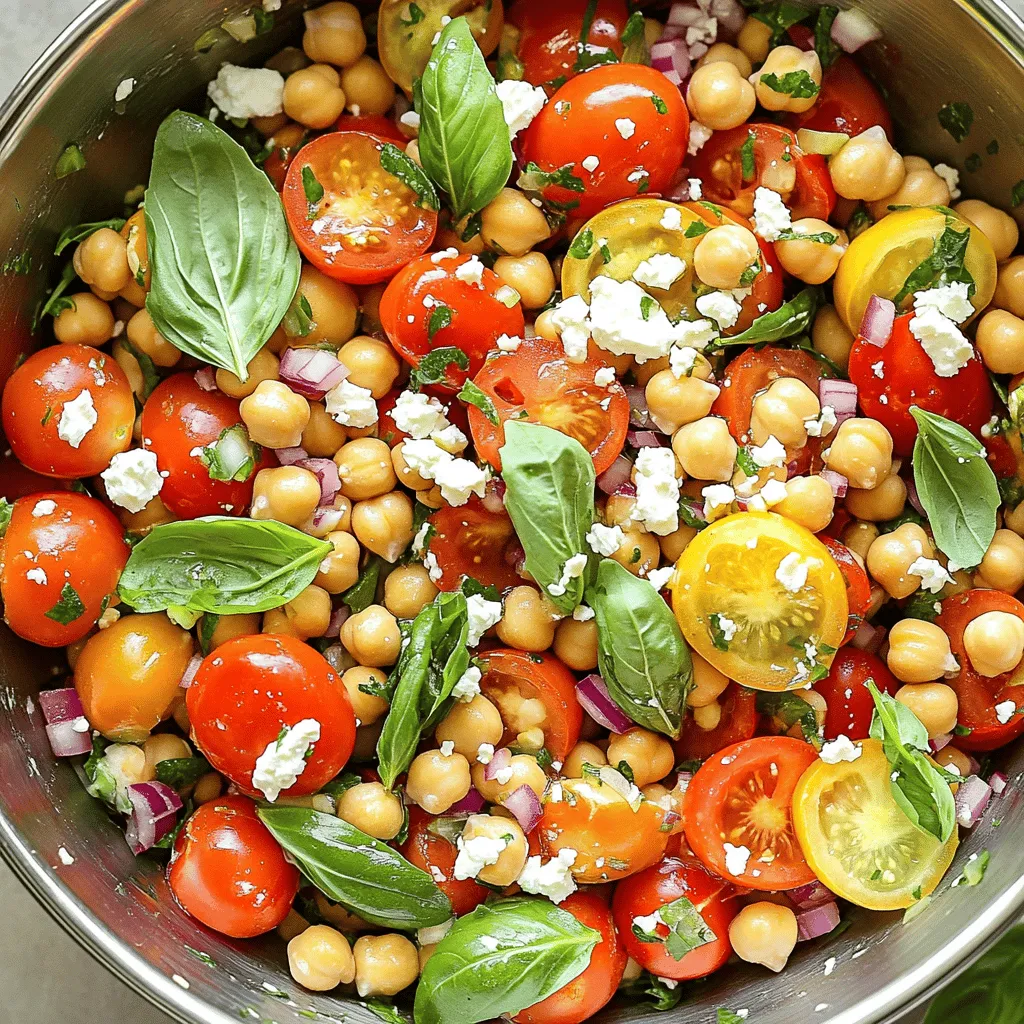
If you’re seeking a delightful way to boost your protein intake, look no further! This High Protein Chickpea, Basil & Tomato Salad is packed with nutrition and flavor. As an …

Read more

Categories Salads

Crispy Beef and Cheese Chimichangas Savory Delight

May 28, 2025 by Chef Luca
- 1 pound ground beef - 1 small onion, finely chopped - 2 cloves garlic, minced - 1 teaspoon cumin - 1 teaspoon chili powder - 1 teaspoon salt - ½ teaspoon black pepper - 1 cup shredded cheddar cheese - ½ cup shredded Monterey Jack cheese - 8 large flour tortillas - 2 cups vegetable oil for frying To make crispy beef and cheese chimichangas, you need key ingredients. First, ground beef gives the dish its hearty base. Onions and garlic add depth of flavor. Spices like cumin and chili powder bring heat and warmth. Salt and black pepper enhance all the flavors. The cheeses—cheddar and Monterey Jack—melt beautifully, making each bite rich and creamy. Flour tortillas wrap all these tasty ingredients, holding them snugly. Finally, vegetable oil is essential for frying, ensuring a perfect crisp. - Fresh cilantro - Lime wedges Adding fresh cilantro and lime wedges makes your chimichangas pop. Cilantro adds a fresh taste, while lime offers a bright zing. These ingredients elevate the dish, making each bite even better. You can also use them as a garnish for a beautiful presentation. 1. Sautéing onions and garlic Start by heating a tablespoon of oil in a large skillet over medium heat. Add the finely chopped onion. Cook it until it turns soft and clear, about 3 to 4 minutes. Next, toss in the minced garlic. Sauté for just 1 minute. Stir often to avoid burning. 2. Cooking and seasoning ground beef Now, add the ground beef to the skillet. Break it apart with a spatula. Cook until it turns brown, which takes about 5 to 7 minutes. Stir in the cumin, chili powder, salt, and black pepper. Mix well and let it cook for 2 more minutes. Take the skillet off the heat. Let the mixture cool for a bit. 1. Filling tortillas with beef-cheese mixture In a bowl, combine the cooled beef mixture with the shredded cheeses. Stir until they mix well. Lay a tortilla on a flat surface. Place about ¼ cup of the beef-cheese mixture right in the center of the tortilla. 2. Securing and rolling the tortillas Fold the sides of the tortilla over the filling. Then, roll from the bottom to the top. Make sure to secure the filling inside. Repeat this with the rest of the tortillas and filling. 1. Heating oil to the correct temperature In a large pot or deep skillet, pour in the vegetable oil. Heat it over medium-high heat. Wait until the oil shimmers, which means it’s about 350°F or 175°C. 2. Frying until golden brown Carefully place 2 or 3 chimichangas in the hot oil. Fry them for 3 to 4 minutes on each side. Look for a golden brown color and a crispy texture. Once done, remove them from the oil. Put them on a plate lined with paper towels to drain extra oil. For detailed cooking times and serving sizes, check the Full Recipe. Enjoy your crispy beef and cheese chimichangas! To make crispy chimichangas, you need to follow a few steps. Start with the right oil. I recommend vegetable oil, as it has a high smoke point. Heat the oil until it shimmers but avoid smoking. - Use a thermometer to check the oil temperature. It should be around 350°F. - Fry only a few chimichangas at a time. Overcrowding lowers the oil's temperature. To avoid sogginess, drain the chimichangas well. Once they come out of the oil, place them on paper towels. This will help absorb excess oil. You can also let them sit for a minute before serving to keep them crisp. Want to add some heat to your chimichangas? You can mix in spices like cayenne pepper or jalapeño. This gives a nice kick without overpowering the beef and cheese. For cheese lovers, try different cheese blends. Instead of just cheddar and Monterey Jack, you can mix in pepper jack or even queso fresco. This adds depth and variety to each bite. For the full recipe, check the details above. {{image_2}} You can switch things up with different proteins. Chicken or turkey work great in chimichangas. Just cook them the same way as the beef. Shred or dice the meat finely for easy wrapping. For a vegetarian option, fill your chimichangas with beans, cheese, and veggies. Black beans or pinto beans add fiber and taste. You can also add corn, bell peppers, or zucchini for more flavor and color. If you want a lighter dish, try baking your chimichangas instead of frying. Preheat your oven to 375°F. Place the filled chimichangas on a baking sheet. Brush them with a little oil for crispiness. Bake for about 20 to 25 minutes, or until golden brown. Another healthy tip is using whole wheat tortillas. They add fiber and nutrients. Whole wheat tortillas also give a nice, nutty flavor. This small change makes your meal a bit more wholesome without losing taste. For more detailed instructions, check the Full Recipe. To store leftover chimichangas, let them cool first. Place them in an airtight container. This keeps them fresh and tasty. You can store them in the fridge for up to three days. When you're ready to eat, reheat the chimichangas. The best way is in the oven. Preheat it to 350°F (175°C). Place the chimichangas on a baking sheet. Heat them for about 15-20 minutes until crispy and warm. You can also use an air fryer for a quick reheat. Set it to 350°F (175°C) and cook for 5-7 minutes. To freeze uncooked chimichangas, wrap each one in plastic wrap. Then put them in a freezer-safe bag. They will last for up to three months. When you're ready to cook them, do not thaw. Just fry them straight from the freezer. This keeps them crispy. For cooked chimichangas, let them cool. Then wrap each one in foil or plastic wrap. Place them in a freezer bag. They also last up to three months. To reheat, bake at 350°F (175°C) for about 20-25 minutes. This helps them regain their crispiness. Follow this storage info for the best results from your crispy beef and cheese chimichangas! For the full recipe, check the earlier sections. How to make Crispy Beef and Cheese Chimichangas in advance? You can prepare these chimichangas ahead of time. After you fill and roll each chimichanga, place them on a baking sheet. Cover them tightly with plastic wrap. You can store them in the fridge for up to 24 hours. When ready to fry, simply heat the oil and cook them as directed. This saves time on busy nights. Can I make the filling a day ahead? Yes, making the filling in advance is a great idea. Cook the beef mixture as usual, then let it cool. Store it in an airtight container in the fridge. This way, you can assemble the chimichangas quickly when you're ready to cook. What to do if chimichangas burst while frying? If your chimichangas burst, don't worry. It can happen if they are overfilled or not sealed tightly. Next time, ensure you fold the edges securely. If they do burst, you can still enjoy the filling. Just serve it as a delicious beef and cheese dip with chips! How to know when the oil is ready for frying? To check if the oil is hot enough, drop a small piece of tortilla in it. If it sizzles and bubbles right away, the oil is ready. You can also use a thermometer. Aim for about 350°F (175°C). This temperature ensures your chimichangas fry evenly and become golden brown and crispy. In this blog post, we covered how to make delicious chimichangas. We explored the key ingredients, from ground beef to spices and cheese. I shared step-by-step instructions for preparing, assembling, and frying them to perfection. You also learned tips for making them crispy and how to try different fillings. Finally, I discussed storage options to keep your chimichangas fresh. With these ideas, you can impress anyone at your table. Enjoy making these tasty treats!

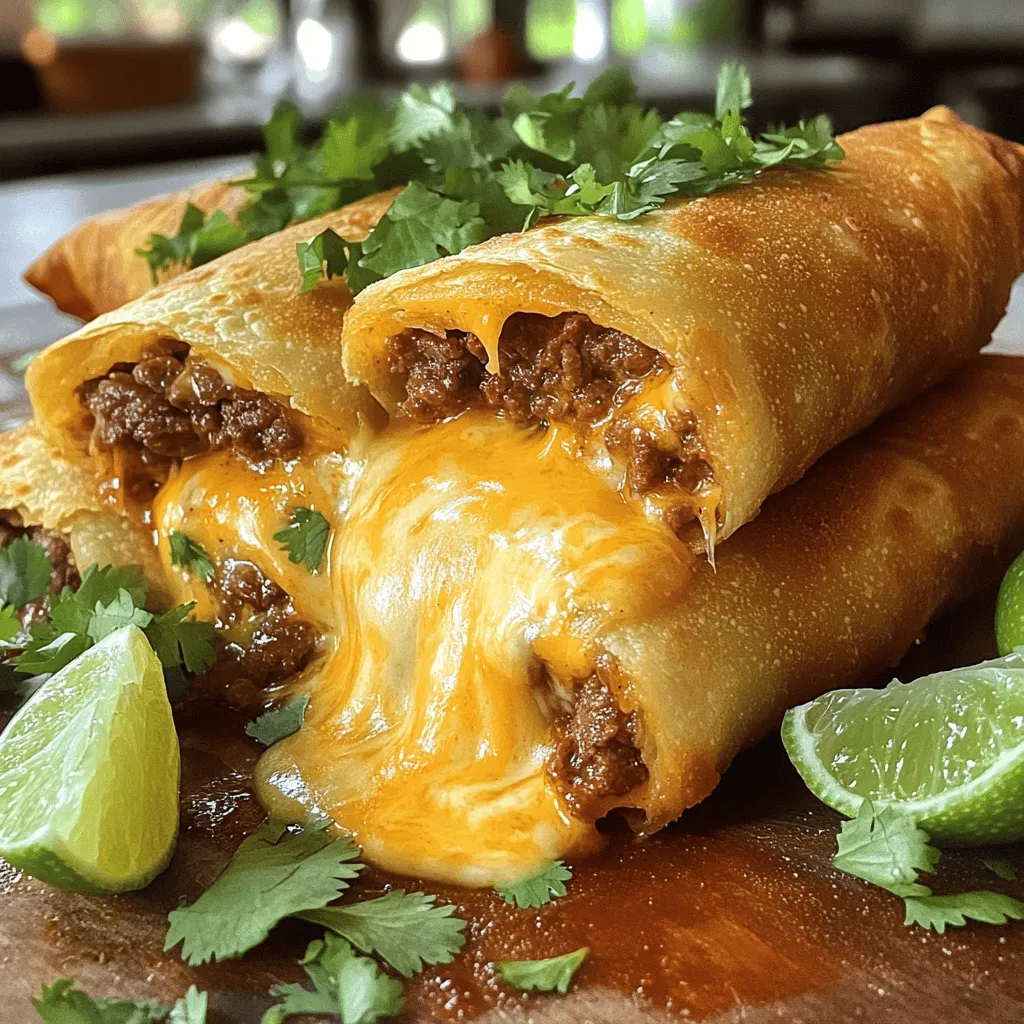
Crispy Beef and Cheese Chimichangas are a true treat you can’t miss. They are crispy on the outside and packed with cheesy, savory goodness inside. Today, I’ll guide you through …

Read more

Categories Dinner
Older posts
Newer posts
← Previous Page1 … Page112 Page113 Page114 … Page122 Next →

STIRRED RECIPES

Where every dish begins with a stir! 🍲✨

PAGES

Home About Contact Privacy Policy Terms & Conditions Cookie Policy GDPR Policy Copyright Policy Disclaimer

CATEGORIES

Appetizers Desserts Salads Breakfast Dinner

Contact

  • Pinterest
  • Mail
Copyright © 2026 Stirred Recipes. All rights reserved.