Skip to content
Stirred Recipes
  • Home
  • Appetizers
  • Desserts
  • Salads
  • Breakfast
  • Dinner
  • Privacy Policy
  • Contact
  • About

Chef Luca

Cowboy Salad Flavorful and Fresh Meal Idea

May 29, 2025 by Chef Luca
- 2 cups romaine lettuce, chopped - 1 cup cherry tomatoes, halved - 1 cup corn kernels - 1 can black beans - 1 red bell pepper, diced - 1 avocado, diced - 1/2 cup red onion, finely chopped - 1/2 cup shredded cheddar cheese - 1/4 cup fresh cilantro, chopped - Juice of 2 limes - 3 tablespoons olive oil - 1 teaspoon cumin - 1 teaspoon chili powder - Salt and pepper to taste The Cowboy Salad shines with its fresh and vibrant ingredients. You start with crisp romaine lettuce. It forms the base for this colorful dish. Cherry tomatoes add a sweet burst of flavor. Corn gives it a nice crunch and a bit of sweetness. Black beans are hearty and packed with protein. Next, you have a red bell pepper that adds both color and sweetness. The creamy avocado brings richness to the salad. Finely chopped red onion gives it a mild bite. Shredded cheddar cheese adds a savory note. Fresh cilantro brightens up the flavors, making everything pop. For the dressing, you mix lime juice and olive oil. Cumin and chili powder give it a warm, spicy kick. Salt and pepper balance everything out. This dressing ties all the ingredients together, adding depth to each bite. - Grilled chicken or steak - Additional vegetables like jalapeños or cucumbers You can boost this salad by adding grilled chicken or steak. This adds protein and makes it more filling. If you like spice, toss in some jalapeños for heat. You can also add cucumbers for extra crunch. These optional add-ins let you customize the salad to your taste. - Tortilla chips - Additional lime wedges for garnish Serve Cowboy Salad with tortilla chips for a fun crunch. Lime wedges make it easy to add more zesty flavor. You can enjoy this salad as a light meal or as a side dish. The combination of flavors and textures makes it a favorite. You can find the full recipe [here](#). 1. Start by mixing the salad base. In a large bowl, combine: - 2 cups romaine lettuce, chopped - 1 cup cherry tomatoes, halved - 1 cup corn kernels (fresh or frozen) - 1 can black beans, drained and rinsed - 1 red bell pepper, diced - 1/2 cup red onion, finely chopped 2. Next, toss in the avocado and cheese. Add: - 1 avocado, diced - 1/2 cup shredded cheddar cheese Gently mix all these ingredients together until they are well combined. This step creates a colorful, fresh base for your Cowboy Salad. 3. Now, it’s time to whisk together the dressing ingredients. In a small bowl, mix: - Juice of 2 limes - 3 tablespoons olive oil - 1 teaspoon cumin - 1 teaspoon chili powder - Salt and pepper to taste Whisk these until the mixture is smooth and well blended. 4. Drizzle the dressing over the salad. Pour your freshly made dressing on top of the salad base. Toss gently to coat all the ingredients evenly with that zesty flavor. 5. For the final touch, garnish with cilantro. Sprinkle: - 1/4 cup fresh cilantro, chopped This adds a bright, fresh taste to your salad. 6. Tips for presentation and serving: Serve your Cowboy Salad in a large bowl for sharing or on individual plates. Add some tortilla chips on the side for a nice crunch. You can also include lime wedges for an extra burst of flavor. Now, you're ready to enjoy a vibrant, tasty meal! For more details, check the Full Recipe. You can swap beans in Cowboy Salad. Chickpeas or kidney beans work well. This change keeps it fresh and fun. If you want a cheese twist, try feta or pepper jack. Each cheese adds its own flavor. Marinate your veggies before serving. This step makes each bite burst with flavor. Use a mix of lime juice and olive oil for a tasty soak. Don't forget to play with spices in the dressing. Add more cumin or a pinch of cayenne for a kick. Prep your salad early for busy days. Chop your veggies and store them in separate containers. This way, they stay crisp and fresh. Keep your dressing apart until you’re ready to eat. Mix it just before serving to keep everything crunchy. {{image_2}} For those who love meat, consider adding grilled chicken or beef to your Cowboy Salad. Grilling the meat adds a smoky flavor that pairs well with the fresh veggies. I suggest marinating the chicken or beef in a BBQ sauce before grilling. This boosts the taste and gives a nice glaze. Use BBQ dressing on top for a zesty kick. This version is hearty and satisfying. If you're looking for a meat-free meal, try adding extra legumes or tofu. Chickpeas or kidney beans work great in this salad. They add protein and texture. You can also use vegan cheese alternatives to keep it dairy-free. Nutritional yeast is a tasty option that adds a cheesy flavor without the cheese. I love to change my Cowboy Salad with the seasons. In spring, add fresh peas or asparagus. In summer, ripe tomatoes and cucumbers brighten the salad. Fall brings roasted squash, which adds sweetness. For dressing, tailor it to fit the season. In fall, try adding apple cider vinegar for a warm flavor. This keeps the salad fresh and exciting all year round. For the full recipe, refer to the earlier section. To keep your Cowboy Salad fresh, use airtight containers. Glass or BPA-free plastic works well. These containers limit air exposure and slow down spoilage. To maintain crunchiness, store ingredients separately. Keep the lettuce and dressing apart until ready to serve. This step prevents sogginess and keeps your salad vibrant. Cowboy Salad can last up to three days in the fridge. After that, the taste and texture decline. Always check for signs of spoilage. If the salad smells off or looks wilted, it’s time to toss it. Freezing Cowboy Salad is not ideal. The lettuce and other fresh veggies do not thaw well. They can become mushy and lose their crunch. Avoid freezing items like tomatoes, avocado, and dressing. Instead, freeze only the beans and corn if needed. When you want a fresh salad, prepare new ingredients each time for the best flavor. For a complete guide, check the Full Recipe for detailed instructions. Yes, you can make Cowboy Salad ahead of time! To prepare it, chop all your veggies and store them in airtight containers. Keep the dressing separate until you are ready to serve. This keeps the salad fresh and crunchy. If you want to prepare it a day in advance, just mix everything in the morning. It tastes great, even after a few hours in the fridge. Want some heat? You can easily add spice to your Cowboy Salad. Try adding fresh jalapeños for a kick. You can also use spicy dressings or hot sauce. Mix it in well so every bite has that zesty flavor. Adjust the heat to your taste. This spice can make the salad even more fun! Cowboy Salad goes well with many sides. You can serve it with tortilla chips for a crunchy bite. Grilled meats also complement the salad nicely. For drinks, try iced tea or a light beer. They balance the fresh flavors of the salad. Cowboy Salad has roots in the American West. It reflects cowboy culture, which values hearty and simple meals. The salad combines fresh ingredients that are easy to find. This dish celebrates flavors from ranch life. Over time, it has gained popularity in many kitchens. Cowboy Salad is packed with nutrients. It has about 200 calories per serving. You get protein from black beans and cheese. The veggies add fiber, vitamins, and minerals. This salad is a healthy choice for any meal. It offers a good mix of healthy fats and carbs, making it both tasty and nutritious. For the complete Cowboy Salad recipe, check out the [Full Recipe]. This blog post covered everything you need to make a delicious Cowboy Salad. From essential ingredients to helpful tips, you now have the tools to create this yummy dish. Remember to enjoy experimenting with flavors and variations. Making this salad ahead of time can save you stress, too. Whether you prefer it spicy or classic, each bite offers great taste and nutrition. I hope you feel inspired to whip up your own Cowboy Salad soon!

Looking for a fresh meal idea that’s both tasty and easy to make? Cowboy Salad is your answer! With a mix of colorful veggies, protein options, and zesty dressing, this …

Read more

Categories Salads

Guy Fieri’s Macaroni Salad Flavorful Summer Side

May 29, 2025 by Chef Luca
- 2 cups elbow macaroni - 1 cup mayonnaise - 1 tablespoon Dijon mustard - 1 teaspoon apple cider vinegar - 1 cup celery, finely chopped - 1 cup red bell pepper, diced - 1/2 cup red onion, finely chopped - 1/2 cup sweet pickle relish - 1/4 cup fresh parsley, chopped - Salt and pepper to taste - 1 tablespoon hot sauce (optional for a kick) Substitutions for mayonnaise You can swap mayonnaise for Greek yogurt or avocado for a lighter option. These swaps keep the salad creamy while adding a twist. Choosing fresh vegetables Always pick fresh vegetables for the best taste. Look for bright colors and firm textures. Fresh veggies bring life to the salad. Hot sauce options for flavor Choose your favorite hot sauce for a spicy kick. Options like sriracha or Tabasco can add fun heat without overpowering the dish. Adjust to your taste to keep it balanced. For the full recipe, check out the steps to make this delicious macaroni salad. Start by boiling a large pot of salted water. This helps give flavor to the pasta. Add 2 cups of elbow macaroni. Cook it for about 7-8 minutes. You want it to be al dente, which means firm to the bite. Once it's ready, drain the macaroni in a colander. Rinse it under cold water to stop the cooking. This keeps the pasta from getting mushy. Let it cool completely in a large bowl. While the pasta cools, let’s make the dressing. In a mixing bowl, whisk together 1 cup of mayonnaise, 1 tablespoon of Dijon mustard, and 1 teaspoon of apple cider vinegar. If you like some heat, add 1 tablespoon of hot sauce. Mix it well until it’s smooth. This dressing should be creamy and tasty. If it’s too thick, you can add a splash of water to get the right consistency. Now it's time to bring everything together. To the bowl with the cooled macaroni, add the chopped vegetables: 1 cup of celery, 1 cup of diced red bell pepper, 1/2 cup of finely chopped red onion, and 1/2 cup of sweet pickle relish. Then, pour the dressing over the pasta and veggies. Gently fold everything together. Make sure all the pasta and vegetables are well-coated. This helps blend the flavors nicely. Chilling the salad is key for the best taste. Cover the bowl with plastic wrap or a lid. Refrigerate it for at least 1 hour. For even better flavor, chill it for a few hours or overnight. This allows the flavors to meld together. Before serving, give it a good stir and check for seasoning. You can adjust with salt and pepper as needed. Enjoy making this fun and tasty dish! For the full recipe, check the earlier section. To make Guy Fieri’s macaroni salad even better, adjust the seasonings. Start with the basics: salt and pepper. Taste as you go. If you want more zing, add a bit more apple cider vinegar. You can also add a splash of lemon juice for a fresh twist. For a richer taste, mix in some grated cheese or chopped herbs. You can personalize the salad by adding extras. Try diced pickles or olives for extra crunch. If you like a bit of heat, toss in some diced jalapeños or a bit more hot sauce. The goal is to make it your own! Serving this salad well makes it even more appealing. Use a bright, colorful bowl for a fun look. You can also layer the salad in a clear dish to show off the colorful ingredients. Garnish with fresh parsley or slices of hard-boiled eggs on top. This adds a nice touch and extra flavor. For dishware, choose something that fits your theme. If it's a picnic, use a fun plastic bowl. For a dinner party, go for a nice glass or ceramic bowl. This salad shines when served cold. After mixing, chill it for at least an hour. The longer it sits, the better it tastes. If you can, let it chill overnight. If you’re taking it to a potluck or picnic, keep it cool. Use an insulated bag or cooler. This keeps the salad fresh and safe to eat. Always pack a serving spoon for easy serving. For the full recipe, check out the details above and get ready to impress your friends with this tasty summer side! {{image_2}} You can easily switch things up in Guy Fieri's macaroni salad. For a vegan version, try using a plant-based mayo. It gives a similar creamy taste without eggs. You can also use different types of pasta. Shells, penne, or even gluten-free pasta work great. Each pasta shape holds the dressing differently, adding a fun twist to your dish. Seasonal veggies can make your salad pop. Think of fresh corn, zucchini, or cherry tomatoes when they are in season. These add bright colors and a sweet crunch. If you're feeling bold, add crispy bacon or cheese for richness. Crumbled feta or sharp cheddar can really enhance the flavor. Get creative and let your taste guide you! The dressing is where you can have fun experimenting. Try adding ranch or Italian dressing for a new taste. If you want more heat, mix in some cayenne or a spicy mayo. For a tangier kick, squeeze in some lemon juice or use vinegar like red wine. Each option can change the whole vibe of the salad. To keep your macaroni salad fresh, use airtight containers. Glass or plastic containers work well. Make sure to let the salad cool before sealing. This prevents moisture buildup that can spoil the salad. Always label your containers with the date. This helps you track how long it's been stored. In the refrigerator, this salad lasts about 3 to 5 days. If you want to freeze it, it may last up to 2 months. To freeze, place the salad in a freezer-safe container. Leave some space at the top because it expands when frozen. When it’s time to eat, thaw it in the fridge overnight. You don’t need to reheat macaroni salad. It tastes great cold. If you prefer it warm, gently heat it on low. Just be careful not to cook it again. Enjoy it fresh from the fridge for the best flavor. For a quick bite, serve it right after chilling. Check out the Full Recipe for all the details! Yes, you can make this salad ahead of time. I suggest making it at least a few hours before serving. This lets the flavors mix well. If you can, chill it overnight for the best taste. Yes, you can try other pasta shapes. Shells, fusilli, or penne work well. Just keep an eye on the cooking time. You want it to be al dente and hold the dressing nicely. This salad pairs great with grilled meats and sandwiches. Try it with burgers or hot dogs for a classic summer meal. You can also serve it with fresh fruit or chips for a complete picnic plate. Yes, but you will need to use gluten-free pasta. Many brands offer good options. Just check the label to ensure it's gluten-free. This way, everyone can enjoy the salad! You now have a complete guide to making a delicious macaroni salad. We covered the right ingredients, steps to follow, and helpful tips. Don't forget to chill your salad for the best flavor. Experiment with variations to make it your own. Enjoy this dish at picnics or potlucks. With the simple steps outlined, you can impress friends and family. Get cooking and make your macaroni salad a hit!

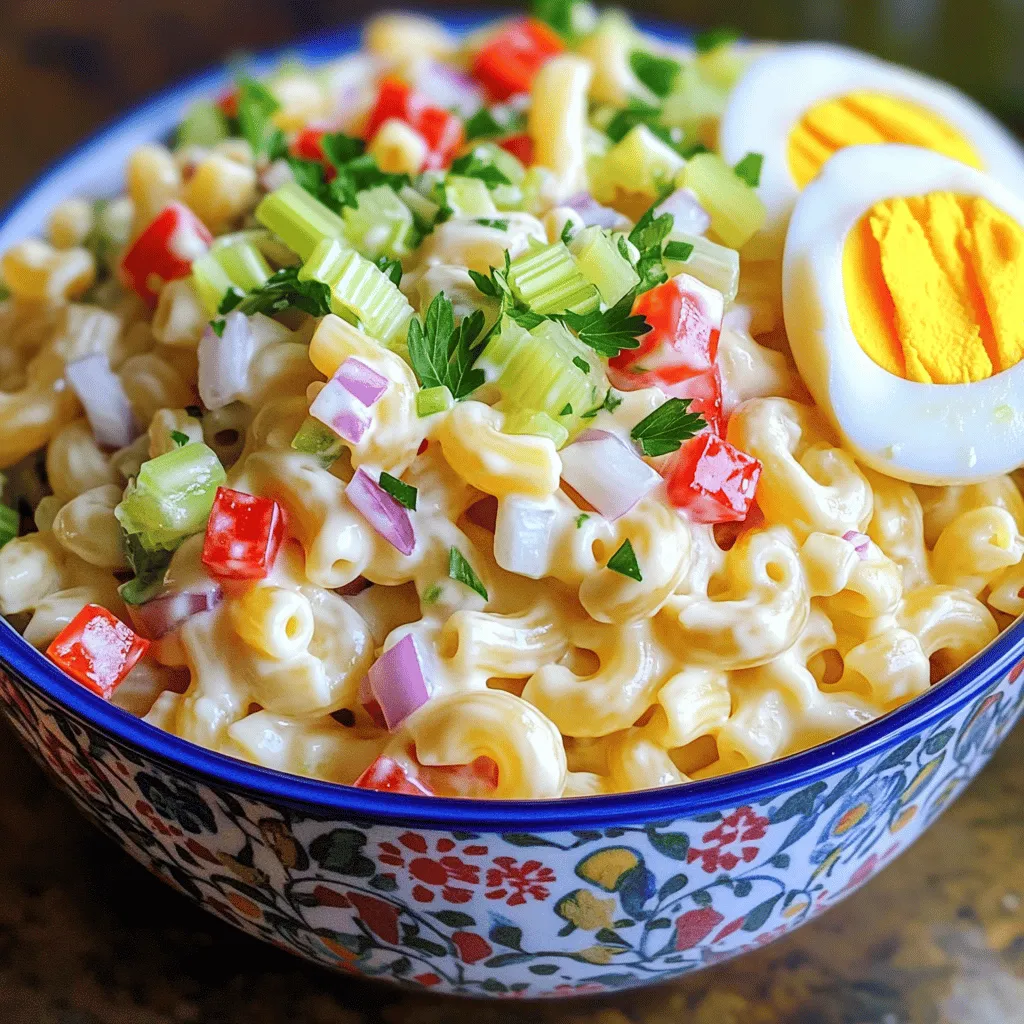
Looking for a side dish that packs a flavorful punch? Guy Fieri’s Macaroni Salad is your answer! This creamy, tangy delight combines fresh vegetables and a kick of flavor that …

Read more

Categories Salads

Black Bean Taco Salad with Creamy Salsa Dressing

May 29, 2025 by Chef Luca
- Black beans - Romaine lettuce - Cherry tomatoes - Corn kernels - Avocado - Greek yogurt - Salsa - Lime juice - Olive oil - Garlic - Ground cumin - Chili powder - Salt and pepper - Tortilla strips - Shredded cheese In this Black Bean Taco Salad, I use simple, fresh ingredients. Black beans provide protein and fiber. Romaine lettuce adds crunch and a fresh taste. Cherry tomatoes bring sweetness, while corn kernels give a pop of color and flavor. Avocado adds creaminess that makes each bite special. For the creamy salsa dressing, I mix Greek yogurt with salsa, lime juice, olive oil, and garlic. This dressing is tangy and rich. It perfectly complements the fresh salad. I sprinkle ground cumin and chili powder on top for warmth and flavor. Salt and pepper enhance everything. Finally, I add crunchy tortilla strips and shredded cheese for texture. This recipe is a quick and tasty meal, perfect for busy days. Check the Full Recipe for detailed steps and tips. 1. Start by mixing the Greek yogurt and salsa in a bowl. Use a whisk to blend them well. 2. Next, add lime juice and olive oil. This adds a nice tang and richness. 3. Season the dressing with minced garlic and a pinch of cayenne. This gives it a little kick. Mix until smooth. Set it aside for now. 1. In a large mixing bowl, combine the black beans, chopped romaine lettuce, cherry tomatoes, corn, avocado, red bell pepper, and red onion. 2. Make sure all ingredients are cold. This keeps the salad crisp and fresh. 1. Layer the salad mixture on individual plates or in a big salad bowl. 2. Top it with tortilla strips and shredded cheese for crunch and flavor. 3. Drizzle the creamy salsa dressing over the salad just before serving. You can also serve it on the side for guests to add as they like. This recipe is simple and quick, taking only about 15 minutes. For the full recipe, check the earlier section. Enjoy the burst of flavors! - Rinse and drain the black beans well. This removes extra salt and improves taste. - To slice the avocado without browning, use a sharp knife. Cut it in half, take out the pit, and slice it while still in the skin. Then, scoop it out with a spoon. This keeps it fresh longer. - Serve the salad in colorful bowls. Bright colors make the dish more inviting. - Layer the salad in clear jars for a fun look. Add a garnish on top for extra color. You can use extra tortilla strips or fresh cilantro. - Try adding spices like smoked paprika or cayenne for a kick. - Top the salad with fresh herbs like cilantro or parsley. - If you prefer other greens, swap romaine with spinach or kale. You can also use different beans, like pinto or kidney beans, to mix it up. For the full recipe, check out the Black Bean Taco Salad with Creamy Salsa Dressing. {{image_2}} You can add protein to your black bean taco salad for extra flavor and nutrition. Here are some great options: - Grilled chicken: Marinate your chicken in lime juice, cumin, and chili powder. Grill until cooked through, then slice and add on top of the salad. - Shrimp: Season shrimp with spices and grill or sauté them. They add a nice crunch. If you prefer vegetarian options, try these: - Tofu: Press and cube firm tofu. Sauté it with spices for a tasty addition. - Tempeh: Crumble tempeh and cook it in a skillet with some seasoning. It’s packed with protein and flavor. Switching up the beans or salsa can change the whole dish. Here are some ideas: - Different types of beans: Use pinto beans or kidney beans for a new taste. Each variety brings its own flavor. - Spicy salsa alternatives: Try mango salsa for sweetness or green salsa for a zesty kick. You can even make your own! Making this salad plant-based is easy. Here’s how: - Dairy-free dressing: Swap Greek yogurt for cashew cream or a dairy-free yogurt. Blend soaked cashews with lime juice and a bit of water for a creamy texture. - Plant-based cheese: Use vegan cheese shreds instead of dairy cheese. You can even make a nut-based cheese at home for a fresh twist. These variations keep your black bean taco salad exciting and cater to different tastes and diets. You can find the [Full Recipe] to start your culinary journey! To store leftovers, place the salad in an airtight container. Keep it in the fridge for up to three days. Store the dressing separately to prevent sogginess. When ready to eat, drizzle the dressing over your salad. This keeps the lettuce crisp and fresh. To keep ingredients fresh, remember these tips: - Rinse and dry the lettuce well before storage. - Use a paper towel to absorb moisture inside the container. - Keep avocado slices in a separate container with lemon juice to slow browning. Prepping ingredients in advance can save time. Chop the romaine, tomatoes, and bell pepper a day ahead. Store each in separate containers. You can also cook corn if using fresh. Assembling the salad and dressing ahead of time works well too: - Make the creamy salsa dressing in advance and store it in the fridge. - Combine the salad ingredients without dressing. - Mix the dressing in right before serving for the best taste. Can you freeze black bean salad? I recommend not freezing the entire salad. Fresh veggies lose their crunch when frozen. However, you can freeze the black beans and corn. For freezing components, follow these methods: - Place black beans and corn in a freezer-safe bag. - Remove excess air and seal it tight. - Label the bags with the date and use within three months. By following these storage tips, you can enjoy your Black Bean Taco Salad with Creamy Salsa Dressing even longer! For the full recipe, check the previous section. You can store Black Bean Taco Salad in the fridge for up to three days. The salad stays fresh if you keep it in an airtight container. After a day, the vegetables may get a bit soft, but the flavor remains great. Yes, you can prepare this recipe ahead of time! I suggest making the dressing and chopping the veggies separately. Keep the salad and dressing in the fridge until you are ready to eat. This way, everything stays fresh and crisp. This salad is great on its own, but you can pair it with some tasty sides. Try serving it with grilled chicken or shrimp for added protein. You can also enjoy it with tortilla chips or a side of rice. This blog post covered how to make a tasty black bean taco salad. We discussed key ingredients, like beans and avocado, and how to prepare a creamy dressing. I also shared tips on storing leftovers and meal prep suggestions. In summary, this salad is simple, fresh, and full of flavor. You can customize it based on what you like. Enjoy creating your own version that fits your taste.

Looking for a fresh and tasty meal? This Black Bean Taco Salad with Creamy Salsa Dressing is your answer! Packed with colorful veggies, black beans, and a zesty dressing, it’s …

Read more

Categories Salads

Savory Salmon Tartine with Dill Pickle Mustard Recipe

May 29, 2025 by Chef Luca
To make the Salmon Tartine with Dill Pickle Mustard, you will need: - 2 slices of crusty sourdough bread - 4 oz smoked salmon - 2 tablespoons cream cheese, softened - 1 tablespoon dill pickle mustard (store-bought or homemade) - 1 tablespoon capers, rinsed - Fresh dill sprigs for garnish - Lemon wedges for serving - Salt and pepper to taste You can enhance your tartine with these tasty toppings: - Sliced radishes for crunch - Avocado for creaminess - Thinly sliced red onion for a bite - A sprinkle of chili flakes for heat Selecting the right ingredients makes a big difference. Here’s how: - Salmon: Look for bright, moist smoked salmon. It should have a clean, fresh scent. Avoid any that smells overly fishy or looks dull. - Bread: Choose a crusty sourdough with a good crust. It should feel firm and not too soft. Look for bread with air pockets inside, as this means it’s fresh and has great texture. These small details can elevate your dish and ensure a tasty result. For the full recipe, check out the provided link. 1. Start with two slices of crusty sourdough bread. 2. Toast them until they turn golden brown and crispy. 3. While the bread toasts, take a small bowl. 4. Add 2 tablespoons of softened cream cheese to the bowl. 5. Then add 1 tablespoon of dill pickle mustard. 6. Mix these together until they are smooth and well combined. 7. Taste the mixture and add a pinch of salt and pepper as needed. 8. Once your bread is toasted, take it out and let it cool slightly. 9. Spread a thick layer of the cream cheese and mustard mix over each slice. 1. Take 4 ounces of smoked salmon and slice it, if needed. 2. Lay the salmon on top of the mustard-spread bread. 3. Arrange the salmon in a nice pattern for a pretty look. 4. Rinse 1 tablespoon of capers under cold water. 5. Sprinkle the capers over the salmon for a burst of flavor. 6. Finish by adding fresh dill sprigs on top for a pop of color. 1. Serve the tartines right away for the best taste. 2. Pair them with lemon wedges on the side. 3. Squeeze the lemon over the tartine for a zesty kick. 4. Consider serving with a light salad or some crisp veggies. 5. A glass of white wine or sparkling water goes well with this dish. For the complete recipe, refer to the Full Recipe. To perfect your salmon tartine with dill pickle mustard, use fresh ingredients. Here are my top tips: - Choose good bread: A crusty sourdough gives the best texture. It holds toppings well. - Spread evenly: Make sure to spread the cream cheese and mustard mix evenly. This helps every bite stay balanced in flavor. - Layer nicely: When placing the smoked salmon, overlap the slices for a nice look. It makes the dish more appealing. Avoid these common pitfalls to get the best results: - Skipping the toast: Don’t skip toasting the bread. It adds crunch and keeps the bread from getting soggy. - Overdoing the mustard: Use just enough dill pickle mustard. Too much can overpower the salmon's flavor. - Using stale ingredients: Always check your salmon and bread for freshness. Old ingredients ruin the tartine. Here are some quick ways to speed up your prep time: - Buy pre-sliced salmon: This saves you minutes and keeps the dish simple. - Prep ahead: Mix the cream cheese and mustard in advance. Store it in the fridge until you’re ready. - Use a toaster oven: If you have one, it quickly toasts your bread while you prepare toppings. For the full recipe, check out the full recipe. Enjoy making this savory delight! {{image_2}} You can play with flavors in your salmon tartine. Try using different mustards, like honey mustard or spicy brown mustard. Each one gives a unique twist. You can also add toppings. Sliced radishes bring crunch, while avocado adds creaminess. For a sweet touch, try thin apple slices. Fresh herbs, such as chives or parsley, can brighten the dish too. Don’t hesitate to mix and match until you find a flavor you love! If you want a vegetarian option, swap the smoked salmon for roasted vegetables. Grilled zucchini or eggplant works great. You can also use hummus or a bean spread instead of cream cheese. For a gluten-free tartine, choose gluten-free bread. There are many tasty options available now. Just make sure to check the label for gluten-free status. Adapt this recipe based on the season. In the summer, top your tartine with fresh tomatoes or cucumbers. They add a refreshing taste. In the fall, consider using roasted squash or pumpkin puree. For winter, try adding sautéed greens like kale or spinach. These changes keep the dish exciting all year long. Explore your local farmers' market to find fresh ingredients. To store leftover salmon tartines, wrap each tartine tightly in plastic wrap. This keeps them fresh and prevents drying out. If you have extra ingredients, like smoked salmon or cream cheese, store them in airtight containers in the fridge. Use them within a few days for the best taste. When reheating, avoid the microwave. It makes the bread soggy. Instead, place the tartines in a toaster oven or regular oven at 350°F (175°C) for about 5 minutes. This keeps the bread crispy while warming the toppings. Check often to avoid overcooking. Smoked salmon lasts about 3 days in the fridge after opening. Cream cheese should also be used within 1 week. Dill pickle mustard can stay fresh for up to a month if stored properly. Always check the labels for specific dates to ensure safety. To make your own dill pickle mustard, you need just a few items. Start with yellow mustard or Dijon mustard as your base. Add finely chopped dill pickles and a bit of pickle juice. Mix these together in a small bowl. For a bit of zest, you can add some garlic powder or a dash of hot sauce. Adjust the taste to your liking. This simple recipe gives your tartine a fresh kick. Yes, you can use fresh salmon instead of smoked salmon. Fresh salmon will give your tartine a different flavor. Make sure to cook the fresh salmon first. You can grill, bake, or pan-sear it. This adds a nice touch to the dish. If you choose fresh, season it well with salt and pepper for the best taste. Each option brings its own unique flavor to the tartine. You can serve your tartine with many sides. A fresh salad with crisp greens pairs well. Consider adding sliced cucumbers or cherry tomatoes for color. You might also serve it with potato chips for crunch. For drinks, a crisp white wine or sparkling water enhances the meal. Each side will bring out the flavors of the salmon tartine. This blog post covered the essential ingredients, tips, and steps to make Salmon Tartine with Dill Pickle Mustard. You learned about required ingredients, optional add-ons, and quality tips for the best flavors. We discussed preparation, assembly, and serving suggestions to impress your guests. You now have expert tips, common mistakes to avoid, and time-saving hacks for quick prep. Lastly, we explored variations, storage info, and answered common questions. With these details, you can craft a delicious tartine at home, delighting your taste buds and those of your friends.

Are you ready to elevate your snack game? This Savory Salmon Tartine with Dill Pickle Mustard is your new go-to recipe for a quick meal or appetizer. With fresh salmon, …

Read more

Categories Appetizers

Satisfying Air Fryer Calzones Easy Homemade Delight

May 29, 2025 by Chef Luca
To make tasty air fryer calzones, you need a few key ingredients: - 2 cups all-purpose flour - 1 packet (2 ¼ teaspoons) instant yeast - ½ teaspoon salt - 1 teaspoon sugar - ¾ cup warm water (about 110°F) - 1 tablespoon olive oil - 1 cup ricotta cheese - 1 cup shredded mozzarella cheese - ½ cup cooked Italian sausage, crumbled - ½ cup spinach, chopped - ½ teaspoon garlic powder - ½ teaspoon dried oregano - Salt and pepper to taste - Marinara sauce for dipping These ingredients work together to create a soft dough and a cheesy filling. The instant yeast helps the dough rise. The ricotta and mozzarella provide creaminess, while the sausage and spinach add flavor. You can mix and match fillings to suit your taste. Here are some options: - Pepperoni slices - Mushrooms, diced - Bell peppers, chopped - Fresh basil leaves - Feta cheese - Different herbs and spices Feel free to get creative! You can also make vegetarian calzones by skipping the meat and loading up on veggies. Choosing the best ingredients makes a big difference. Here are my tips: - Flour: Look for high-protein all-purpose flour for a chewier crust. - Cheese: Use fresh cheeses for better flavor and texture. - Meat: If using sausage, check for high-quality, minimally processed options. - Vegetables: Choose fresh, vibrant vegetables for the best taste. - Olive Oil: Use extra virgin olive oil for its rich taste and health benefits. High-quality ingredients lead to better results. Always pay attention to the freshness and source of your food. Enjoy making your air fryer calzones! For the complete recipe, check the Full Recipe. To make the dough, start with a large bowl. Add 2 cups of all-purpose flour, 2 ¼ teaspoons of instant yeast, ½ teaspoon of salt, and 1 teaspoon of sugar. Mix these dry ingredients well. Now, slowly pour in ¾ cup of warm water and 1 tablespoon of olive oil. Stir until a soft dough forms. Knead the dough on a floured surface for about 5 to 7 minutes until it feels smooth. Next, place the dough in a greased bowl. Cover it with a cloth and let it rise in a warm spot for 30 minutes. This step helps the dough become fluffy. While the dough rises, let's make the filling. In a bowl, combine 1 cup of ricotta cheese and 1 cup of shredded mozzarella cheese. Then, add ½ cup of cooked Italian sausage, crumbled, and ½ cup of chopped spinach. For flavor, mix in ½ teaspoon of garlic powder, ½ teaspoon of dried oregano, and salt and pepper to taste. Stir until everything blends together. This filling is rich and tasty, perfect for your calzones. After the dough has risen, punch it down and divide it into four equal pieces. Roll each piece into a circle about 6 to 7 inches wide. Place a spoonful of the filling on one half of each circle. Leave space at the edges so you can seal them well. Fold the dough over the filling and pinch the edges to close. You can crimp the edges with a fork if you like. Preheat your air fryer to 375°F. Lightly brush each calzone with olive oil and place them in the air fryer basket without touching. Cook them for 12 to 15 minutes until they turn golden brown and crispy. You might need to cook them in batches. Once done, let them cool a bit and serve with marinara sauce for dipping. Enjoy your homemade calzones! For the full recipe, check the section above. To get that perfect crispy crust, start with the right dough. Use all-purpose flour for the best texture. Knead the dough well. This helps it develop gluten. Gluten creates a chewy, sturdy crust. After rolling out the dough, let it rest. This makes it easier to shape. Brush the calzones with olive oil before cooking. The oil helps the calzones brown nicely in the air fryer. Set your air fryer to 375°F for the best results. Cook the calzones for 12 to 15 minutes. Keep an eye on them as they cook. Every air fryer is different. If your calzones don't look golden brown after 12 minutes, add a few more minutes. Don't overcrowd the basket. This ensures they cook evenly and crisp up nicely. One mistake is using too much filling. It can leak out while cooking. Make sure to leave space at the edges when filling. Another mistake is not sealing the edges well. If they aren't sealed, the filling can escape. Lastly, avoid skipping the preheating step. An air fryer needs to be hot before adding food. Follow these tips, and you’ll make delicious calzones! For the complete recipe, check out the full recipe section. {{image_2}} You can easily change your calzones to fit your taste. For a vegetarian option, skip the meat. Use veggies like mushrooms, bell peppers, or zucchini instead. You can mix these with ricotta and mozzarella for a creamy filling. If you want meat, try pepperoni, ham, or chicken. Each choice brings a new flavor and texture. Cheese is key to a great calzone. You can use mozzarella as your base, but don't stop there. Try adding provolone or gouda for a smoky touch. For more tang, add feta or goat cheese. Mixing different cheeses gives your calzones a special flavor blend. Feel free to experiment and find your favorite combo. If you need a gluten-free option, use almond flour or a gluten-free mix. These flours can create a tasty dough, too. If you're low-carb, try using a cauliflower crust. It may take extra time, but the results are worth it. These alternatives let anyone enjoy delicious calzones. Check out the Full Recipe for tips on making these variations. To keep your leftover calzones fresh, store them in an airtight container. Let the calzones cool completely before sealing them. This helps prevent moisture buildup, which can make them soggy. You can keep them in the fridge for up to three days. If you want to keep them longer, consider freezing them. Reheating calzones in the air fryer is quick and easy. Preheat your air fryer to 350°F. Place the calzones in the basket, leaving space between them. Heat for about 5-7 minutes. Check to ensure they are heated through and crispy. This method keeps them tasty and restores their crunch. Freezing calzones is a smart way to save time. First, let them cool completely. Wrap each calzone tightly in plastic wrap, then in aluminum foil. This prevents freezer burn. You can keep them in the freezer for up to three months. When ready to eat, thaw in the fridge overnight, then reheat in the air fryer. For the full recipe, check the details above. You air fry calzones for about 12-15 minutes. The exact time can vary by air fryer. Check them often to avoid burning. You want them golden brown and crispy. Yes, you can use store-bought dough for air fryer calzones. This option saves time and effort. Just roll it out and fill it like you would with homemade dough. It makes the process quick and easy. You can dip calzones in many tasty options. Try ranch dressing for a creamy twist. Garlic butter gives a nice flavor too. Hot sauce adds heat, while pesto offers a fresh taste. Explore different dips to find your favorite! For the full recipe, check the earlier section. You learned how to make great air fryer calzones. We covered the best ingredients and how to pick them. I shared step-by-step instructions to prepare and cook calzones. You got tips to make crispy crusts and avoid common mistakes. We also explored tasty variations and smart storage methods for leftovers. Now, you can create your own versions at home. With these tips, you’ll impress family and friends. Enjoy your cooking journey!

Craving a quick, tasty meal? Look no further! Air fryer calzones are your new best friend. They’re easy to make and delightfully satisfying. In this guide, I’ll share every step, …

Read more

Categories Appetizers

Pineapple Cowboy Candy Irresistible Sweet Treat

May 29, 2025 by Chef Luca
- Fresh pineapple - Granulated sugar - Apple cider vinegar Pineapple forms the base of this treat. Choose a ripe pineapple for the best flavor. Granulated sugar adds sweetness. It helps preserve the pineapple and creates a thick syrup. Apple cider vinegar adds a tangy kick. This balances the sweetness and gives a unique flavor. - Ground cayenne pepper - Garlic powder - Onion powder The spice blend is key to the candy's flavor. Ground cayenne pepper gives heat. Adjust this amount to match your taste. Garlic powder adds depth, while onion powder enhances the savory notes. Together, they create a sweet and spicy mix. - Salt - Ground ginger - Turmeric - Vanilla extract Salt helps to bring out all the flavors. Ground ginger adds warmth and a hint of spice. Turmeric gives a nice golden color. Vanilla extract adds a sweet aroma. These ingredients round out the taste, making every bite memorable. For the full recipe, check out the instructions above. - Preheat your oven to 200°F (95°C). - Line a baking sheet with parchment paper. This helps with easy cleanup later. - In a large saucepan, combine: - 2 cups granulated sugar - 1 cup apple cider vinegar - 1 tablespoon ground cayenne pepper - 1 tablespoon garlic powder - 1 teaspoon onion powder - 1 teaspoon salt - 1 teaspoon ground ginger - 1/2 teaspoon turmeric - 1 teaspoon vanilla extract Stir well to dissolve the sugar. - Bring the mixture to a gentle simmer over medium heat. Stir occasionally. Keep simmering until the syrup thickens slightly, which takes about 5-7 minutes. - Add the pineapple rings to the saucepan. Make sure each ring is fully submerged in the syrup. - Simmer the pineapple for another 10-15 minutes. This step helps the fruit absorb all the yummy flavors. - Carefully remove the pineapple rings from the saucepan. Transfer them to the prepared baking sheet. - Bake in the oven for 1.5 to 2 hours. Turn the rings every 30 minutes. They should be chewy but not completely dried out. - After baking, allow the pineapple cowboy candy to cool completely on the baking sheet. It will firm up as it cools. You can find the full recipe at the beginning of this article. Enjoy your sweet treat! To make Pineapple Cowboy Candy truly amazing, adjust the spice levels. If you love heat, add more cayenne pepper. For a milder taste, reduce the amount. You can also mix in other flavorings. Try adding fresh ginger or a splash of lime juice for a zesty kick. Each choice gives a new twist to the candy. To tell when your candy is done, look for a chewy texture. It should not be too dry or too soft. You want a nice balance. Avoid over-drying by checking every 30 minutes while it bakes. If the rings feel hard, they may be overdone. Remember, they firm up as they cool. When serving your Pineapple Cowboy Candy, think about fun ways to display it. Arrange the rings on a colorful plate or in a mason jar for a rustic look. You can add fresh mint leaves for a pop of color. Drizzle some honey or a bit of the syrup on top for extra flavor. These simple touches make your treat even more inviting. For the full recipe, you can refer to the details shared earlier. {{image_2}} You can change Pineapple Cowboy Candy by adding other fruits. Try mango, peach, or kiwi for a fun twist. Each fruit brings its own flavor, making each batch unique. You can mix these fruits with pineapple or use them alone. Using different spices also adds variety. Think about adding cinnamon or nutmeg for a warm kick. You might even try a hint of cardamom for something exotic. These spices can change the whole taste of the candy. You don't always need to bake Pineapple Cowboy Candy. Try air frying it for a quicker method. Just set your air fryer to 200°F and cook the pineapple rings for about 15 minutes. This method gives a nice crispiness while keeping the flavor rich. Another fun way is dehydrating the pineapple. This method takes longer but creates a chewy snack. Set your dehydrator to 135°F and let it run for 6-8 hours. You'll get a different texture, making it a great option for those who love chewy treats. If you want to change the sweetness, honey or agave can work well. Just replace the sugar with an equal amount of these sweeteners. They add a unique flavor that pairs nicely with the pineapple. For those who prefer sugar-free options, use stevia or monk fruit. These sweeteners can give you the sweetness you need without the calories. Just be sure to adjust the amounts, as they are often sweeter than sugar. For the full recipe, check out the detailed steps above. Store your Pineapple Cowboy Candy in airtight containers. This keeps it fresh and tasty. You can place it at room temperature. If it’s hot or humid, the fridge is a good choice. Just make sure the container is sealed well. This helps prevent moisture from ruining your candy. Pineapple Cowboy Candy lasts about one month when stored properly. Look for signs of spoilage. If you see mold or strange smells, it’s time to toss it. The candy should remain chewy and sweet. If it becomes hard or dry, it may be past its prime. Don’t throw away leftover syrup! It’s a great addition to drinks or dressings. You can mix it into smoothies for a sweet kick. You can also drizzle it over pancakes or waffles. Pineapple Cowboy Candy can add flavor to savory dishes too. Try using it in stir-fries or salads for a fun twist. Pineapple Cowboy Candy is a sweet and spicy treat. It blends fresh pineapple with sugar and spices. This candy is a fun twist on traditional cowboy candy, usually made with jalapeños. You can enjoy it as a snack, topping, or gift. The flavors mix well, giving you a unique taste experience. Yes, you can use canned pineapple, but there are pros and cons. Canned pineapple is convenient and saves time. However, it may not have the same fresh flavor. The texture can also differ. Fresh pineapple gives a better bite and taste. If you use canned, choose one packed in juice, not syrup, for the best results. The spice level in Pineapple Cowboy Candy can be adjusted. The recipe uses cayenne pepper, which adds heat. If you prefer less spice, reduce the cayenne pepper. If you like it hotter, add more! You can also mix in other spices like chili powder for a different flavor. Absolutely! Making Pineapple Cowboy Candy in advance is a great idea. You can store it in an airtight container. It stays fresh at room temperature for about a month. This is perfect for parties or gifts. Just remember to let it cool completely before storing. For the full recipe, check it out [here](link to Full Recipe). Pineapple cowboy candy is a fun treat to make. We covered the key ingredients, from fresh pineapple to spices. I explained how to prepare and candy the fruit, ensuring the best flavor and consistency. You can also explore variations, from tropical fruits to alternative sweeteners. Remember to store your candy well and get creative with leftovers. Enjoy making this sweet, spicy snack! Your kitchen will smell amazing, and your taste buds will thank you.

Want a sweet treat that packs a little heat? Pineapple Cowboy Candy is your answer! This delicious recipe blends fresh pineapple with spices for a unique flavor experience. It’s easy …

Read more

Categories Desserts

Fruit Salad With Condensed Milk Flavorful Treat Recipe

May 29, 2025 by Chef Luca
- Fresh fruits (strawberries, pineapple, kiwi, blueberries, banana) - Sweetened condensed milk - Fresh lime juice - Vanilla extract - Fresh mint leaves for garnish For this fruit salad, I love using a mix of sweet and tangy fruits. The strawberries bring a bright color and juicy flavor. Pineapple adds a tropical touch, while kiwi gives a fun twist. Blueberries offer a burst of sweetness, and bananas bring creaminess to the mix. I recommend using sweetened condensed milk for a rich, creamy dressing. It adds a lovely sweetness that pairs perfectly with the fruits. A splash of fresh lime juice brightens the flavors and balances the sweetness. A hint of vanilla extract adds depth. This fruit salad is not just tasty but also nutritious. Each serving is about 150 calories. Here’s a quick breakdown of the macronutrients: - Carbohydrates: 30g - Protein: 2g - Fat: 3g You get a good dose of vitamins from the fruits. They provide fiber, antioxidants, and hydration. Feel free to mix up the fruits based on what you like or have at home. You can use mangoes, peaches, or even grapes. If you want a dairy-free option, try coconut cream or almond milk instead of sweetened condensed milk. This way, you keep the creaminess without the dairy. To make your fruit salad, you first need to prepare the fruits. Let's start with the strawberries. - How to hull and slice strawberries: Hold a strawberry in your hand. Use a small knife to cut out the green leaves at the top. Then, slice the strawberry into thin pieces. - Dicing pineapple and peeling kiwi: For the pineapple, cut off the top and bottom first. Stand it up and cut off the skin in strips. Then, slice the pineapple into small cubes. For the kiwi, cut off both ends and then peel the skin with a knife. Slice it into rounds. Now, let's make the sweet dressing. It is super easy! - Instructions for whisking together ingredients: In a small bowl, add the sweetened condensed milk, fresh lime juice, and vanilla extract. Grab a whisk and mix it all together until it is smooth. This mixture adds a creamy touch to your salad. Now it's time to bring everything together! - How to properly toss the salad without bruising the fruit: In a large bowl, combine all the chopped fruits. Pour the condensed milk mixture over the fruits. Use a spatula or large spoon to gently toss the salad. Be careful not to mash the fruit, just mix until all the pieces are coated. After this, cover the bowl and chill it in the fridge for about 30 minutes. This helps the flavors blend nicely. Enjoy your fruity indulgence salad! To make your fruit salad pop, add fresh lime or lemon juice. The citrus brightens the flavors and balances sweetness. Just a tablespoon goes a long way. You can also think about adding spices or herbs. A pinch of cinnamon or mint can give the salad a fun twist. Serving your salad in a clear bowl makes it look great. You can use a large glass bowl or individual cups. This way, everyone can see the colorful fruits. For a lovely touch, garnish with fresh mint leaves. The green adds color and a fresh scent. Chilling the salad is key for great taste. Let it sit in the fridge for at least 30 minutes. This time allows the flavors to blend. You’ll enjoy a more refreshing and tasty treat. {{image_2}} You can switch up the fruits in this fruit salad for a fresh twist. Here are two fun ideas: - Tropical fruits alternative: Try using mango, papaya, or coconut. These fruits add a sweet and juicy taste that brightens the salad. They also bring a tropical vibe to your dish. - Berry-based variations: Use raspberries, blackberries, or cherries. These berries are tart and sweet, giving your salad a burst of flavor. Mixing berries with the other fruits creates a colorful and tasty treat. You can change the dressing to match your taste or diet. Here are some options: - Using yogurt or sour cream instead of condensed milk: If you want a lighter salad, you can use plain yogurt or sour cream. This change adds creaminess with a tangy flavor. It also makes it a bit healthier. - Making it a vegan dish: For a vegan option, use coconut cream or a plant-based yogurt. These choices keep the salad creamy and tasty without any dairy. Your friends will love it just as much! Adding some crunch can make your fruit salad even better. Here’s how: - Incorporating nuts or seeds: Sprinkle in some chopped nuts like almonds or walnuts. You can also add seeds like pumpkin or sunflower seeds. These add texture and extra nutrition. They make your fruit salad more filling and satisfying. For the full recipe, check out the Fruity Indulgence Salad. Enjoy making your unique version! To keep your fruit salad fresh, place it in an airtight container. Cover the container tightly to avoid air exposure. This helps maintain the salad's taste and texture. Store it in the fridge right away. If you leave it out, the fruit may spoil faster. When stored correctly in the fridge, your fruit salad will stay fresh for about 3 days. After that, the fruits may lose their crunchiness. You might notice some browning, especially with bananas. Always check the salad before serving. If it smells off or looks bad, it’s best to toss it. I don’t recommend freezing this salad. The fruits will lose their texture and become mushy. However, if you want to preserve some fruits, freeze them separately. Cut the fruits and spread them in a single layer on a baking sheet. After they freeze, transfer them to a freezer bag. They can last up to 6 months in the freezer. This way, you can enjoy them later in smoothies or other dishes. Yes, you can use frozen fruits. They are convenient and often just as tasty as fresh fruits. Here are some pros and cons: - Pros: - Frozen fruits are easy to find year-round. - They last longer in your freezer. - You can skip washing and peeling, saving time. - Cons: - Frozen fruits may lose some texture. - They can be watery when thawed. - The color may not be as bright as fresh fruits. If you choose frozen fruits, let them thaw and drain excess water before mixing them with condensed milk. You can keep your fruit salad in the fridge for about 2 to 3 days. For the best taste, eat it within one day. After that, the fruits may become mushy. To keep it fresh longer, cover it tightly with plastic wrap or a lid. Yes, you can prepare this salad ahead of time. Here are some tips: - Mix the fruits and the condensed milk mixture separately. - Combine them right before serving. This helps keep the fruits firm. - Prepare the salad up to a day in advance. Just store it in the fridge. This way, you’ll have a delicious treat ready to go! For the full recipe, check out the Fruity Indulgence Salad details. You learned about making a fresh fruit salad that bursts with flavor. We covered essential ingredients, like fruits and sweetened condensed milk. I shared step-by-step instructions for preparation and mixing. You now know tips to enhance flavor and store leftovers. Remember, the right mix of fruits and a tasty dressing makes all the difference. Don’t shy away from experimenting with different fruits and toppings. Enjoy making your fruit salad and delight in every bite!

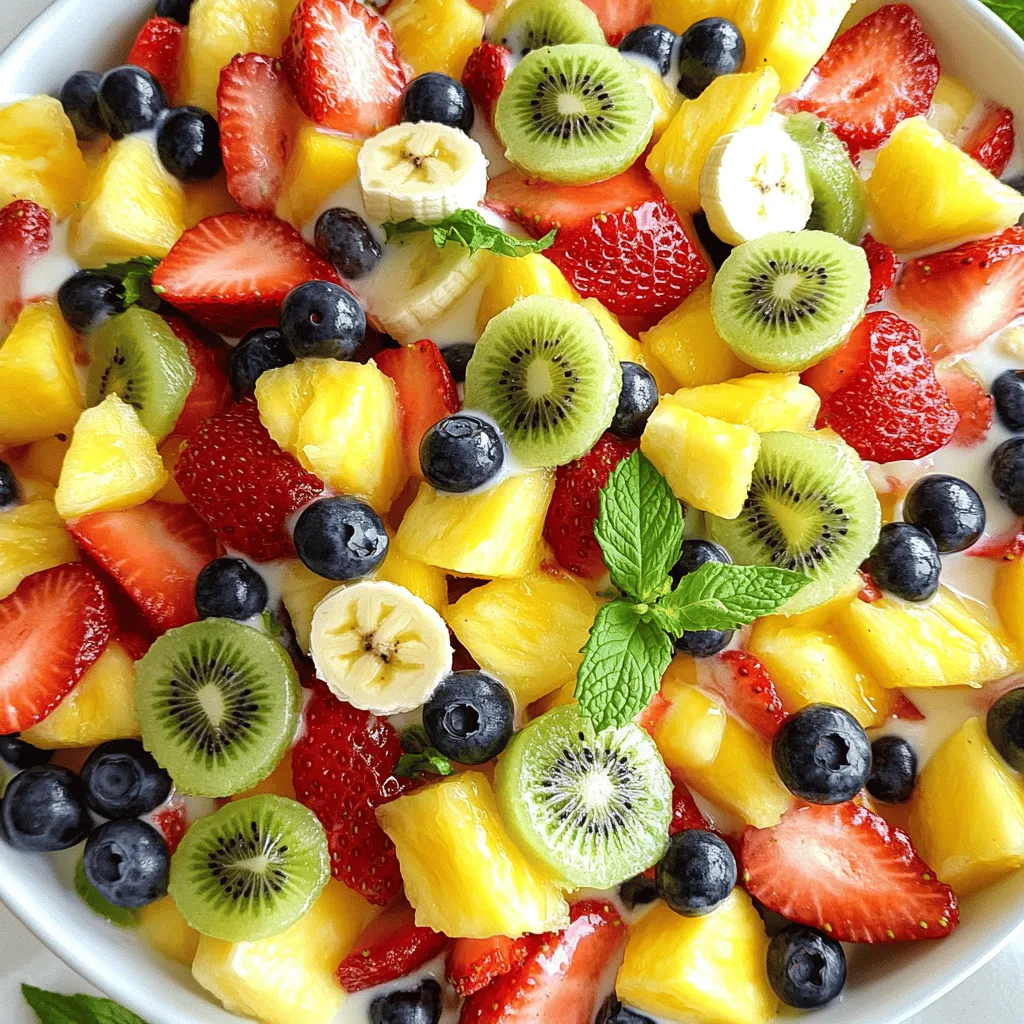
Looking for a quick and tasty way to enjoy fresh fruit? My Fruit Salad with Condensed Milk recipe is your answer! This delightful treat combines ripe fruits with a creamy …

Read more

Categories Salads

Roasted Garlic Butter Parmesan Potatoes Simple Treat

May 29, 2025 by Chef Luca
- 2 pounds baby potatoes, halved - 6 cloves garlic, minced - 1/2 cup unsalted butter, melted - 1 cup grated Parmesan cheese The main ingredients make this dish shine. Baby potatoes provide a soft inside with a crispy skin. Garlic brings a rich flavor. Unsalted butter adds creaminess, while Parmesan gives a tasty, cheesy finish. - 2 tablespoons fresh parsley, chopped - 1 teaspoon dried oregano - 1 lemon, zested and juiced You can enhance the flavor with a few optional ingredients. Fresh parsley adds a bright color and taste. Dried oregano gives an earthy touch. Lemon zest and juice brighten the dish and balance the richness. - Baking sheet - Parchment paper - Large mixing bowl Use simple tools for this recipe. A baking sheet helps roast the potatoes evenly. Parchment paper makes for easy cleanup. A large mixing bowl is perfect for tossing all the ingredients together. For the Full Recipe, follow the steps to create these delicious roasted garlic butter Parmesan potatoes. First, preheat your oven to 425°F (220°C). This ensures the potatoes cook evenly. Next, prepare your baking sheet by lining it with parchment paper. This helps with easy cleanup and prevents sticking. In a large bowl, mix the halved baby potatoes with minced garlic, melted butter, dried oregano, lemon zest, lemon juice, salt, and pepper. Toss the mixture well until the potatoes are coated evenly. This is key for flavor. Spread the coated potatoes on the lined baking sheet in a single layer. Make sure the cut sides face down. This will give you a crispy texture. Roast in the oven for about 25-30 minutes. Flip the potatoes halfway through to ensure even cooking. After roasting, remove the potatoes from the oven and sprinkle grated Parmesan cheese on top. Return them to the oven for an extra 5-7 minutes. This allows the cheese to melt and become bubbly. Once done, garnish with fresh parsley for a splash of color and flavor. Enjoy your Roasted Garlic Butter Parmesan Potatoes, a simple treat! For the full recipe, check the details above. To get crispy potatoes, cut them evenly. Halve the baby potatoes so they cook well. Lay them cut-side down on your baking sheet. This helps them brown nicely. For seasoning, use enough salt and pepper. Don't skip the lemon juice; it adds great flavor. Toss the potatoes well to coat each piece. If you want to serve more people, scale the ingredients up. For every extra two people, add one pound of potatoes. Keep the other ingredients in proportion. Watch the cooking time too. Larger amounts may need an extra few minutes. Check for doneness by piercing a potato with a fork. Storing leftover potatoes is easy. Let them cool down first. Place them in an airtight container. They will stay fresh for about three days in the fridge. To reheat, place them in the oven at 350°F (175°C) for 10-15 minutes. This keeps them crispy. You can also use the microwave, but the oven is better for texture. For more details, check the Full Recipe. {{image_2}} You can change up the flavor of your Roasted Garlic Butter Parmesan Potatoes by adding herbs. Try thyme or rosemary for a fresh taste. These herbs blend well with garlic and butter, making your dish pop. You can also use different cheese options. Instead of Parmesan, try aged cheddar or feta. Each cheese adds a unique twist to the flavor. If you want to make this recipe vegan, swap out the butter for dairy-free alternatives. Look for vegan butter that melts well. For the cheese, use plant-based cheese alternatives. Many brands now offer vegan Parmesan that melts nicely and tastes great. This way, you can enjoy tasty potatoes without dairy. You can experiment with different types of potatoes for this dish. Sweet potatoes bring a natural sweetness and vibrant color. Yukon gold potatoes are creamy and buttery, making them a great choice as well. Just adjust the cooking time if you use larger or denser potatoes. Enjoy the variety! A serving of Roasted Garlic Butter Parmesan Potatoes has around 300 calories. This dish serves about four to six people. Each serving contains: - 20 grams of fat - 30 grams of carbohydrates - 6 grams of protein These numbers can vary based on the size of your potatoes and how much cheese you use. Garlic offers many health perks. It helps boost your immune system. Garlic can lower blood pressure and improve heart health. Adding fresh parsley not only brightens the dish but also gives you vitamins A, C, and K. It also helps with digestion. Potatoes are a great source of energy. They provide vitamins like C and B6. Potatoes also contain potassium, which is good for your heart and muscles. When you eat the skin, you get fiber too. This helps keep your digestive system healthy. This recipe is gluten-free and vegetarian, making it a great choice for many diets. If you want a low-carb option, you can use cauliflower instead of potatoes. It will change the flavor, but it will still taste good! Always check your ingredients to make sure they fit your diet. For the full recipe, check out the previous sections. Yes, you can prepare Roasted Garlic Butter Parmesan Potatoes ahead of time. Cook them fully, then cool them down. Store them in an airtight container in the fridge. They will stay fresh for up to three days. When you are ready to eat, just reheat them. This saves time for busy nights. These potatoes pair well with many dishes. You can serve them with grilled chicken, steak, or fish. They also go great with a fresh salad or roasted vegetables. For a fun twist, serve them with a dipping sauce like ranch or garlic aioli. To add some heat, try these easy ideas: - Add red pepper flakes to the seasoning mix. - Toss in chopped jalapeños or serrano peppers. - Use spicy garlic butter instead of regular butter. These options will give your potatoes a nice kick that you will love. Absolutely! You can use many types of potatoes. Yukon Gold, red potatoes, or fingerling potatoes can work well. Each potato type has its own flavor and texture. Just adjust the cooking time if needed, as different potatoes may take longer or shorter to cook. Reheating is simple. The best way is to use an oven. Preheat the oven to 350°F (175°C). Spread the potatoes on a baking sheet. Heat them for about 10-15 minutes, until warm. This method keeps them crispy. You can also use a microwave, but they may get soft. For the best flavor, stick to the oven. For the full recipe, check out the main section. Roasted Garlic Butter Parmesan Potatoes are tasty and easy to make. We covered the main ingredients, steps, and useful tips. You learned how to adjust the recipe and ensure crispy potatoes. Remember, these potatoes are great with different seasonings and can fit many diets. Experiment with your favorite flavors to make this dish your own. Enjoy your cooking, and make it a fun experience!

Looking for a simple yet tasty side dish? Roasted Garlic Butter Parmesan Potatoes are a winner! These crispy bites combine the rich flavor of roasted garlic with the creamy goodness …

Read more

Categories Dinner

The Best Mascarpone Stuffed Dates Tasty and Irresistible

May 29, 2025 by Chef Luca
- 12 Medjool dates, pitted - 1 cup mascarpone cheese - 2 tablespoons honey The Medjool dates are sweet and chewy. They serve as the perfect base for this treat. I love using mascarpone cheese because it’s creamy and rich. It makes the filling taste amazing. Honey adds a touch of natural sweetness that blends well with the cheese. - 1 teaspoon vanilla extract - 1/4 teaspoon cinnamon Vanilla extract gives the filling a warm flavor. It works well with the mascarpone. The cinnamon adds a hint of spice, making every bite special. These two ingredients elevate the dish to something extraordinary. - 1/4 cup crushed pistachios (for topping) - Flaky sea salt (for garnish) - Fresh mint leaves (for garnish) Crushed pistachios offer a nice crunch. They also add a pop of color. A sprinkle of flaky sea salt brings out the sweetness of the dates and cheese. Fresh mint leaves add a refreshing note. They enhance both the look and taste of the dish. For the complete recipe, check out the Full Recipe section. - Preheat oven to 350°F (175°C). This warms the dates and makes them extra yummy. - Open Medjool dates carefully. Use a small knife to split them without breaking. - Combine mascarpone, honey, vanilla, and cinnamon in a bowl. These flavors blend well. - Mix until smooth and creamy. A spatula works great for this task. - Fill each date with the mascarpone mixture. Be generous and let it overflow a bit. - Arrange on a baking sheet. Use parchment paper for easy cleanup. This recipe is not only easy but also fun. The blend of sweet dates and creamy mascarpone is truly tasty. Try it out, and you will love how simple it is to create these treats. For the full recipe, check the earlier sections! To keep your stuffed dates fresh, place them in an airtight container. You can store them in the fridge for up to three days. If you want to eat them warm, simply reheat them in the oven. Set your oven to 300°F (150°C) for about 5 minutes. This warms them gently without drying them out. Want to spice things up? You can add a pinch of nutmeg or cardamom to the filling. These spices add a nice twist. To adjust the sweetness, try adding more honey or a dash of maple syrup. Taste as you go to ensure it’s just right. Pair your mascarpone stuffed dates with a light dessert wine. A sweet white wine or sparkling wine works great. For a fun serving idea, use a wooden board with fresh fruits and herbs. This makes your dish look amazing and inviting. Add a few mint leaves for color and extra flavor. {{image_2}} You can switch mascarpone with cream cheese. Cream cheese has a tangy taste that works well too. You might also add fruit, like chopped apples or berries, to the filling. Nuts, like walnuts or pecans, can bring crunch and extra flavor. Mixing in these ingredients adds variety and fun. Toppings can change the look and taste of your dates. Try using different nuts or seeds, like almonds or sunflower seeds. They add good texture. You can also explore alternative sweet toppings. Options like maple syrup or chocolate drizzle can make your dates even sweeter. Feel free to get creative! If you're looking for vegan or dairy-free options, you can use cashew cream instead of mascarpone. Blend soaked cashews with a bit of almond milk for a creamy texture. Also, check for gluten-free options if that’s a concern. Dates are naturally gluten-free, making them a safe choice for many diets. To keep your mascarpone stuffed dates fresh, use airtight containers. Glass or plastic containers with tight seals work best. Always store the dates in the refrigerator. They stay fresh for about 3 to 5 days. You can freeze stuffed dates for later enjoyment. First, place them in a single layer on a baking sheet. Freeze them for about an hour. Once frozen, transfer the dates to a freezer bag. Seal it well to keep air out. To thaw, just leave them in the fridge overnight. You can also let them sit at room temperature for about 30 minutes. In the refrigerator, mascarpone stuffed dates last about one week. Check for spoilage signs like an off smell or a change in texture. If they feel sticky or slimy, it’s time to toss them. Enjoy your delicious treats while they are at their best! For the full recipe, check out the details above. For the best flavor, use Medjool dates. They are soft, sweet, and large. These dates are easy to open and perfect for holding the mascarpone filling. You can also try Deglet Noor dates. They are firmer but still tasty. Medjool dates, however, provide a rich, caramel-like flavor that pairs well with mascarpone. Yes, you can prepare these stuffed dates in advance. Fill the dates and store them in the fridge for up to a day. Just remember to add toppings right before serving. This keeps the pistachios crunchy and the mint fresh. If you plan to serve them warm, heat them in the oven for a few minutes before serving. These dates are best served warm, but they can also be enjoyed at room temperature. They make a great appetizer for parties or a sweet treat for gatherings. You can pair them with a nice wine or serve them on a platter with other appetizers. For a fun twist, try drizzling extra honey on top before serving. For the full recipe, visit the [Full Recipe]. In this blog post, I shared a simple way to make stuffed Medjool dates. You learned about the main ingredients, flavor boosters, and tasty toppings. I also provided step-by-step instructions for preparation and storage tips. These stuffed dates are perfect for any occasion and easy to customize. Try different fillings and toppings to make this recipe your own. Enjoy creating delicious treats that everyone will love!

Are you ready to elevate your snack game? These mascarpone stuffed dates are not just tasty; they are irresistible! With creamy mascarpone, sweet honey, and a sprinkle of pistachios, each …

Read more

Categories Desserts

Chicken Caesar Pasta Salad Flavorful and Easy Recipe

May 29, 2025 by Chef Luca
To make a tasty Chicken Caesar Pasta Salad, gather these items: - 8 oz rotini pasta - 1 cup cooked chicken breast, diced - 1 cup romaine lettuce, chopped - ½ cup cherry tomatoes, halved - ¼ cup parmesan cheese, grated - ⅓ cup Caesar dressing - 2 tablespoons olive oil - 1 teaspoon garlic powder - Salt and pepper to taste - Fresh parsley for garnish (optional) You can use fresh or pre-cooked chicken in this salad. Fresh chicken gives a nice, juicy bite. Cook it simply by boiling or grilling. Let it cool before dicing. Pre-cooked chicken is a great time-saver. You can find it in stores, already cooked and ready to use. Whichever you choose, make sure it’s flavorful and safe to eat. Choosing the right Caesar dressing can make a big difference. Some popular brands include Ken's Steakhouse, Marie's, and Annie's. These brands have rich flavors and creamy textures. You can also make your own dressing at home with simple ingredients. Just mix garlic, lemon juice, anchovy paste, and mayonnaise for a homemade touch. Start by cooking the rotini pasta. Boil a large pot of water. Add a pinch of salt for taste. Cook the pasta according to the package instructions until it is al dente. This usually takes about 8 to 10 minutes. Once done, drain the pasta and rinse it under cold water. This stops the cooking process and cools it down. Set the pasta aside in a large mixing bowl. Next, it’s time to mix the salad. In the same bowl with the pasta, add the diced chicken, chopped romaine lettuce, and halved cherry tomatoes. These ingredients add great flavor and texture. Toss them gently with the pasta. You want everything to mix well without breaking the pasta. Now, let’s make the Caesar dressing. In a small bowl, whisk together the Caesar dressing, olive oil, garlic powder, salt, and pepper. Make sure all the ingredients blend well. Pour this dressing over the salad mixture. Toss everything together gently to coat all the ingredients. Add the grated parmesan cheese next. Fold it into the salad. This will add a rich, cheesy flavor. If needed, adjust the seasoning with more salt and pepper. For the best taste, let the salad chill for about 30 minutes. This allows the flavors to meld beautifully. Enjoy your Chicken Caesar Pasta Salad! To make your Chicken Caesar Pasta Salad shine, focus on the flavors. Use fresh, crunchy romaine lettuce for a crisp bite. The dressing should be rich but not overpowering. Start with a bit of Caesar dressing, then add more if you need it. Mix in grated parmesan for a salty kick. Taste as you go to find the right balance. When cooking rotini pasta, follow the package instructions closely. Boil the water first, then add the pasta. Cook until al dente, which means firm to the bite. This helps the pasta hold its shape and not get mushy. Rinse the pasta under cold water after draining. This stops the cooking process and cools it down quickly. Store any leftover Chicken Caesar Pasta Salad in an airtight container. Keep it in the fridge. It’s best to eat it within three days for optimal taste and freshness. If you have extra dressing, store it separately. This keeps the salad from getting soggy. When ready to eat, mix in the extra dressing and enjoy! {{image_2}} You can boost the salad’s nutrition by adding vegetables. Try adding sweet bell peppers, cucumbers, or broccoli. These veggies add crunch and color. You can also toss in peas or spinach for more flavor. Each option brings its own taste and health benefits, making your salad more exciting. If you want to change the protein, you have many choices. You can use shrimp, grilled steak, or even tofu. Each protein adds a different twist to the dish. For a vegetarian option, chickpeas or black beans are great choices. They bring extra protein and fiber to your meal. To make this dish gluten-free, swap the rotini pasta for gluten-free pasta. Many brands offer good alternatives that taste great. For a dairy-free version, skip the parmesan cheese or use a dairy-free substitute. There are many vegan cheeses available that melt well. These changes keep the taste yummy while meeting special diets. For the full recipe, check out my complete guide. To keep your Chicken Caesar Pasta Salad fresh, store it in an airtight container. This helps to lock in flavors and keep it crisp. Make sure to separate the dressing if you plan to eat it later. Adding the dressing right before eating keeps the lettuce from getting soggy. If you have leftovers, try to consume them within a few days for the best taste. Your Chicken Caesar Pasta Salad can stay fresh in the fridge for about 3 to 4 days. After that, the flavors may fade, and the texture can change. Always check for any signs of spoilage before eating. If it smells off or looks different, it's best to toss it out. Freezing Chicken Caesar Pasta Salad is not ideal. The lettuce and dressing do not freeze well. If you want to freeze leftovers, consider just freezing the pasta and chicken. When you're ready to eat, thaw it in the fridge overnight. You can then mix in fresh lettuce and dressing for a better taste. Always serve it cold for the best experience. For a full recipe, check the earlier section. Yes, you can use other pasta shapes. Penne, fusilli, or farfalle work well too. Just ensure the pasta is bite-sized. This makes it easy to eat. Choose a shape you like for fun. Different shapes can add a nice twist to your dish. You can make this salad ahead of time. First, prepare the pasta and chicken. Mix all the ingredients except for the dressing. Store this mix in the fridge. When you're ready to serve, add the dressing. This keeps the salad fresh and tasty. Absolutely! Chicken Caesar Pasta Salad is great for meal prep. It stays fresh in the fridge for a few days. Just portion it into containers. This makes for a quick lunch or dinner. You can grab it on busy days. Plus, it still tastes delicious after a day or two. For the full recipe, check the details above. In this post, we covered how to make Chicken Caesar Pasta Salad. We examined fresh and pre-cooked chicken options, plus different Caesar dressings. You learned easy steps to prepare the pasta and mix ingredients. I shared tips for great flavors and best storage practices. You can also try various veggie and protein options to make the salad your own. Now you can enjoy this tasty dish anytime! Keep experimenting and have fun.

Are you ready to enjoy a tasty Chicken Caesar Pasta Salad that’s both flavorful and easy to make? In this post, I’ll guide you through the simple steps to create …

Read more

Categories Salads
Older posts
Newer posts
← Previous Page1 … Page110 Page111 Page112 … Page122 Next →

STIRRED RECIPES

Where every dish begins with a stir! 🍲✨

PAGES

Home About Contact Privacy Policy Terms & Conditions Cookie Policy GDPR Policy Copyright Policy Disclaimer

CATEGORIES

Appetizers Desserts Salads Breakfast Dinner

Contact

  • Pinterest
  • Mail
Copyright © 2026 Stirred Recipes. All rights reserved.