Skip to content
Stirred Recipes
  • Home
  • Appetizers
  • Desserts
  • Salads
  • Breakfast
  • Dinner
  • Privacy Policy
  • Contact
  • About

Chef Luca

Crispy Cinnamon-Sugar Air Fryer Banana Chips Recipe

May 30, 2025 by Chef Luca
- 3 ripe bananas - 1 tablespoon cinnamon - 2 tablespoons granulated sugar - 1 tablespoon lemon juice - A pinch of salt Let’s dive into the ingredients. You need ripe bananas for the best flavor. They should be soft and sweet. The cinnamon and sugar add a lovely sweetness and warmth. Mixing these two makes a classic topping. Lemon juice helps keep the bananas from turning brown. It also adds a nice zing to the flavor. A pinch of salt balances the sweetness. It brings out the taste of the bananas and spices. To make the cinnamon-sugar air fryer banana chips, gather all these ingredients first. This will make the process smooth and fun. You’ll find the full recipe in the article to guide you through the steps. 1. Peel and slice bananas: Start by peeling your three ripe bananas. Slice them into thin rounds, about 1/8 inch thick. Keeping the slices even helps them cook evenly. 2. Prepare the cinnamon-sugar mixture: In a small bowl, mix together one tablespoon of cinnamon, two tablespoons of granulated sugar, and a pinch of salt. This will be your sweet and spicy blend for the banana chips. 3. Toss banana slices with lemon juice: Take your sliced bananas and place them in a bowl. Add one tablespoon of lemon juice and toss gently. This step stops browning and adds flavor. 4. Air frying instructions and temperature settings: Preheat your air fryer to 350°F (175°C) for about 3 minutes. Lay the banana slices in a single layer in the air fryer basket. Avoid overlapping them, as this ensures they all cook well. Cook for 10-12 minutes. Shake the basket halfway through to promote even cooking and stay close to watch them. You want them golden and crispy. 5. Checking for doneness: After 10-12 minutes, check the chips. They should be golden and crisp. If they need more time, air fry for a couple of extra minutes. 6. Cooling and serving chips: Once done, carefully remove the chips from the air fryer. Place them on a wire rack to cool for a few minutes. This helps them crisp up even more. When cool, enjoy your tasty cinnamon-sugar banana chips! You can find the Full Recipe for more details. Slicing bananas evenly is key to getting nice, crispy chips. If the slices are thick, some may stay soft while others get too hard. Aim for 1/8 inch thick slices. Use a sharp knife or a mandoline for the best results. A mandoline gives you quick, even cuts. This tool makes it easy to slice a lot of bananas at once. To make your banana chips even tastier, try adding spices. Nutmeg or vanilla can bring a new twist. Just remember, too much sugar can make them overly sweet. Stick to the recipe's sugar amount, and taste as you go. You can always add more if needed, but it’s hard to take it away. Avoid overcrowding the air fryer basket. If you stack the banana slices, they will not cook evenly. Cook them in batches if needed. For crispier chips, preheat your air fryer for a few minutes. This helps start the cooking process right away. Also, shake the basket halfway through cooking. This ensures even cooking and helps avoid burning. {{image_2}} You can add extra flavors to spice up your banana chips. Try adding nutmeg for a warm touch. Just a pinch will do! You can also mix in vanilla extract for a sweet aroma. If you want less sugar, use alternative sweeteners like stevia or agave syrup. These keep the sweetness while cutting calories. To make your banana chips gluten-free, this recipe is already safe! Bananas, cinnamon, and sugar are naturally gluten-free. For vegan-friendly options, this recipe is perfect as it contains no animal products. Just stick with the listed ingredients, and you’re all set! Want to make your banana chips more exciting? Combine them with nuts or dried fruits. This adds crunch and flavor. You can also drizzle some melted chocolate over the chips after cooking. This sweet touch makes a great treat for special occasions or snack time! To keep your banana chips fresh, use an airtight container. Glass jars work great, but plastic containers are fine too. Make sure the lid seals tightly. This helps keep air out and keeps them crispy. If you store them in a cool place, they will stay crunchier for longer. Avoid damp areas as moisture can ruin the texture. At room temperature, your banana chips can last up to two weeks. Check for any signs of spoilage. If they feel soft or have an off smell, it's best to toss them. Freshness is key to enjoying these tasty snacks. Always trust your senses when checking for spoilage. If your banana chips lose their crunch, don't worry! You can revive them. The best way is to pop them back in the air fryer for about 3 to 5 minutes. Set the temperature to 300°F (150°C) to warm them up. This method works wonders to regain that crispy texture. You can also use a toaster oven if you don’t have an air fryer handy. Using frozen bananas is not the best idea. They lose their firm texture when thawed. This can lead to soggy chips instead of crispy ones. Fresh bananas give you that delightful crunch. For the best results, stick with ripe, fresh bananas. These chips stay fresh for about a week. Store them in an airtight container at room temperature. If you notice any soft spots or moisture, toss them out. For maximum crispness, avoid the fridge. Yes, these chips are a great snack for kids. They are sweet and crunchy, making them a fun treat. Plus, they have natural sugars and no added junk. Pair them with yogurt for a healthy snack option. You can find the Full Recipe for Cinnamon-Sugar Air Fryer Banana Chips in the earlier section of this article. It has all the details you need to make this tasty snack! In this article, we explored how to make delicious cinnamon-sugar air fryer banana chips. We covered key ingredients and provided step-by-step cooking instructions for perfect chips. I shared tips for slicing and enhancing flavor, plus variations to cater to different diets. Storing and reheating methods help keep your snacks fresh. Enjoy making these simple banana chips as a tasty treat! They are easy, fun, and sure to impress everyone. Happy cooking!

Looking for a tasty snack that’s simple to make? Try my Crispy Cinnamon-Sugar Air Fryer Banana Chips! With just a few ripe bananas and a sprinkle of cinnamon, you can …

Read more

Categories Desserts

Strawberry Brownies Recipe Simple and Delicious Treat

May 30, 2025 by Chef Luca
In this recipe, you will need the following ingredients to make delicious strawberry brownies: - 1 cup unsalted butter, melted - 1 cup granulated sugar - 3 large eggs - 1 teaspoon vanilla extract - 1 cup all-purpose flour - 1/2 cup unsweetened cocoa powder - 1/2 teaspoon baking powder - 1/4 teaspoon salt - 1 cup fresh strawberries, pureed - 1/2 cup fresh strawberries, diced (for topping) - 1/2 cup dark chocolate chips (optional) These ingredients bring together a delightful mix of rich chocolate and fresh strawberry flavor. The melted butter helps create a fudgy texture, while the pureed strawberries add a fruity twist. You can use dark chocolate chips if you want an extra burst of chocolate goodness. Each part plays a big role in making these brownies a favorite treat. For the full recipe, check out the details above. - Preheat the oven to 350°F (175°C). - Grease a 9x9-inch baking pan or line it with parchment paper. - In a large mixing bowl, mix melted butter and sugar until smooth. - Incorporate eggs one at a time and add vanilla extract. - Whisk together flour, cocoa powder, baking powder, and salt in a separate bowl. - Gradually add the dry mix to the wet mixture until just combined. - Gently incorporate pureed strawberries into the batter for a fruity touch. - Optional: include dark chocolate chips for added richness. - Pour the batter into the pan, smoothing it out evenly. - Drop diced strawberries on top, then swirl with a knife for a marbled effect. - Bake for 25-30 minutes or until a toothpick comes out mostly clean. - Allow brownies to cool in the pan on a wire rack for a perfect texture. - Cut into squares after they have cooled fully for neat edges. You can find the full recipe for these delicious strawberry brownies in the previous sections. Enjoy! For the best brownie texture, you must adjust your baking time. Each oven is different. Start by checking the brownies a few minutes early. When you insert a toothpick, it should come out with a few moist crumbs. If it is wet, bake for a few more minutes. After baking, let the brownies cool completely. This cooling time is key for clean cuts. To boost flavor, use high-quality chocolate. It adds depth and richness to your brownies. You might also try mixing in nuts or shredded coconut. These ingredients can add a nice crunch and extra taste. Do not be afraid to play around with flavors. Serve your brownies warm for the best experience. They pair wonderfully with whipped cream or a scoop of vanilla ice cream. Top them with fresh strawberry slices for a pretty touch. This simple step makes your dessert look as good as it tastes. If you want to impress, consider a drizzle of chocolate sauce. This will elevate your brownies to a new level. Check out the Full Recipe for more tips on presentation. {{image_2}} You can make these brownies gluten-free. Just substitute all-purpose flour with a gluten-free baking blend. This swap works well and keeps the brownies moist and tasty. Look for blends that have a mix of flours, starches, and xanthan gum. These ingredients help mimic the texture of regular flour. If you want a vegan version, it's easy to make changes. Replace eggs with flax eggs. To make a flax egg, mix 1 tablespoon of flaxseed meal with 2.5 tablespoons of water. Let it sit for a few minutes until it thickens. Use plant-based butter instead of regular butter to keep it vegan. You can also add non-dairy yogurt for moisture. Yogurt adds creaminess while keeping the brownies soft. Choose a flavor that complements strawberries, like vanilla or plain. Mixing in other fruits can enhance the flavor of your brownies. Raspberries or blueberries can add a nice tartness. You can also combine pureed strawberries with other fruit purees for new tastes. Try peaches or mango for a tropical twist. This adds fun colors and flavors to the brownies, making them even more delicious. For the full recipe, check out the complete guide to making these delightful treats! To keep your brownies fresh, store them in an airtight container at room temperature. This helps maintain their soft texture. If you want them to last longer, refrigerate them. The brownies will stay good for about a week in the fridge. If you have extra brownies, freezing is a great option. Wrap each square in plastic wrap. Place them in a freezer bag for added protection. When you're ready to enjoy them, thaw them at room temperature. You can also use the microwave for a quick thaw. Just be careful not to overheat them! For more details on making these tasty treats, check out the Full Recipe. Yes, but be sure to thaw and drain excess water before using. Frozen strawberries can work well in this recipe. The key is to remove as much water as possible. Otherwise, the brownies may turn out too wet. A toothpick inserted should come out mostly clean with a few moist crumbs. This helps you know the brownies are still fudgy inside. If it comes out clean, the brownies might be overbaked. Absolutely! They store well for several days and can be frozen for longer preservation. Just keep them in an airtight container. When you’re ready to enjoy, simply thaw them at room temperature. Serve warm with a dollop of whipped cream or alongside ice cream for a delightful treat. The cold ice cream pairs well with the warm brownie, making for a tasty dessert experience. You can even add fresh strawberry slices on top for a nice touch. You now have a clear guide to make delicious strawberry brownies. We covered all the ingredients, simple steps, tips for great texture, and fun variations. Remember, these brownies are easy to adapt and store. You can experiment with flavors or even make them gluten-free or vegan. Enjoying these treats warm with ice cream makes them even better. Get ready to impress your friends and family with this tasty dessert!

Looking for a simple and delicious way to satisfy your sweet tooth? Try my Strawberry Brownies Recipe! These fudgy treats blend rich chocolate with fresh strawberries, creating a delightful dessert …

Read more

Categories Desserts

Sweet Chili Air Fryer Brussels Sprouts Delight

May 30, 2025 by Chef Luca
- 1 pound Brussels sprouts, trimmed and halved - 2 tablespoons olive oil - 3 tablespoons sweet chili sauce - 1 tablespoon soy sauce (or tamari for gluten-free) - 1 teaspoon garlic powder - 1 teaspoon onion powder - Salt and pepper to taste These main ingredients give the Brussels sprouts their tasty flavor. The sweet chili sauce adds a nice kick, while the olive oil helps them crisp up. - 1 tablespoon sesame seeds (optional for garnish) - Fresh cilantro, chopped (for garnish) Adding sesame seeds and cilantro makes the dish look bright and fresh. They also add extra flavor and crunch. - Choose firm, fresh Brussels sprouts. Avoid soft or yellowing ones. - Adjust the sweet chili sauce to your spice level. More sauce equals more heat. - Tamari works well for a gluten-free option. It's a great substitute for soy sauce. When you use fresh ingredients, you get the best taste. This makes your Sweet Chili Air Fryer Brussels Sprouts truly shine. For the full recipe, check out the complete guide. Start by washing the Brussels sprouts well. Trim the ends and cut them in half. This helps them cook evenly. Aim for a pound for about four servings. The smaller they are, the quicker they cook. In a large bowl, combine these ingredients: - 2 tablespoons olive oil - 3 tablespoons sweet chili sauce - 1 tablespoon soy sauce - 1 teaspoon garlic powder - 1 teaspoon onion powder - Salt and pepper to taste Toss the halved Brussels sprouts into the bowl. Mix well so the sprouts are fully coated. This step adds flavor and helps with crispiness during cooking. Preheat your air fryer to 375°F (190°C). Once heated, place the Brussels sprouts in the air fryer basket. Arrange them in a single layer for best results. If you have too many, cook them in batches. Air fry for 15-18 minutes. Remember to shake the basket halfway through. This ensures even cooking. They should turn golden brown and become crispy. After cooking, transfer them to a serving dish. Drizzle with extra sweet chili sauce if you like. Garnish with sesame seeds and chopped cilantro for a nice touch. Enjoy your tasty dish! For the complete instructions, check the Full Recipe. To get that perfect crispiness, make sure to dry the Brussels sprouts well. Moisture can make them soggy. Trim them evenly and cut them in half. This helps them cook evenly. When you toss them with oil and sauce, coat them well. Avoid overcrowding the air fryer. This lets hot air flow freely. Shake the basket halfway through cooking for even crispiness. One common mistake is not preheating the air fryer. This step is key for good results. Also, don’t skip the shaking step during cooking. It helps brown and crisp them up. Using too much sauce can also make them soggy. Stick to the recipe. Lastly, avoid using untrimmed Brussels sprouts. They will not cook well and may taste bitter. You can enhance the flavor with a few simple tweaks. Consider adding a splash of lime juice for brightness. You can also mix in some red pepper flakes for heat. Try swapping sweet chili sauce for a spicy version if you like heat. Top with toasted nuts for crunch. Fresh herbs like basil or mint can also add a nice touch. For a complete experience, check the Full Recipe for more ideas. {{image_2}} To kick up the heat, add chili flakes. Start with half a teaspoon. If you like it hotter, add more. You can also mix in Sriracha. This will give your sprouts an extra kick. The sweet and spicy blend creates a great flavor. It wakes up your taste buds and pairs well with the dish. This recipe is already vegetarian. To make it vegan, use a plant-based sweet chili sauce. Check the label for any hidden ingredients. You can swap soy sauce for tamari to keep it gluten-free. This way, everyone can enjoy this dish. Vegan or not, the flavor stays rich and satisfying. Try different sauces for variety. You can use barbecue sauce for a smoky twist. Honey mustard also works well, giving a sweet and tangy vibe. For a creamy option, toss the sprouts with ranch dressing after cooking. Each sauce brings a new taste to your sprouts. Explore these ideas and find your favorite flavor. Check out the Full Recipe to see how you can mix it up! You can keep leftover Brussels sprouts in the fridge. Place them in an airtight container. They stay fresh for about 3 days. Make sure they cool down to room temperature before sealing. This helps keep their texture and flavor. To reheat, place the Brussels sprouts in the air fryer. Set it to 350°F (175°C). Heat them for about 5 minutes. This method makes them crispy again. You can also use a microwave if you are in a hurry. Heat them for about 30 seconds, but they may lose some crunch. You can freeze Brussels sprouts, but the texture may change. First, blanch them in boiling water for 3 minutes. Then, cool them quickly in ice water. Drain and dry them well. Place the sprouts in a freezer-safe bag. They can last for up to 3 months in the freezer. Just remember to label the bag with the date. Yes, you can use frozen Brussels sprouts. However, they may not get as crispy. Thaw and drain them before cooking. This helps them crisp up better in the air fryer. You may need to cook them a bit longer, so check for doneness. To reduce bitterness, you can try several methods. First, trim the ends and remove any yellow leaves. Second, soak them in cold water for 30 minutes. This helps to lessen the bitter taste. Roasting or air frying with sweet sauces also balances the flavor nicely. These Brussels sprouts pair well with many dishes. They complement grilled chicken or fish nicely. You can also serve them with rice or quinoa for a hearty meal. Try them alongside Asian-inspired dishes for a vibrant flavor match. If you don’t have an air fryer, you can roast Brussels sprouts in the oven. Preheat your oven to 400°F (200°C). Spread the coated Brussels sprouts on a baking sheet. Bake for 20-25 minutes, tossing halfway through. This method will still give you crispy and tasty sprouts. For the full recipe, you can check the detailed cooking steps. In this post, we explored the ingredients and step-by-step instructions for making Sweet Chili Air Fryer Brussels Sprouts. I shared tips for perfecting crispiness and avoiding common mistakes. You learned about delicious variations, storage tips, and answers to common questions. Enjoy making this tasty dish at home. Experiment with flavors and enjoy every bite!

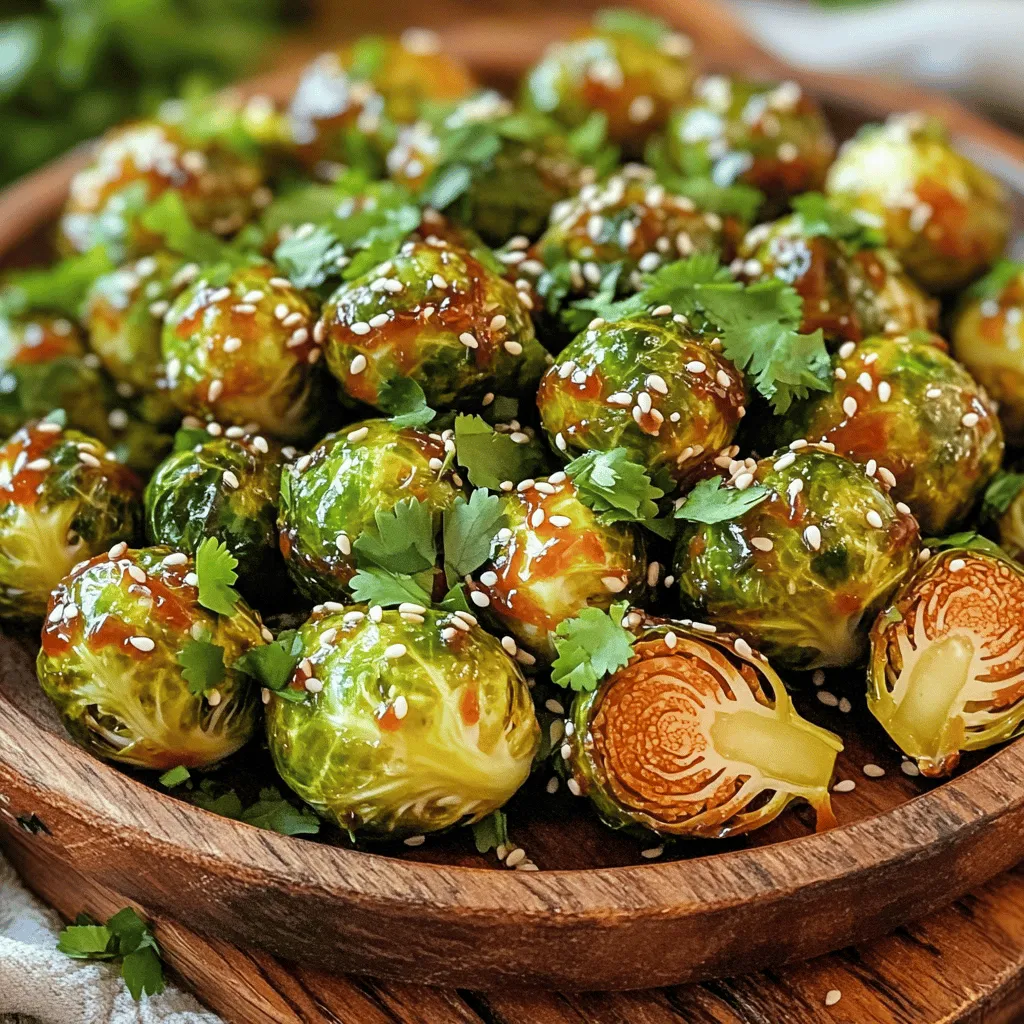
Are you ready to elevate your vegetable game? Sweet Chili Air Fryer Brussels Sprouts Delight offers a crispy, tangy twist on a classic dish. You’ll love how easy it is …

Read more

Categories Appetizers

Cheesecake Fruit Salad Delightful and Easy Recipe

May 30, 2025 by Chef Luca
To make a delightful cheesecake fruit salad, you need some simple ingredients. Here is what you need: - 1 cup cream cheese, softened - 1/2 cup Greek yogurt - 1/4 cup powdered sugar - 1 tablespoon vanilla extract - 2 cups mixed berries (strawberries, blueberries, raspberries) - 1 ripe banana, sliced - 1 cup diced pineapple - 1 cup chopped kiwi - 1/4 cup crushed graham crackers (for topping) - Fresh mint leaves for garnish These ingredients come together to create a sweet and creamy dish. The cream cheese gives a rich taste, while Greek yogurt adds a nice tang. Powdered sugar sweetens it perfectly. Vanilla extract makes everything smell amazing. Using fresh fruits keeps the salad bright and colorful. You can mix and match fruits as you like, but I recommend using berries, bananas, pineapples, and kiwis. They bring great flavors and textures. Lastly, crushed graham crackers top the salad, adding that cheesecake crust feel. Fresh mint leaves brighten the dish. They add a pop of color and a hint of freshness. For the full recipe, check the details above. Enjoy making your cheesecake fruit salad! To start, we need to prepare the cream cheese mixture. In a large mixing bowl, beat 1 cup of softened cream cheese with an electric mixer. Mix until it turns smooth and creamy. Next, add 1/2 cup of Greek yogurt, 1/4 cup of powdered sugar, and 1 tablespoon of vanilla extract. Blend these ingredients until they are well combined. Now, let’s move on to chopping and slicing the fruits. Slice 1 ripe banana and chop 1 cup of kiwi. Measure out 2 cups of mixed berries and 1 cup of diced pineapple. It’s important to keep the fruits fresh and colorful. Next, we combine the ingredients. Gently fold the sliced fruits into the cream cheese mixture. Be careful not to mash the berries. Once everything is mixed well, spoon the cheesecake fruit salad into serving bowls. When it comes to plating the cheesecake fruit salad, aim for a colorful display. Use clear bowls to show off the vibrant fruits and creamy mixture. For garnishing tips, sprinkle 1/4 cup of crushed graham crackers on top of each serving. This adds a nice crunch and cheesecake flavor. Finish with fresh mint leaves for a pop of color and aroma. If you want to see the full process, check out the Full Recipe. Enjoy! To create a smooth cheesecake base, start with softened cream cheese. This helps prevent lumps. Use a hand mixer to blend until it’s creamy. Aim for a fluffy texture that is easy to fold into your fruits. If you don’t have Greek yogurt, don’t worry! You can use sour cream or regular yogurt. These options still give you that nice tangy taste. Just make sure they are not too watery. This keeps your mixture thick and creamy. For the best cheesecake fruit salad, choose ripe fruits. Strawberries, blueberries, raspberries, and bananas work wonderfully. Pineapple and kiwi add a sweet twist. Their bright colors make the dish pop! Using seasonal fruits enhances flavor. In summer, berries shine. In winter, consider citrus fruits like oranges or mandarins. They add freshness and zing to the salad. No matter what fruits you choose, make sure they’re fresh. This gives your salad that extra burst of flavor. For the full recipe, check out the details provided earlier. {{image_2}} You can play with flavors in your cheesecake fruit salad. Adding citrus fruits like oranges or lemons brightens the dish. These fruits add a zesty kick and balance the sweet cream. You can also try using flavored yogurts. A strawberry or lemon Greek yogurt adds a fun twist to your mix. Alternative sweeteners are another way to change it up. If you want less sugar, use honey or maple syrup. These natural sweeteners blend well and add their own flavors. You can also try stevia for a low-calorie option. This way, you keep it sweet without the extra sugar. Making this salad dairy-free is easy. You can swap the cream cheese for cashew cream. Blend soaked cashews with a bit of lemon juice for a rich texture. Use coconut yogurt instead of Greek yogurt for a creamy base. This keeps all the flavors while meeting dietary needs. For low-sugar alternatives, use fresh fruits that are naturally sweet. Strawberries and bananas add sweetness without needing much sugar. You can also replace powdered sugar with a sugar-free option. This way, you can enjoy the salad without worrying about sugar intake. For the Full Recipe, check out the complete guide for all the steps and details. To keep your cheesecake fruit salad fresh, you should use airtight containers. Glass or plastic containers both work well. Make sure to seal them tightly to avoid air exposure. Store the salad in the fridge right after you prepare it. The cool temperature helps maintain its flavor and texture. Cheesecake fruit salad lasts about 3 to 5 days in the fridge. After that, it may start to lose its taste and quality. Look for signs that it has gone bad, like a sour smell or a watery texture. If you see any mold, throw it away. Always trust your senses! You can prepare cheesecake fruit salad a day in advance. Just follow these simple tips: - Make the cream cheese mixture first and store it in the fridge. - Chop fruits like bananas right before mixing. This keeps them fresh and bright. - Mix the fruits into the cream cheese mixture just before serving. This prevents sogginess. Preparing ahead makes it easy for parties or family meals. You can swap fruits easily in this recipe. Here are some tasty options: - Use peaches or nectarines for a sweet twist. - Try cherries for a bold flavor. - Apples or pears can add crunch and sweetness. - Grapes are also a great choice if you want bite-sized pieces. Feel free to mix and match based on your taste! Freezing cheesecake fruit salad is not the best idea. The texture changes when you thaw it. Here’s what happens: - Cream cheese can become grainy or watery after freezing. - Fruits may turn mushy and lose their fresh look. If you want to save leftovers, store them in the fridge instead. Enjoy fresh flavors every time! This blog post covered how to make a tasty cheesecake fruit salad. You need simple ingredients like cream cheese, Greek yogurt, and fresh fruit. We also shared step-by-step instructions to mix, chop, and serve it well. Remember to try different fruits and toppings for variety. Store your salad properly for the best taste and freshness. Enjoy creating this easy and tasty dish anytime!

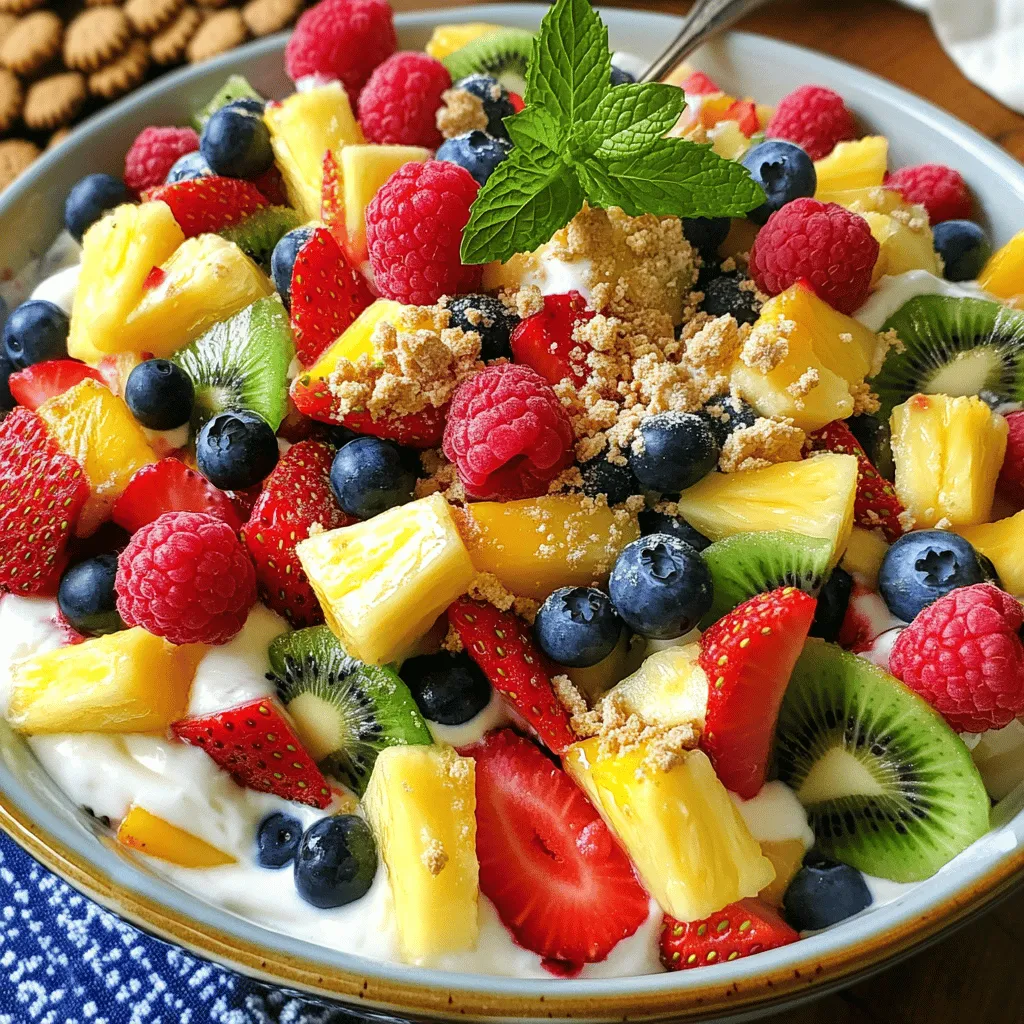
Are you ready for a sweet and refreshing treat? My Cheesecake Fruit Salad combines creamy texture with vibrant fruits for a dish that’s both delightful and easy to make. With …

Read more

Categories Desserts

Mexican Macaroni Salad Tasty and Colorful Dish

May 30, 2025 by Chef Luca
- 2 cups elbow macaroni - 1 cup cherry tomatoes, halved - 1 cup corn (fresh, frozen, or canned) - 1/2 cup red bell pepper, diced - 1/2 cup red onion, finely chopped For a great Mexican Macaroni Salad, start with these main ingredients. The elbow macaroni gives a nice base. Cherry tomatoes add sweetness and color. Corn brings a pop of texture. Red bell pepper gives crunch, and red onion adds a sharp flavor. - 1/2 cup black olives, sliced - 1 cup shredded cheese (cheddar or Mexican blend) - 1/4 cup fresh cilantro, chopped You can add optional ingredients for more flavor. Black olives give a briny taste. Cheese adds creaminess and richness. Fresh cilantro offers a burst of herbal flavor that brightens the dish. - 1/2 cup mayonnaise - 1 tablespoon lime juice - 1 tablespoon taco seasoning - Salt and pepper to taste The dressing is key to this salad. Mayonnaise gives a creamy base. Lime juice adds a tangy kick. Taco seasoning brings a mix of spices that tie everything together. Don’t forget to add salt and pepper to balance the flavors. Check out the [Full Recipe] for step-by-step guidance on making this colorful dish. First, boil the elbow macaroni in salted water. Cook it until it is al dente. This usually takes about 7 to 9 minutes. Drain the macaroni and rinse it under cold water. Rinsing stops the cooking and cools it down. Next, you will combine all the main ingredients in a large bowl. Add the cooked macaroni, cherry tomatoes, corn, red bell pepper, red onion, and black olives. Don’t forget the shredded cheese! Make sure everything is evenly mixed. This helps all the flavors blend together. In a separate small bowl, whisk together mayonnaise, lime juice, and taco seasoning. Add salt and pepper to taste. This dressing gives the salad a zesty kick. Once smooth, pour the dressing over the salad mixture. Toss gently to coat all the ingredients. This step is key for flavor. For an extra touch, fold in chopped cilantro for a fresh pop. For the full recipe, check out the instructions above. To make your Mexican macaroni salad even better, try adding diced avocado. The avocado gives a creamy texture that pairs well with the other ingredients. I also suggest using fresh lime juice instead of bottled. It adds a zesty kick that brightens the whole dish. Getting the perfect al dente pasta is key. Cook the elbow macaroni in salted water until it has a slight bite. This makes the salad more enjoyable. When cutting your veggies, keep them in small, even pieces. This helps mix them well with the pasta and dressing. Garnishing your salad can make it look even more appealing. Try adding extra cilantro or a sprinkle of cheese on top. You can also pair your salad with proteins like grilled chicken or shrimp. This makes it a hearty meal that everyone will love. For the full recipe, check out the section above! {{image_2}} To make this dish suitable for vegetarians or vegans, you can swap out the mayonnaise. Use vegan mayo for a creamy base without animal products. You can also add chickpeas to boost the protein content. Chickpeas add a nice texture and flavor. They also help make the salad more filling. Do you like spice? Consider adding jalapeños to your salad. You can chop them up and mix them in for a kick. If you want more heat, try using hot sauce. A few dashes can really amp up the flavor. For a cheesy twist, look for spicy cheese blends. These can add both heat and creaminess to your dish. Using local vegetables can give your salad a fresh twist. Think about adding seasonal produce from your area. Fresh corn or bell peppers from a nearby market can enhance the taste. You might also explore regional cheeses or spices. Different flavors can take your salad to a whole new level. To keep your Mexican macaroni salad fresh, store any leftovers in an airtight container. This helps prevent the salad from absorbing other flavors in the fridge. I recommend eating the salad within 3 to 5 days for the best taste and quality. Always check for any signs of spoilage before serving. You can freeze this salad, but be careful to keep the texture. First, place the salad in a freezer-safe container. Leave some space at the top, as it will expand when frozen. Avoid freezing for more than 2 months, as the quality will start to decline. When you are ready to eat the salad, thaw it in the fridge overnight. To refresh it, mix in a bit of fresh mayonnaise and lime juice. Taste the salad and adjust seasoning if needed. This helps bring back the bright flavors after storage. For the full recipe, you can check the recipe section above. You can store Mexican macaroni salad in the fridge for about 3 to 5 days. Make sure to keep it in an airtight container. If you see any signs of spoilage, like a sour smell or mold, throw it away. Yes, you can make this salad a day in advance. This allows the flavors to blend nicely. Just cover it well and keep it in the fridge. When you're ready to serve, give it a quick stir. If it seems dry, add a little more dressing. If you want a mayo alternative, you have a few tasty options: - Greek yogurt for creaminess - Sour cream for a tangy kick - Avocado for a smooth texture - Hummus for a unique flavor Each option will change the taste a bit but still keeps your salad delicious. For the full recipe, check out the complete details. Mexican macaroni salad is a fun dish to make and enjoy. We covered the key ingredients, from elbow macaroni to tasty dressings. You can mix in optional items like cheese or olives for added flavor. Remember to follow my tips for texture and serving ideas. You can make this dish your own with various twists. With simple storage tips, you can savor it for days. Now, it's time to whip up your own version and impress your friends and family!

Looking for a fun twist on a classic dish? Mexican macaroni salad is your answer! Packed with colorful ingredients and zesty flavors, this dish is perfect for any gathering. In …

Read more

Categories Salads

Marinated Cucumbers, Onions, and Tomatoes Delight

May 30, 2025 by Chef Luca
- Cucumbers - Tomatoes - Red Onion - Apple cider vinegar - Olive oil - Honey - Spices - Fresh parsley - Additional seasonings To create this bright and fresh dish, you need some simple ingredients. Start with cucumbers. They add a nice crunch. For sweetness, use ripe tomatoes. The red onion brings a strong flavor that pairs well with the other veggies. For the dressing, apple cider vinegar gives a tangy taste. Olive oil adds richness. Honey balances the acidity and brings a hint of sweetness. A mix of spices, like garlic and oregano, makes the dish pop. You can also add some fresh parsley on top. It gives a burst of color and extra flavor. If you like more spice, feel free to add your favorite seasonings. To get the full recipe, check out the Crisp & Zesty Cucumber Tomato Medley. It's a quick and tasty way to enjoy fresh vegetables! - How to slice cucumbers and onions: Start with the cucumbers. Wash them well. Cut off both ends. Slice them thinly. Aim for about 1/8 inch thick. This helps them soak up the marinade. Now, take the red onion. Peel it first. Cut it in half, then slice thinly. You want pieces that are easy to mix in. - Preparing the tomatoes: For the tomatoes, wash them too. Cut them into quarters, then dice them into small pieces. This size works well with the cucumbers and onions. Make sure they are ripe for the best taste. - Mixing liquid ingredients: In a small bowl, combine apple cider vinegar, olive oil, and honey. Use a whisk to blend them well. This mix helps bring out the flavor of the veggies. - Incorporating seasonings: Next, add granulated garlic, dried oregano, salt, and pepper. Whisk again until everything is smooth. This will be the tangy and sweet dressing for your salad. - Tossing vegetables and marinade: In a large mixing bowl, add your sliced cucumbers, diced tomatoes, and red onions. Pour the marinade over them. Use a spoon to toss everything gently. Make sure all the veggies are coated. - Covering and refrigerating: Cover the bowl with plastic wrap or use an airtight container. Place it in the fridge for at least 30 minutes. This lets the flavors mix well. When you’re ready to eat, give it another toss. Enjoy your marinated cucumbers, onions, and tomatoes delight! For the full recipe, check out the details above. To boost the taste of your marinated cucumbers, onions, and tomatoes, I suggest a few simple changes. You can add some crushed red pepper for heat or fresh herbs like dill for a fresh twist. If you like it sweet, increase the honey to suit your taste. Marinate the veggies for at least 30 minutes, but letting them sit for 2 hours makes them even better! The longer they sit, the more the flavors blend. One mistake I see often is over-marinating. If you leave the veggies too long, they can become mushy. Aim for a balance between flavor and texture. Also, slicing is key! Make sure to cut cucumbers and onions thinly. Thick slices won't absorb the marinade well, and they can taste bland. This vibrant dish pairs well with grilled meats like chicken or fish. It can also brighten up a sandwich or taco. You can serve it as a side at a picnic or barbecue. The fresh flavors of the marinated cucumbers, onions, and tomatoes are a perfect match for summer meals. Try it alongside a hearty grain salad for a colorful plate. You can find the full recipe for this delightful dish to make it at home! {{image_2}} You can swap some veggies to change the taste. Try adding bell peppers for crunch. Radishes give a nice kick. Carrots can add sweetness. Use what you love! You can also switch the vinegar. Rice vinegar is mild and sweet. Balsamic vinegar adds depth and richness. Each type brings its own twist to the dish. In summer, this dish bursts with flavor. Use fresh herbs like basil or mint. They add a bright touch that pairs well with the veggies. You can also toss in some juicy summer squash for extra color. In fall, consider adding roasted pumpkin or sweet potatoes. These will make your dish warm and filling. The changing seasons give you chances to try new things. This recipe is easy to make vegan. Just skip honey or use maple syrup instead. This keeps it sweet without animal products. If you want a low-sugar version, leave out the honey. You can use a sugar substitute if you prefer. This way, you can enjoy the dish without added sugar. For the full recipe, check out the Crisp & Zesty Cucumber Tomato Medley section. To keep your marinated cucumbers, onions, and tomatoes fresh, store them in the fridge. Use an airtight container. This helps keep the flavors strong. If you have leftovers, eat them within three days for the best taste. You can freeze them, but the texture may change. If you do freeze, use a freezer-safe container. In the fridge, the marinated veggies last about three to five days. After that, they may start to lose flavor. Look for signs of spoilage. If you see any mold or the veggies smell off, it’s best to throw them away. Always trust your senses! Don’t toss the leftover marinade! You can use it for other dishes. Try drizzling it over grilled meats or as a salad dressing. It gives extra flavor to many meals. To keep it fresh, store any leftover marinade in a clean jar in the fridge. Use it within a week for the best taste. For the full recipe, check out the Crisp & Zesty Cucumber Tomato Medley. To enhance the flavor, try adding spices like cumin or dill. You can also mix in a pinch of red pepper flakes for some heat. Fresh herbs like basil or cilantro add brightness. Taste the marinade and adjust salt or vinegar to suit your preference. Yes, you can prepare this dish in advance. It tastes even better after sitting for a while. Make it up to two days ahead of time. Just store it in the fridge in an airtight container. This allows the flavors to meld and develop. You can swap out cucumbers for zucchini or bell peppers. Cherry tomatoes work great instead of larger ones. For a sweeter twist, add diced bell peppers. You can also try a different vinegar, like balsamic or rice vinegar, for a unique taste. It's best to eat marinated vegetables within a week. After that, the texture may change. If they smell off or look slimy, it's time to toss them. Always trust your senses when checking for freshness. This recipe for marinated cucumbers, onions, and tomatoes is simple and fun. We covered the ingredients, instructions, and tips that make this dish great. Remember to experiment with flavors and variations. This salad can fit any meal or season. Enjoy your creation, and don’t be afraid to make it your own. Fresh, tasty, and healthy food like this can brighten any table. Dive into the world of marinated veggies today!

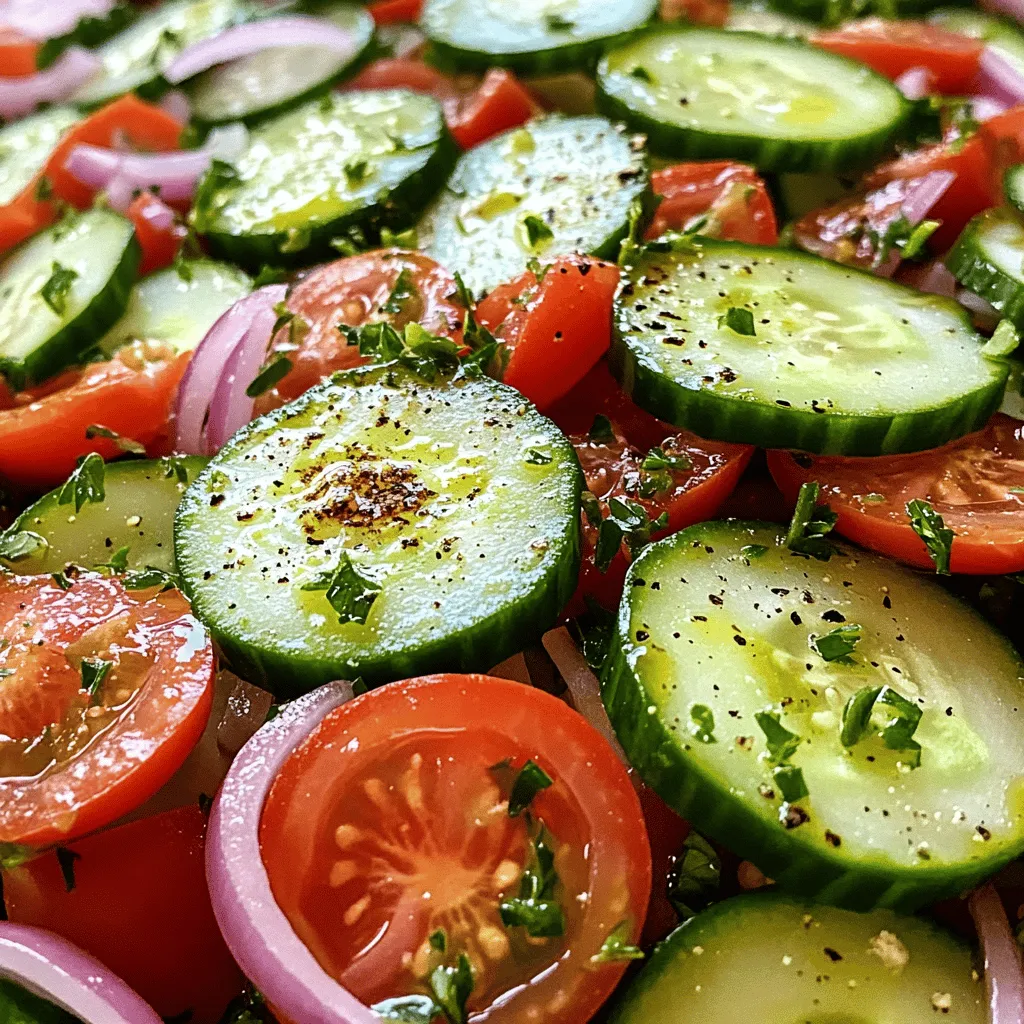
Are you ready to elevate your salad game? In this Marinated Cucumbers, Onions, and Tomatoes Delight, I’ll share a simple and tasty recipe that bursts with flavor. This fresh combination …

Read more

Categories Salads

Cinnamon Roll French Toast Bites Tasty Sweet Treat

May 29, 2025 by Chef Luca
To make these tasty Cinnamon Roll French Toast Bites, you will need: - 1 can refrigerated cinnamon rolls (8 rolls) - 3 large eggs - ½ cup milk - 1 teaspoon vanilla extract - ½ teaspoon ground cinnamon - ¼ teaspoon nutmeg - 2 tablespoons maple syrup (plus more for serving) - Cooking spray or butter for greasing - Powdered sugar for dusting (optional) - Fresh strawberries or berries for garnish (optional) If you want to swap some ingredients, here are my top picks: - Use almond milk or oat milk instead of regular milk for a dairy-free option. - For a vegan version, replace eggs with 1 cup of mashed banana or applesauce. - You can also use a sugar substitute instead of maple syrup if you prefer less sugar. - Try adding a dash of pumpkin spice instead of ground cinnamon for a seasonal twist. Each serving of Cinnamon Roll French Toast Bites has about: - Calories: 270 - Total Fat: 10g - Saturated Fat: 3g - Cholesterol: 110mg - Sodium: 390mg - Total Carbohydrates: 40g - Dietary Fiber: 1g - Sugars: 15g - Protein: 6g Enjoy these bites as a sweet treat! They are fun to make and even better to eat. For the full recipe, check the details above. First, set your oven to 375°F (190°C). This heat will make our bites nice and warm. Next, take a 9x9-inch baking dish and grease it. You can use cooking spray or butter for this. Greasing helps the bites not stick. Now, open the can of cinnamon rolls. Carefully separate each roll and cut them into quarters. Place the pieces aside for later. In a large bowl, whisk together three eggs, half a cup of milk, one teaspoon of vanilla extract, half a teaspoon of ground cinnamon, and a quarter teaspoon of nutmeg. Add two tablespoons of maple syrup to this mix. Whisk until all is smooth. Gently fold in the quartered cinnamon rolls. Ensure each piece is coated well with the egg mixture. Pour the cinnamon roll mix into the greased baking dish. Spread the pieces out evenly. Place the dish in your preheated oven and bake for 20-25 minutes. You want them to turn golden brown and puff up nicely. When done, take the dish out and let it cool for a few minutes. Drizzle more maple syrup on top and, if you like, dust with powdered sugar. Add fresh strawberries or your favorite berries for a pop of color. Serve these warm and enjoy your Cinnamon Roll French Toast Bites! For the complete process, check out the Full Recipe. To get your cinnamon roll bites perfectly puffed, focus on the oven temperature. Preheat your oven to 375°F (190°C) before baking. This step is key! When you mix the cinnamon rolls with the egg mix, ensure every piece is well coated. This helps them puff up nicely. Spread the bites evenly in the baking dish. Avoid overcrowding; give them room to expand. Serving these bites is part of the fun! Place them on a colorful plate for a pop of color. Drizzle extra maple syrup over the top. A dusting of powdered sugar adds sweetness and charm. For a fresh touch, garnish with berries. Strawberries or blueberries work great. You can even serve them with whipped cream on the side for extra delight! One common mistake is not cutting the rolls enough. Quartering each roll helps them cook evenly. Another mistake is opening the oven too soon. This can lead to flat bites. Wait until they are golden brown before checking. Lastly, be mindful of baking time. Overbaking can dry them out. Keep an eye on them in the last few minutes for the best results. For more details, you can check the full recipe. {{image_2}} You can change the flavor of your Cinnamon Roll French Toast Bites easily. Want chocolate? Add chocolate chips to the egg mixture. This makes the bites rich and sweet. For a nutty twist, add chopped nuts like pecans or walnuts. They add crunch and flavor. You can also mix in some pumpkin spice for a fall vibe. Just switch the ground cinnamon with pumpkin spice. These small changes create big taste. If you want to make this recipe dairy-free, you have options. Use almond milk or oat milk instead of regular milk. You can also swap the eggs for a flaxseed mixture. Just mix 1 tablespoon of ground flaxseed with 3 tablespoons of water. Let it sit for a few minutes. This mix will help bind everything together. For a gluten-free option, look for gluten-free cinnamon rolls. They work just as well in this recipe. Toppings can take your bites to the next level. Drizzle extra maple syrup over your bites for added sweetness. You can also dust them with powdered sugar for a nice touch. For freshness, top with fresh strawberries or blueberries. They add color and a burst of flavor. If you want a creamy touch, add a dollop of whipped cream. Each topping choice brings something special. Enjoy trying different combinations with the Full Recipe! After you enjoy your Cinnamon Roll French Toast Bites, let them cool down. Place any leftovers in an airtight container. Keep them in the fridge for up to three days. If you want to keep them longer, freezing is a great option. To reheat, you can use a microwave or an oven. For the microwave, place a few bites on a plate. Heat for about 30-45 seconds. If you prefer the oven, set it to 350°F (175°C). Bake them for about 10 minutes or until warm. This keeps them nice and soft. To freeze, wrap the bites tightly in plastic wrap. Then, place them in a freezer-safe bag. They can stay in the freezer for up to two months. When you are ready to eat, let them thaw in the fridge overnight. Then, reheat as mentioned above. Enjoy your tasty treat anytime! Yes, you can prep the bites ahead. Make the mixture and coat the rolls. Place them in the baking dish but don’t bake yet. Cover and store in the fridge for up to 24 hours. When ready, just bake them. This saves time in the morning. Look for a golden brown color on the bites. They should puff up nicely. A toothpick inserted in the center should come out clean. If it has wet egg mixture, bake for a few more minutes. Absolutely! Homemade cinnamon rolls work great. Just cut them into quarters like the refrigerated ones. You may need to adjust the baking time based on their size and texture. These bites pair well with fresh fruit, like strawberries or blueberries. You can also serve them with whipped cream or extra maple syrup. A sprinkle of powdered sugar adds a nice touch too. For a fun twist, try some chocolate chips or nuts as toppings. For the full recipe, check out the instructions above. In this post, we explored how to make Cinnamon Roll French Toast Bites. We covered key ingredients, substitutions, and nutritional facts. I shared step-by-step baking instructions and tips for perfect bites. We also looked at tasty variations and how to store leftovers. Try these bites at home. They are fun, easy, and delicious. Enjoy your cooking adventure!

Are you ready for a warm, sweet treat that combines two breakfast favorites? Cinnamon Roll French Toast Bites offer the perfect blend of gooey cinnamon rolls and fluffy French toast. …

Read more

Categories Breakfast

Cheesecake Crescent Rolls Casserole Simple and Tasty

May 29, 2025 by Chef Luca
Here are the ingredients you need for Cheesecake Crescent Rolls Casserole: - 2 cans of crescent rolls - 16 oz cream cheese, softened - 1 cup granulated sugar - 1 teaspoon vanilla extract - 3 large eggs - 1 cup sour cream - 1 tablespoon lemon juice - 1/2 teaspoon cinnamon - Powdered sugar for dusting (optional) Using these ingredients, you can create a delightful dessert that everyone will love. The cream cheese gives a rich flavor, while the lemon juice adds a nice zing. The crescent rolls form a soft and flaky base. You can find the Full Recipe for detailed steps on how to make this tasty casserole. Each bite will be creamy and sweet, making it a perfect treat for any occasion! - Preheat oven to 350°F (175°C). - Prepare a greased 9x13-inch baking dish. - In a large bowl, blend 16 oz cream cheese, 1 cup sugar, 1 teaspoon vanilla, and 1 tablespoon lemon juice. - Use an electric mixer until the mix is smooth. - Add 3 large eggs one at a time. Mix well after each egg. - Stir in 1 cup sour cream and 1/2 teaspoon cinnamon. - Open the first can of crescent rolls and unroll in the baking dish. - Pinch seams to seal and cover the bottom. - Pour half of the cheesecake mixture over this layer. - Roll out the second can of crescent rolls and place on top. - Pour the rest of the cheesecake mixture over the second layer. - Bake casserole in the preheated oven for 30-35 minutes. - Look for a golden top that is set. - Allow casserole to cool for 10-15 minutes before serving. - Dust with powdered sugar if you like. For the complete instructions, refer to the Full Recipe. To get the best texture, make sure the cream cheese is soft. Cold cream cheese will clump. Leave it out for an hour before mixing. When you mix the eggs, do not overmix. This keeps the filling light and fluffy. For a fun touch, add fresh fruits like berries or bananas on top. You can also drizzle with chocolate or caramel sauce. You can serve this dish warm or chilled. Each way gives a tasty experience. One common mistake is underbaking the casserole. If it looks too jiggly in the center, it may need more time. Another mistake is letting it deflate. If it cools too fast, it may sink. Always let it cool slowly for the best results. For the complete recipe, check out the Full Recipe. {{image_2}} You can get creative with flavors in your cheesecake casserole. Adding chocolate is a quick way to change the taste. Just mix in chocolate chips or cocoa powder into the filling. If you love fruit, add strawberries or blueberries to the mix. They bring a fresh taste and color! You can also experiment with different extracts. Almond extract gives a nice twist. Just a teaspoon can make a big difference. Want to make it a bit lighter? Use low-fat cream cheese. It gives you the same creamy texture but with fewer calories. If you need a sugar substitute, try using stevia or monk fruit. They can work well without changing the taste too much. For those with gluten issues, look for gluten-free crescent rolls. Many brands offer good options that work just as well. Seasonal fruits or spices can make your casserole special. In the fall, add pumpkin spice for a cozy flavor. In summer, try fresh peaches or cherries. They add a juicy sweetness! For holidays, consider adding crushed peppermint or nutmeg. These flavors can turn your dish into a festive treat that everyone will love. To keep your cheesecake crescent rolls casserole fresh, use airtight containers. Glass or plastic containers work well. Make sure to let the casserole cool before storing. Place it in the fridge. It will stay good for about 3 to 4 days. If you want to keep it longer, consider freezing it. To freeze the casserole, first cool it completely. Then, cut it into portions. Wrap each piece tightly in plastic wrap. Place the wrapped pieces in a freezer bag. This way, you can enjoy them later. When you're ready to eat, move a piece to the fridge a day before. Let it thaw slowly for the best texture. For reheating, the oven gives the best results. Preheat your oven to 350°F (175°C). Place the casserole piece on a baking sheet and cover with foil. Heat for about 15-20 minutes. This keeps it moist. If you're in a hurry, you can use the microwave. Heat on medium for 1-2 minutes. Check if it's warm throughout. Cheesecake Crescent Rolls Casserole stays fresh in the fridge for about 3 to 4 days. Make sure to cover it well. This keeps it from drying out or absorbing other smells in the fridge. Yes, you can make this casserole ahead of time. Prepare it up to the baking step, then cover it and store it in the fridge. Bake it the next day when you are ready to enjoy it. You can use flaxseed meal or applesauce as an egg substitute. For each egg, use 1 tablespoon of flaxseed meal mixed with 2.5 tablespoons of water or 1/4 cup of applesauce. If you don't have sour cream, plain yogurt works great. You can also mix cream cheese with a little milk to get a similar texture and taste. Absolutely! Store-bought crescent rolls are perfect for this recipe. They save time and still give you that flaky, buttery flavor we all love. For the full recipe, check the section above. This blog post covered a fun recipe for Cheesecake Crescent Rolls Casserole. You learned about the ingredients, step-by-step instructions, and helpful tips to make the perfect dish. Experiment with flavors and variations to make it your own. Don’t forget the storage tips to keep leftovers fresh. By following these guidelines, you can enjoy a delicious treat that impresses everyone. Try it out, share it with friends, and enjoy the sweet results!

Are you ready to bring a sweet twist to your breakfast table? This Cheesecake Crescent Rolls Casserole is simple, tasty, and perfect for any occasion. With just a few ingredients …

Read more

Categories Desserts

Crispy Bang Bang Salmon Bites Flavorful Quick Snack

May 29, 2025 by Chef Luca
- 1 lb fresh salmon fillet, skin removed and cut into bite-sized pieces - 1 cup panko breadcrumbs - 1/2 cup all-purpose flour - 2 large eggs, beaten - 1 teaspoon garlic powder - 1 teaspoon paprika - 1/2 teaspoon salt - 1/4 teaspoon black pepper - 1/2 cup mayonnaise - 2 tablespoons sweet chili sauce - 1 tablespoon sriracha (adjust for spiciness) - 1 tablespoon lime juice - Fresh cilantro, chopped (for garnish) - Lime wedges (for serving) The main parts of this recipe come together to create tasty bites. First, we start with the salmon fillet. It is fresh and packed with nutrients. I love using panko breadcrumbs because they give a light and crispy texture. The all-purpose flour helps the coating stick well. Beaten eggs act like glue for the breadcrumbs. Next, we add flavor with seasonings. Garlic powder and paprika add depth. Salt and pepper make everything pop. The Bang Bang sauce is the star here. It mixes creamy mayonnaise with sweet chili sauce and a kick from sriracha and lime juice. This sauce adds a zesty twist. Garnishing with fresh cilantro brightens the dish. Lime wedges add a fresh squeeze that enhances the bites. For the full recipe, check the section above. Enjoy crafting these crispy bites for a quick, flavorful snack! To make Crispy Bang Bang Salmon Bites, start with a few easy steps. First, preheat your oven to 425°F (220°C). This high heat helps make the salmon bites crispy. Next, prepare your baking sheet. Line it with parchment paper and lightly spray it with cooking oil. This prevents sticking and ensures a good crunch. Now, let’s set up your dredging station. You’ll need three bowls. Fill one bowl with flour, another with beaten eggs, and the last with panko breadcrumbs mixed with garlic powder, paprika, salt, and black pepper. This setup makes coating the salmon easy and quick. Take each piece of salmon and coat it lightly in flour first. Then, dip it in the beaten eggs. Finally, roll it in the panko mixture. Make sure each piece is well-coated. This ensures each bite is super crispy. Next, arrange the coated salmon bites on the baking sheet. Make sure to leave space between each piece. If they are too close, they won’t crisp up properly. Lightly spray the tops with cooking oil for extra crunch. Bake the salmon bites for 12 to 15 minutes. They should turn golden brown and reach an internal temperature of 145°F (63°C). Keep an eye on them, as each oven can vary slightly. For the full recipe, check back to get all the details you need to enjoy this quick and tasty snack! To get that perfect crunch, use panko instead of regular breadcrumbs. Panko is lighter and airier. It creates a crispier texture on your salmon bites. Light oil spraying is key too. Spray the tops of the salmon with oil before baking. This helps them brown nicely and adds extra crunch. You can choose between the oven and an air fryer. Both methods work well, but the air fryer gives a quicker crisp. If you use the oven, preheat it to 425°F (220°C) for best results. To check for doneness, use a food thermometer. Salmon should reach 145°F (63°C). This ensures it's cooked and safe to eat. You can adjust the spice level to fit your taste. Want it hotter? Add more sriracha to the Bang Bang sauce. For extra flavor, try adding herbs like dill or parsley. A pinch of smoked paprika can also enhance the taste. These small changes can make your bites even better. For the full recipe, check out the Crispy Bang Bang Salmon Bites. Enjoy your cooking adventure! {{image_2}} You can switch salmon for other proteins. Chicken works great. Cut chicken into small pieces, just like the salmon. The cooking time may change, so check for doneness. Tofu is another option. Use firm tofu for the best texture. Press it to remove excess moisture, then cut it into bite-sized pieces. This adds a fun twist to the recipe. For seafood lovers, shrimp is a fantastic choice. Use medium or large shrimp, peeled and deveined. Coat them in the same way as salmon. Bake until they turn pink and crispy. If you need a gluten-free version, swap the all-purpose flour. Use gluten-free flour instead. It works just as well for coating. For breadcrumbs, choose gluten-free panko. This keeps the bites crispy without gluten. Make sure to check the labels on your ingredients. Not all brands are gluten-free, so read carefully. Add some excitement to your dish with new flavors. Mango salsa is a fresh and fruity option. Just chop mango, red onion, and cilantro. Squeeze some lime juice over it and mix. This pairs perfectly with the crispy bites. Another great idea is to use avocado sauce. Mash ripe avocados and mix with lime juice and salt. This creamy dip complements the crunch of the salmon. You can also enhance flavors by adding herbs or spices. Fresh dill or cilantro can brighten the dish. For a spicy kick, try adding cayenne pepper or chili flakes to the coating. This will give your bites an extra zing. For the full recipe, check out the Crispy Bang Bang Salmon Bites recipe! After enjoying your Crispy Bang Bang Salmon Bites, you may have some left. To keep them fresh, place them in a container. - Use an airtight container to lock in flavor. - Store in the fridge for up to three days. Make sure to let them cool down first. This will help keep the texture intact. When it's time to enjoy leftovers, you have two main options: the oven or the microwave. - Oven: Preheat to 350°F (175°C). Place the bites on a baking sheet. Heat for about 10-12 minutes. This method keeps them crispy. - Microwave: Place the bites on a microwave-safe plate. Heat for 30 seconds to 1 minute. This method is faster, but it may make them soft. If you want crispy bites, I recommend the oven. If you want to save some for later, freezing is a great option. - Freezing Salmon Bites: Place them in a single layer on a baking sheet. Freeze until solid, then transfer to a freezer bag. This prevents them from sticking together. - Thawing Tips: When you're ready to eat, take them out the night before. Place them in the fridge to thaw. You can also thaw them in the microwave, but be cautious. You don't want to cook them. For the full recipe and tips, check out the [Full Recipe]. Yes, you can use frozen salmon. Just make sure to thaw it first. Thaw the salmon in the fridge or under cold running water. This keeps it fresh and safe. Using thawed salmon helps the bites cook evenly. The salmon is done when it reaches 145°F (63°C). You can check this with a food thermometer. The inside should be opaque and flake easily with a fork. If it looks shiny and raw, it needs more time. You can serve these bites with many sides. Here are a few ideas: - Fresh green salad - Steamed vegetables - Rice or quinoa - Sweet potato fries - Dipping sauces like extra Bang Bang sauce or soy sauce To make the Bang Bang sauce spicier, add more sriracha. You can also include red pepper flakes for extra heat. Start with a little, and taste as you go. Adjust it to match your spice level. Yes, you can prepare the salmon bites ahead of time. Coat them and place them on the baking sheet. Cover and refrigerate for up to 24 hours. When ready, bake them straight from the fridge. This saves time and makes your snack quick. For the full recipe, check the earlier section. This blog post covered everything you need for Crispy Bang Bang Salmon Bites. We explored the main ingredients, seasonings, preparation steps, and cooking techniques. I shared tips to ensure crispiness and various proteins you can use. We also discussed storage and reheating methods for leftovers. Now you have the tools to make a delicious dish. Enjoy your cooking and feel free to get creative!

Are you ready to elevate your snacking game? Crispy Bang Bang Salmon Bites are a quick, tasty treat that’s perfect for any occasion. Packed with flavor and a satisfying crunch, …

Read more

Categories Appetizers

Easy Italian Antipasto Pasta Salad Tasty and Quick Meal

May 29, 2025 by Chef Luca
For a delicious Easy Italian Antipasto Pasta Salad, gather these ingredients: - 8 oz rotini pasta - 1 cup cherry tomatoes, halved - 1/2 cup black olives, pitted and sliced - 1/2 cup pepperoncini, sliced - 1/2 cup marinated artichoke hearts, chopped - 1 cup mozzarella balls, halved - 1/2 cup salami, sliced into thin strips - 1/4 cup red onion, thinly sliced - 1/4 cup fresh basil, chopped - 1/4 cup olive oil - 2 tablespoons red wine vinegar (or lemon juice for a twist) - 1 teaspoon Italian seasoning - Salt and pepper to taste I always choose fresh, high-quality ingredients. Fresh cherry tomatoes add sweetness. Look for ripe ones. Use good-quality olives and salami; they make a big difference. Opt for whole mozzarella balls when possible. They taste better than pre-shredded cheese. Fresh basil enhances the flavor, so don’t skip it. A good olive oil will tie all the flavors together. You can swap out some ingredients if needed. Use penne or fusilli pasta instead of rotini. If you dislike salami, try prosciutto or turkey slices. For a vegan option, skip the cheese and salami. Use marinated tofu instead. If you can’t find pepperoncini, use banana peppers or jalapeños for heat. Lemon juice can replace red wine vinegar for a brighter taste. First, cook the rotini pasta. Follow the package instructions closely. You want it to be al dente. This means it should be firm, not mushy. After cooking, drain the pasta. Rinse it with cold water. This stops the cooking process and cools it down. Once cooled, set it aside. Next, grab a large mixing bowl. In this bowl, combine the halved cherry tomatoes, sliced black olives, and pepperoncini. Add the chopped artichoke hearts, halved mozzarella balls, sliced salami, and thinly sliced red onion. Now, add the cooled rotini pasta to the bowl. Gently toss everything together. This helps mix all the flavors evenly. In a small bowl, whisk together the olive oil and red wine vinegar. If you want a twist, use lemon juice instead. Add the Italian seasoning and a pinch of salt and pepper. Mix well until the dressing is combined. Pour this dressing over the pasta salad. Toss it again to coat all the ingredients well. Just before serving, fold in the fresh basil. This keeps it bright and fresh. Taste the salad and adjust the seasoning if needed. You want it to be just right! For the full recipe, check out the details above. You can easily prepare this pasta salad ahead of time. Cook the pasta and chop the veggies a day before. Store them in the fridge separately. This keeps everything fresh. Just mix them together with the dressing before serving. This saves you time on busy days. You will enjoy a tasty meal ready to go! To make your salad pop, try adding more spices. Fresh herbs like parsley or dill bring bright flavors. You can also use balsamic vinegar instead of red wine vinegar. A touch of garlic powder adds depth too. Taste as you go, adjusting to your liking. You can even add a pinch of red pepper flakes for heat! Serving matters as much as taste. Use a large, shallow bowl for a nice display. Garnish with extra basil leaves or a sprinkle of Italian seasoning on top. You can also add some colorful bell pepper slices for extra flair. If you serve the salad in individual bowls, it looks fancy and inviting. Enjoy the compliments from your guests! {{image_2}} If you want a vegetarian antipasto pasta salad, skip the salami. You can add more veggies instead. Try using bell peppers, zucchini, or even artichokes for extra flavor. You can also add chickpeas for protein. They make a great meat substitute. This way, everyone can enjoy this tasty dish! To make this salad gluten-free, choose gluten-free rotini pasta. Many brands offer great options. You can find them in most grocery stores. This swap keeps the texture while catering to gluten-free diets. Just follow the same steps in the recipe. You won't miss the regular pasta. You can change the dressing for a new taste. For a creamy option, mix in some Italian dressing or ranch. If you want something zesty, try a lemon vinaigrette. You can also play with herbs. Add fresh parsley or oregano for extra flavor. Use what you love! This keeps the salad fresh and exciting. For more ideas, check the Full Recipe. To keep your Easy Italian Antipasto Pasta Salad fresh, store it in an airtight container. This will help keep the flavors intact. Always let the salad cool to room temperature before sealing. If you have leftovers, do not mix in the dressing right away. Keep it separate for best taste. In the refrigerator, your pasta salad will last about 3 to 5 days. Check for any changes in smell or appearance before eating. If you notice anything off, it’s best to throw it away. The salad tastes best within the first couple of days. While freezing is not ideal, you can freeze the pasta salad if needed. Place it in a freezer-friendly container. Leave a little space at the top for expansion. When ready to eat, thaw it in the refrigerator overnight. Expect some texture changes, but the flavors will still be good. Yes, you can use other pasta shapes. Penne, fusilli, or bowtie work great too. Just choose a shape you like. Each type adds a different texture. The key is to cook pasta until it's al dente. This means it should be firm but not hard. This helps the pasta hold the dressing well. To stop pasta from sticking, rinse it after cooking. Use cold water to cool it down. This also helps keep the pasta firm. You can add a little olive oil after rinsing. Toss it gently so the oil coats each piece. This makes sure the pasta stays separate in the salad. Serve this pasta salad in a large bowl. It's great for family meals or parties. You can garnish it with fresh basil for color. A sprinkle of extra Italian seasoning adds a nice touch. It looks beautiful and tastes fresh. For the full recipe, check out Easy Italian Antipasto Pasta Salad. This blog post covered key ingredients, step-by-step instructions, and useful tips. We explored ingredient quality, common swaps, and ways to enhance your dish. I shared storage advice and answers to FAQs, making it easy to enjoy this recipe. In summary, with the right ingredients and a few tips, you can create a great meal. Dive in, experiment with variations, and remember to have fun while cooking!

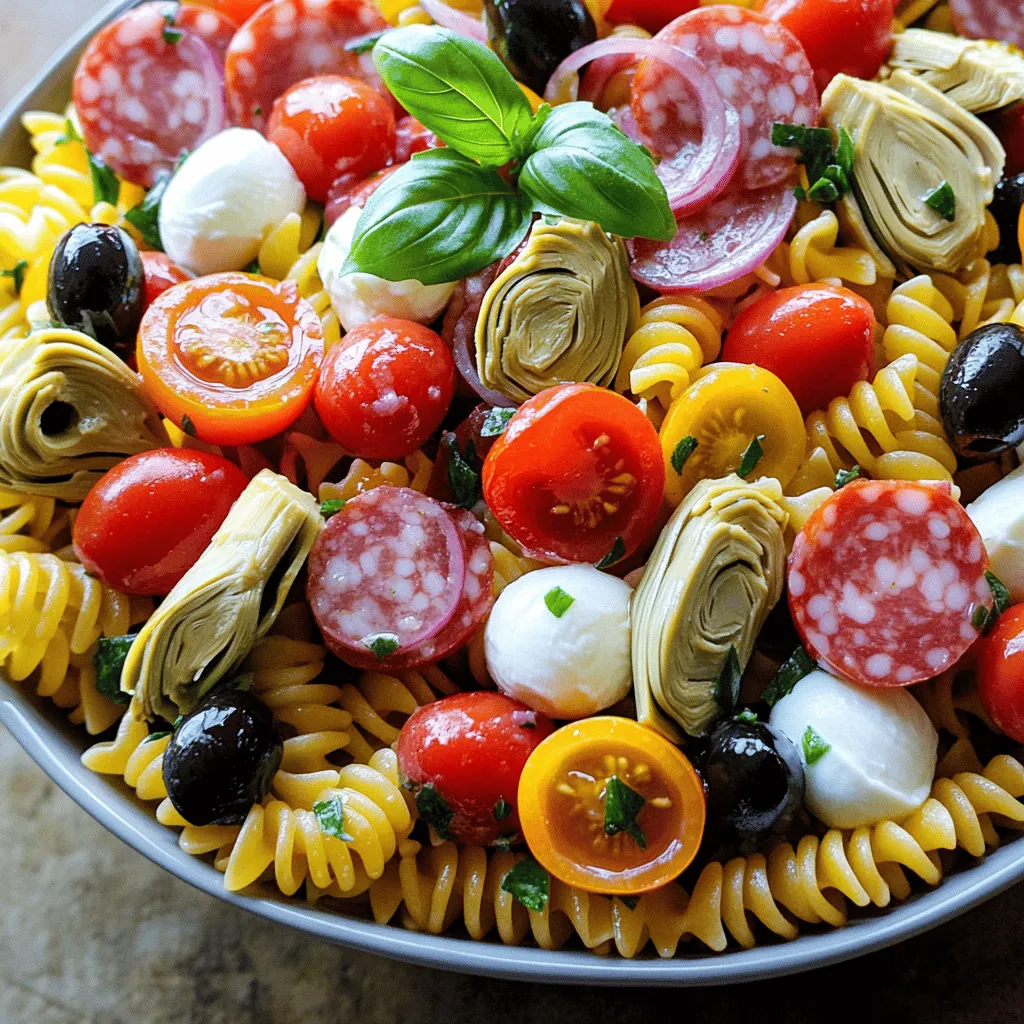
Looking for a quick and tasty meal? This Easy Italian Antipasto Pasta Salad is exactly what you need! Packed with fresh flavors and simple ingredients, it makes the perfect dish …

Read more

Categories Salads
Older posts
Newer posts
← Previous Page1 … Page107 Page108 Page109 … Page122 Next →

STIRRED RECIPES

Where every dish begins with a stir! 🍲✨

PAGES

Home About Contact Privacy Policy Terms & Conditions Cookie Policy GDPR Policy Copyright Policy Disclaimer

CATEGORIES

Appetizers Desserts Salads Breakfast Dinner

Contact

  • Pinterest
  • Mail
Copyright © 2026 Stirred Recipes. All rights reserved.