Skip to content
Stirred Recipes
  • Home
  • Appetizers
  • Desserts
  • Salads
  • Breakfast
  • Dinner
  • Privacy Policy
  • Contact
  • About

Chef Luca

Mexican Street Corn Pasta Salad Flavorful Fresh Dish

June 3, 2025 by Chef Luca
This Mexican Street Corn Pasta Salad brings a burst of flavor and color to any meal. It combines pasta, fresh corn, and spices for a tasty dish. You can enjoy it as a side or a main course. This salad is simple to make and perfect for gatherings. - 8 oz. fusilli pasta - 2 cups fresh corn kernels (or canned corn, drained) - 1 red bell pepper, diced - 1 small red onion, finely chopped - 1 jalapeño pepper, seeded and minced - 1/2 cup cilantro, chopped - 1/2 cup crumbled feta cheese - 1/4 cup mayonnaise - 2 tablespoons lime juice - 1 tablespoon chili powder - 1 teaspoon garlic powder - Salt and pepper to taste - 1 avocado, diced (for garnish) - Lime wedges (for serving) This list gives you everything you need to create a bright and tasty salad. Each ingredient adds its own flair, making this dish fun and exciting. The creamy dressing ties it all together, bringing the flavors to life. For the complete recipe, check out the Full Recipe. Start by boiling water in a large pot. Add a pinch of salt to the water. Once it boils, add 8 oz. of fusilli pasta. Cook it until it's al dente, following the package instructions. This usually takes about 8 to 10 minutes. Drain the pasta in a colander and rinse it under cold water. This stops the cooking and cools the pasta down quickly. Set it aside while you prepare the rest. In a large mixing bowl, gather your fresh ingredients. Add 2 cups of fresh corn kernels. If you use canned corn, make sure it's drained. Next, add 1 diced red bell pepper and 1 finely chopped small red onion. For a spicy kick, include 1 minced jalapeño pepper. Finally, toss in 1/2 cup of chopped cilantro. This mix adds vibrant colors and fresh flavors to your salad. In a small bowl, pour 1/4 cup of mayonnaise. Add 2 tablespoons of lime juice for tanginess. Then, sprinkle in 1 tablespoon of chili powder and 1 teaspoon of garlic powder. Season with salt and pepper to taste. Whisk these ingredients together until they're smooth and well combined. This dressing will bring all the flavors together beautifully. Once your pasta is cool and your vegetables are ready, it’s time to mix. Add the cooled pasta to the bowl with the veggies. Pour the dressing over the top. Mix gently until everything is well coated. Then, fold in 1/2 cup of crumbled feta cheese. This adds a creamy texture and a salty flavor. Cover the salad and chill it in the fridge for at least 30 minutes. This helps the flavors blend. Before serving, top with diced avocado and extra cilantro if you like. Serve with lime wedges on the side for an extra zesty touch. For the full recipe, check the previous section. Cooking pasta right is key for this dish. Use a big pot of water. Make sure it boils before adding pasta. This helps the pasta cook evenly. Stir the pasta often. This stops it from sticking. Check the package for cooking times. You want it al dente, firm but tender. After cooking, drain it well and rinse with cold water. This keeps it from cooking more and helps it stay fresh. To make this dish pop with flavor, use fresh ingredients. Fresh corn adds sweetness and crunch. When you add lime juice, it brightens the whole salad. Chili powder gives it a nice kick. Don’t skip the garlic powder; it adds depth. Mixing in feta cheese adds a creamy and salty touch. Adjust the salt and pepper to your taste. If you want more heat, add extra jalapeño or a dash of hot sauce. Serve this pasta salad cold for the best taste. It makes a great side for grilled meats. Try it with chicken or steak for a full meal. You can also use it as a main dish. Add diced avocado on top for creaminess. Lime wedges on the side enhance the fresh flavors. This salad is perfect for picnics or potlucks. You can make it a day ahead. Let it chill in the fridge to meld the flavors. For the full recipe, check the details above. {{image_2}} You can make this dish heartier by adding protein. Grilled chicken works well. Just cube the cooked chicken and mix it in. Shrimp is another great choice. Cook the shrimp until pink, then add them to the salad. Both options add a satisfying bite. If you want a vegetarian option, simply omit the feta cheese. You can use nutritional yeast for a cheesy flavor. For a vegan twist, replace the mayonnaise with a plant-based version. This keeps the salad creamy and delicious. You can also add black beans for extra protein and fiber. Feta cheese adds a nice tang, but you can switch it up. Try cotija cheese for a more traditional Mexican flavor. Queso fresco is another great option; it has a soft texture. If you want something creamier, use goat cheese. Each cheese brings a unique taste to the dish. Feel free to experiment with these variations. They can make your Mexican Street Corn Pasta Salad even more exciting. You can find the complete details in the Full Recipe. After enjoying your Mexican Street Corn Pasta Salad, store any leftovers in an airtight container. This keeps them fresh. Place the container in the fridge. The salad will stay good for about 3 to 5 days. If you see any signs of spoilage, like strange smells or colors, toss it out. This pasta salad tastes best cold. If you want to warm it, do so gently. Use a microwave and heat it in short bursts. Stir between each burst to avoid hot spots. You can also let it sit at room temperature for a bit before serving. I do not recommend freezing this salad. The texture of the pasta and vegetables changes when frozen. If you must freeze it, keep only the pasta and corn. Avoid the dressing and fresh veggies. To thaw, place it in the fridge overnight. You can then mix in fresh ingredients before serving. For the full recipe, visit the recipe section. Yes, you can use frozen corn. Just thaw it first. Frozen corn tastes sweet and is easy to work with. It cooks quickly, which is great for this dish. If you choose frozen corn, it will still give you that delicious taste. You can store this salad in the fridge for about three days. Make sure to keep it in an airtight container. The flavors will blend more over time. However, the veggies may lose some crunch. If you want the best texture, eat it within two days. Absolutely! Making this salad ahead of time works well. It tastes better after chilling in the fridge for at least 30 minutes. This helps the flavors mix. You can prepare it a day in advance if needed. Just add avocado just before serving. For the full recipe, check out the earlier section. This blog post shared a simple and tasty Mexican Street Corn Pasta Salad recipe. We covered the ingredients you need, steps to prepare, and helpful tips. You can customize it with proteins or different cheeses. Plus, we discussed storage options for leftovers. Enjoy this fresh dish at your next meal. It’s easy to make and sure to impress. Get creative with flavors and pairings to suit your taste. Enjoy cooking and sharing this salad with friends and family!

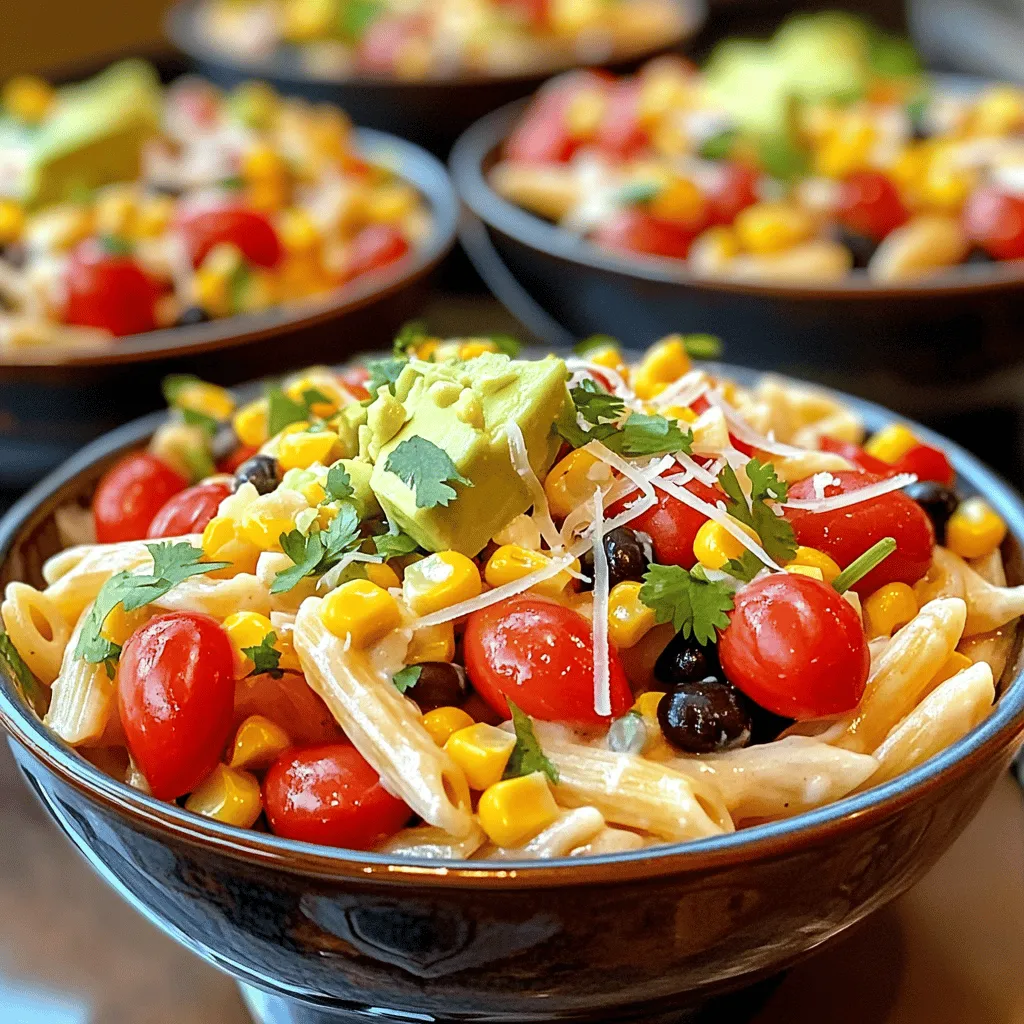
If you crave a dish that’s both tasty and refreshing, you’re in for a treat! This Mexican Street Corn Pasta Salad combines fun flavors and vibrant ingredients to create a …

Read more

Categories Salads

Best Blueberry Yogurt Recipe Simple and Tasty Delight

June 3, 2025 by Chef Luca
To make the best blueberry yogurt, you need simple, fresh ingredients. Here’s what you’ll need: - 2 cups plain Greek yogurt - 1 cup fresh blueberries - 1 tablespoon honey (or maple syrup for vegan option) - 1/2 teaspoon vanilla extract - 1/2 cup granola (your choice) - 2 tablespoons chia seeds - Fresh mint leaves for garnish These ingredients create a delightful blend of flavors and textures. The Greek yogurt gives a creamy base. Blueberries provide natural sweetness and a burst of flavor. Honey or maple syrup adds a touch of sweetness. Granola gives a nice crunch, while chia seeds add nutrition. You can enhance your yogurt with some fun add-ins. Here are a few ideas: - Try different flavored yogurts for a twist. - Add more sweeteners like agave or stevia. - Mix in nuts or seeds for extra crunch. These options allow you to customize your blueberry yogurt. You can make it your own based on taste or dietary needs. Choosing the right blueberries is key for this recipe. Here’s what to consider: - Fresh blueberries offer the best taste and texture. - Frozen blueberries are also good but may change texture. - Organic blueberries are often more flavorful and safer. - Conventional blueberries are usually cheaper but may have pesticide residues. When picking blueberries, look for ones that are firm and plump. Avoid any that are mushy or have a dull color. Fresh blueberries will make your yogurt taste amazing. To start, gather your ingredients. In a bowl, combine 2 cups of Greek yogurt, 1 tablespoon of honey, and 1/2 teaspoon of vanilla extract. Mix these together until they are smooth. This blend creates a rich and creamy base. To make it even smoother, try softening your yogurt a bit before mixing. For the blueberry layer, take 1 cup of fresh blueberries. Mash half of them in a separate bowl with a fork. You want to break them down just enough to release some juice, but keep some whole. This keeps the layer bright and adds a nice texture. The fresh blueberries also bring great flavor to your parfait. Now it’s time to layer your parfait. Start by adding a spoonful of the yogurt mixture at the bottom of a clear glass. Then, add a layer of your mashed blueberries. Sprinkle in 2 tablespoons of chia seeds and 1/2 cup of granola. Repeat these layers until you run out of ingredients. Finish with yogurt on top. To make it look nice, add whole blueberries, a sprinkle of granola, and a few mint leaves for garnish. This adds color and freshness. Chill your parfait in the fridge for 10-15 minutes before serving. This step enhances the flavors and makes it even more refreshing. To get the best texture for your blueberry yogurt, use plain Greek yogurt. It has a thick and creamy base. If you prefer a lighter yogurt, try regular yogurt instead. Adjust sweetness to match your taste. Start with one tablespoon of honey. You can add more if needed. For a vegan version, use maple syrup. Blueberry yogurt works great for breakfast or a snack. It’s perfect in the morning to kickstart your day. You can also enjoy it after lunch for a quick energy boost. Pair it with nuts or seeds for added crunch. It also tastes great with a slice of toast or as a dip for fruits. To impress your guests, serve your parfait in clear glassware. This showcases the lovely layers of yogurt, blueberries, and granola. You can create a fun, layered look with colorful fruits too. Add a sprig of fresh mint on top for an elegant finish. This simple touch makes your dish more appealing. {{image_2}} You can switch out blueberries for other fruits. Consider using strawberries, raspberries, or blackberries. Seasonal fruits like peaches in summer or apples in fall work great too. Mixing different berries adds a fun twist. Try a blend of blueberries and strawberries for a vibrant flavor. If you want a dairy-free version, you can use coconut yogurt or almond yogurt as a substitute. These options still give you a creamy texture. Look for non-dairy milk like oat milk or almond milk to mix with your yogurt. Both choices keep your parfait tasty and exciting. For a little spice, try adding cinnamon or nutmeg to the yogurt mix. These spices boost the flavor and make it warm and cozy. You can also add protein powders or superfoods like spirulina. This makes your parfait not just tasty but also more nutritious. To keep your blueberry yogurt parfaits fresh, store them in the fridge. Use airtight containers for best results. This will prevent any unwanted odors or flavors from mixing in. Your parfaits will stay tasty for up to three days. If you want them to last longer, keep the layers separate until you are ready to eat. You should serve this parfait cold. It tastes best chilled. If you let it sit at room temperature for too long, the texture may change. The yogurt may become runny and the granola might get soggy. Enjoying it right out of the fridge also keeps the blueberries fresh and vibrant. You can freeze yogurt parfaits, but it’s a bit tricky. The yogurt can separate after thawing. To freeze, layer your parfait in a freezer-safe container. Leave some space at the top to allow for expansion. When you're ready to eat, thaw it in the fridge overnight. This way, it will be cooler and more enjoyable. The best way to layer a yogurt parfait is to start with yogurt. Use a clear glass to show off the colors. Add a spoonful of yogurt, then a layer of fruit. Follow with granola and chia seeds. Repeat the layers until you reach the top. Make sure to balance the flavors. Each layer should complement the others. This mix of creamy yogurt, sweet blueberries, and crunchy granola creates a delightful treat. Yes, you can use frozen blueberries. They work well in yogurt parfaits. However, frozen blueberries can change the texture. They may become mushy when thawed. To thaw them, place the blueberries in the fridge overnight. You can also run them under cold water for a quick thaw. This helps retain some firmness. Try to drain excess water before adding them to your parfait. Blueberry yogurt offers many health benefits. Blueberries are rich in vitamins and antioxidants. They help support your immune system. Yogurt provides probiotics, which promote gut health. Combining these two boosts the nutritional value. This tasty treat is not only delicious but also good for you! Blueberry yogurt can help you feel full and satisfied while nourishing your body. In this post, we explored how to make the best blueberry yogurt parfait. We covered essential ingredients like Greek yogurt and fresh blueberries. You learned tips for mixing and layering the parfait for the best look and taste. Remember, you can customize flavors with different fruits or yogurt types. Keep your parfaits fresh in the fridge or even freeze for later. Enjoy this healthy treat as a snack or breakfast. With these steps, you can create a delicious and nutritious yogurt parfait anytime.

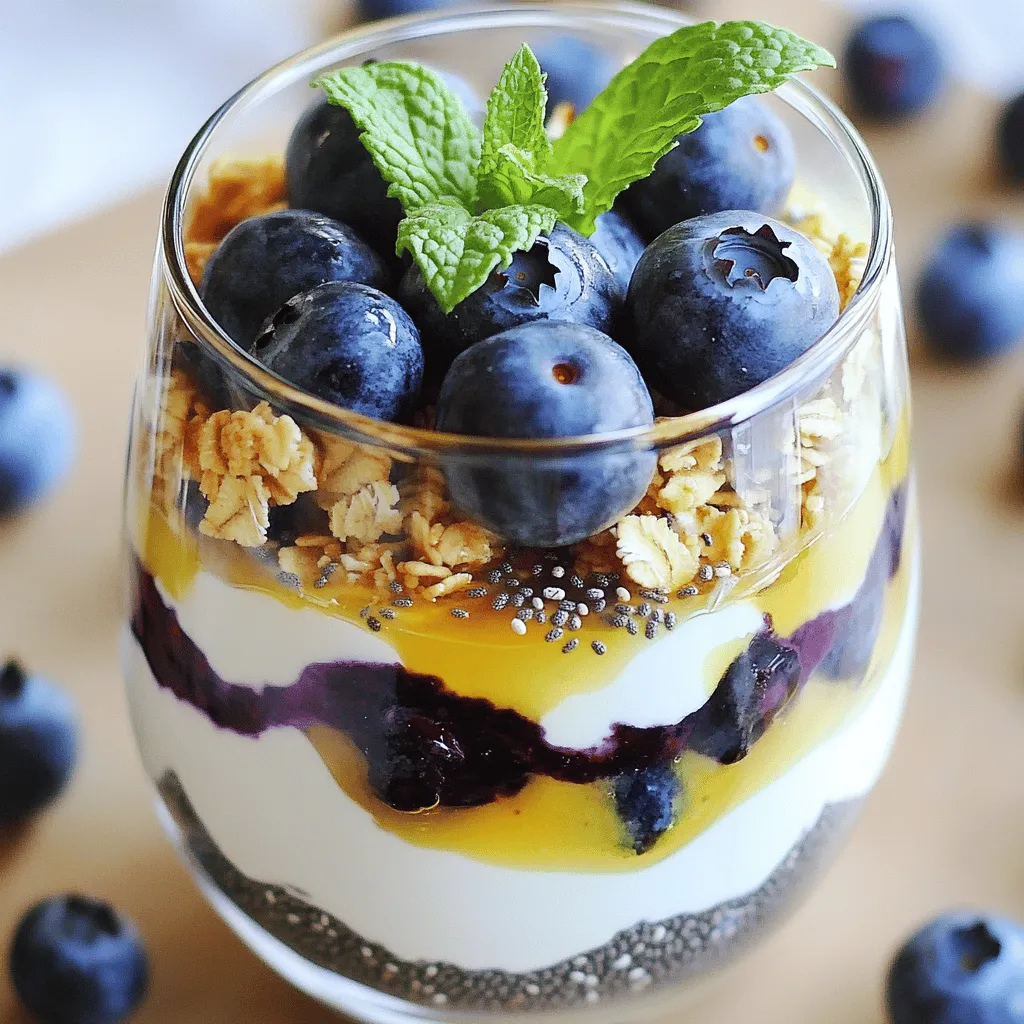
Looking for a delicious and healthy treat? You’ve found it! My Best Blueberry Yogurt Recipe is simple to make and bursting with flavor. Whether you enjoy it for breakfast or …

Read more

Categories Desserts

Garlic Parmesan Cheeseburger Juicy and Flavorful Meal

June 3, 2025 by Chef Luca
- 1 lb ground beef (80/20 blend) - 1/4 cup grated Parmesan cheese - 2 cloves garlic, minced - 1 tablespoon Worcestershire sauce - 1 teaspoon onion powder - 1 teaspoon black pepper - Salt to taste - 4 slices of cheddar cheese - 4 burger buns - Lettuce leaves - Tomato slices - Pickles (optional) - Garlic aioli (for spreading) The key to a great garlic Parmesan cheeseburger is the right mix of flavors. I use a blend of 80/20 ground beef. This mix gives the burger a juicy texture. Adding grated Parmesan cheese boosts the flavor. The minced garlic provides a fresh kick. Worcestershire sauce adds depth, while onion powder and black pepper enhance the taste. For toppings, I love using crisp lettuce and ripe tomato slices. Pickles add a nice crunch if you like them. The garlic aioli is a must for spreading on the bun. It ties all the flavors together. One serving of this cheeseburger offers about 500 calories. It has 30 grams of protein, 30 grams of fat, and 35 grams of carbs. For those watching carbs, you can use lettuce wraps instead of buns. This change keeps the flavor while lowering the carb count. You can also try gluten-free buns if needed. This garlic Parmesan cheeseburger is not just tasty; it's also versatile. You can make it fit your diet and enjoy a delicious meal. For the full recipe, check out the details above. 1. In a big bowl, combine the ground beef, Parmesan cheese, minced garlic, Worcestershire sauce, onion powder, black pepper, and salt. Mix gently. Avoid overworking the meat to keep it juicy. 2. Divide the mixture into four equal parts and shape them into patties. Make a small depression in the center of each patty. This helps them cook evenly and prevents bulging. 3. Preheat your grill or skillet over medium-high heat. It should feel hot before you add the patties. 1. Place the patties on the grill or skillet. Cook for about 4-5 minutes without pressing down on them. This keeps the juices inside. 2. Flip the patties carefully. Place a slice of cheddar cheese on each one. Cook for another 4-5 minutes. You want the cheese to melt and the burger to reach 160°F (70°C). 3. While the patties cook, toast your burger buns. You can use the grill or a toaster. Keep an eye on them to avoid burning. 1. To build your burger, spread garlic aioli on the bottom half of each toasted bun. This gives a great flavor boost. 2. Place the cooked burger patty on top. Add a lettuce leaf and tomato slice. If you like, add pickles too. 3. Finish with the top half of the bun. Serve right away! Pair it with fries or a side salad for a tasty meal. For the detailed recipe, check out the Full Recipe. How do you achieve the perfect burger doneness? Start by using a meat thermometer. For medium, aim for an internal temperature of 160°F. If you like it rare, go for 130°F. Insert the thermometer into the side of the patty for the best reading. Grilling and skillet cooking have their perks. A grill adds a nice smoky flavor. Preheat it well to avoid sticking. If using a skillet, choose non-stick for easy flipping. Add a touch of oil to prevent sticking. Cook over medium-high heat for a great sear. What are some substitutions for dietary preferences? For a vegan option, swap ground beef for a plant-based burger. You can find many tasty brands. Use dairy-free cheese instead of Parmesan or cheddar. Look for options made from nuts or soy. You can still enjoy a delicious garlic Parmesan cheeseburger in a way that fits your diet. {{image_2}} You can easily change up your garlic Parmesan cheeseburger in fun ways. Try a spicy garlic Parmesan cheeseburger. Just add some diced jalapeños or hot sauce to the meat mix. This gives a nice kick to each bite. You will love the heat paired with the garlic and cheese. Another great option is the Mediterranean garlic cheeseburger. Add some chopped olives and feta cheese to the beef. This twist brings a fresh and tangy taste. Top it with tzatziki sauce instead of garlic aioli for extra flavor. Cheese can change the whole taste of your burger. If you want a strong flavor, try blue cheese. It adds a rich and bold taste that many enjoy. For a spicy kick, use pepper jack cheese. Its creamy texture and spices will make your burger stand out. You can mix and match these cheeses with the garlic Parmesan for a new favorite. Toppings bring your burger to life. Avocado adds creaminess and healthy fats. Slice it up and place it on top. A fried egg can also make your burger special. The runny yolk adds richness that blends well with the other flavors. Sautéed mushrooms are another tasty option. Their earthy taste goes perfectly with the garlic and cheese. Just cook them in a bit of butter until soft, then pile them on. Each of these toppings can enhance your garlic Parmesan cheeseburger and make it uniquely yours. For the full recipe, check out the Garlic Parmesan Cheeseburger section. To store cooked patties, let them cool first. Place them in an airtight container. Store them in the fridge for up to three days. If you want to keep them longer, freeze the patties. Wrap each patty in plastic wrap and then put them in a freezer bag. They can last up to three months in the freezer. For assembled burgers, it’s best to store them unassembled. The buns can get soggy. Keep the lettuce and tomato separate. Wrap each burger in foil or plastic wrap. Store them in the fridge for one day. To reheat the patties, use a skillet or grill. Heat the skillet over medium heat. Add the patties and cook for about three minutes on each side. This keeps them juicy and flavorful. If you prefer the oven, preheat it to 350°F (175°C). Place the patties on a baking sheet and cover with foil. Heat for about 10-12 minutes. This method also keeps the burgers moist. For assembled burgers, remove any cold toppings first. Then, reheat the burger in a skillet or microwave. If you use the microwave, heat in short bursts to prevent it from drying out. Enjoy your delicious garlic Parmesan cheeseburger even as leftovers! Check out the Full Recipe for more details. How to make a garlic Parmesan cheeseburger from scratch? To make a garlic Parmesan cheeseburger, you need simple ingredients. Start with ground beef, grated Parmesan cheese, and minced garlic. Mix these in a bowl with Worcestershire sauce, onion powder, black pepper, and a little salt. Shape the mixture into patties. Cook them on a grill or skillet until they are juicy and well-cooked. Add a slice of cheddar cheese on top to melt while cooking. You can follow the Full Recipe for detailed steps. Can I prepare the patties ahead of time? Yes, you can make the patties ahead of time. Shape the patties and store them in the fridge for up to one day. This helps the flavors blend together. You can also freeze them for longer storage. Just thaw them overnight in the fridge before cooking. What’s the best bun for a garlic Parmesan cheeseburger? A soft yet sturdy burger bun works best. Look for brioche or potato buns. They hold the juicy burger well and add a nice touch of flavor. Toasting them slightly adds a great crunch and keeps them from getting soggy. How do I know when the burgers are done cooking? You can tell when burgers are done by checking their color and temperature. The inside should be brown, not pink. Use a meat thermometer to check for a safe internal temperature of 160°F (70°C). This ensures the burgers are fully cooked and safe to eat. You learned how to make a tasty garlic Parmesan cheeseburger. We covered the key ingredients, cooking tips, and fun variations. Remember to mix fresh ingredients for better flavor. Don't shy away from custom toppings or cheese choices. Lastly, storing and reheating your burgers can keep them delicious for days. Enjoy making this burger your own and please your taste buds.

Looking for a burger that’s both juicy and packed with flavor? You’re in the right place! This Garlic Parmesan Cheeseburger combines savory beef with rich cheese and aromatic garlic. Perfect …

Read more

Categories Dinner

Western Ranch Pasta Delight Simple and Flavorful Meal

June 3, 2025 by Chef Luca
To make Western Ranch Pasta Delight, you need these main ingredients: - 8 oz (about 225g) pasta (penne or fusilli works well) - 1 cup cherry tomatoes, halved - 1 cup corn kernels (fresh or frozen) - 1 red bell pepper, diced - 1 cup cooked black beans, rinsed and drained - 1 ripe avocado, diced - 1/2 cup ranch dressing - 1/2 teaspoon garlic powder - 1 teaspoon chili powder - Salt and pepper to taste - Fresh cilantro, chopped (for garnish) - 1/2 cup shredded cheese (cheddar or Monterey Jack) These ingredients bring vibrant colors and flavors to your plate. The pasta serves as a hearty base, while the veggies add crunch and freshness. The ranch dressing ties everything together, giving a creamy touch. If you want to kick up the taste, consider these optional add-ins: - Sliced green onions - Diced jalapeños for a spicy kick - Black olives for a briny touch - Cooked chicken or shrimp for added protein These choices can make your dish more exciting. Feel free to mix and match based on what you enjoy. You can easily adapt this recipe for different diets. Here are some substitutions: - Use gluten-free pasta for a gluten-free option. - Swap ranch dressing with a dairy-free version for vegan needs. - Replace black beans with chickpeas for a different texture. These swaps keep the meal tasty while meeting various dietary needs. Always choose what works best for you. For the full recipe, check out Western Ranch Pasta Delight. First, boil a large pot of salted water. Add your pasta to the water. Cook the pasta until it feels firm yet tender, known as al dente. This usually takes about 8 to 10 minutes. Drain the pasta well and set it aside. Make sure not to rinse it. You want that starchy goodness to help the sauce stick later. Next, grab a large skillet and heat a splash of olive oil over medium heat. Add the diced red bell pepper and halved cherry tomatoes. Sauté these for about 3 to 4 minutes. You want them to soften but not turn mushy. Then, toss in the corn kernels and rinsed black beans. Stir everything together and cook for another 2 to 3 minutes. This will heat them through and blend the flavors. Now, let’s make the dressing. In a small bowl, whisk together the ranch dressing, garlic powder, chili powder, and a pinch of salt and pepper. This dressing is key to bringing all the flavors together. Pour the ranch mixture over the sautéed veggies in the skillet. Add the cooked pasta and toss everything well to coat. Finally, gently fold in the diced avocado and shredded cheese. Taste and adjust the seasoning with more salt and pepper if needed. Let it rest for a couple of minutes to allow the flavors to meld. For the full recipe, check out the detailed instructions. Enjoy every bite of your Western Ranch Pasta Delight! To get the best pasta, always cook it al dente. This means it should have a slight bite. I like to add a pinch of salt to the water. This helps bring out the flavor. After cooking, drain the pasta right away. Rinse it with cold water if you want to stop the cooking. This keeps it firm and tasty in your dish. If you have leftovers, store them in an airtight container. This keeps the pasta fresh. You can keep it in the fridge for up to three days. If you want to freeze it, place it in a freezer-safe bag. Make sure to remove as much air as you can. It can last in the freezer for up to a month. Seasoning is key to making the pasta pop. I love using garlic powder and chili powder for a kick. You can adjust the salt and pepper to taste. Fresh herbs, like cilantro, add bright flavor. Feel free to try other spices too. A pinch of cumin or smoked paprika can bring a new twist. For more details, check out the Full Recipe. {{image_2}} You can easily make this dish vegetarian. Just leave out the cheese. For vegan options, swap the ranch dressing for a vegan version. There are many brands available that taste great. You can also add more veggies like spinach or zucchini. This adds color and nutrients. If you want more protein, try adding diced chicken or turkey. Cook it first and then mix it with the pasta. Shrimp also makes a tasty addition. Just sauté it until it turns pink and toss it in. For a plant-based option, use tofu or tempeh. These both soak up flavors well. While ranch dressing shines in this recipe, other sauces can work too. Try a creamy avocado sauce for a fresh twist. You can blend ripe avocados with lime juice, garlic, and herbs. A zesty tomato sauce can also change the flavor profile. It gives a nice tang to the dish. Don't be afraid to experiment with flavors. Each sauce can bring a new taste to the table. For the full recipe, check out the Western Ranch Pasta Delight. To keep your Western Ranch Pasta Delight fresh, store it in an airtight container. Make sure it cools down first. Place it in the fridge within two hours of cooking. This helps stop bacteria from growing. It will stay good for up to three days in the fridge. If you want to save some for later, freezing is a great option. First, let the dish cool completely. Then, portion it into freezer-safe bags. Squeeze out as much air as you can. Label the bags with the date. You can freeze it for up to three months. When you are ready to eat, just thaw it in the fridge overnight. When it's time to enjoy your pasta again, reheat it carefully. You can use the microwave or a skillet. If using the microwave, place it in a bowl and cover it with a damp paper towel. Heat in short bursts, stirring in between. If using a skillet, add a splash of water to help steam it. Heat over medium-low until warm. This keeps it tasty and not dry. Enjoy your meal! You can use penne or fusilli pasta for this dish. Both types hold sauce well. Penne has a smooth surface, while fusilli twists help catch more flavors. If you prefer whole wheat or gluten-free pasta, those options work too. Just cook them according to package instructions. The key is to ensure the pasta is al dente. This gives it a nice bite and prevents it from becoming mushy. Yes, you can prepare this dish ahead of time. In fact, the flavors deepen when it sits. Cook the pasta and mix in the veggies and dressing. Store it in the fridge for up to two days. When you're ready to eat, just add the avocado and cheese before serving. This keeps them fresh and tasty. If you want a different flavor, try Italian dressing or Greek yogurt. Both add a nice tang to the meal. You can also make a simple dressing with sour cream, lemon juice, and herbs. This will give you a creamy and zesty alternative. Remember to adjust the seasoning to match your taste. For the full recipe and more details, check out the Western Ranch Pasta Delight. This blog post showed how to make Western Ranch Pasta Delight with ease. We explored key ingredients, step-by-step instructions, and helpful tips. You learned how to tweak the recipe to fit diets and add flavor. Variations allow you to enjoy this dish in many ways. Remember to store it properly for fresh leftovers. Use this guide to create a tasty meal that suits your taste and needs. Enjoy cooking and experimenting with this fun dish!

Are you ready to enjoy a simple and tasty meal? Western Ranch Pasta Delight is here! With just a few key ingredients, you can whip up a dish that’s packed …

Read more

Categories Dinner

Fireman’s Overnight Breakfast Casserole Savory Delight

June 3, 2025 by Chef Luca
- Whole grain bread and its role Whole grain bread gives the dish texture and fiber. The cubes soak up the egg mixture, making each bite soft and tasty. You can use any whole grain bread you like. Sourdough or multigrain also works well. - Breakfast sausage options I recommend using a pound of crumbled breakfast sausage. You can choose pork, turkey, or chicken. Each adds a different flavor. If you prefer a bit of spice, opt for hot sausage. It will bring warmth to the casserole. - Choosing the right cheese Sharp cheddar cheese is my go-to for this dish. It melts beautifully and adds a rich flavor. You can also mix in mozzarella or pepper jack for a twist. Just be sure to shred it fresh for the best results. - Vegetables to enhance flavor Adding vegetables like bell peppers and onions boosts flavor and nutrition. Diced bell peppers bring color and sweetness. Onions add a nice depth. Feel free to include spinach or mushrooms for more variety. - Seasoning suggestions for a unique taste Garlic powder and onion powder give a great base flavor. I also like adding smoked paprika for a hint of smokiness. Adjust the salt and pepper based on your taste. Experimenting with herbs can also add a fresh touch. - Garnish options for presentation Fresh parsley is perfect for garnish. It adds a pop of green and freshness. You can also use chopped green onions or even a sprinkle of paprika for color. These small touches make your dish look more appealing. For the complete recipe, check out the Full Recipe section. 1. Cooking the sausage Start by heating a large skillet over medium heat. Add the crumbled breakfast sausage. Cook it until it's browned and fully cooked. This should take about 5 to 7 minutes. Make sure to drain any extra fat after cooking. Set the cooked sausage aside to cool slightly. 2. Preparing the bread and mixing ingredients In a large mixing bowl, take 8 slices of cubed whole grain bread. Add the cooked sausage, 1 cup of diced bell peppers, 1 cup of diced onion, and 1 ½ cups of shredded sharp cheddar cheese. Stir everything together until all the ingredients are well mixed. 1. Combining eggs and seasonings In another bowl, crack 8 large eggs and pour in 2 cups of milk. Add 1 teaspoon of garlic powder, 1 teaspoon of onion powder, ½ teaspoon of smoked paprika, and some salt and pepper to taste. 2. Tips for whisking effectively Use a whisk to blend the eggs and milk. Whisk until the mixture is smooth and all ingredients are combined. Make sure there are no egg whites left unblended. 1. Transferring to baking dish Pour the egg mixture over the bread and sausage mixture. Gently stir until everything is coated well with the egg mixture. 2. Prepping the casserole for refrigeration Transfer the entire mixture into a greased 9x13 inch baking dish. Spread it out evenly. Cover the dish with plastic wrap or foil. Place it in the refrigerator overnight. 3. Baking recommendations The next morning, preheat your oven to 350°F (175°C). Remove the cover from the casserole and sprinkle the remaining ½ cup of cheddar cheese on top. Bake the casserole uncovered for 45 to 55 minutes. The center should be set, and the top should look golden and bubbly. Let it rest for about 10 minutes before slicing. You can garnish with chopped fresh parsley. For the full recipe, check the [Full Recipe]. To ensure even cooking, spread the mixture in your dish evenly. Avoid piling it too high on one side. This helps every bite cook just right. When baking, keep an eye on the casserole. It should be golden brown on top. To check for doneness, stick a toothpick in the center. If it comes out clean, it’s ready. If it’s still wet or gooey, give it more time. Remember, the center must be fully set for the best texture. Prep-ahead ideas can make busy mornings stress-free. You can prepare this casserole the night before. Just mix all the ingredients and place them in your baking dish. Cover it well and refrigerate overnight. In the morning, you only need to bake it. Freezing portions is another great idea. Cut leftover casserole into slices and wrap them tightly. Place them in freezer bags to keep them fresh. When you want a quick meal, just reheat a slice in the oven or microwave. This makes for easy breakfasts any day of the week! {{image_2}} You can easily swap some ingredients in Fireman’s Overnight Breakfast Casserole. If you need a gluten-free option, try using gluten-free bread. Many brands offer great alternatives that taste good. For the sausage, you can use turkey sausage or even plant-based options. These substitutions keep the dish tasty while being healthier. To add more flavor, consider adding spices. A pinch of cayenne pepper or a dash of hot sauce can give it a nice kick. You can also play with cheeses. Try mixing sharp cheddar with mozzarella or pepper jack for a fun twist. Adding vegetables like spinach, mushrooms, or zucchini can also boost the taste and nutrition. For the full recipe, visit the [Full Recipe] link. To store leftovers, let the casserole cool completely. Cut it into serving sizes. Place the pieces in an airtight container. Store them in the fridge. This method keeps them fresh. How long does it last? The casserole lasts about 3 to 4 days in the fridge. After that, the quality may decline. If you want to keep it longer, consider freezing it. To reheat, use the oven for the best texture. Preheat it to 350°F (175°C). Place the casserole in a baking dish. Cover it with foil to prevent drying out. Heat for about 20 minutes or until warm. You can also use the microwave for quick reheating. However, this may make it a bit soggy. Serve it with fresh fruit or a side salad. These sides balance the rich flavors of the casserole. Can I prepare this casserole without eggs? Yes, you can make this casserole without eggs. Use a mix of silken tofu and plant-based milk. Blend until smooth. This will keep the casserole creamy and moist. What can I serve with Fireman’s Overnight Breakfast Casserole? This dish pairs well with fruit salad or yogurt. You can also serve it with crispy bacon or fresh juice. These sides add balance to the meal. Is it possible to make this dish in advance longer than overnight? Yes, you can prepare this casserole up to two days ahead. Just keep it in the fridge. Make sure it is well-covered to prevent drying out. How to adjust cooking time for smaller portions? If you make a smaller batch, reduce the baking time. Check the casserole after 30 minutes. It may need an extra 10-15 minutes, depending on the size. Can I make it vegetarian-friendly? Absolutely! Simply swap the sausage for a veggie option. You can use mushrooms or plant-based sausage. This change keeps the flavor while making it meat-free. In summary, this blog post guides you through making a delicious breakfast casserole. We covered essential ingredients like whole grain bread, sausage, and cheese, enhancing flavors with vegetables and spices. The step-by-step instructions simplify preparation, while tips help save time. You can explore variations with gluten-free options or plant-based sausage. Remember to store leftovers properly and reheat for the best taste. Enjoy this hearty dish any morning, and feel free to customize it to fit your taste!

Looking for an easy and delicious breakfast that will fuel your day? Try my Fireman’s Overnight Breakfast Casserole! This savory delight combines wholesome bread, savory sausage, and your choice of …

Read more

Categories Breakfast

Philly Cheesesteak Sliders Tasty and Easy Recipe

June 3, 2025 by Chef Luca
To make these tasty sliders, you need a few key ingredients: - 1 lb ribeye steak, thinly sliced - 1 medium onion, thinly sliced - 1 green bell pepper, thinly sliced - 1 cup provolone cheese, shredded - 12 slider buns The ribeye steak gives the sliders their rich flavor. The onion and bell pepper add sweetness and crunch. Provolone cheese melts beautifully and ties everything together. Using the right seasonings and oils makes a big difference. Here are some to use: - 2 tablespoons olive oil - 2 tablespoons unsalted butter, melted - 1 teaspoon garlic powder - Salt and pepper to taste Olive oil helps cook the steak and veggies. Butter adds a nice finish and flavor. Garlic powder gives a hint of warmth without being overpowering. Salt and pepper enhance the natural tastes in the dish. You can customize these sliders with extra toppings. Here are some ideas: - Hot sauce for serving - Sautéed mushrooms - Fresh herbs like parsley or cilantro Adding hot sauce gives a spicy kick. Sautéed mushrooms can add depth, while fresh herbs brighten the dish. Feel free to mix and match to find your perfect combination! For the full recipe, check out the details above. Start with a large skillet. Heat it over medium-high heat. Add 1 tablespoon of olive oil. Wait until it gets hot. Then, add the thinly sliced ribeye steak. Season it with salt and pepper. Cook for about 3 to 5 minutes. Stir often until the steak is browned. It should still be tender. When done, take it out and set it aside. In the same skillet, add the other tablespoon of olive oil. Now, toss in the thinly sliced onion and bell pepper. Sauté these for about 5 to 7 minutes. You want them soft and caramelized. Stir them occasionally to avoid burning. This step adds a lot of flavor. Preheat your oven to 350°F (175°C). Slice the slider buns in half. Place the bottom halves in a baking dish. Spoon the steak and vegetable mix evenly over the buns. Then, sprinkle the shredded provolone cheese on top. Place the top halves of the buns over the cheese. In a small bowl, mix the melted butter with a sprinkle of garlic powder. Brush this mixture over the top of the sliders. Cover the dish with aluminum foil. Bake for 15 minutes. Then, remove the foil and bake for 5 more minutes. The cheese should melt, and the buns will turn golden. Let them cool slightly, then cut along the sliders. Enjoy these cheesy delights! Check out the Full Recipe for more details. The best way to cook ribeye steak is in a hot skillet. Cast iron works great. It holds heat well and gives a nice crust. Use medium-high heat to keep the steak juicy. Cook it for only a few minutes. You want it browned but still tender. To get that gooey cheese effect, use provolone or mozzarella. Both melt well and taste great. Add the cheese on top of the meat mix in the last few minutes of cooking. This allows it to melt perfectly. If you want extra flavor, mix some garlic powder into the cheese before adding. When slicing steak, use a sharp knife. Cut against the grain for tender bites. For onions and bell peppers, thin slices help them cook evenly. Keep your fingers curled back when cutting. This keeps your hand safe and steady. Practice makes perfect, so don’t rush. Good knife skills make cooking easier and more fun. For a detailed guide on making these tasty sliders, check out the Full Recipe. {{image_2}} You can easily make vegetarian Philly cheesesteak sliders. First, swap the ribeye steak for portobello mushrooms or seitan. Both options give you a hearty and tasty base. Slice the mushrooms thickly to mimic the steak's texture. Next, sauté them with onions and peppers just like the original recipe. While provolone cheese is classic, you can try other cheeses too. Cheddar cheese melts well and adds a sharp taste. For a creamy option, use mozzarella. If you want something unique, try pepper jack for a hint of spice. Each cheese brings its own flavor and fun twist to the sliders. To kick up the heat, add jalapeños or banana peppers into the mix. You can also mix in some hot sauce while cooking the meat and veggies. For a smoky flavor, try chipotle peppers in adobo sauce. These spicy additions will make your sliders stand out and impress your guests. Explore these variations to find your favorite twist on Philly cheesesteak sliders! For the full recipe, check out the details above. To keep your leftover sliders fresh, place them in an airtight container. Make sure they cool down first. Store them in the fridge. They will stay good for 3-4 days. You can also wrap them tightly in plastic wrap. This helps prevent them from drying out. When you’re ready to eat, preheat your oven to 350°F (175°C). Place the sliders on a baking sheet. Cover them with aluminum foil to keep them moist. Heat for about 10-15 minutes. You can also microwave them, but the oven keeps the buns crispy. Just heat for about 1-2 minutes in the microwave. If you want to freeze your sliders, wrap them well in plastic wrap. Then put them in a freezer bag. They will last for up to 2 months. When you’re ready to eat, thaw them in the fridge overnight. Reheat as mentioned above. Enjoy the great taste of Philly cheesesteak sliders, even after freezing! You can find the Full Recipe to make more whenever you want. For Philly cheesesteak sliders, I recommend using soft slider buns. The best choices are Hawaiian rolls or potato buns. They are soft and sweet, which complements the savory filling. You want bread that holds up well but does not overpower the taste. Avoid crusty bread, as it can be hard to bite into. Yes, you can use different meats. While ribeye is classic, you can try flank steak or chicken. Ground beef or turkey can also work. The key is to slice the meat thinly for quick cooking. Each meat brings a different flavor and texture, so feel free to experiment. To make sliders ahead, prepare the meat and veggies in advance. You can store them in the fridge for up to 24 hours. Assemble the sliders just before baking. This keeps the bread fresh and prevents sogginess. You can also bake them and then reheat when ready to serve. For the full recipe, check the main article. You now know how to make tasty Philly cheesesteak sliders. We covered the main ingredients, cooking steps, and handy tips. Don't forget the fun variations you can try. Whether you like spicy or vegetarian options, there's something for everyone. Remember, proper storage keeps these sliders fresh. Enjoy making and sharing this meal with family and friends. This recipe brings joy to any gathering. You have all the tools to impress your guests with these tasty sliders!

Craving something delicious and easy? You’re in the right place! These Philly Cheesesteak Sliders pack all the classic flavors into bite-sized goodness. With juicy ribeye, sautéed veggies, and gooey cheese, …

Read more

Categories Appetizers

Easy Cajun Shrimp Boil Foil Packs Flavorful Delight

June 3, 2025 by Chef Luca
- 1 pound large shrimp, peeled and deveined - 1 cup baby potatoes, halved - 1 cup corn on the cob, cut into thirds - 1 red bell pepper, sliced - 1 yellow onion, sliced - 4 cloves garlic, minced - 3 tablespoons Cajun seasoning - 4 tablespoons unsalted butter, melted - 1 lemon, sliced - Fresh parsley, for garnish - Salt and pepper to taste Gathering these ingredients sets the stage for a fun cooking adventure. Each one brings a unique taste. The shrimp are the star, tender and sweet. The potatoes add heartiness, while corn brings a lovely crunch. Red bell pepper and yellow onion add a sweet note and vibrant color. Using garlic boosts the flavor, making it rich and savory. Cajun seasoning gives it that special kick. Butter adds richness, while lemon brightens the dish. Finally, parsley adds a fresh touch on top. These ingredients make the meal not just tasty but also beautiful. For the full recipe, check out Cajun Bliss Shrimp Foil Packs. It’s a fantastic way to enjoy these flavors! 1. Preheat your oven to 400°F (200°C). This step is key for cooking the shrimp and potatoes evenly. 2. Tear off four large pieces of aluminum foil, about 12x18 inches each. Lay them flat on a clean surface. 3. In a large bowl, combine the baby potatoes, corn, red bell pepper, onion, and garlic. This mix brings great flavor. 4. Drizzle the melted butter over the vegetable mixture. Sprinkle with Cajun seasoning, salt, and pepper. Toss well until everything is coated. 1. Divide the veggie mixture evenly among the four pieces of foil. 2. Top each portion with a handful of shrimp and a couple of slices of lemon. The lemon adds a fresh taste. 3. Fold the sides of the foil over the mixture, sealing tightly. This keeps the steam in for a perfect cook. 1. Place the foil packs on a baking sheet and bake in the preheated oven for 20-25 minutes. 2. Check that the shrimp are pink and cooked through. The potatoes should be tender as well. 3. Carefully unwrap the foil packs, watching out for steam. Serve hot, garnished with fresh parsley. For the full recipe, refer to the earlier section. To get the best flavor, start with the right Cajun seasoning. Look for a blend that has a balance of spices. You want it to be bold but not too hot. You can make your own mix with paprika, cayenne, garlic powder, and onion powder. This way, you control the spice level. When using foil packs, keep a few tips in mind. First, cut your vegetables evenly. This helps them cook at the same rate. Second, don’t overfill the packs. Leave some space for steam to build. Lastly, seal the packs tightly. This locks in the flavors and moisture, making your shrimp juicy. For sides, I love serving this dish with crusty bread. It’s perfect for soaking up the tasty juices. A fresh salad also pairs well. Try a simple green salad with a light vinaigrette. For dips, consider a zesty remoulade or a classic cocktail sauce. Both add a nice kick to your shrimp. If you want to keep it simple, lemon wedges bring brightness to the dish. They enhance the flavors and add freshness. For the full recipe, check out the Cajun Bliss Shrimp Foil Packs! {{image_2}} You can make your Cajun shrimp boil unique by using different vegetables. For example, try adding carrots or zucchini for a fresh twist. These veggies add great flavor and crunch. You can also swap proteins. Instead of shrimp, use sausage or crab for a hearty meal. Each option brings its own taste, so feel free to mix it up! Adjusting the spice level is easy. If you like heat, add more Cajun seasoning. For a milder dish, cut back on the spice. You can also try different seasonings to change the flavor. Herbs like thyme or oregano can add nice depth. Explore what you like best! Enjoy experimenting with flavors that make your taste buds dance. To keep your leftover Cajun shrimp boil foil packs fresh, store them properly. First, let the foil packs cool. Then, transfer the contents to an airtight container. I recommend using glass or plastic containers with tight seals. This helps keep the shrimp and veggies moist. You can also wrap the foil packs tightly in plastic wrap if you don’t have containers. Make sure to label them with the date. They will last in the fridge for about 2-3 days. When it’s time to enjoy leftovers, reheating is key to keeping flavor and texture. The best method is using an oven. Preheat the oven to 350°F (175°C). Place the foil packs on a baking sheet. Heat for about 10-15 minutes, until everything is warm. If you want a quick option, you can use a microwave. Just remove the shrimp and veggies from the foil, place them in a microwave-safe dish, and heat for about 2-3 minutes. Stir halfway to ensure even warming. Enjoy the delicious taste of your Cajun shrimp boil again! To cook shrimp in foil packs, you need about 20 to 25 minutes. The cooking time may change based on shrimp size and other ingredients. Large shrimp usually need this time to turn pink and firm. If you add larger veggies like baby potatoes, they may take a bit longer. Always check to ensure everything is tender and cooked through. Yes, you can use frozen shrimp. Just make sure to thaw them before cooking. Place them in cold water for about 15 minutes. This helps them cook evenly. If you cook shrimp straight from the freezer, they might not cook well. Thawing helps keep the shrimp juicy and tender. You can add many tasty ingredients to your Cajun shrimp boil. Try adding sausage for extra protein and flavor. You can also include vegetables like carrots or zucchini. They add more color and nutrients. For a kick, consider adding jalapeños or hot sauce. This makes the dish heartier and more fun. Yes! You can easily adapt this recipe for the grill. Just prepare the foil packs as you would for the oven. Place them on a preheated grill instead. Cook them for about 15 to 20 minutes, checking often. Make sure the shrimp are pink and the veggies are tender. Grilling adds a nice smoky flavor that enhances the dish. This blog post shared a simple and tasty Cajun shrimp foil pack recipe. We covered main ingredients like shrimp, baby potatoes, and corn. You learned how to prepare, assemble, and cook the packs perfectly. Tips for flavor and customization add fun to your cooking. Remember to store leftovers properly and reheat them safely. This dish is flexible, so feel free to make it your own. Enjoy creating your shrimp boil!

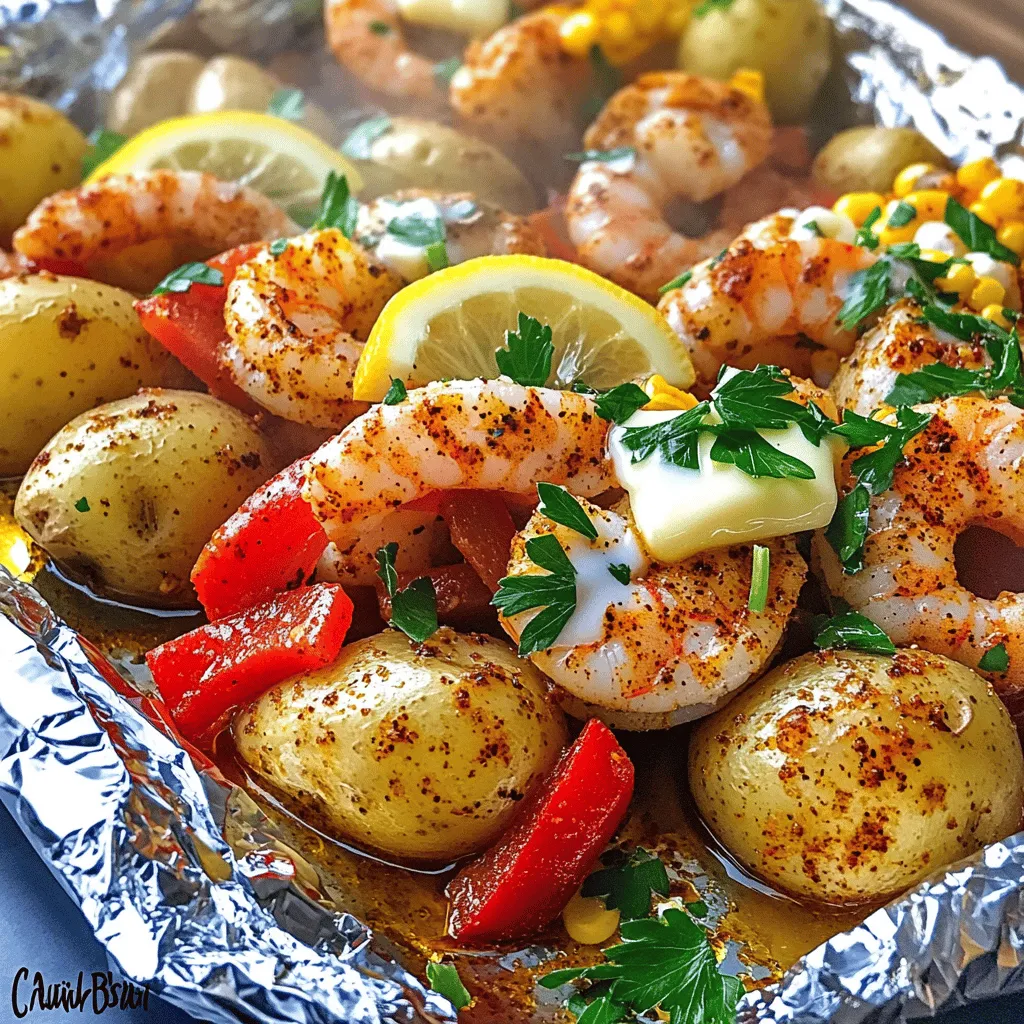
Craving a delicious meal that’s easy to make? You’re in the right place! My Easy Cajun Shrimp Boil Foil Packs deliver bold flavors and fun cooking. With juicy shrimp, tender …

Read more

Categories Dinner

Garlic Butter Shrimp and Broccoli Savory Delight

June 3, 2025 by Chef Luca
- 1 pound large shrimp, peeled and deveined - 2 cups broccoli florets - 4 tablespoons unsalted butter - 4 cloves garlic, minced - 1 teaspoon lemon zest - 2 tablespoons lemon juice - 1 teaspoon red pepper flakes - Salt and black pepper, to taste - Fresh parsley, chopped (for garnish) In this dish, I focus on fresh and simple ingredients. The shrimp offers a sweet and tender base, while the broccoli adds a bright crunch. The unsalted butter is key. It brings a creamy richness that makes this meal feel special. Garlic takes center stage here. It not only adds a strong flavor but also a wonderful aroma. The lemon zest and juice brighten the dish, making it feel fresh. I always like to include red pepper flakes for warmth. Adjust them based on your spice level. The fresh parsley serves as a garnish. It adds color and a fresh taste. Together, these ingredients create a dish that’s both delicious and visually appealing. If you're curious about the full recipe, check out the [Full Recipe]. - Rinse and season the shrimp: Start by rinsing the shrimp under cold water. This helps remove any grit. Next, pat them dry with paper towels. Season the shrimp with salt and black pepper to taste. - Blanch the broccoli: Bring a large pot of water to a boil. Add the broccoli florets and cook for 2-3 minutes. You want them bright green and slightly tender. After blanching, drain them and quickly transfer them to an ice bath. This stops the cooking. Drain again after a few minutes. - Melt the butter and add garlic: In a large skillet, melt the butter over medium heat. Once melted, add the minced garlic. Sauté for about 1-2 minutes. You want it fragrant but not browned. - Incorporate red pepper flakes: After the garlic is fragrant, add the red pepper flakes. This gives the sauce a nice kick. Stir well to combine. - Cook the shrimp until pink and opaque: Add the seasoned shrimp to the skillet. Cook for 3-4 minutes, flipping halfway. They are done when they turn pink and opaque. - Combine broccoli and season to taste: Now, add the blanched broccoli to the skillet. Drizzle with lemon juice and lemon zest. Toss everything gently for about 2 minutes. Make sure all ingredients are well-mixed and heated through. Adjust the seasoning with more salt and pepper if needed. For the full recipe, be sure to check the details above! To make the best garlic butter sauce, you must watch the garlic closely. Burnt garlic can ruin the flavor. Cook it just until you smell its lovely scent. If you want more heat, add more red pepper flakes. Start with a small amount and taste as you go. Ensuring your shrimp are perfectly cooked is key. Cook them until they turn pink and opaque. This usually takes about 3-4 minutes. If you can't find shrimp, you can use chicken or tofu instead. Just make sure to adjust the cooking time. The best way to blanch broccoli is quick and simple. Boil water first, then add the florets. Cook them for just 2-3 minutes. This keeps the color bright and the crunch alive. You can also swap broccoli with green beans or asparagus for a twist. Both add a nice crunch and flavor. {{image_2}} - Gluten-free adaptations: This dish is naturally gluten-free. Use gluten-free grains like quinoa or rice. Ensure any broth or sauces are also gluten-free. - Low-carb alternatives: For a low-carb twist, skip the grains. Serve the shrimp and broccoli with a side salad or on their own. You can also use zucchini noodles for a fun, veggie-based option. - Adding different herbs or spices: Try using fresh herbs like basil or thyme for a new flavor. You can also swap red pepper flakes with paprika for a milder taste or cayenne for more heat. - Incorporating other vegetables: Feel free to add bell peppers, snap peas, or asparagus. This not only boosts nutrition but also adds color and texture to your meal. - Pairing with different grains: Serve the garlic butter shrimp and broccoli over brown rice, jasmine rice, or even cauliflower rice. Each grain gives a unique taste and texture. - Making it a one-pan meal: To simplify cleanup, cook everything in one pan. Start with the shrimp, add the broccoli, and then mix in your chosen grains. This method makes for an easy, delicious meal. For the full recipe, check out the detailed steps in the previous section. To keep your Garlic Butter Shrimp and Broccoli fresh, use airtight containers. Glass containers are great for this. They do not absorb odors and are easy to clean. Place your leftovers in the fridge. They will stay good for about 3 days. When reheating, the best method is to use the stove. Heat a skillet over low heat. Add a bit of butter or oil to keep things moist. Stir gently until hot. This way, the shrimp and broccoli stay tender. You can also use a microwave, but it may change the texture. You can freeze cooked shrimp and broccoli for later meals. First, let them cool completely. Then, pack them in freezer-safe bags. Remove as much air as possible to prevent freezer burn. They will last up to 2 months in the freezer. When ready to eat, thaw in the fridge overnight and reheat as mentioned before. This keeps the flavor and texture intact. Garlic Butter Shrimp and Broccoli lasts about three days in the fridge. Store it in an airtight container. The shrimp keeps its flavor well, but the broccoli may lose some crunch. Yes, you can use frozen shrimp. Just thaw them before cooking. You can run them under cold water for quick thawing. This helps keep the shrimp juicy and tender. If you want a dairy-free option, use olive oil or coconut oil. Both work well and add unique flavors. You can also try vegan butter for a similar taste. This dish pairs well with rice or quinoa. You can also serve it with noodles or crusty bread. A side salad or steamed rice adds a nice touch too. To spice it up, add more red pepper flakes. You can also include diced jalapeños or a splash of hot sauce. Adjust the spice level to match your taste. Yes, this dish is healthy! It has lean protein from shrimp and fiber from broccoli. The butter adds flavor but can be adjusted or replaced for lighter options. Enjoy this savory delight with a side of whole grains for a balanced meal. For the full recipe details, check the Full Recipe section. In this blog post, we covered how to make Garlic Butter Shrimp and Broccoli. We explored the key ingredients, like shrimp, broccoli, and a flavorful garlic butter sauce. I shared step-by-step instructions to guide you through the cooking process. We also discussed tips for perfecting the dish and variations to suit different diets. In the end, you can enjoy this quick, tasty meal that’s easy to customize. You’ll impress friends and family while enjoying a healthy, delicious dish!

Are you ready to whip up a quick and tasty dish? Garlic Butter Shrimp and Broccoli is a savory delight that satisfies your cravings and fits into your busy life. …

Read more

Categories Dinner

Honey Lime Fruit Salad Fresh and Flavorful Delight

June 3, 2025 by Chef Luca
- Strawberries - Blueberries - Kiwi - Pineapple - Banana - Honey - Lime juice - Lime zest - Fresh mint leaves To make a great Honey Lime Fruit Salad, you need to prep your fruits well. Start with the strawberries. Hull them, then cut them into quarters. This makes them easy to eat and blends nicely. Next, rinse the blueberries. They are small and do not need cutting. Just toss them in whole. For the kiwi, peel the skin off first. Then, dice it into bite-sized pieces. This adds a nice pop of color and taste. Chop the pineapple into small cubes. Fresh pineapple works best, but canned can work in a pinch. Lastly, slice the banana just before you mix the salad to keep it fresh. Now, gather your fruits in a bowl. You can keep the fruits separate if you like. When you are ready, mix them all together. It's fun to see the colors and shapes combine. For the full recipe, check out the details. Enjoy making your salad! To start, gather your fresh fruits. Take a large mixing bowl. Combine the quartered strawberries, blueberries, diced kiwi, diced pineapple, and sliced banana. Make sure to mix them gently. This keeps the fruit from breaking apart. The colors will brighten your kitchen. You will see reds, yellows, and greens all mingling together. This makes the salad look tasty and fresh. Now, let’s make the dressing. Take a small bowl and add the honey. Next, squeeze in the fresh lime juice. Then, add the zest of one lime. Use a whisk to blend these ingredients. Keep whisking until they mix well. The honey will sweeten the tartness of the lime. This dressing will add a bright flavor to your fruit salad. Once your fruits are mixed and your dressing is ready, it’s time to assemble the salad. Drizzle the honey lime dressing over the mixed fruits. Use a spatula or a large spoon to toss the salad gently. Be careful not to mash the fruit. You want each piece to be coated, but whole. Let the salad sit for about 10 minutes. This allows the flavors to blend and soak into the fruit. Serve it in individual bowls or on a large platter. You can also add fresh mint leaves on top for a pop of color. For the full recipe, check the section above. To pick ripe fruits for your salad, look for bright colors and firm textures. For strawberries, choose ones that are red and plump. Avoid any with white or green tips. Blueberries should be deep blue with a slight sheen. Kiwi should feel soft but not mushy. Pineapple should smell sweet and have a golden hue. For bananas, select ones that are slightly speckled for the best flavor. Freshness matters, as it enhances the taste of your Honey Lime Fruit Salad. Adjusting sweetness and acidity in your dressing is key. Start with three tablespoons of honey, but taste as you go. If it’s too sweet, add more lime juice. The zest adds a delightful punch, so don’t skip it. If you prefer a more tangy flavor, increase the lime juice by a teaspoon. Remember, the goal is a nice balance that complements the fruits. This dressing makes your salad pop! Enhancing your salad with garnishes can make it more appealing. Fresh mint leaves add a splash of color and a fresh aroma. You can also sprinkle a few extra blueberries or sliced strawberries on top. For a fun twist, use a colorful serving bowl to showcase your beautiful fruits. Arrange the fruits in a rainbow pattern for a vibrant look. These little touches elevate your Honey Lime Fruit Salad and impress your guests. {{image_2}} You can mix up the fruits in this salad. Here are some tasty options: - Mango - Grapes - Oranges - Apples - Peaches Using these fruits can add new flavors. You can also choose fruits based on what you like. Just remember to keep the fruit fresh and ripe. This makes the salad even better. If you want a vegan option, you can use agave syrup instead of honey. It gives a similar sweet taste. For a sugar-free version, try a sugar substitute like stevia. Just make sure you adjust the amount to match your taste. This way, anyone can enjoy your salad. Different seasons bring different fruits. In spring and summer, berries shine. In fall, apples and pears are great choices. Winter fruits like citrus can add a zesty twist. By using seasonal fruits, your salad stays fresh and fun. You can explore new flavors all year round! To keep your fruit salad fresh, place it in an airtight container. This helps keep the flavors locked in. Make sure the salad is cool before sealing. Store it in the fridge. It will last for about 2-3 days. If you notice any browning, toss those pieces out. Can you freeze fruit salad? It’s not the best idea. Some fruits, like bananas and strawberries, can get mushy. If you still want to freeze it, use fruits that hold up well, like blueberries and pineapple. Just cut them into small pieces. Keep in mind that the texture may change when thawed. To maintain texture and flavor, consider these tips: - Add the dressing just before serving to avoid sogginess. - Use fresh fruits that are ripe but firm. - Avoid mixing in soft fruits like peaches or ripe bananas until the last minute. These steps help keep your fruit salad vibrant and tasty. For the full recipe, check the earlier section. I love using fresh fruits for this salad. Strawberries, blueberries, kiwi, pineapple, and banana work best. Their colors and flavors pop together. You can also swap in peaches or apples if you like. Just make sure the fruits are ripe and sweet. This keeps the salad fresh and tasty. You can keep the salad in the fridge for about 2 to 3 days. Make sure to cover it with plastic wrap or a lid. This helps to keep the fruits from drying out. After a day, the fruits may get softer. But the taste will still be good. Yes, you can prepare this salad ahead of time. Just cut the fruits and make the dressing. Keep them separate until you are ready to serve. This keeps the fruits crisp and bright. Mix them together about 30 minutes before serving. This way, the salad stays fresh and flavorful. This fruit salad pairs well with many dishes. You can serve it with grilled chicken or fish for a light meal. It also makes a great side for brunch. Consider adding it to a picnic spread. You can even enjoy it as a snack on its own. It's fresh, light, and full of flavor. For the full recipe, check out the details above. This fruit salad is a bright, fresh dish. We discussed essential fruits like strawberries and bananas. I shared tips on preparing the fruits and making the honey lime dressing. You learned how to mix, assemble, and add your personal touch with garnishes. Remember to choose ripe fruits for the best flavor. Also, feel free to swap in seasonal options or adjust for dietary needs. Keeping it fresh is key. Enjoy this simple recipe any time the craving hits!

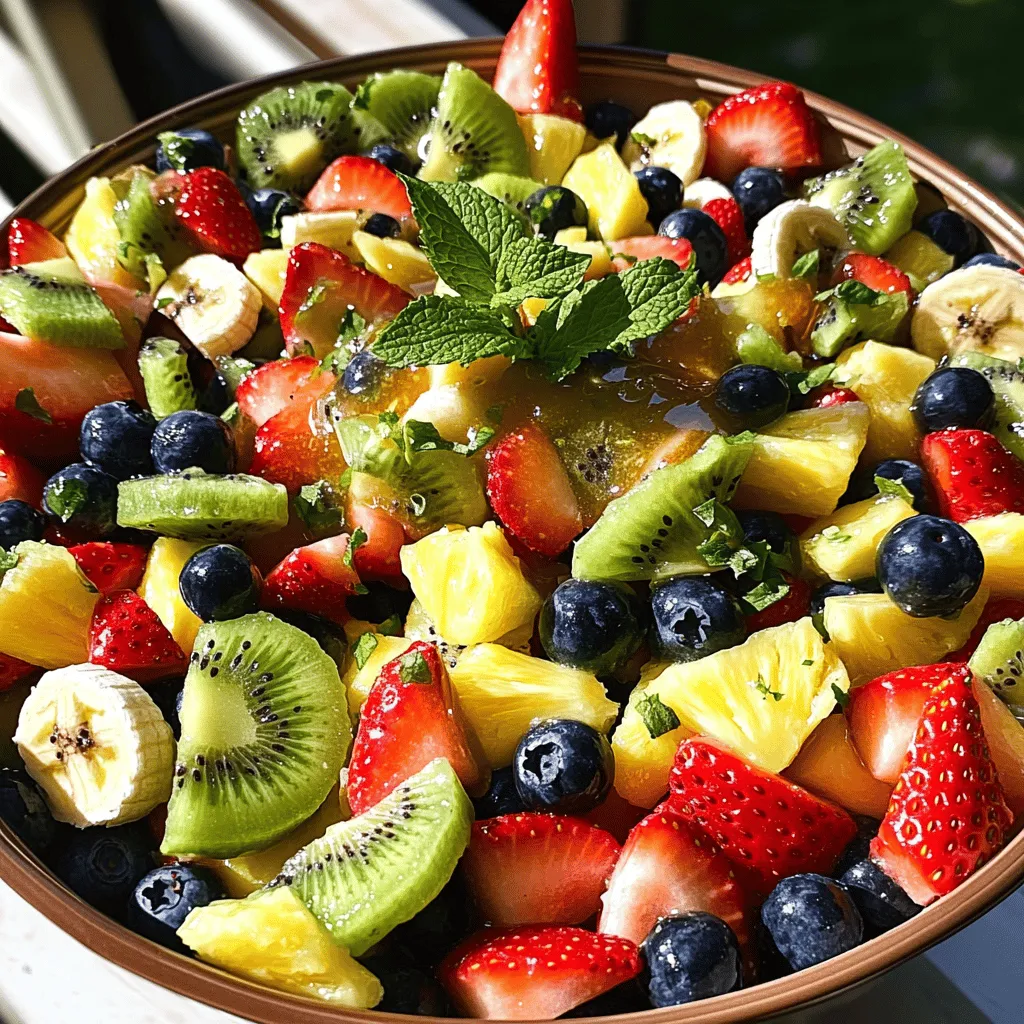
Craving a refreshing treat? My Honey Lime Fruit Salad is the answer! Bursting with vibrant flavors, this salad combines fresh fruits like strawberries and kiwi, all drizzled with a zesty …

Read more

Categories Salads

Cowboy Butter Creamed Corn Rich and Flavorful Side Dish

June 3, 2025 by Chef Luca
Cowboy Butter Creamed Corn needs simple and fresh ingredients for the best taste. Here’s what you’ll need: - Fresh or Frozen Corn Kernels - Dairy and Seasoning Components - Optional Garnishes - 4 cups fresh corn kernels (or frozen) - 1 cup heavy cream - 4 tablespoons unsalted butter - 2 tablespoons garlic, minced - 1 teaspoon smoked paprika - 1/2 teaspoon cayenne pepper (adjust to taste) - 1 teaspoon salt - 1/2 teaspoon black pepper - 1/3 cup grated Parmesan cheese - 2 green onions, finely chopped for garnish Fresh corn works best for this dish. If you can’t find it, frozen corn is a great option. The heavy cream adds richness, while butter gives a nice flavor. Garlic brings warmth, and smoked paprika adds depth. Cayenne pepper gives it a little kick, so adjust it based on your taste. Salt and black pepper balance the flavors well. Finally, Parmesan cheese makes the corn creamy and rich. Green onions add a fresh touch as a garnish. For the full recipe, you can refer to the cooking instructions that follow. Melting Butter and Sautéing Garlic Start by melting the unsalted butter in a large skillet over medium heat. Watch the butter closely as it melts. It should become bubbly but not brown. Once melted, add the minced garlic to the skillet. Sauté the garlic for about one minute. It should smell amazing but be careful not to burn it. Cooking Corn Kernels Next, stir in the corn kernels. You can use fresh or frozen corn; both work well. Cook the corn for about five minutes, stirring occasionally. The corn will start to soften and become bright yellow. This step is key for flavor and texture. Combining Cream and Seasonings Now, pour in the heavy cream. Add the smoked paprika, cayenne pepper, salt, and black pepper. Mix everything well to ensure the spices coat the corn evenly. Allow this mixture to simmer for about eight to ten minutes. Stir occasionally. This helps thicken the dish and makes it creamy. Adding Parmesan Cheese Once the mixture thickens, stir in the grated Parmesan cheese. This will melt into the creamed corn, adding rich flavor. Keep stirring until the cheese is fully melted and creamy. Adjusting Seasoning Taste the creamed corn. Adjust the salt and pepper to your liking. You can add more cayenne if you want a kick. Just remember to stir well after adding. Preparing for Serving Finally, remove the skillet from heat. Transfer the Cowboy Butter Creamed Corn to a serving bowl. Top it off with chopped green onions for a fresh finish. This dish is ready to impress your family or guests! For the full recipe, check the details above. Achieving Creaminess To make your creamed corn rich and smooth, use heavy cream. It gives a nice, thick texture. You can also add more butter for extra richness. Stir the corn often to keep it from sticking. This helps blend the cream with the corn well. Cooking Time Adjustments Cook the corn until it is just tender. This takes about five minutes. If you like your corn softer, let it cook a little longer. Just watch it carefully to avoid mushiness. The key is to find the right balance for your taste. Spice Level Adjustments If you want more heat, add more cayenne pepper. Start with a little and taste as you go. Mixing in fresh jalapeños can also boost the spice. Adjust it to fit your family’s taste, so everyone enjoys it. Alternative Seasoning Choices You can switch up the spices to create new flavors. Try adding chili powder or even cumin for a different twist. Fresh herbs like thyme or basil also make great additions. Each change can give your dish a unique flair. {{image_2}} You can make Cowboy Butter Creamed Corn even better by adding fun ingredients. One great option is bell peppers. They add a nice crunch and a pop of color. Just chop them into small pieces and sauté them with garlic. This will give your dish a fresh taste. Another option is to incorporate herbs. Fresh herbs like basil or thyme can boost flavor. Chop the herbs finely and add them in the last few minutes of cooking. This will keep their bright taste and aroma intact. If you need gluten-free options, this recipe is already safe for you. Just make sure to check your seasonings for any hidden gluten. Most spices and the ingredients in this recipe are naturally gluten-free. For vegan alternatives, you can swap out the heavy cream and butter. Use coconut cream for a rich flavor. You can also use vegan butter instead of regular butter. Nutritional yeast can replace Parmesan cheese for a cheesy taste without dairy. These swaps keep the dish tasty while meeting your dietary needs. To store leftovers, let the creamed corn cool first. Use an airtight container to keep it fresh. Place the container in the fridge. This will help keep the flavors intact. The shelf life of prepared Cowboy Butter Creamed Corn is about three to four days. After that, the taste may fade. Always check for any off smells before eating. The best methods to reheat this dish are using the stovetop or microwave. For the stovetop, place the corn in a pan. Heat it over low to medium heat. Stir it often to warm it evenly. If you choose the microwave, use a microwave-safe dish. Cover it loosely to trap some steam. Heat in short bursts, stirring in between. To avoid sogginess, do not add extra liquid when reheating. If it seems too thick, add a splash of cream or milk. This keeps the texture creamy and delightful. Enjoy your leftovers just as much as when they were fresh! What is Cowboy Butter Creamed Corn? Cowboy Butter Creamed Corn is a rich and tasty side dish. It uses fresh corn, cream, and butter. This dish has a creamy texture and bold flavors. The garlic and spices bring a great taste that pairs well with many meals. It’s perfect for barbecues or cozy family dinners. Can I use canned corn for this recipe? Yes, you can use canned corn. It’s a great time saver. Just drain and rinse the corn before using it. Canned corn will still taste good, but fresh corn gives the best flavor. Frozen corn is also a fantastic option if fresh is not available. How do I make this dish spicier? To spice it up, add more cayenne pepper. You can also try other spices like chili powder or hot sauce. Start with a little and taste as you go. This way, you can find the right heat for your taste. What to serve with Cowboy Butter Creamed Corn? This dish goes well with grilled meats like steak or chicken. It also pairs nicely with barbecue ribs or burgers. For a lighter meal, serve it with a fresh salad. The creamy corn adds a nice contrast to crunchy dishes. Can this be made ahead of time? Yes, you can make this dish ahead of time. Prepare it and store it in the fridge. Just reheat it on the stove or microwave before serving. Keep in mind that the texture may change slightly, but it will still taste great! In this post, we explored how to make Cowboy Butter Creamed Corn, from ingredients to serving tips. We covered fresh and frozen corn, rich dairy components, and perfect seasoning. Remember, cooking is fun and creative. Feel free to try your own twists. Always adjust flavors to your liking. Enjoy sharing this comforting dish with friends and family. Keep it fresh and tasty!

If you want a mouthwatering side dish, try Cowboy Butter Creamed Corn. This rich recipe is packed with flavor and easy to make. You’ll savor fresh or frozen corn, creamy …

Read more

Categories Dinner
Older posts
Newer posts
← Previous Page1 … Page105 Page106 Page107 … Page122 Next →

STIRRED RECIPES

Where every dish begins with a stir! 🍲✨

PAGES

Home About Contact Privacy Policy Terms & Conditions Cookie Policy GDPR Policy Copyright Policy Disclaimer

CATEGORIES

Appetizers Desserts Salads Breakfast Dinner

Contact

  • Pinterest
  • Mail
Copyright © 2026 Stirred Recipes. All rights reserved.