Skip to content
Stirred Recipes
  • Home
  • Appetizers
  • Desserts
  • Salads
  • Breakfast
  • Dinner
  • Privacy Policy
  • Contact
  • About

Chef Luca

Flavorful Fish Taco Slaw Bowls Fresh and Easy Meal

June 7, 2025 by Chef Luca
- 1 pound white fish fillets (cod or tilapia) - 2 cups green and red cabbage, finely shredded - 1/2 cup Greek yogurt and lime juice mixture For the main dish, we need fresh fish. I love using cod or tilapia for this recipe. They cook well and have a mild taste. The slaw adds a crunchy bite. I mix green and red cabbage to make it colorful and nutritious. The Greek yogurt and lime juice mixture brings a zesty creaminess that ties it all together. - Olive oil, cumin, chili powder, salt, and pepper - Fresh cilantro, grated carrot, avocado, and lime wedges Seasonings are key to great flavor. I use olive oil to help the spices stick to the fish. Cumin and chili powder add warmth and depth. Don't forget salt and pepper for balance. For toppings, I like fresh cilantro for a burst of flavor. Grated carrot adds sweetness and a bit of crunch. Sliced avocado gives a creamy texture. A lime wedge is perfect for an extra zing. - 4 corn tortillas for serving Tortillas are the base of the bowl. I prefer corn tortillas for their flavor and texture. Toast them lightly to enhance their taste and make them crispy. They serve as a great vehicle for all the delicious ingredients in this dish. For the full recipe, check out the detailed steps that will guide you through making these Fish Taco Slaw Bowls. To start, I pat the fish fillets dry. This helps the seasonings stick better. Then, I drizzle olive oil over them. Next, I sprinkle cumin, chili powder, salt, and pepper. Let the fish marinate for about 15 minutes. This adds great flavor and ensures a tasty bite. When it’s time to cook, I preheat a non-stick skillet over medium heat. I place the fish fillets in the skillet. I cook them for about 3-4 minutes on each side. The fish is done when it turns opaque and flakes easily with a fork. After cooking, I remove the fish and break it into bite-sized pieces. For the slaw, I grab a large bowl. I toss together the finely shredded green and red cabbage, grated carrot, and chopped cilantro. This mix adds crunch and color. Then, I take a small bowl and mix Greek yogurt with lime juice. This dressing brings all the flavors together. I pour it over the cabbage mixture and toss until everything is well combined. Now comes the fun part—assembling the bowls! I start with a base of the slaw mixture in individual serving bowls. Then, I layer on the pieces of cooked fish. I add a few slices of avocado on top. For the tortillas, I lightly toast them in a dry skillet for about 1 minute on each side. This makes them warm and slightly crispy. Finally, I serve the bowls with lime wedges on the side. A squeeze of lime adds brightness. You can also add more cilantro for an extra pop of flavor. Don’t forget to check the Full Recipe for more details! To ensure your fish is cooked to perfection, start with high-quality fillets. I like using cod or tilapia. These fish cook quickly and stay moist. Season them well with olive oil, cumin, chili powder, salt, and pepper. Let them sit for about 15 minutes to soak up all those flavors. When cooking, preheat your skillet to medium heat. Cook each side for 3-4 minutes. Look for the fish to turn opaque and flake easily with a fork. This means it's ready. Do you want a spicier version? You can add chopped jalapeños to the slaw or sprinkle some cayenne pepper on the fish. This will give you that kick you crave. Meal prepping makes cooking easier. You can prepare the slaw and fish separately. This way, they stay fresh longer. Make your slaw the day before. Store it in an airtight container in the fridge. For the fish, cook it just before serving. This keeps it tender and flavorful. If you have leftover fish or slaw, store them in separate containers. This keeps each ingredient fresh. Avoid mixing too early to prevent sogginess. When serving, aim for the right temperature. Enjoy your fish taco slaw bowls warm. The warmth of the fish balances the coolness of the slaw. For a great presentation, layer the slaw at the bottom of the bowl. Then, add the fish and top with avocado slices. Pair your bowls with sides like tortilla chips or a light salad. A refreshing drink like lime-infused water or a light beer goes well too. Enjoy your meal! For more details, check the Full Recipe. {{image_2}} You can switch out the fish for other proteins. Shrimp is a great choice. It cooks fast and has a nice flavor. Chicken works well too. Just grill or sauté it with the same spices. Tofu is a fun option for a vegetarian twist. Press it to remove moisture, then season and cook. Each option brings its own taste to the bowl. If you're vegan, you can swap the Greek yogurt with a plant-based yogurt. For the fish, try using jackfruit or a fish alternative. Both of these options work well in the slaw. For the tortillas, look for gluten-free versions made from corn or rice. These changes keep the meal tasty and safe for different diets. To make your bowls pop, add some sweet fruits. Diced mango or pineapple adds a fresh twist. You can also mix in different spices. Try smoked paprika for a warm flavor. Fresh herbs like mint or dill can brighten the dish. These small changes can elevate your Fish Taco Slaw Bowls to a new level. For the full recipe, check out the Fish Taco Slaw Bowls. To keep your fish taco slaw bowls fresh, place leftovers in an airtight container. Store the fish and slaw separately. This helps prevent the slaw from getting soggy. Use the fish within two days for the best taste. You can keep slaw for up to three days. Always let the food cool before sealing it in a container. When it's time to enjoy your leftovers, reheat the fish in a skillet over medium heat. This keeps the fish moist. Avoid the microwave if you want to keep the fish crispy. For the slaw, it’s best served cold, so skip reheating it. If you have extra tortillas, toast them lightly in a skillet. This will help prevent sogginess. Your fish taco slaw bowls will last in the fridge for about two days. If you see any changes in color or smell, it’s time to toss it. Look for signs of spoilage, like slimy fish or wilted cabbage. Always trust your senses. Enjoy the vibrant flavors while they are fresh! You can find the full recipe for these delicious bowls in the earlier sections. For taco bowls, I recommend using white fish like cod or tilapia. These fish have a mild flavor and cook quickly. Their flaky texture works well in tacos. You can also try mahi-mahi or halibut for a richer taste. If you like a stronger flavor, consider using salmon. Each fish type can bring a unique twist to your bowls. Yes, you can make Fish Taco Slaw Bowls ahead of time. Prepare the slaw and fish separately. Store the slaw in the fridge for up to two days. This keeps it fresh and crunchy. Cook the fish just before serving to keep it moist. Warm tortillas and assemble your bowls when you're ready to eat. Absolutely! You can make a vegetarian version by using grilled portobello mushrooms or tofu instead of fish. Both options absorb flavors well and provide a hearty texture. For the slaw, keep the cabbage, carrots, and dressing. You might also add black beans for protein. This way, you still enjoy the fresh and tasty flavors. Many sides pair well with Fish Taco Slaw Bowls. Consider serving black beans or Mexican rice for a filling touch. Fresh guacamole or pico de gallo adds extra flavor and freshness. You can also offer a simple corn salad or grilled corn on the cob. Lime wedges are great for a zesty kick, too. For dessert, try fresh fruit like mango or pineapple to keep it light. For the full recipe, check out the details above. Fish Taco Slaw Bowls combine fresh flavors and textures for a meal everyone can enjoy. We explored key ingredients, like fish fillets, crunchy cabbage, and zesty toppings. You learned how to prepare, assemble, and even store these bowls for later. Remember, you can swap proteins and adjust flavors to fit your taste. Enjoy cooking and experimenting with these recipes. Each bite offers freshness and satisfaction, making it a perfect choice for any occasion. Happy cooking!

Are you ready to elevate your dinner game? Dive into these flavorful Fish Taco Slaw Bowls that are fresh and easy to make. With tender fish, crunchy slaw, and simple …

Read more

Categories Dinner

Cheesy Taco Rice Skillet Quick and Tasty Meal

June 7, 2025 by Chef Luca
- 1 cup long-grain white rice - 2 cups vegetable broth - 1 pound ground beef (or turkey) - 1 can (15 oz) black beans, drained and rinsed - 1 cup corn kernels (fresh, frozen, or canned) - 1 packet taco seasoning - 1 cup shredded cheddar cheese - 1 small onion, chopped - 2 cloves garlic, minced - 1 tablespoon olive oil - Salt and pepper to taste - Fresh cilantro (for garnish) - Lime wedges (for serving) Gathering the right ingredients is key for a tasty Cheesy Taco Rice Skillet. You want to use long-grain white rice for the best texture. The vegetable broth adds flavor, so don't skip it! Ground beef or turkey works well, but feel free to swap it for your favorite protein. Canned black beans are a great source of fiber and protein. Corn adds sweetness and a pop of color. Taco seasoning ties it all together with bold flavor. I love using sharp cheddar cheese for its rich taste, but you can pick your favorite cheese. Chop your onion and garlic finely. These aromatics build the base of flavor in your skillet. Olive oil is perfect for sautéing. Finally, salt and pepper help to enhance every bite. Don’t forget fresh cilantro and lime wedges for a bright finish! For the full recipe and detailed cooking instructions, check out the [Full Recipe](#). - Heat 1 tablespoon of olive oil in a large skillet over medium heat. - Add 1 small chopped onion and sauté for 3-4 minutes. The onion should turn soft and clear. - Next, add 2 cloves of minced garlic and 1 pound of ground beef (or turkey). Cook until the meat is brown. This takes about 5-7 minutes. - Stir in 1 packet of taco seasoning, 1 can of drained black beans, 1 cup of corn, and 1 cup of long-grain white rice. Mix well to combine all the flavors. - Pour in 2 cups of vegetable broth. Bring the mixture to a boil. - Once it boils, reduce the heat to low. Cover the skillet and let it simmer for 18-20 minutes. The rice should be cooked and the liquid absorbed. - After simmering, remove the skillet from heat. Sprinkle 1 cup of shredded cheddar cheese on top. Cover for a few minutes to let the cheese melt. - Gently fluff the rice mixture with a fork and season with salt and pepper to taste. - Serve hot, garnished with fresh cilantro and lime wedges for extra flavor. For the full recipe, check out the detailed instructions provided. Enjoy your cooking! - Use high-quality taco seasoning for better flavor. It makes a big difference in taste. - Ensure rice is fully cooked by checking texture. It should be soft and fluffy. - Serve directly from the skillet for a rustic look. It feels homey and inviting. - Use fresh garnishes to enhance visual appeal. Cilantro and lime add color and freshness. - Add jalapeños for heat. They bring a nice kick to the dish. - Mix in diced tomatoes for extra moisture. This keeps your rice skillet juicy and tasty. These tips will help you create a delicious and visually appealing Cheesy Taco Rice Skillet. For the complete recipe, check out the [Full Recipe]. {{image_2}} You can switch up the protein in this Cheesy Taco Rice Skillet. Use ground chicken or plant-based meat for a lighter option. If you want a vegetarian meal, lentils or tofu work great too. Both options are rich in protein and add unique flavors to the dish. If you seek a healthier version, try using brown rice or cauliflower rice. Brown rice adds more fiber, while cauliflower rice keeps it low-carb. Quinoa is another excellent choice; it’s packed with protein and gives a nutty taste. You can get creative with spices and herbs. Try adding cumin or smoked paprika for depth. You might also want to mix in different cheese types. Pepper jack adds a spicy kick, while mozzarella gives a creamy texture. These variations keep the dish fresh and exciting. For the full recipe, check out the details above. Store any leftovers in an airtight container. This keeps the dish fresh and tasty. You should eat the Cheesy Taco Rice Skillet within 3-4 days of cooking. After that, the flavors may fade, and the texture can change. To freeze this dish, let it cool completely first. Then, place it in a freezer-safe container. Make sure to leave some room at the top for expansion. You can keep it frozen for up to three months. When you are ready to eat, thaw it in the fridge overnight before reheating. For reheating, you can use the stovetop or microwave. If using the stovetop, heat it gently over low heat. This helps avoid burning. If you use a microwave, cover the dish to keep moisture in. Add a splash of broth or water to help it stay moist. This prevents it from drying out during reheating. You can use many tasty options. Ground turkey is a great choice. It is lean and cooks well. You can also try ground chicken. If you want a meat-free dish, use lentils or crumbled tofu. For a fun twist, black beans or chickpeas can add protein. Each option gives a different flavor and texture. Yes, you can easily prep this dish before serving. Cook the Cheesy Taco Rice Skillet as usual. Let it cool, then place it in an airtight container. Store it in the fridge for up to 3-4 days. You can also freeze it. Just separate into portions before freezing. When ready to eat, thaw in the fridge overnight. Reheat on the stove or in the microwave. There are many fun ways to add heat. You can mix in diced jalapeños or chopped chili peppers. Add a dash of cayenne pepper or hot sauce to the mix. For extra flavor, consider using spicy taco seasoning. If you like it really hot, sprinkle some crushed red pepper on top before serving. Adjust the heat to your taste for a perfect kick! This blog post covered how to make a tasty Cheesy Taco Rice Skillet. You learned the key ingredients, preparation steps, and useful tips for cooking and serving. Explore variations to suit your taste, like different proteins or rice types. Proper storage ensures leftovers stay fresh and delicious. Overall, this dish is flexible and easy. Experiment with flavors and enjoy your cooking!

Looking for a quick and tasty meal? The Cheesy Taco Rice Skillet is here to save your dinner time! This one-pan dish combines the savory flavors of taco night with …

Read more

Categories Dinner

Ground Beef and Rice Skillet Simple and Savory Meal

June 7, 2025 by Chef Luca
- 1 pound ground beef - 1 cup long-grain white rice - 1 medium onion, diced - 2 cloves garlic, minced - 1 bell pepper (red or green), diced - 1 can (14.5 oz) diced tomatoes, undrained - 2 cups beef broth - 1 teaspoon cumin - 1 teaspoon smoked paprika - 1/2 teaspoon dried oregano - Salt and pepper to taste - 1 cup corn (frozen or canned) - 1 tablespoon olive oil - Fresh parsley or cilantro for garnish In this recipe, I use simple and fresh ingredients. Ground beef is my main protein. It provides great flavor and keeps the dish hearty. The rice makes the meal filling and pairs well with the beef. I always add an onion, diced small, to bring sweetness and depth. Garlic gives a nice aroma and taste. A bell pepper, whether red or green, adds color and crunch. The diced tomatoes help keep the dish moist and flavorful. For seasonings, I use cumin and smoked paprika. They add warmth and a smoky flavor. Dried oregano brings a hint of earthiness. I season with salt and pepper to enhance all the flavors. Beef broth is key for cooking the rice and adding richness. Frozen or canned corn brings a sweet pop of flavor. Lastly, a drizzle of olive oil helps everything cook evenly. This recipe is versatile. You can adjust the ingredients based on what you have at home. For the full recipe, check out the [Full Recipe]. - Heat 1 tablespoon of olive oil in a large skillet over medium-high heat. - Add 1 pound of ground beef. - Cook until the beef is browned, about 5-7 minutes. - Break the meat apart with a spatula as it cooks. - Drain any excess fat if needed. - Add 1 medium diced onion, 1 diced bell pepper, and 2 minced garlic cloves to the skillet. - Sauté for 3-4 minutes. - Cook until the vegetables soften and the onion turns clear. - Stir in 1 cup of long-grain white rice. - Add 1 teaspoon of cumin, 1 teaspoon of smoked paprika, and 1/2 teaspoon of dried oregano. - Mix well to coat the rice with the spices. - Season with salt and pepper to taste. - Pour in 1 can of diced tomatoes (14.5 oz) and 1 cup of corn. - Then, add 2 cups of beef broth to the skillet. - Bring the mixture to a boil over high heat. - Once boiling, reduce the heat to low. - Cover the skillet with a lid. - Let it simmer for 20-25 minutes. - Stir occasionally until the rice is tender and the liquid is absorbed. - Once cooked, remove the skillet from the heat. - Fluff the rice with a fork gently. - Let it sit for a few minutes. - Garnish with fresh parsley or cilantro before serving. For the full recipe, check out the details above. Enjoy your savory ground beef and rice skillet! - Make sure the beef is well-browned for great flavor. This step builds a rich taste. - Use low-sodium broth for a healthier option. It helps control salt while keeping the dish tasty. - Stir occasionally to prevent sticking. This keeps the rice and beef from clumping. - Adjust the cooking time based on the rice type. Brown rice takes longer than white rice. - Pair your skillet dish with a side salad or crusty bread. This adds freshness and texture. - Top with shredded cheese for extra flavor. Melted cheese can make each bite more delightful. For more details, check the Full Recipe. {{image_2}} You can switch up the meat in this dish. Ground turkey or chicken works well. Both options keep it light and tasty. For a vegetarian choice, use lentils. Cooked lentils add a great texture. They soak up flavors just like beef. Adding vegetables makes this meal even better. Toss in peas, carrots, or spinach for color and nutrients. You can also swap the bell pepper for zucchini or mushrooms. These changes add different flavors and textures. Feel free to get creative with what you have! If you like heat, this dish can easily spice up. Add jalapeño or crushed red pepper flakes for a kick. Use spicy sausage instead of ground beef for a bold taste. These options will warm you up and make every bite exciting. For the full recipe, check out the details above! Store any leftovers in an airtight container. This keeps the food fresh and safe. It will last well for about 3-4 days in the fridge. Make sure to cool it down before putting it away. You can freeze the skillet in portions for quick meals. This makes it easy to grab a meal later. Just thaw it overnight in the refrigerator before reheating. This way, it stays tasty and safe. When you are ready to eat, reheat on the stove or in the microwave. To keep it moist, add a splash of broth. This helps bring back the flavor and texture. Enjoy your delicious meal again! Typically, this dish lasts 3-4 days when stored properly. Make sure to keep it in an airtight container. This helps keep the flavors fresh and safe to eat. Yes, you can make this recipe ahead of time. Cook it fully and let it cool. Then store it in the fridge. This way, you have quick meals ready for busy days. I recommend using long-grain white rice. It cooks evenly and stays fluffy, which makes it perfect for this dish. Other rice types may become sticky and mushy. Yes, it can be gluten-free. Just use gluten-free beef broth and check all other ingredients. Always read labels to ensure they meet your dietary needs. For the full recipe, check out the earlier section. This recipe for Ground Beef and Rice Skillet blends simplicity and flavor. We covered the main ingredients, seasonings, and easy steps to create this meal. Remember, you can customize it using different proteins and veggies. Store your leftovers well for busy days. Whether you're enjoying it fresh or reheated, this dish brings comfort to any table. Try it out, and make it your own!

Looking for a quick and tasty dinner idea? The Ground Beef and Rice Skillet is your answer! This simple dish packs a lot of flavor and comes together in one …

Read more

Categories Dinner

Shrimp Rice Bowls with Spicy Mayo Tasty and Simple Dish

June 7, 2025 by Chef Luca
- 1 lb shrimp, peeled and deveined - 2 cups cooked jasmine rice - 1 avocado, sliced - 1 cup shredded carrots - 1 cup green cabbage, thinly sliced - ½ cup mayonnaise - 1-2 tablespoons sriracha (adjust to taste) - 2 tablespoons soy sauce - 1 tablespoon sesame oil - 1 tablespoon olive oil - 1 tablespoon lime juice - 1 teaspoon garlic powder - 1 teaspoon paprika - Salt and pepper to taste - Sesame seeds for garnish - Fresh cilantro for garnish Gathering these ingredients is the first step to making your shrimp rice bowls. I love using fresh and vibrant veggies like shredded carrots and green cabbage. They add color and crunch to the dish. The shrimp is the star here, making sure they are peeled and deveined makes cooking easy. For the spicy mayo, I simply mix mayonnaise and sriracha. You can adjust the sriracha to fit your taste. This adds a nice kick to the dish. Don't forget the soy sauce and sesame oil! They add rich flavors that tie the whole bowl together. You’ll find that these ingredients make for a quick and tasty meal. It’s simple enough for a weeknight dinner yet special for entertaining. For the full recipe, check the detailed instructions to bring this dish to life! To start, you will need to marinate the shrimp. In a bowl, mix together: - 1 lb shrimp, peeled and deveined - 2 tablespoons soy sauce - 1 tablespoon sesame oil - 1 tablespoon lime juice - 1 teaspoon garlic powder - 1 teaspoon paprika - Salt and pepper to taste Combine these ingredients well. Let the shrimp sit in the marinade for at least 15 minutes. This step brings tons of flavor. Next, let’s make the spicy mayo. In a small bowl, combine: - ½ cup mayonnaise - 1-2 tablespoons sriracha (adjust based on your spice preference) Mix these two ingredients together until smooth. Taste it to see if you want more heat. Now, heat a pan over medium-high heat. Add 1 tablespoon of olive oil. Once hot, add the marinated shrimp to the pan. Sauté the shrimp for about 3-5 minutes. You want them to be pink and cooked through. This step is quick, so keep an eye on them! It’s time to build your bowls. Start with: - 2 cups cooked jasmine rice Spoon the rice into each serving bowl. Then, add: - 1 cup shredded carrots - 1 avocado, sliced - 1 cup green cabbage, thinly sliced On top of the veggies, layer your cooked shrimp generously. Finally, drizzle the spicy mayo over everything. For a finishing touch, sprinkle sesame seeds and fresh cilantro on top. This adds color and flavor. For the full recipe, you can refer to the earlier sections. Enjoy creating your beautiful and tasty shrimp rice bowls! To cook shrimp just right, timing is key. Aim for about 3-5 minutes. Shrimp cooks fast. You'll know they are done when they turn pink and curl slightly. Overcooking makes shrimp tough. So, watch closely as they cook. For the best texture, try not to crowd the pan. This helps shrimp cook evenly. Use medium-high heat for a nice sear. A hot pan keeps shrimp juicy and flavorful. Adjust the heat in your spicy mayo to your liking. If you want it milder, use less sriracha. You can also add a bit of honey for sweetness. This balances the heat nicely. If you want dairy-free mayo, try using avocado or a vegan mayo. Both work great! You can also use Greek yogurt for a tangy twist. Each option adds its own unique flavor to the dish. For a stunning look, arrange your ingredients well. Layer rice, veggies, and shrimp in separate sections. This makes each component pop. It’s colorful and fun to eat! Don’t forget the lime wedges! They add a bright touch and extra flavor. Squeeze some lime over the bowls just before eating. It enhances the whole dish and makes it refreshing. {{image_2}} If you want a change, try using chicken, tofu, or fish instead of shrimp. Chicken works well with the same marinade. Just cook it until it’s no longer pink. For tofu, choose firm tofu and press it to remove extra moisture. Cube it before marinating and sauté until golden. Fish like salmon or tilapia also brings a fresh twist. Season and cook them until flaky. Each option gives you a new taste and texture. For gluten-free options, use gluten-free soy sauce. This keeps the flavor without the gluten. You can also make the dish vegetarian or vegan. Swap shrimp with marinated mushrooms or tempeh. These choices add depth and are full of flavor. Use vegan mayo for the spicy sauce. This way, everyone can enjoy a tasty meal. To mix things up, explore tropical or Asian-inspired seasonings. Add coconut milk to the rice for a tropical vibe. Use lime zest and cilantro for a fresh kick. You can also try adding ginger or lemongrass to the shrimp marinade. For an Asian twist, use sesame seeds or furikake as a topping. These changes will keep your shrimp rice bowls exciting and full of flavor. For the full recipe, check out the Spicy Shrimp Crunch Rice Bowls. To store your shrimp rice bowls, let them cool down first. Place leftovers in an airtight container. This keeps moisture in and prevents odors from mixing. Make sure to cover each bowl tightly. You can also separate the spicy mayo if you prefer. This helps keep all flavors fresh. When stored properly in the fridge, these shrimp rice bowls last about three days. After that, the shrimp may not taste as good. The veggies might lose some crunch too. To enjoy the best quality, eat them within this time frame. For reheating, the best method is using the stove. Heat a non-stick pan over medium heat. Add the rice bowl and cover it with a lid. This helps keep the moisture in. Stir occasionally to heat evenly. If you use a microwave, place a damp paper towel over the bowl. This helps keep the shrimp moist. Reheat for short bursts, stirring in between. This way, you won’t lose any flavor! Yes, you can make shrimp rice bowls ahead of time. To do this, cook the shrimp and prepare the spicy mayo. You can store these in the fridge for up to two days. I recommend keeping the rice and veggies separate until you are ready to serve. This way, they stay fresh and tasty. When it's time to eat, just warm the shrimp and rice in the microwave. Then, assemble your bowls! I like using jasmine rice for shrimp rice bowls. It has a nice, fragrant flavor and pairs well with the shrimp and veggies. You can also use brown rice for a healthier option. If you want something different, try sushi rice or basmati rice. Each type will give your dish a unique taste and texture. To make fewer servings, just scale down the ingredients. If the full recipe serves four, you can easily halve everything. Use ½ lb of shrimp and 1 cup of rice. Adjust the veggies and mayo to match. Keep the cooking times the same, and your dish will still taste great! This dish has a nice kick from the spicy mayo. The sriracha gives it heat, but you can adjust it. If you prefer less spice, use less sriracha in the mayo. You can even skip it and just use plain mayo. For those who love heat, add more sriracha for a spicier kick! In this article, we explored how to create delicious shrimp rice bowls. We covered the essential ingredients, preparation steps, and tips for cooking shrimp perfectly. You learned how to customize flavors and give your dish a personal touch. In the end, shrimp rice bowls are versatile and easy to make. Feel free to experiment with different proteins and spices. Enjoy the process and have fun creating your bowl!

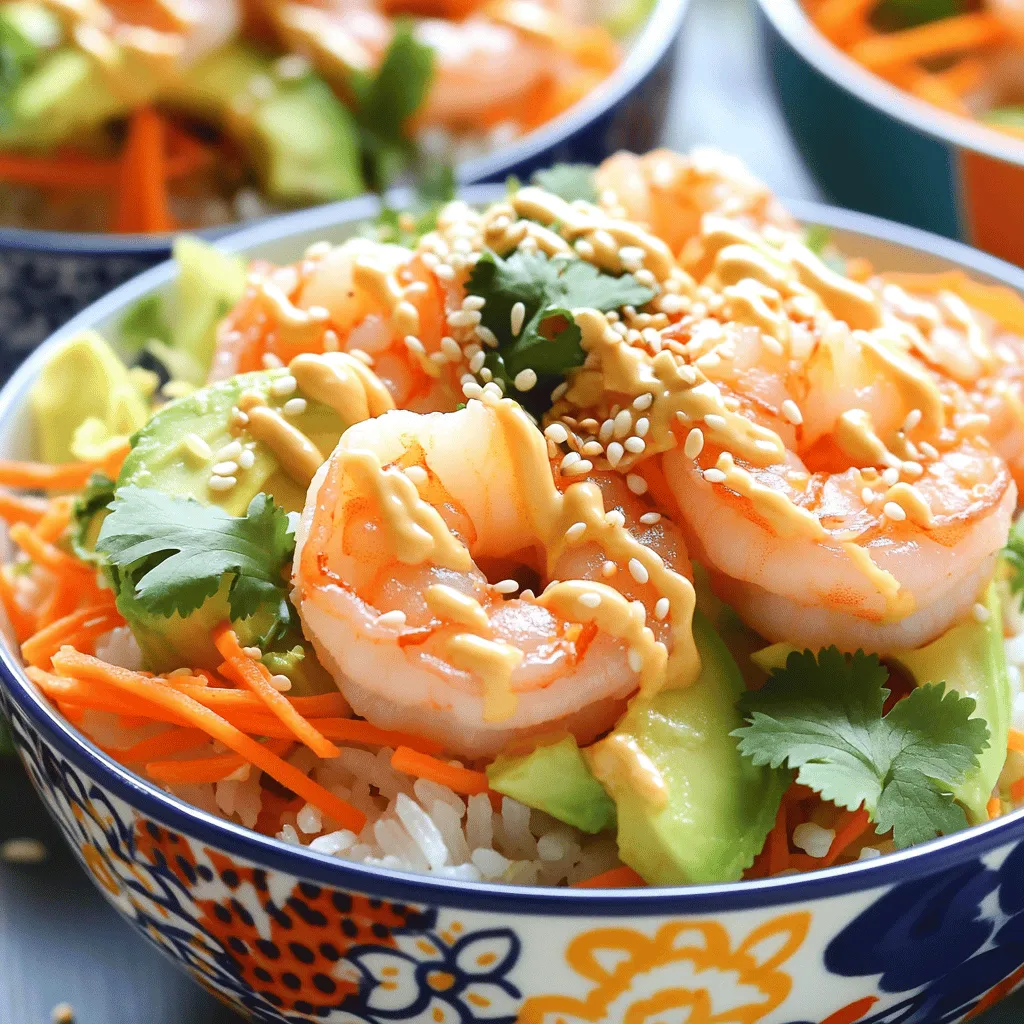
If you’re craving a quick, flavorful meal, shrimp rice bowls with spicy mayo are a perfect choice! These bowls are easy to make and packed with fresh ingredients. With tender …

Read more

Categories Dinner

Easy Buffalo Chicken Bowls Quick and Tasty Meal

June 7, 2025 by Chef Luca
To create a tasty buffalo chicken bowl, gather these key items: - 2 cups cooked quinoa - 2 chicken breasts, cooked and shredded - 1/2 cup buffalo sauce - 1 cup cherry tomatoes, halved - 1 cup corn, frozen or fresh - 1 avocado, diced - 1/2 cup shredded cheddar cheese - 1/4 cup green onions, sliced - 1/2 cup ranch dressing or Greek yogurt - Salt and pepper to taste These ingredients bring together a mix of flavors and textures. The quinoa serves as a great base, while the chicken adds protein. The buffalo sauce gives it that spicy kick you crave. You can make this meal even better with some extra toppings: - Fresh cilantro or parsley for a pop of color - Sliced jalapeños for an added kick - Crumbled feta cheese for a tangy flavor - Crunchy tortilla chips for texture These garnishes can enhance the dish and make it more fun to eat. Feel free to mix and match based on what you like. To boost the flavors in your buffalo chicken bowls, consider these seasonings: - Garlic powder for a savory touch - Onion powder for an extra layer of flavor - Smoked paprika for a smoky note - Black pepper for a spicy finish Using these seasonings can help you personalize your dish. You can adjust them to fit your taste, making every bowl a bit different. For the full recipe, check out the details above. To start, shred the cooked chicken. You can use leftover chicken or rotisserie chicken to save time. Place the shredded chicken in a large mixing bowl. Pour in the buffalo sauce. Mix well until the chicken is fully coated in the sauce. This gives the chicken a bold flavor. Now, let’s build our bowls. Take four serving bowls and divide the cooked quinoa evenly among them. Quinoa adds a nice texture and is healthy too. Next, spoon the buffalo chicken mixture on top of the quinoa. Layer the halved cherry tomatoes and corn over the chicken. These add freshness and a pop of color. Sprinkle diced avocado and shredded cheddar cheese on each bowl. For the final touch, garnish with sliced green onions. This adds a nice crunch. Drizzle ranch dressing or Greek yogurt over each bowl. This makes the dish creamy and rich. Season with salt and pepper to taste. Serve with a lime wedge on the side. This adds a burst of freshness. You can arrange the ingredients in a rainbow pattern for a fun look. Check out the Full Recipe for more details! To make the perfect buffalo chicken, start with good quality chicken breasts. Cook them until they are tender. Shredding the chicken makes it soak up the sauce better. Use your favorite buffalo sauce, but don’t be shy. Mix the sauce well with the chicken. This gives each bite a spicy kick. If you want it milder, adjust the amount of sauce. You can also add spices like garlic powder or onion powder for more flavor. Meal prepping saves time and keeps meals easy. Cook a big batch of quinoa and chicken. Store them in separate containers. You can mix them up later. This dish stays fresh in the fridge for up to four days. Pack some veggies like cherry tomatoes and corn in small bags. That way, you can grab them when you're ready to eat. It makes lunch or dinner a breeze! To get the best flavor, serve these bowls fresh. Add avocado right before eating to keep it green. A drizzle of ranch dressing or Greek yogurt adds creaminess. Squeeze a wedge of lime over the top. It brightens the whole meal. For a pop of color, arrange the ingredients in a fun way. It makes the dish look great and appetizing. Enjoy every bite of these buffalo chicken bliss bowls! You can find the full recipe in the earlier section. {{image_2}} You can easily swap out chicken for plant-based proteins. Try using chickpeas or tofu. Both options soak up flavors well. For tofu, press it to remove extra water. Then, cook it until golden brown. Toss the chickpeas or tofu with buffalo sauce just like you would with chicken. This way, you keep the spicy kick and make it vegetarian-friendly. If you love spice, add jalapeños or cayenne pepper. Both will bring heat to your bowls. You can slice fresh jalapeños and sprinkle them on top. If you like a kick in every bite, mix in some cayenne into the buffalo sauce. Just a pinch can really amp up the flavor. Adjust the spice level to your taste! Not a fan of buffalo sauce? No problem! You can try BBQ sauce for a sweet twist. Honey mustard or sriracha can also work great. Each sauce gives a different flavor profile. You can even mix sauces for a unique taste. Just remember to keep it balanced so it doesn't overpower the other flavors. To keep your buffalo chicken bowls fresh, store them in an airtight container. Make sure to separate the chicken from the quinoa and toppings if you can. This helps keep everything crispy and tasty. Use the leftovers within three days for the best flavor. Label your container with the date to track freshness. If you want to freeze your buffalo chicken bowls, use freezer-safe containers. Portion out the chicken and quinoa separately. This way, you can heat just what you need. Use within three months for the best quality. When ready to eat, let them thaw in the fridge overnight. To reheat your buffalo chicken bowls, use the microwave. Heat on high for two to three minutes, stirring halfway. You can also use the oven. Preheat to 350°F (175°C) and heat for about 15 minutes. Check that the chicken is hot all the way through. Add a splash of buffalo sauce or ranch dressing for extra flavor. For the Full Recipe, check the previous section. Yes, you can use a slow cooker! Cook the chicken breasts on low for about 6-7 hours. Add buffalo sauce halfway through for extra flavor. This method makes the chicken tender and easy to shred. If you don’t have quinoa, use rice, couscous, or cauliflower rice. These options work well and keep the meal tasty. Each substitute offers a different texture, so choose what you like best! You can store buffalo chicken bowls for 3-4 days in the fridge. Just make sure to keep them in an airtight container. For best taste, eat them within this time frame. - Full Recipe: Buffalo Chicken Bliss Bowls These Buffalo Chicken Bowls are simple and full of flavor. You learned about key ingredients, steps to make them, and tips to nail the recipe. We also explored variations like vegetarian options and spice boosters. Remember to store your leftovers well for future meals. Enjoy these bowls for a quick lunch or dinner. With easy prep and tasty results, you’ll love making this dish again and again!

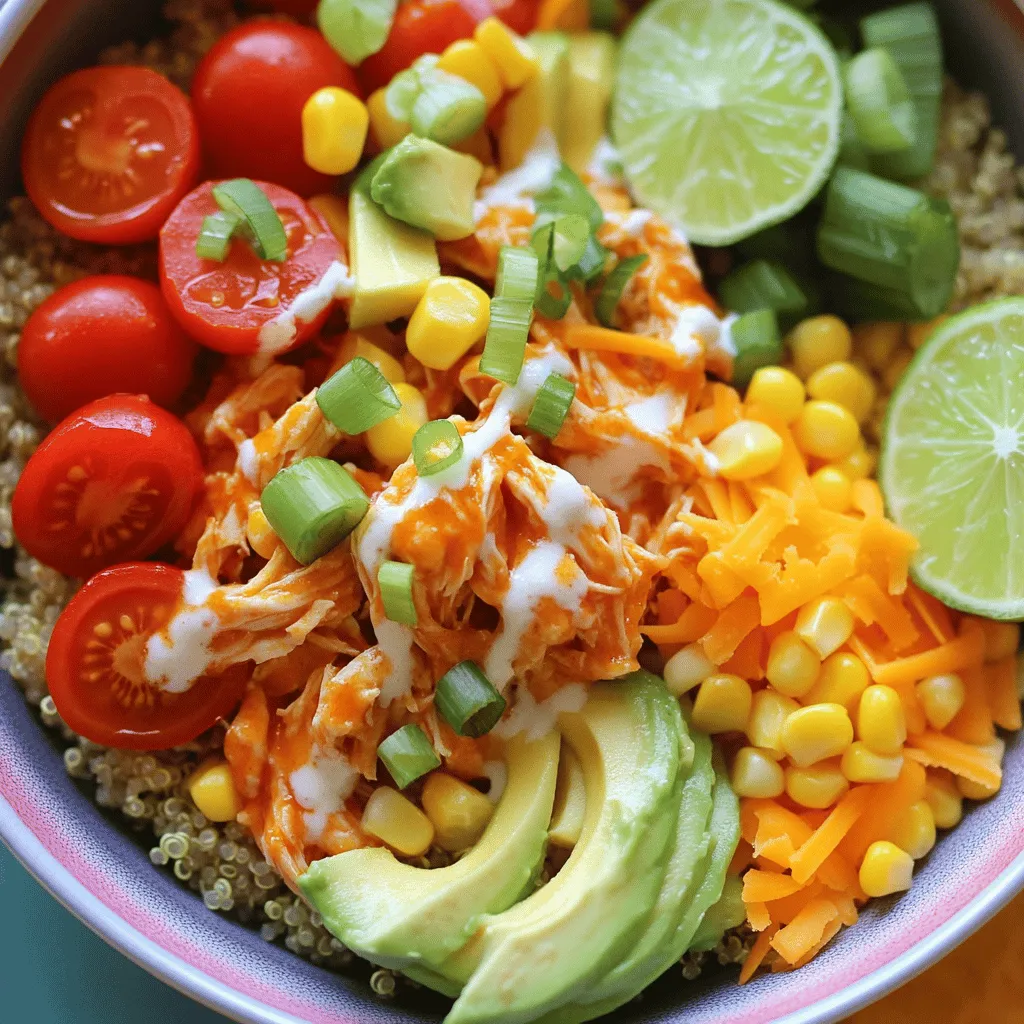
Who doesn’t love a quick, tasty meal? These Easy Buffalo Chicken Bowls are packed with flavor and simple to make. You can whip them up in no time, perfect for …

Read more

Categories Dinner

Minute Pan-Fried Noodles Quick and Tasty Recipe

January 12, 2026June 7, 2025 by Chef Luca
- 8 oz egg noodles (or ramen noodles) - 2 tablespoons vegetable oil - 1 cup mixed bell peppers, julienned (red, yellow, green) - 2 cloves garlic, minced - 1 tablespoon sesame oil - 1 teaspoon ginger, grated - 1 small carrot, julienned - 1 cup broccoli florets - Sesame seeds (for garnish) To start your Minute Pan-Fried Noodles, gather your main ingredients. You need egg noodles or ramen noodles. They bring a nice texture and soak up flavors well. The vegetable oil helps in frying and adds a little richness. Next, get your flavor elements. The garlic and ginger will give the dish a bright kick. You’ll also need sesame oil for a nutty touch that ties everything together. Don’t forget the vegetables! The bell peppers add color and crunch. The carrot and broccoli not only bring nutrition but also enhance the dish's visual appeal. Finally, sesame seeds make a lovely garnish that adds a crunch. Make sure everything is prepped before you cook. It helps to have the ingredients ready to go. This way, you can focus on cooking without rushing. {{ingredient_image_1}} - Bring salted water to a boil. - Cook noodles for about 3 minutes. Start by boiling water with a pinch of salt. The salt adds flavor to the noodles. Once the water boils, add your noodles. I like using egg noodles, but ramen works too. Cook them until they are just tender, which is usually around three minutes. When done, drain the noodles and rinse them under cold water. This stops the cooking and keeps them firm. - Julienne bell peppers and carrot. - Cut broccoli into small florets. While your noodles cook, you can prep the veggies. Grab your bell peppers and carrot. Slice them into thin strips, called julienne. This makes them cook evenly. Next, take your broccoli and cut it into small florets. Small pieces cook faster and add a nice crunch to your dish. - Heat vegetable oil in a skillet. - Add garlic and ginger, stir-fry for 30 seconds. - Stir-fry vegetables until tender-crunchy. Now, heat two tablespoons of vegetable oil in a large skillet. Use medium-high heat for best results. Once the oil is hot, add minced garlic and grated ginger. This step is key! Stir-fry them for about 30 seconds until they smell amazing. Next, toss in your bell peppers, carrot, and broccoli. Stir-fry these veggies for about three to four minutes. You want them tender but still crunchy. - Add noodles to skillet. - Drizzle with soy sauce and sesame oil. Once the veggies look good, add your cooked noodles to the skillet. Gently toss everything together. Make sure the noodles mix well with the veggies. Now, drizzle soy sauce and sesame oil over the mixture. This adds great flavor. Toss again to coat everything evenly. - Toss to combine and coat. - Garnish with green onions and sesame seeds. After everything is hot and well mixed, remove it from the heat. For the final touch, sprinkle sliced green onions and sesame seeds on top. This adds color and crunch. Serve your pan-fried noodles in bowls and enjoy the tasty dish! - Use high heat for a better stir-fry. High heat gives you crispy veggies and flavorful noodles. - Rinse noodles to stop cooking. This keeps them from becoming mushy after boiling. - Add chili flakes for spice. A pinch can transform your dish into a zesty delight. - Include protein options like shrimp or chicken. They add heartiness and make the meal more filling. - Serve in colorful bowls. Bright colors make the dish more appealing and exciting to eat. - Optional garnish suggestions include fresh herbs or more sesame seeds. These can add a touch of elegance and flavor. Pro Tips Cook Noodles Al Dente: Ensure your noodles are cooked al dente for the best texture. This prevents them from becoming mushy during stir-frying. Prep Ahead: To save time, prepare all your vegetables ahead of cooking. This allows for a quicker stir-frying process and ensures everything cooks evenly. Customize Your Veggies: Feel free to add other vegetables like snap peas, mushrooms, or zucchini based on your preference or what you have on hand. Perfect Seasoning: Taste your dish before serving and adjust the seasoning as needed. A splash more soy sauce or sesame oil can enhance the flavors significantly. {{image_2}} You can change the veggies based on what you like or have. If you want a crisp snap, try snap peas. Bok choy is another great choice. It adds a nice crunch. You can also use zucchini or mushrooms for a different taste. Each of these options brings its own flavor and texture. Mix and match to create your favorite blend! Not a fan of egg noodles? You can switch to rice noodles for a gluten-free meal. They still taste great and cook quickly. If you want something healthier, try whole grain noodles. They add more fiber and keep you full longer. Both options work well in this dish, so feel free to experiment! Sauce can change the whole dish! Instead of soy sauce, you can use teriyaki or hoisin sauce. This will give your noodles a sweet twist. You can also try different oils. For instance, sesame oil adds a rich flavor. Or use chili oil for a spicy kick. Mix it up and find your perfect sauce! You can store your leftover Minute Pan-Fried Noodles in the fridge. Place them in an airtight container. They stay fresh for up to 3 days. This helps keep the flavors intact. If you want to keep them longer, freezing is a good choice. First, let the noodles cool completely. This step helps prevent ice crystals. Use freezer-safe containers or bags. When you're ready to eat, thaw them in the fridge overnight. Reheating the noodles is simple. You can use a skillet, microwave, or steamer. Each method works well. To avoid sogginess, add a splash of water if using a microwave. Stir often to heat evenly. Enjoy your tasty noodles just like when they were fresh! It takes about 20 minutes to make Minute Pan-Fried Noodles. Here’s the breakdown: - Prep Time: 10 minutes - Cook Time: 10 minutes You can cook the noodles while you prepare the veggies. This way, everything is ready in no time. Yes, you can easily make these noodles vegetarian. Swap out meat for: - Tofu - Tempeh - Edamame These options add protein and work well with the stir-fry. You can boost the flavor with a few simple additions: - Chili flakes for heat - A splash of rice vinegar for tang - Fresh herbs like cilantro or basil Try adding these to the pan during cooking for extra taste. Yes, you can make these noodles ahead. Here’s how: - Meal Prep: Cook and store in the fridge for up to 3 days. - Storage: Use an airtight container to keep them fresh. When ready to eat, just reheat in a skillet and enjoy! In summary, this blog post guides you through making delicious Minute Pan-Fried Noodles. You learned about the key ingredients, step-by-step cooking instructions, and helpful tips. Experiment with different vegetables, sauces, or proteins to find your favorite flavor. Remember, adjusting the recipe can lead to unique dishes every time. Storing leftovers properly keeps them tasty and fresh. Enjoy your cooking adventure and savor each bite of your homemade noodles!

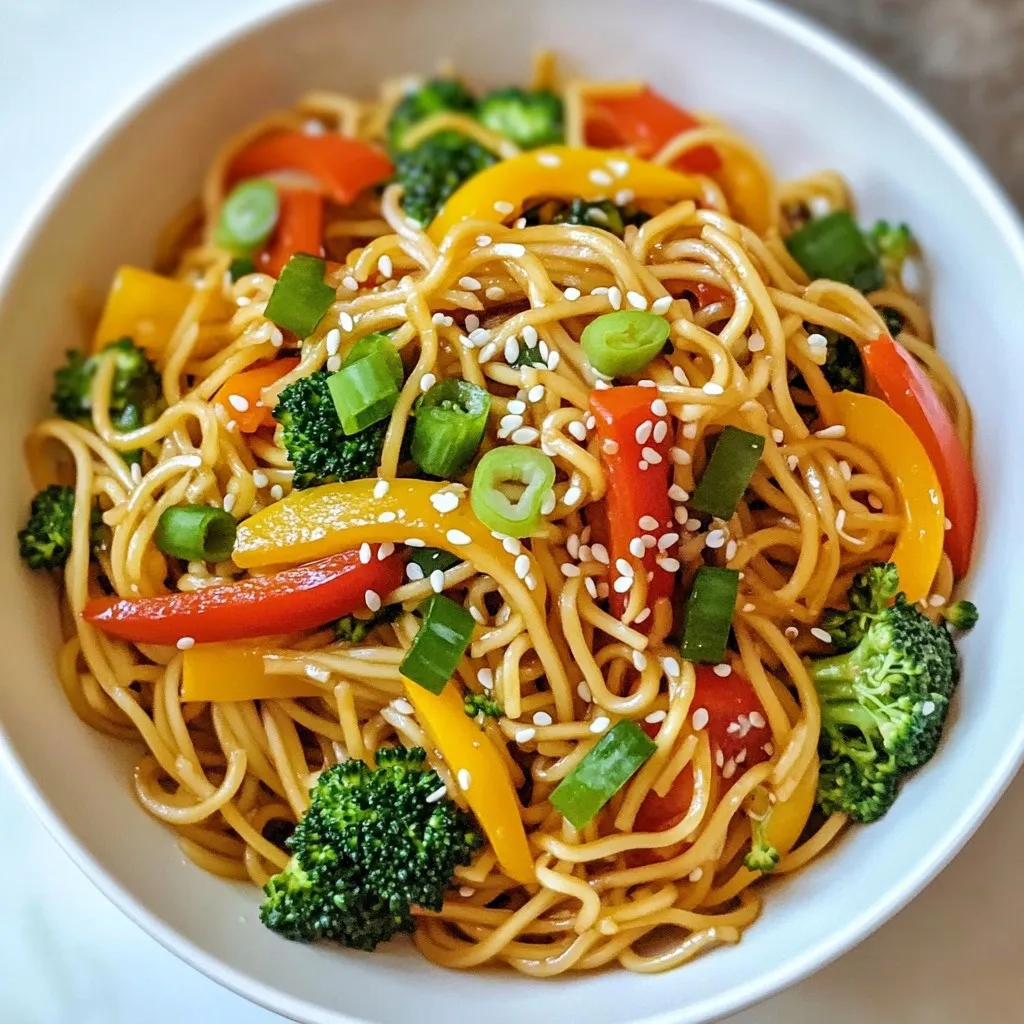
If you need a quick and tasty meal, Minute Pan-Fried Noodles are a perfect choice! This easy recipe comes together in just a few minutes and packs a lot of …

Read more

Categories Dinner

Slow Cooker Garlic Butter Beef Bites & Potatoes Recipe

June 6, 2025 by Chef Luca
For this tasty dish, gather the following ingredients: - 2 lbs beef sirloin, cut into bite-sized pieces - 4 cups baby potatoes, halved - 1/2 cup unsalted butter, melted - 6 cloves garlic, minced - 1 tablespoon fresh rosemary, chopped - 1 tablespoon fresh thyme, chopped - 1 teaspoon onion powder - Salt and pepper to taste - 1 cup beef broth - 2 tablespoons olive oil This list gives you everything you need to create a delicious meal. Using fresh herbs adds a bright flavor. Fresh rosemary and thyme bring out the best in your dish. They have a vibrant taste that dried herbs cannot match. However, if you only have dried herbs, that's okay! Use one-third the amount of dried herbs as a substitute. The flavor will be different but still good. You can make this recipe your own with some simple swaps. For a different protein, try chicken or pork. If you want a vegetarian option, use mushrooms instead of beef. They soak up flavors well. If you don’t have baby potatoes, any potato variety works. Just chop them into similar-sized pieces. For a kick, add some red pepper flakes or a splash of hot sauce. These changes let you play with flavors while keeping the core recipe intact. Check out the Full Recipe for more tips! Start by gathering all your ingredients. This will help you stay organized. I recommend using fresh herbs for the best flavor. Measure out your beef, potatoes, butter, and spices. You will need 2 pounds of beef sirloin and 4 cups of baby potatoes. Make sure to cut the beef into bite-sized pieces. This will ensure they cook evenly. Searing the beef is a fun step. It adds a rich flavor. Heat 2 tablespoons of olive oil in a skillet over medium-high heat. Once the oil is hot, add the beef bites. Cook them for 2-3 minutes on each side. You want them browned but not fully cooked. If you skip this step, just add the beef directly to the slow cooker. In a large bowl, mix melted butter, minced garlic, rosemary, thyme, onion powder, salt, and pepper. Toss the beef bites in this mixture. Make sure they are well-coated. Next, transfer the beef to your slow cooker. Place the halved baby potatoes on top. Pour in 1 cup of beef broth. Ensure the beef and potatoes are submerged in the liquid. Now, cover your slow cooker and set it to low for 6-8 hours. If you are short on time, use the high setting for 3-4 hours. When the cooking time is up, check if the beef is tender and the potatoes are soft. Adjust the seasoning if needed. Serve hot, and don't forget to drizzle the garlic butter sauce over each serving. Enjoy this hearty meal! For the complete instructions, check the Full Recipe. To get that perfect tenderness in your beef bites, choose sirloin. This cut cooks well in a slow cooker. You should cook on low for 6-8 hours. This long cooking time helps break down the meat fibers. If you’re in a hurry, cook on high for 3-4 hours. Just remember, the longer you cook, the more tender the beef will be. To boost flavor, consider adding a splash of Worcestershire sauce. This sauce adds depth and richness. You can also toss in some vegetables like carrots or bell peppers. They add texture and taste. Fresh herbs like parsley or chives will brighten the dish. Add them just before serving for the best flavor. Serve your beef bites and potatoes on a large, beautiful platter. Drizzle the garlic butter sauce over the top. This makes the dish look inviting. Garnish with fresh rosemary or thyme for a pop of color. Serve with crusty bread to soak up the sauce. This makes for a cozy, hearty meal. For the full recipe, check the earlier sections. {{image_2}} You can easily adapt this recipe to be vegetarian or vegan. Instead of beef, use hearty vegetables like mushrooms, eggplant, or jackfruit. These options give you a similar texture. For the butter, swap it out with vegan butter or olive oil. Use vegetable broth in place of beef broth. The garlic and herbs will still bring great flavor to your dish. If you want to switch up the protein, try chicken or pork. Cut chicken breasts or thighs into bite-sized pieces. For pork, use tenderloin or shoulder. The cook times may change slightly. Chicken usually cooks faster than beef, so check for doneness after 4 hours on low. Always ensure your meat is fully cooked for safety. Feel free to play with different spices and herbs. Instead of rosemary and thyme, try Italian seasoning or a blend of paprika and cumin for a smoky taste. You can also add a splash of soy sauce or Worcestershire sauce for depth. Experimenting with flavors can lead to a new favorite version of this dish. For the full recipe, be sure to check the original version. After you enjoy your meal, store leftovers in an airtight container. Make sure to cool the beef bites and potatoes first. Place the container in the fridge. They will stay fresh for about 3 to 4 days. To reheat, take the beef and potatoes out of the fridge. You can warm them in the microwave. Use a microwave-safe dish and cover it loosely. Heat in short bursts for 1-2 minutes. Check if it’s hot enough, and stir if needed. You can also reheat on the stove over low heat. This helps keep the meat tender. If you want to keep your leftovers longer, freezing is a good option. Place the cooled beef and potatoes in a freezer-safe bag. Remove as much air as possible to avoid freezer burn. They can last for about 2-3 months in the freezer. To eat, let them thaw in the fridge overnight before reheating. For the complete recipe, check out the Full Recipe section above. The cook time depends on your slow cooker setting. For low heat, cook for 6-8 hours. For high heat, 3-4 hours works best. The beef should be tender, and the potatoes should be soft. I always check the meat with a fork. If it falls apart easily, it’s ready to eat! Yes, you can use frozen beef or potatoes. Just remember to add extra cooking time. If you cook on low, it may take 1-2 hours longer. For high heat, add about 30 minutes. Thawing them first is best, but if you’re in a hurry, throw them in frozen. Just keep an eye on the doneness. To make this recipe gluten-free, use gluten-free beef broth. Most brands offer gluten-free options. Check the labels to be sure. Also, avoid any sauces or seasonings that contain gluten. The rest of the ingredients are naturally gluten-free, so you can enjoy this dish worry-free! For the full recipe, check the link to make your cooking easier! In this blog post, we covered key ingredients and their importance in slow cooking. Fresh and dried herbs affect flavor, while suggested substitutions help you adapt. I shared step-by-step instructions for easy preparation and cooking. Tips helped ensure perfect tenderness and added flavor. Finally, don’t forget about the variations and storage tips. You can change proteins and seasonings to match your taste. With these ideas, your meals will be tasty and satisfying. Enjoy your cooking journey!

If you’re craving a cozy meal that’s packed with flavor, look no further! My Slow Cooker Garlic Butter Beef Bites & Potatoes recipe is here to save your dinner time. …

Read more

Categories Dinner

Blueberry Pastry Rings with Vanilla Cream Delight

June 6, 2025 by Chef Luca
To make these delightful Blueberry Pastry Rings, gather these simple ingredients: - 1 sheet of puff pastry, thawed - 1 cup fresh blueberries - 1 tablespoon sugar (for blueberries) - 1 egg (for egg wash) For the creamy filling, you will need: - 1 teaspoon vanilla extract - 1 cup heavy whipping cream - 1/2 cup powdered sugar - 1 teaspoon cornstarch - Zest of 1 lemon - A pinch of salt To take your pastry rings to the next level, consider these optional add-ins: - A splash of almond extract for a nutty touch. - A sprinkle of cinnamon for warmth. - Fresh mint leaves for garnish. These ingredients add a unique twist to the dish. You can find the full recipe above, which details how to bring all these flavors together. First, grab 1 cup of fresh blueberries. Place them in a small bowl. Add 1 tablespoon of sugar. This sugar helps the blueberries release their juices. Let them sit for about 10 minutes. This process is called macerating. You will see some juice at the bottom of the bowl. This juice adds flavor to your pastry rings. Now, take 1 sheet of thawed puff pastry. Roll it out on a lightly floured surface. It should be about 1/4 inch thick. Use a round cutter to cut out rings. You can also use a large glass for the outer circle. Then, use a smaller glass for the inner circle. This creates a donut shape. After cutting, beat 1 egg in a small bowl. Brush the egg wash on the edges of the pastry rings. This gives them a nice golden color when baked. Place the rings on a parchment-lined baking sheet. While the pastry bakes, let’s make the filling. In a mixing bowl, pour in 1 cup of heavy whipping cream. Start whipping until soft peaks form. Gradually add 1/2 cup powdered sugar, 1 teaspoon cornstarch, 1 teaspoon vanilla extract, the zest of 1 lemon, and a pinch of salt. Keep whipping until stiff peaks form. This cream will be rich and flavorful. Once the pastry rings cool, it’s time to fill them. Take a piping bag or a spoon. Fill each center with the vanilla cream. Make sure to fill them well. Top each ring with the macerated blueberries. Arrange your lovely pastry rings on a platter. For a nice touch, you can dust them with extra powdered sugar. Enjoy your delicious Blueberry Pastry Rings with Vanilla Cream! You can find the full recipe in the previous sections. One mistake is not rolling the puff pastry thin enough. Thin pastry puffs better. Another issue is overbaking the pastry. Watch closely for a golden brown color. If the cream is not whipped enough, it will not hold its shape. Always whip until stiff peaks form. Lastly, don’t skip letting the blueberries sit with sugar. This step brings out their sweet juices. To get that perfect puff, keep your pastry cold. Warm pastry will not rise well. Preheating the oven is essential. The heat helps the layers expand. Brush the edges with egg wash for a beautiful shine. Bake the rings on a parchment-lined sheet for easy release. Avoid opening the oven door too soon; this can cause the pastry to collapse. For a beautiful presentation, use a clean platter. Arrange the pastry rings in a circle. This draws the eye and looks inviting. Dust the tops with powdered sugar for a sweet touch. Add fresh mint leaves for color. You can also drizzle some of the blueberry juices around the plate. This adds flair and makes it more appealing. For the full recipe, click here! {{image_2}} You can swap blueberries for many fruits. Consider using raspberries or strawberries. They add a bright flavor and beautiful color. Peaches or cherries also work well. Just remember to adjust the sugar based on the fruit's sweetness. For tart fruits, like raspberries, add more sugar. If you are adventurous, try a mix of fruits for a fun twist! If you want a dairy-free version of the vanilla cream, use coconut cream. Chill a can of full-fat coconut milk overnight. Then scoop out the solid part and whip it. It will be creamy and rich. You can also use almond milk or oat milk in place of heavy cream. Add a thickener like cornstarch to help it hold shape. To change the flavor of the cream filling, add different extracts. Almond extract gives a nutty touch. Lemon zest brightens the flavor. You can even add a spoonful of fruit puree for a fruity twist. Try mixing in chocolate or espresso powder for a decadent treat. These small changes can make your pastry rings even more special. For the full recipe, check out the details. Keep your blueberry pastry rings fresh by storing them properly. Place them in an airtight container. This helps avoid moisture loss and keeps them crisp. If you plan to eat them within two days, store them at room temperature. For longer storage, keep them in the fridge. To enjoy leftover pastry rings, you can reheat them easily. Preheat your oven to 350°F (175°C). Place the pastry rings on a baking sheet. Heat for about 5 to 10 minutes. This will help retain their flaky texture. Avoid using the microwave, as it can make the pastry soggy. If you want to freeze your pastry rings, follow these steps. First, let the baked rings cool completely. Then, wrap each one tightly in plastic wrap. Place the wrapped rings in a freezer-safe bag or container. They can last up to three months in the freezer. When you’re ready to enjoy them, thaw in the fridge overnight, then reheat in the oven. For the full recipe, check out the earlier sections. Yes, you can use frozen blueberries. Just thaw them first. Drain excess juice before mixing with sugar. This helps keep your pastry rings crisp. Frozen berries may not hold their shape as well, but they still taste great. These pastry rings taste best when eaten fresh. They can stay fresh for up to two days if stored in an airtight container. After that, they may get soggy. To keep them crisp, store the filling separately. You can use full-fat coconut milk or a dairy-free cream. Both options whip well and provide a rich taste. Alternatively, you can use Greek yogurt for a tangy twist. Just note that this will give a different texture and flavor. For the complete recipe, check out the Full Recipe section. Blueberry pastry rings are a delightful treat. We covered the key ingredients and their roles. You learned how to prepare, assemble, and present these tasty rings. I shared tips to avoid mistakes and variations to try. Remember, you can use frozen blueberries and store leftovers with ease. Enjoy experimenting with different fillings and flavors. These pastries are fun to make and delicious to eat. Give this recipe a try and impress your friends and family!

Get ready to impress your taste buds with Blueberry Pastry Rings filled with creamy vanilla delight! These sweet treats are simple to make and perfect for any occasion. Whether you’re …

Read more

Categories Desserts

Baked Garlic Parmesan Potato Wedges Crispy Delight

June 6, 2025 by Chef Luca
- 4 large russet potatoes - 3 tablespoons olive oil - 4 cloves garlic - 1 cup grated Parmesan cheese - 1 teaspoon paprika - 1 teaspoon dried oregano - 1 teaspoon salt - ½ teaspoon black pepper - Fresh parsley (for garnish) - Alternative seasonings (like cayenne pepper or Italian seasoning) - Cheese variations (such as mozzarella or cheese blends) - Baking sheet - Parchment paper - Mixing bowl - Knife - Cutting board Gathering the right ingredients is key for great baked garlic Parmesan potato wedges. Start with russet potatoes for their sturdy texture. Their starch helps create that crispy outside. Use fresh garlic for the best flavor. Grated Parmesan adds a nice salty note. You can play with optional ingredients. Add cayenne pepper for heat or Italian seasoning for more flavor. For cheese lovers, try mozzarella or a blend of cheeses. This makes the dish extra cheesy and delicious. Tools are simple and easy to find. A baking sheet keeps the wedges flat as they cook. Parchment paper makes clean-up easy. A mixing bowl is perfect for tossing all the ingredients. Use a knife and cutting board to cut the potatoes into wedges. Once you have everything ready, check out the full recipe for steps to make these tasty potato wedges. You'll enjoy the cooking process and the great results! - Preheat the oven to 425°F (220°C). - Cut russet potatoes into wedges. The first step is easy. Start by preheating your oven. This ensures the wedges cook evenly and get nice and crispy. While the oven heats up, grab your russet potatoes. Wash them well and then slice them into wedges. Aim for uniform sizes. This helps them cook at the same rate. - Combine olive oil and minced garlic in a mixing bowl. - Add the spices and mix thoroughly. Now, let’s make the tasty mixture. In a bowl, add olive oil and minced garlic. Mix them well. The garlic will give the potatoes great flavor. Next, sprinkle in the paprika, oregano, salt, and black pepper. Stir everything together until it's well combined. This mixture will coat the potatoes perfectly. - Coat potato wedges in the mixture. - Sprinkle Parmesan and arrange on the baking sheet. - Bake for 30-35 minutes, turning halfway. Time to coat the wedges! Toss the potato wedges in the garlic mixture. Make sure each wedge gets a good coating. Then, sprinkle the grated Parmesan cheese over the top. This adds a crunchy, cheesy layer. Place the coated wedges on a baking sheet lined with parchment paper. Make sure they are in a single layer. This helps them bake evenly. Bake for 30-35 minutes, flipping them halfway. When they are golden brown and crispy, they are ready to serve. For the full recipe, check the instructions above. To get crispy baked garlic Parmesan potato wedges, lay them out in a single layer. This way, all sides can get nice and golden. Overcrowding the baking sheet leads to steaming, not baking. Space is key for that perfect crunch. You can mix up the seasonings to fit your taste. Try adding a pinch of cayenne for heat or lemon zest for brightness. Always use freshly grated Parmesan for the best melting. This cheese adds a rich flavor that store-bought pre-grated cheese just can't match. These wedges pair well with many dipping sauces. Try ranch or marinara for a tasty treat. They also make a great side dish for grilled meats. A plate of these wedges next to burgers or chicken will impress your guests and family alike. Check the [Full Recipe] for more ideas! {{image_2}} You can take your baked garlic Parmesan potato wedges to the next level! Adding jalapeños gives them a spicy kick. Slice fresh jalapeños and mix them in when you toss the potatoes. If you love cheese, try cheddar or even a blend of cheeses. They melt nicely and add great flavor. If you want a vegan dish, use vegan cheese instead of Parmesan. Many brands offer tasty alternatives that melt well. For gluten-free options, replace regular coating with cornstarch. This keeps the wedges crispy without any gluten. Want a quicker option? Use an air fryer! It cooks the wedges fast and makes them super crispy. Just adjust the time and temperature to match your air fryer’s settings. If it’s summer, consider grilling them. Grilling adds a smoky flavor that works great with garlic and cheese. After enjoying your baked garlic Parmesan potato wedges, store them right. Place them in an airtight container. This keeps them fresh. Consume leftovers within 3-4 days for the best taste. You want them crispy and flavorful, right? When it’s time to reheat, the oven is your best friend. Preheat your oven to 400°F (200°C). Place the wedges on a baking sheet. Heat for about 10-15 minutes. This way, they stay crispy. If you're in a hurry, use the microwave. Heat them for 30 seconds to 1 minute. They won’t be as crispy, but they’ll still taste good. You can freeze baked potato wedges for later. First, let them cool completely. Then, place them in a single layer on a baking sheet. Freeze them for about 1-2 hours until firm. After that, transfer them to a freezer bag. For best taste, use them within 1-2 months. To reheat, thaw in the fridge overnight. Then, follow the oven reheating steps. Enjoy your crispy delight anytime! You can tell potato wedges are done by checking their texture and color. Look for a golden-brown color on the outside. The wedges should be crispy and firm. If you poke them with a fork, they should feel soft inside. This means they are cooked through. Yes, you can use other types of potatoes. Sweet potatoes are a great option. They add a nice sweetness and a unique flavor. Yukon Gold potatoes also work well. They have a buttery taste and creamy texture. Just keep in mind that cooking times may vary slightly. Leftover baked garlic Parmesan potato wedges are very versatile. You can slice them and add them to salads for extra crunch. They make a great topping for pizzas too. You could also mash them up and use them in a breakfast hash. Get creative and enjoy! To sum up, we explored how to make delicious baked garlic Parmesan potato wedges. We covered essential ingredients, providing options to customize flavors and textures. You learned step-by-step instructions for preparation, baking, and serving suggestions. Remember, experimenting with toppings and methods can create unique dishes. Whether you dress them up or enjoy them plain, these wedges are a satisfying choice. Store leftovers properly for future meals, ensuring you enjoy every last bite. Happy cooking!

Welcome to a crispy delight that will transform your snacking game! Baked Garlic Parmesan Potato Wedges are not just any side dish; they are the perfect blend of crunch and …

Read more

Categories Appetizers

Cheesy Beef and Bowtie Pasta in Garlic Butter Delight

June 6, 2025 by Chef Luca
To make Cheesy Beef and Bowtie Pasta in Garlic Butter, gather the following items: - 8 oz bowtie pasta - 1 lb ground beef - 4 cloves garlic, minced - 1 cup shredded cheddar cheese - 1 cup shredded mozzarella cheese - 1/2 cup cream cheese, softened - 1/4 cup grated Parmesan cheese - 1/4 cup butter - 1 teaspoon Italian seasoning - Salt and black pepper to taste - Fresh parsley, chopped (for garnish) These ingredients come together to create a rich and creamy dish. Each item plays a key role in the flavor and texture. The ground beef provides protein, while the cheeses add a delightful creaminess. Garlic adds a savory touch that elevates the whole dish. To keep your pasta perfect, choose good-quality bowtie pasta. This shape holds sauce well, making each bite full of flavor. Fresh parsley not only brightens the dish but adds a pop of color. For a twist, you can swap some ingredients. Try using turkey instead of beef for a lighter option. You can also use dairy-free cheese if you prefer. The Full Recipe provides all the steps to bring these ingredients together into a delicious meal. To start, bring a large pot of salted water to a boil. Add the bowtie pasta and cook it until it is al dente. This usually takes about 8-10 minutes. You want it firm but not hard. Once done, drain the pasta in a colander. Don’t forget to save about 1/2 cup of the pasta water. This starchy water is key for making the sauce creamy. Next, grab a large skillet and set it over medium heat. Add the butter and let it melt completely. Once melted, toss in the minced garlic. Sauté it for 1-2 minutes. You want it fragrant but not brown. Then, add the ground beef to the skillet. Break it apart with a spatula as it cooks. Season with salt, black pepper, and Italian seasoning. Cook until the beef turns brown and is cooked through, which takes about 5-7 minutes. Now, it’s time to bring it all together. Stir in the softened cream cheese with the beef until it melts and mixes well. Next, add the drained bowtie pasta to the skillet. Pour in some of that reserved pasta water to help combine everything smoothly. Mix until the pasta is well-coated with the creamy beef mixture. Finally, remove the skillet from heat and stir in the shredded cheddar, mozzarella, and Parmesan cheeses. Keep mixing until the cheeses melt and become creamy. Taste your dish and adjust the seasoning if needed. For the full recipe, refer to the previous section. To cook bowtie pasta al dente, start with a large pot of salted water. Bring it to a rolling boil before adding the pasta. Stir the pasta occasionally to prevent sticking. Follow the package's cooking time but check a minute before it's done. The pasta should be firm yet tender. Drain it well but save some pasta water for later. To stop cheese from clumping, warm it gently. Remove the skillet from heat before adding cheese. Stir it in slowly, allowing each layer to melt before adding more. This keeps the cheese smooth and creamy. If you want alternatives to ground beef, try ground turkey or chicken. They offer lighter options and are easy to cook. You could also use lentils for a vegetarian choice. Lentils add a lovely texture and soak up flavors well. For those who need dairy-free options, look for plant-based cheese. Many stores carry vegan cheddar or mozzarella that melts nicely. You can also use cashew cream for a rich, creamy taste without dairy. Cheesy Beef and Bowtie Pasta pairs well with simple sides. A fresh green salad with vinaigrette balances the rich flavors. Garlic bread is another great choice for dipping and adds a crunchy texture. For a beautiful finish, garnish the dish with freshly chopped parsley. You can also sprinkle extra cheese on top for more flavor. A few red pepper flakes can add a nice touch for those who enjoy a bit of heat. {{image_2}} You can switch ground beef for chicken or turkey. These lean meats work well. They soak up the garlic butter flavor. You can also use shredded rotisserie chicken for ease. For a vegetarian twist, try mushrooms instead of meat. Sauté them with garlic for a rich taste. They add a nice texture and flavor. To boost taste, add veggies like spinach or bell peppers. They bring color and nutrients. Sauté them with the garlic before adding the beef. For those who like heat, sprinkle chili flakes or add hot sauce. This adds a spicy kick to your dish. Adjust the level of spice to your liking. You can use various cheeses for unique flavors. Try gouda or pepper jack for something different. They melt beautifully and change the taste. A mix of cheeses can create depth. Pair cheddar with mozzarella for a classic combo. Grate fresh cheese right before using it for the best melt. You can find the full recipe to explore all these ideas! To store leftovers, cool the pasta first. Let it sit for about 30 minutes at room temperature. Once cooled, place it in an airtight container. Glass or plastic containers work well. Store it in the fridge for up to three days. Reheat your cheesy beef and bowtie pasta gently. You can use a microwave or a skillet. If using a microwave, add a splash of water to keep it moist. Cover it to trap steam as it heats. For the skillet, add a bit of butter and stir often to avoid drying. This will help keep the creaminess intact. If you want to freeze the dish, allow it to cool completely first. Portion it into freezer-safe bags or containers. Remove as much air as possible to prevent freezer burn. It can last for up to three months in the freezer. To thaw, place it in the fridge overnight. Reheat it in the microwave or on the stove, just like before. This keeps it creamy and delicious. For the full recipe, check out the guide I provided earlier. It takes about 30 minutes to make this dish. The prep time is around 15 minutes, while cooking takes about 15 minutes. You can quickly gather your ingredients and start cooking. Yes, you can prepare it ahead of time. Cook the pasta and beef, then mix with cheese. Store it in the fridge for up to two days. When ready to eat, just reheat it gently. Adding a splash of water can help keep it moist. This dish pairs well with simple sides. Try a fresh garden salad or garlic bread. Steamed veggies like broccoli or green beans also make great companions. They add color and nutrition to your meal. Absolutely! Kids love cheesy flavors and pasta shapes. The soft texture makes it easy to eat. You can adjust the seasoning to suit their tastes. Even picky eaters often enjoy this dish. It’s a fun, tasty meal for the whole family. For the full recipe, check out the details above! This post shared a fun and tasty recipe for Cheesy Beef and Bowtie Pasta. We covered all the key ingredients, with tips for cooking and serving. You can easily customize the dish with different proteins and flavors. Make sure to store leftovers properly for future meals. This recipe is simple, making it perfect for families. Try it out, and enjoy every creamy bite with loved ones. You’ll be a star at your next meal!

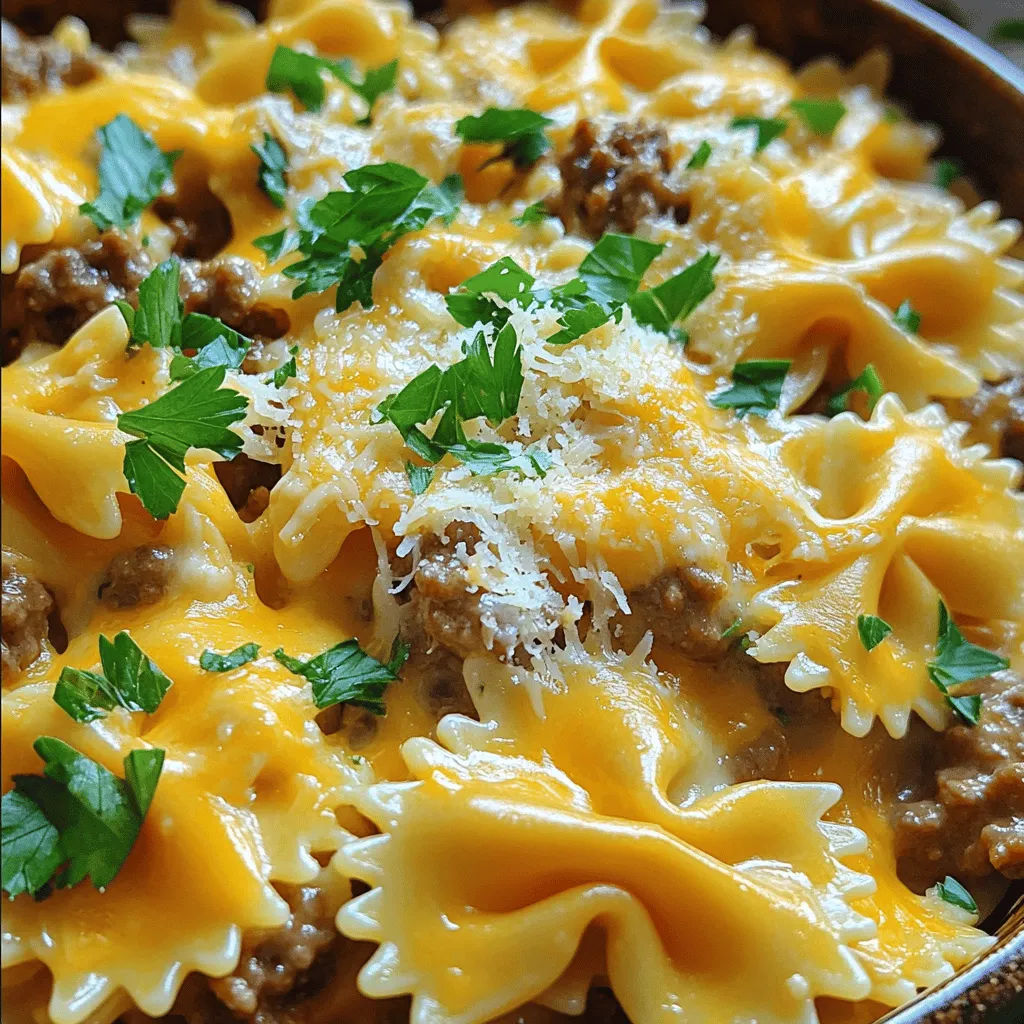
Get ready to dive into a delicious dish that will wow your taste buds! My Cheesy Beef and Bowtie Pasta in Garlic Butter Delight is simple, quick, and bursting with …

Read more

Categories Dinner
Older posts
Newer posts
← Previous Page1 … Page102 Page103 Page104 … Page122 Next →

STIRRED RECIPES

Where every dish begins with a stir! 🍲✨

PAGES

Home About Contact Privacy Policy Terms & Conditions Cookie Policy GDPR Policy Copyright Policy Disclaimer

CATEGORIES

Appetizers Desserts Salads Breakfast Dinner

Contact

  • Pinterest
  • Mail
Copyright © 2026 Stirred Recipes. All rights reserved.