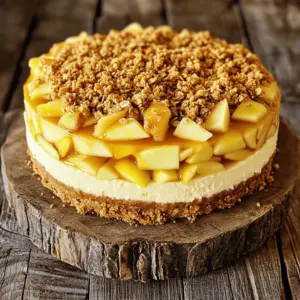
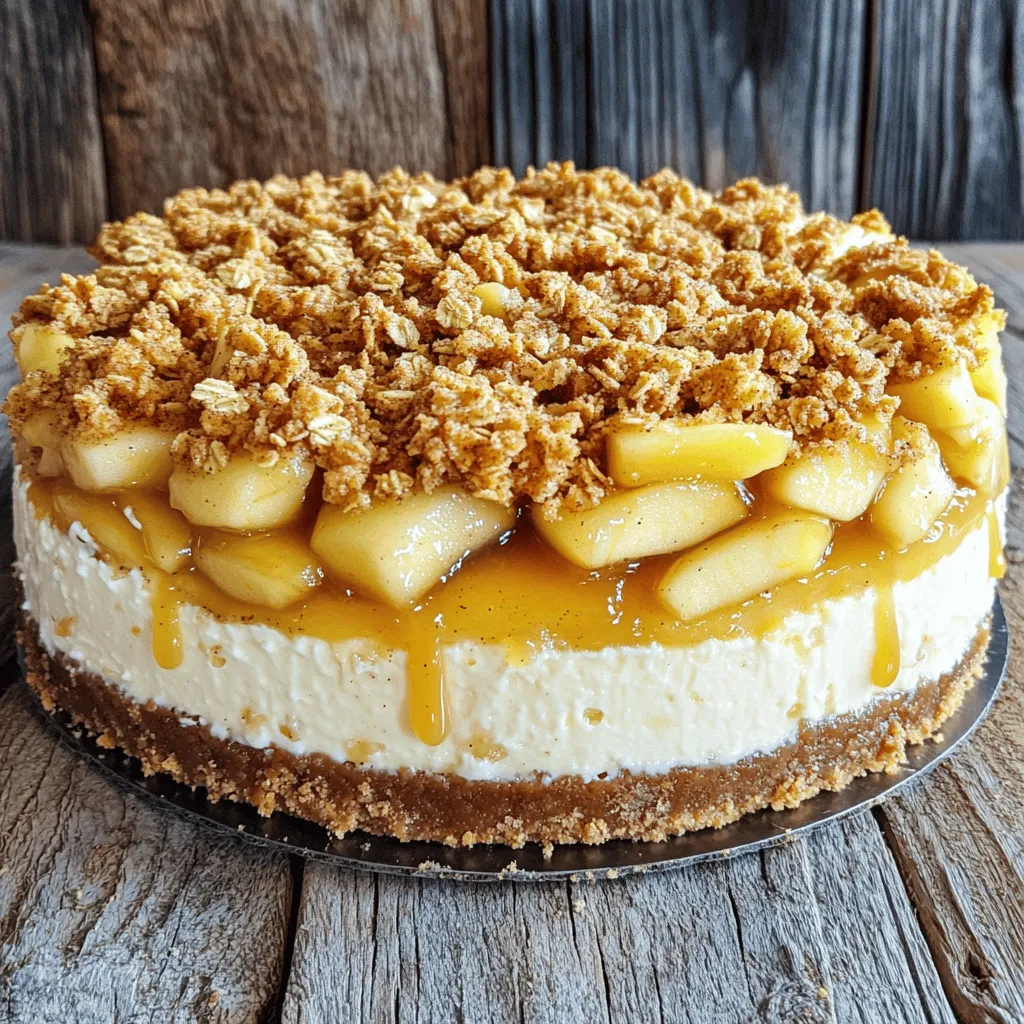
Are you ready to impress your family and friends with a dessert that combines sweet, tart apples and creamy cheesecake? The Apple Crisp Cheesecake is a showstopper that will have everyone begging for seconds. In this post, I’ll share my detailed recipe, tips, and variations to make it a perfect fit for any occasion. Let’s dive in and create this mouthwatering treat together!
Ingredients
Complete Ingredient List
To make a great apple crisp cheesecake, you need these ingredients:
– For the Crust:
– 1 ½ cups graham cracker crumbs
– ⅓ cup granulated sugar
– ½ cup unsalted butter, melted
– For the Cheesecake Filling:
– 24 oz cream cheese, softened
– 1 cup granulated sugar
– 3 large eggs
– 1 teaspoon vanilla extract
– 1 teaspoon cinnamon
– For the Apple Filling:
– 3 cups apples, peeled, cored, and diced (sweet varieties like Honeycrisp or Fuji work well)
– ¼ cup brown sugar
– 1 teaspoon cinnamon
– 1 tablespoon lemon juice
– For the Crisp Topping:
– 1 cup rolled oats
– ½ cup all-purpose flour
– ½ cup brown sugar
– ½ teaspoon cinnamon
– ½ cup unsalted butter, melted
Ingredient Substitutions
You can swap some ingredients based on your needs:
– Graham Cracker Crumbs: Use crushed cookies or gluten-free alternatives for crust.
– Cream Cheese: Neufchâtel works if you want a lighter cheesecake.
– Granulated Sugar: Coconut sugar can replace granulated sugar for a healthier choice.
– Apples: Other sweet apples like Gala or Golden Delicious can be used.
– Butter: Coconut oil can replace butter for a dairy-free version.
Nutritional Information per Serving
Each slice of this apple crisp cheesecake has about:
– Calories: 350
– Total Fat: 20g
– Saturated Fat: 10g
– Cholesterol: 85mg
– Sodium: 250mg
– Total Carbohydrates: 38g
– Dietary Fiber: 2g
– Sugars: 22g
– Protein: 5g
This dessert, while indulgent, offers a delightful treat. For the full recipe, check out the detailed instructions.
Step-by-Step Instructions
Prepping the Oven and Equipment
Start by preheating your oven to 325°F (160°C). This step is key to getting the cheesecake just right. Next, grab a 9-inch springform pan. This type of pan helps the cheesecake come out easily. Line the bottom with parchment paper for easy removal later.
Preparing the Crust
In a medium bowl, mix 1 ½ cups of graham cracker crumbs, ⅓ cup of granulated sugar, and ½ cup of melted unsalted butter. Use a fork to combine the ingredients until they look like wet sand. Press this mixture into the bottom of your springform pan. Bake it for 10 minutes. This gives your crust a nice, firm base. Let it cool while you make the rest.
Making the Apple Filling
For the apple filling, take 3 cups of peeled and diced apples. Sweet apples like Honeycrisp or Fuji work best. In a bowl, mix the apples with ¼ cup of brown sugar, 1 teaspoon of cinnamon, and 1 tablespoon of lemon juice. Stir until the apples are well-coated. Set this mixture aside so the flavors can blend.
Creating the Cheesecake Filling
In a large bowl, beat 24 oz of softened cream cheese with an electric mixer until it is smooth. Gradually add 1 cup of granulated sugar while mixing. Add 3 large eggs one at a time, mixing until just combined. Finally, stir in 1 teaspoon of vanilla extract and 1 teaspoon of cinnamon. This mixture should be creamy and fluffy.
Assembling the Layers
Start by pouring half of the cheesecake filling into your cooled crust. Then, add the apple filling on top, spreading it evenly. Finally, add the rest of the cheesecake filling over the apples. Smooth the top with a spatula for an even layer.
Baking and Cooling Instructions
Now, let’s make the crisp topping. In a bowl, mix 1 cup rolled oats, ½ cup all-purpose flour, ½ cup brown sugar, and ½ teaspoon cinnamon. Drizzle in ½ cup of melted butter. Stir until crumbly. Sprinkle this topping over the cheesecake layers. Bake everything in the oven for 55-60 minutes. The center should be set but still jiggle slightly. Once done, turn off the oven and crack the door open. Let the cheesecake cool inside for 1 hour. After that, refrigerate it for at least 4 hours or overnight. This chilling time helps set the flavors and texture.
Tips & Tricks
Common Mistakes to Avoid
One mistake is overmixing the cheesecake filling. If you mix too much, it can become too airy. This will make your cheesecake crack. Another common error is not letting the cheesecake cool slowly. If you rush this step, it may sink in the middle. Always allow the cheesecake to cool gradually. Lastly, avoid using too many wet apples. They can make the cheesecake soggy.
Expert Tips for Perfect Texture
To get a smooth filling, make sure your cream cheese is at room temperature. This helps it blend easily. When adding eggs, mix just until combined. Overmixing adds air, leading to cracks. For a creamy texture, bake the cheesecake in a water bath. This keeps the heat gentle, which helps prevent cracks.
Serving Suggestions and Presentation Ideas
Serve your cheesecake chilled for the best flavor. You can drizzle caramel sauce on top for added sweetness. A sprinkle of cinnamon or nutmeg adds a nice touch. For a pop of color, add fresh apple slices on the side. A dollop of whipped cream also makes a lovely addition. You can find the Full Recipe in the earlier sections for all the details.
Variations
Different Flavor Profiles (e.g., Pumpkin Spice Apple Crisp Cheesecake)
You can change the flavor of your cheesecake. Try using pumpkin spice for a warm twist. Just add pumpkin puree and pumpkin pie spice to the cheesecake filling. This makes it rich and cozy, perfect for fall. You can also swap apples for pears or berries for a fresh flavor.
Gluten-Free Adaptation
Need a gluten-free option? It’s easy! Use gluten-free graham cracker crumbs for the crust. Also, switch out regular flour for almond flour or oat flour in the crisp topping. This keeps it tasty while being friendly for gluten-free diets.
Mini Apple Crisp Cheesecakes
If you love bite-sized treats, try mini apple crisp cheesecakes! Use a muffin tin instead of a springform pan. Line the cups with paper liners. Fill them with the crust, then layer the cheesecake and apple filling. Bake for about 25-30 minutes. They are cute and perfect for parties.
These variations allow you to play with flavors and make the dessert your own. For the full recipe, check out the complete steps provided earlier!
Storage Info
How to Store Leftovers
To keep your apple crisp cheesecake fresh, store any leftovers in the fridge. Use an airtight container or cover the cheesecake with plastic wrap. This will prevent it from drying out. Leftovers should stay good for up to five days. If you want to enjoy them later, consider freezing.
Freezing Instructions
Freezing this cheesecake is easy. First, let the cheesecake cool completely. Then, wrap it tightly in plastic wrap. After that, place it in a freezer-safe container. This way, it won’t absorb any odors from the freezer. You can freeze it for up to three months. When you’re ready to eat, simply thaw it in the fridge overnight.
Reheating Tips
If you want to warm up your cheesecake, avoid using the microwave. This could make it soggy. Instead, place the slices in a preheated oven at 300°F (150°C) for about 10-15 minutes. This will help restore its creamy texture. Remember to check often so it doesn’t get too warm. Enjoy your dessert at its best! For the full recipe, check back to ensure you have everything you need.
FAQs
How do I know when the cheesecake is done?
You can tell the cheesecake is done when the edges look set, but the center still jiggles a bit. It should not look liquid. The jiggle means it will finish cooking as it cools. You can also check with a toothpick; it should come out mostly clean, but a little filling is okay.
Can I make Apple Crisp Cheesecake ahead of time?
Yes, you can make this cheesecake a day or two ahead. Just bake it, cool it, and chill it in the fridge. This helps the flavors mix well. It tastes even better the next day as the apples soak up the flavors.
What types of apples are best for this recipe?
I recommend using sweet apples like Honeycrisp or Fuji. They hold their shape well and add a nice sweetness. You can also mix in some tart apples like Granny Smith for balance. This mix gives a great flavor and texture to your cheesecake.
How do I serve the cheesecake after chilling?
After chilling, remove the sides of the springform pan. Cut the cheesecake into wedges. You can serve it plain or add some caramel sauce or whipped cream. This adds a nice touch and makes it look fancy. Enjoy the layers of flavor with each bite!
This blog post covered all you need for a delicious Apple Crisp Cheesecake. We looked at ingredients, step-by-step instructions, and clever tips. I shared variations to try and showed how to store your cheesecake.
Remember, making this dessert is fun and rewarding. With practice, you’ll impress friends and family every time you bake. Enjoy your tasty creation!