
Tired of takeout that just doesn’t hit the spot? You’re in for a treat! My crispy sweet and sour chicken recipe packs all the flavor you love, but it’s fresher and better right at home. With juicy chicken, vibrant bell peppers, and a tangy-sweet sauce, this dish will elevate your dinner game. Ready to impress your taste buds? Let’s dive into making a meal that beats takeout every time!
Ingredients
Main Ingredients
– 1 pound boneless, skinless chicken thighs, cut into bite-sized pieces
– 1 cup cornstarch
– 1/2 cup all-purpose flour
– 2 large eggs, beaten
– 1 teaspoon salt
– 1/2 teaspoon black pepper
– Vegetable oil (for frying)
– 1 red bell pepper, diced
– 1 green bell pepper, diced
– 1 cup pineapple chunks (canned or fresh)
– 1/4 cup green onions, chopped
The chicken thighs provide a juicy base. I prefer them over chicken breasts for flavor. The cornstarch and flour mix gives that crispy crunch. It’s all about texture here. The bell peppers and pineapple add color and sweetness, which makes every bite fun.
Sweet and Sour Sauce Ingredients
– 1/2 cup granulated sugar
– 1/2 cup apple cider vinegar
– 1/2 cup ketchup
– 1 tablespoon soy sauce
– 1 teaspoon garlic powder
– 1 teaspoon ginger powder
This sauce brings the dish to life. The sugar balances with the vinegar. Ketchup adds depth and richness. Garlic and ginger give a warm zing that ties everything together.
Optional Garnishes
– Chopped green onions
– Sesame seeds
– Lime wedges
These garnishes add a fresh twist. Chopped green onions bring a nice crunch. Sesame seeds add a nutty flavor. A squeeze of lime brightens every bite. These small touches make your dish look and taste gourmet.
Step-by-Step Instructions
Preparing the Sweet and Sour Sauce
– In a medium saucepan, combine:
– 1/2 cup granulated sugar
– 1/2 cup apple cider vinegar
– 1/2 cup ketchup
– 1 tablespoon soy sauce
– 1 teaspoon garlic powder
– 1 teaspoon ginger powder
– Whisk the ingredients together.
– Heat on medium until it simmers.
– Cook for 5 minutes then remove from heat.
Preparing the Chicken
– For extra crispiness, use a double coating.
– In a large bowl, mix:
– 1 cup cornstarch
– 1/2 cup all-purpose flour
– 1 teaspoon salt
– 1/2 teaspoon black pepper
– Dredge each chicken piece in the dry mix.
– Dip in 2 beaten eggs, then coat again in the dry mix.
Frying the Chicken
– Heat 2 inches of vegetable oil in a deep skillet.
– The oil should be medium-high, about 350°F.
– Fry the chicken in batches for 5-7 minutes.
– They should be golden brown and crispy.
– Drain on paper towels after frying.
Stir-Frying the Vegetables
– In a large pan, heat a tablespoon of vegetable oil.
– Add diced bell peppers and pineapple chunks.
– Stir for 3-4 minutes until tender but still bright.
Combining all Components
– Pour the sweet and sour sauce over the veggies.
– Stir well to mix everything.
– Add the crispy chicken and toss until coated.
– Cook for 1-2 minutes to warm through.
– Garnish with chopped green onions before serving.
Tips & Tricks
Achieving the Perfect Crispy Coating
For a crunchy coating, I use a double coating method. First, I roll each piece of chicken in the dry mix of cornstarch and flour. Then, I dip it in beaten eggs. Finally, I coat it again in the dry mix. This extra layer makes a big difference in crispiness.
The oil temperature is key. I heat the vegetable oil to about 350°F. If the oil is too cold, the chicken will soak up oil. If too hot, it will burn. A good fry should take about 5-7 minutes, until golden brown.
Enhancing the Sweet and Sour Flavor
To get the right taste, I balance sweetness and acidity. I use equal parts sugar and apple cider vinegar in the sauce. This mix gives that classic sweet and sour kick. Feel free to adjust the sugar for more sweetness or vinegar for more tang.
Customizing seasonings can elevate the dish. I often add a bit more garlic or ginger powder to the sauce. Taste as you go to find your ideal flavor.
Serving Suggestions
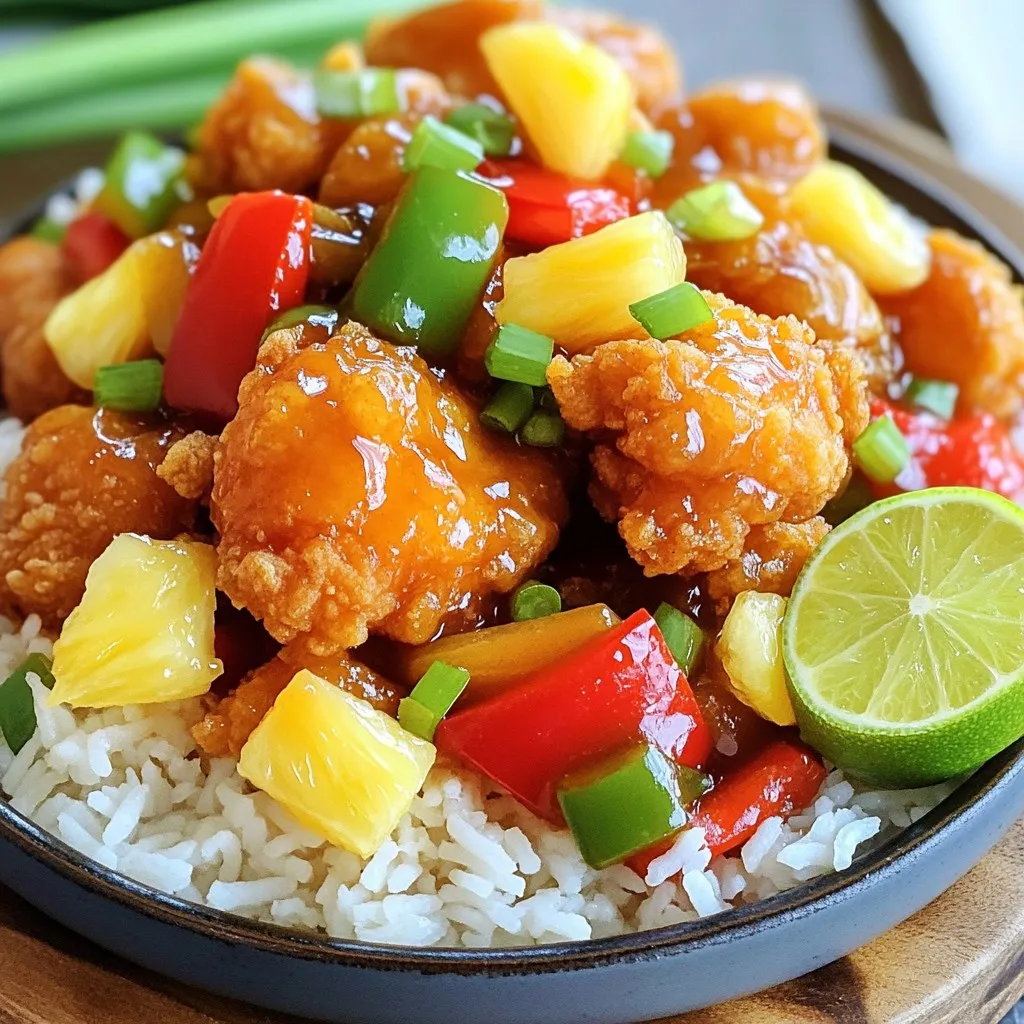
For the best meal, I serve the crispy sweet and sour chicken over a bed of steamed rice. The rice soaks up the sauce nicely, making each bite delicious.
For visual appeal, I garnish with chopped green onions and sesame seeds. A wedge of lime adds a pop of color and flavor, making the dish look as good as it tastes.
Variations
Alternative Proteins
You can switch up the protein in this dish. Shrimp or tofu works great. For shrimp, cook them for about 3-4 minutes until they turn pink. If you choose tofu, use firm tofu. Cut it into cubes and fry until golden. Adjust cooking times based on the protein you use.
Different Vegetables
Feel free to use seasonal veggies! Broccoli, snow peas, and carrots add a nice crunch. For these, cook them for about 3-5 minutes to keep them crisp. Just make sure to slice them thinly. This helps them cook evenly and quickly.
Healthier Version Adjustments
If you want a healthier dish, reduce the sugar in the sauce. You can use honey or maple syrup instead. This keeps it sweet but lowers calories. Also, consider baking the chicken instead of frying it. Preheat your oven to 400°F and bake for 20-25 minutes. This method gives you a crispy texture without extra oil.
Storage Info
How to Store Leftovers
To keep your crispy sweet and sour chicken fresh, follow these steps:
– Temperature: Store leftovers in the fridge at 40°F (4°C) or lower.
– Container Types: Use airtight containers. Glass or plastic containers work well.
Reheating Instructions
To enjoy your dish again without losing its crunch, try these methods:
– Oven Method: Preheat your oven to 375°F (190°C). Place chicken on a baking sheet. Heat for about 10-15 minutes. This keeps it crispy.
– Air Fryer Method: Set your air fryer to 350°F (175°C). Heat for about 5-7 minutes. This also helps to retain crispiness.
Freezing Options
If you want to save some for later, freezing is an option:
– How to Freeze: Cool the chicken completely. Place it in an airtight container or freezer bag. Remove as much air as possible.
– Thawing: To thaw, place it in the fridge overnight. You can also use the microwave on low power.
– Impact on Texture: Freezing may soften the chicken’s crispiness. Reheat properly to regain some texture. The flavor will still be good!
FAQs
Can I make this recipe gluten-free?
Yes, you can make this dish gluten-free. Use gluten-free cornstarch and a gluten-free flour blend. Check labels for sauces too. Many brands offer gluten-free soy sauce. This way, you keep all the flavor without gluten.
How do I prevent the chicken from getting soggy?
To keep chicken crispy, avoid overcrowding the pan when frying. Cook in small batches. After frying, let the chicken rest on paper towels to drain excess oil. Serve right away for the best crunch.
What can I use instead of apple cider vinegar?
If you lack apple cider vinegar, try white vinegar or rice vinegar. Both give a nice tang. White vinegar is sharper, while rice vinegar is milder. Adjust the amount based on your taste preference.
How long does this dish last in the fridge?
Crispy sweet and sour chicken lasts about three days in the fridge. Store it in an airtight container. If you see any signs of mold or off smells, it’s best to toss it.
This recipe covers all you need for homemade sweet and sour chicken. You learned how to make a tasty sauce, fry the chicken, and stir-fry bell peppers and pineapple. I shared tips for crispiness, ways to customize flavors, and storage methods. Remember, you can swap proteins and veggies to fit your taste. Enjoy creating a meal that excites your taste buds and impresses your family!
