No-Bake Oreo Cheesecake Bars Easy and Delicious Treat

WANT TO SAVE THIS RECIPE?

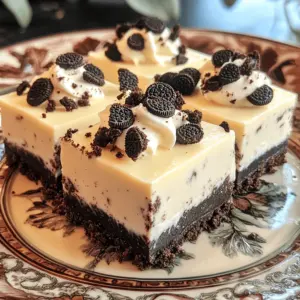
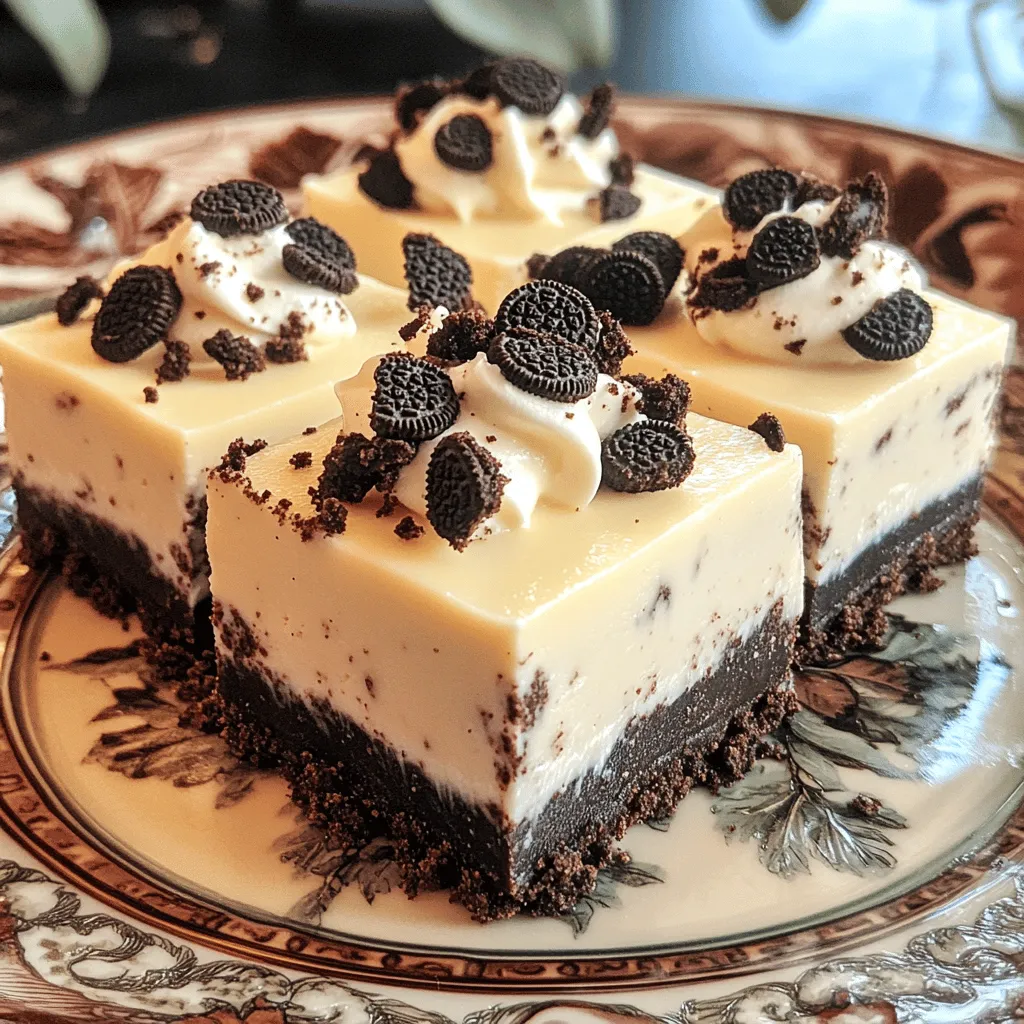
Ready for a sweet treat that’s easy to make and even easier to enjoy? This No-Bake Oreo Cheesecake Bars recipe is perfect for all ages. You only need a handful of simple ingredients like Oreos, cream cheese, and whipped cream to whip up this delicious dessert. You’ll impress friends and family alike, and they’ll be asking for seconds! Let’s dive into the tasty details of this fun and creamy dessert!

Ingredients

Main Ingredients

– 24 Oreo cookies (for the crust)

– 4 tablespoons unsalted butter (melted)

– 16 oz cream cheese (softened)

– 1 cup powdered sugar

– 1 teaspoon vanilla extract

– 1 cup heavy whipping cream

– 12 Oreo cookies (chopped for filling)

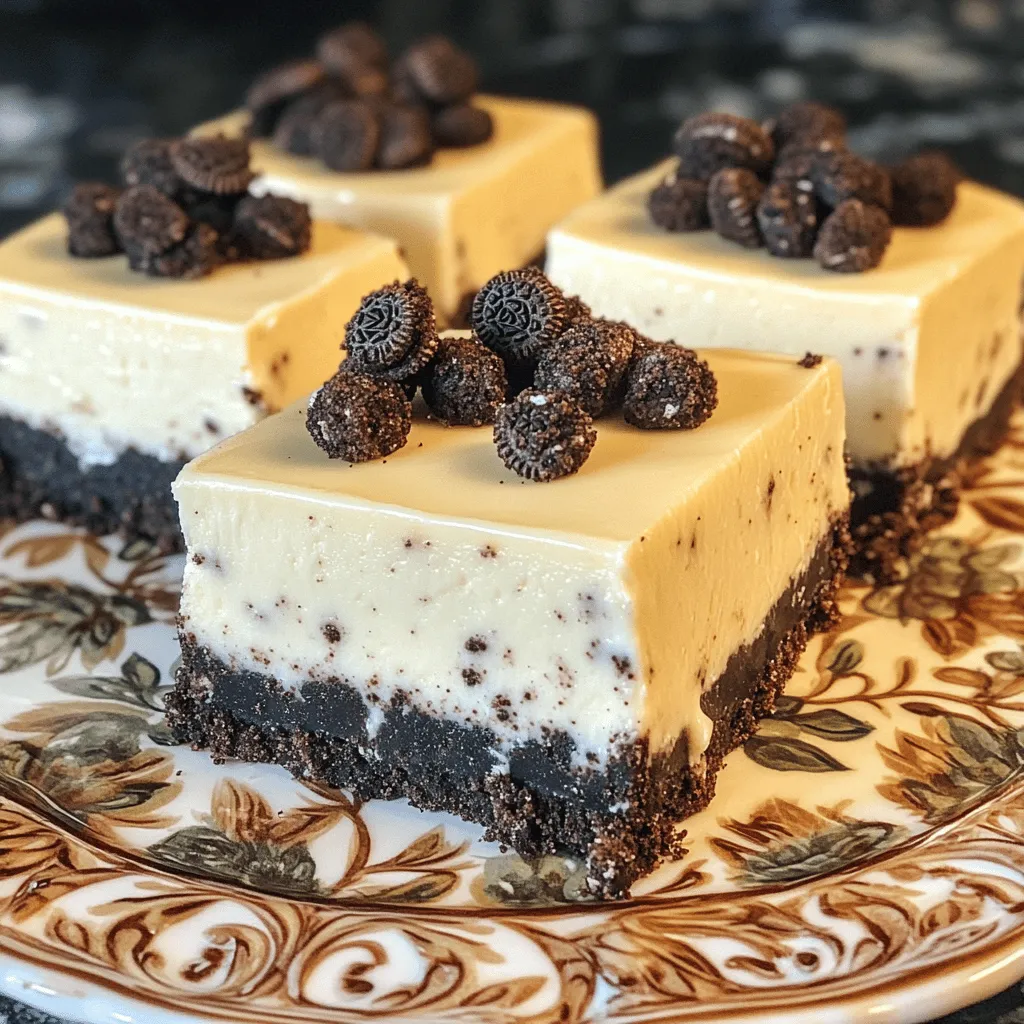
– Extra Oreo cookies (for topping)

To make these no-bake Oreo cheesecake bars, you need simple ingredients. You start with 24 Oreo cookies to create a tasty crust. Crush them well and mix them with melted butter. This mixture forms a solid base.

Next, you need 16 oz of cream cheese. Make sure it is softened. This helps create a smooth filling. Add 1 cup of powdered sugar to sweeten it up. A teaspoon of vanilla extract brings in extra flavor.

For a light and fluffy texture, use 1 cup of heavy whipping cream. Whip it until stiff peaks form. Don’t forget 12 chopped Oreo cookies to mix into the filling. They add great texture and extra yumminess. Finally, keep some extra Oreo cookies aside for a delicious topping.

Optional Garnishes

– Mini Oreo cookies

– Chocolate shavings

– Whipped cream

If you want to make your bars even more special, consider these optional garnishes. Mini Oreo cookies are fun and cute. Chocolate shavings add a nice touch. A dollop of whipped cream can make each piece feel fancy.

Step-by-Step Instructions

Preparing the Crust

To start, grab a medium bowl. Mix 24 crushed Oreo cookies with 4 tablespoons of melted butter. Stir well until the mix looks like wet sand. Next, take a 9×9 inch baking dish. Press the cookie mixture firmly into the bottom. Make sure it covers the whole bottom evenly. Now, set the dish in the fridge. Let it chill while you prepare the filling.

Making the Cheesecake Filling

For the filling, use a large mixing bowl. Beat 16 oz of softened cream cheese with 1 cup of powdered sugar and 1 teaspoon of vanilla extract. Use a hand mixer for this task. Mix until the filling is smooth and fluffy. You want a creamy texture with no lumps. This step is key for a perfect cheesecake.

Whipping the Cream

In another bowl, whip 1 cup of heavy whipping cream. Use a handheld mixer to whip it until stiff peaks form. This means the cream holds its shape well. Next, gently fold the whipped cream into the cream cheese mixture. Be careful not to deflate the whipped cream. You want it light and airy. After mixing, add 12 chopped Oreo cookies. Fold them in gently.

Completing the Bars

Now, pour the cheesecake filling over your prepared crust. Use a spatula to spread it evenly. Make sure it reaches all corners. Cover the baking dish with plastic wrap. Place it in the fridge for at least 4 hours. This time allows the bars to set completely. When ready, lift them out or cut directly in the dish. Top with extra crushed Oreo cookies for a delightful finish.

Tips & Tricks

Achieving the Perfect Texture

To get that creamy texture, start with softened cream cheese. Cold cream cheese clumps up and makes mixing hard. Leave it out for about 30 minutes before using. This makes it easy to blend with the sugar and vanilla.

When you whip the cream, aim for stiff peaks. This means the cream holds its shape well. Then, gently fold the whipped cream into the cream cheese mix. Use a spatula and be careful not to deflate it. This keeps your cheesecake light and airy.

Presentation Tips

Cutting the bars neatly helps with serving. Use a sharp knife and wipe it clean between cuts. This keeps each piece looking great. For a fancy touch, you can garnish. Top each bar with mini Oreo cookies or chocolate shavings. These little details make a big difference in how they look.

Common Mistakes to Avoid

One big mistake is over-mixing the filling. If you mix too long, the cheesecake can become dense. Mix just until smooth. Also, don’t skip the chilling time. If the bars don’t chill long enough, they won’t set. Aim for at least four hours in the fridge. This helps them hold their shape when you cut them.

Variations

When it comes to making No-Bake Oreo Cheesecake Bars, the fun doesn’t stop at the basic recipe. You can easily create different flavors and styles to impress your friends and family. Here are some tasty variations you can try.

Flavor Variations

Adding mint extract: For a refreshing twist, add a few drops of mint extract. This gives your bars a mint chocolate flavor that is perfect for cool weather.

Incorporating flavor extracts: Try using almond or hazelnut extract in place of vanilla. This adds a nutty depth that pairs well with the rich cream cheese.

Ingredient Swaps

Using gluten-free Oreos: If you need a gluten-free option, use gluten-free Oreos. They taste just as good and let everyone enjoy your treat.

Substituting cream cheese with mascarpone: For a creamier texture, swap cream cheese for mascarpone. This gives the bars a rich, luxurious feel.

Serving Suggestions

Pairing with fruit sauces: Drizzle fruit sauces like raspberry or strawberry on top. This adds a vibrant color and fresh taste to your bars.

Serving alongside coffee or dessert wine: These bars pair wonderfully with a cup of coffee or a glass of dessert wine. It makes for a perfect end to a meal.

Storage Info

Proper Storage Methods

To keep your no-bake Oreo cheesecake bars fresh, store them in the fridge. First, cut them into squares. Then, use plastic wrap to cover the bars. This helps keep them moist. You can also use an airtight container. An airtight container provides better protection against odors.

Freezing Instructions

If you want to save some for later, freezing is easy. First, cut the bars into squares. Then, wrap each square tightly in plastic wrap. Place the wrapped bars in a freezer bag. Make sure to squeeze out as much air as possible. To enjoy again, take them out of the freezer. Thaw them in the fridge for a few hours or overnight.

Shelf Life

These cheesecake bars last about 5 days in the fridge. Keep an eye out for any changes. If you see mold or an off smell, it’s time to toss them. Proper storage helps maintain their delicious taste and texture.

FAQs

Can I use light cream cheese?

Yes, you can use light cream cheese. However, it will change the taste and texture. Light cream cheese has less fat, so it may not be as rich. The bars might be softer and less creamy. If you prefer a lighter option, go ahead, but know the difference!

How do I know when the cheesecake bars are set?

The cheesecake bars are set when they feel firm to the touch. Press lightly in the center. If it springs back, they are ready. You can also check the edges; they should not jiggle much. Chill them for at least four hours to get the right consistency.

Can I make these cheesecake bars ahead of time?

Yes, you can make these cheesecake bars a day in advance. They taste even better after chilling overnight. Just keep them covered in the fridge. This way, you save time on the day you want to serve them. Enjoy the ease of having a sweet treat ready!

This blog post covered making delicious Oreo cheesecake bars. We explored the main ingredients, like Oreo cookies and cream cheese, and gave step-by-step instructions. I shared tips for texture, presentation, and common mistakes to avoid. We also discussed fun flavor variations and how to store these treats.

In summary, this dessert is easy to make and customizable. Enjoy every bite and share with friends! Happy baking!

- 24 Oreo cookies (for the crust) - 4 tablespoons unsalted butter (melted) - 16 oz cream cheese (softened) - 1 cup powdered sugar - 1 teaspoon vanilla extract - 1 cup heavy whipping cream - 12 Oreo cookies (chopped for filling) - Extra Oreo cookies (for topping) To make these no-bake Oreo cheesecake bars, you need simple ingredients. You start with 24 Oreo cookies to create a tasty crust. Crush them well and mix them with melted butter. This mixture forms a solid base. Next, you need 16 oz of cream cheese. Make sure it is softened. This helps create a smooth filling. Add 1 cup of powdered sugar to sweeten it up. A teaspoon of vanilla extract brings in extra flavor. For a light and fluffy texture, use 1 cup of heavy whipping cream. Whip it until stiff peaks form. Don’t forget 12 chopped Oreo cookies to mix into the filling. They add great texture and extra yumminess. Finally, keep some extra Oreo cookies aside for a delicious topping. - Mini Oreo cookies - Chocolate shavings - Whipped cream If you want to make your bars even more special, consider these optional garnishes. Mini Oreo cookies are fun and cute. Chocolate shavings add a nice touch. A dollop of whipped cream can make each piece feel fancy. To start, grab a medium bowl. Mix 24 crushed Oreo cookies with 4 tablespoons of melted butter. Stir well until the mix looks like wet sand. Next, take a 9x9 inch baking dish. Press the cookie mixture firmly into the bottom. Make sure it covers the whole bottom evenly. Now, set the dish in the fridge. Let it chill while you prepare the filling. For the filling, use a large mixing bowl. Beat 16 oz of softened cream cheese with 1 cup of powdered sugar and 1 teaspoon of vanilla extract. Use a hand mixer for this task. Mix until the filling is smooth and fluffy. You want a creamy texture with no lumps. This step is key for a perfect cheesecake. In another bowl, whip 1 cup of heavy whipping cream. Use a handheld mixer to whip it until stiff peaks form. This means the cream holds its shape well. Next, gently fold the whipped cream into the cream cheese mixture. Be careful not to deflate the whipped cream. You want it light and airy. After mixing, add 12 chopped Oreo cookies. Fold them in gently. Now, pour the cheesecake filling over your prepared crust. Use a spatula to spread it evenly. Make sure it reaches all corners. Cover the baking dish with plastic wrap. Place it in the fridge for at least 4 hours. This time allows the bars to set completely. When ready, lift them out or cut directly in the dish. Top with extra crushed Oreo cookies for a delightful finish. To get that creamy texture, start with softened cream cheese. Cold cream cheese clumps up and makes mixing hard. Leave it out for about 30 minutes before using. This makes it easy to blend with the sugar and vanilla. When you whip the cream, aim for stiff peaks. This means the cream holds its shape well. Then, gently fold the whipped cream into the cream cheese mix. Use a spatula and be careful not to deflate it. This keeps your cheesecake light and airy. Cutting the bars neatly helps with serving. Use a sharp knife and wipe it clean between cuts. This keeps each piece looking great. For a fancy touch, you can garnish. Top each bar with mini Oreo cookies or chocolate shavings. These little details make a big difference in how they look. One big mistake is over-mixing the filling. If you mix too long, the cheesecake can become dense. Mix just until smooth. Also, don't skip the chilling time. If the bars don't chill long enough, they won’t set. Aim for at least four hours in the fridge. This helps them hold their shape when you cut them. {{image_2}} When it comes to making No-Bake Oreo Cheesecake Bars, the fun doesn’t stop at the basic recipe. You can easily create different flavors and styles to impress your friends and family. Here are some tasty variations you can try. - Adding mint extract: For a refreshing twist, add a few drops of mint extract. This gives your bars a mint chocolate flavor that is perfect for cool weather. - Incorporating flavor extracts: Try using almond or hazelnut extract in place of vanilla. This adds a nutty depth that pairs well with the rich cream cheese. - Using gluten-free Oreos: If you need a gluten-free option, use gluten-free Oreos. They taste just as good and let everyone enjoy your treat. - Substituting cream cheese with mascarpone: For a creamier texture, swap cream cheese for mascarpone. This gives the bars a rich, luxurious feel. - Pairing with fruit sauces: Drizzle fruit sauces like raspberry or strawberry on top. This adds a vibrant color and fresh taste to your bars. - Serving alongside coffee or dessert wine: These bars pair wonderfully with a cup of coffee or a glass of dessert wine. It makes for a perfect end to a meal. To keep your no-bake Oreo cheesecake bars fresh, store them in the fridge. First, cut them into squares. Then, use plastic wrap to cover the bars. This helps keep them moist. You can also use an airtight container. An airtight container provides better protection against odors. If you want to save some for later, freezing is easy. First, cut the bars into squares. Then, wrap each square tightly in plastic wrap. Place the wrapped bars in a freezer bag. Make sure to squeeze out as much air as possible. To enjoy again, take them out of the freezer. Thaw them in the fridge for a few hours or overnight. These cheesecake bars last about 5 days in the fridge. Keep an eye out for any changes. If you see mold or an off smell, it’s time to toss them. Proper storage helps maintain their delicious taste and texture. Yes, you can use light cream cheese. However, it will change the taste and texture. Light cream cheese has less fat, so it may not be as rich. The bars might be softer and less creamy. If you prefer a lighter option, go ahead, but know the difference! The cheesecake bars are set when they feel firm to the touch. Press lightly in the center. If it springs back, they are ready. You can also check the edges; they should not jiggle much. Chill them for at least four hours to get the right consistency. Yes, you can make these cheesecake bars a day in advance. They taste even better after chilling overnight. Just keep them covered in the fridge. This way, you save time on the day you want to serve them. Enjoy the ease of having a sweet treat ready! This blog post covered making delicious Oreo cheesecake bars. We explored the main ingredients, like Oreo cookies and cream cheese, and gave step-by-step instructions. I shared tips for texture, presentation, and common mistakes to avoid. We also discussed fun flavor variations and how to store these treats. In summary, this dessert is easy to make and customizable. Enjoy every bite and share with friends! Happy baking!

No-Bake Oreo Cheesecake Bars

Indulge in the ultimate dessert with these Decadent No-Bake Oreo Cheesecake Bars! This easy recipe combines crushed Oreos and creamy cheesecake for a deliciously sweet treat. Perfect for any occasion, these bars are quick to make, requiring just 20 minutes of prep and chilling time. Impress your friends and family with this mouthwatering dessert! Click to discover the full recipe and bring these tasty bars to life!

Ingredients
  

24 Oreo cookies, crushed

4 tablespoons unsalted butter, melted

16 oz cream cheese, softened

1 cup powdered sugar

1 teaspoon vanilla extract

1 cup heavy whipping cream

12 Oreo cookies, chopped for filling

Extra Oreo cookies for topping

Instructions
 

Prepare the Crust: In a medium bowl, mix the crushed Oreo cookies with melted butter until fully combined. Press the mixture into the bottom of a 9x9 inch baking dish to form an even layer. Set aside in the fridge to firm up while you prepare the filling.

    Make the Filling: In a large mixing bowl, beat the softened cream cheese with powdered sugar and vanilla extract until smooth and fluffy.

      Whip the Cream: In another bowl, whip the heavy cream with a handheld mixer until stiff peaks form. Then gently fold this whipped cream into the cream cheese mixture until well combined. Add the chopped Oreo cookies at this stage, folding them gently to not deflate the mixture.

        Combine and Spread: Pour the cheesecake filling over the prepared crust and spread it evenly with a spatula.

          Chill: Cover the baking dish with plastic wrap and refrigerate for at least 4 hours, or until the cheesecake has set completely.

            Serve: Once set, lift the cheesecake bars out of the baking dish using parchment paper (if used), or cut directly in the dish. Top with additional crushed Oreo cookies for garnish before serving.

              Prep Time: 20 minutes | Total Time: 4 hours 20 minutes | Servings: 12

                - Presentation Tips: Cut into squares and serve each bar on a decorative plate, garnished with mini Oreo cookies or chocolate shavings for an elegant touch.

                  WANT TO SAVE THIS RECIPE?