Apple Cider Whoopie Pies Delicious Fall Dessert

WANT TO SAVE THIS RECIPE?

Fall is the perfect time for a fun kitchen project, and Apple Cider Whoopie Pies are just the treat you need! These delicious pies blend warm spices and sweet apple cider into soft, cake-like cookies. With a creamy filling that takes just minutes to whip up, you’ll impress your friends and family. Ready to dive into this easy recipe? Let’s explore how to make these delightful desserts step by step!

Ingredients for Apple Cider Whoopie Pies

To make these tasty treats, gather these simple ingredients. Each one plays a role in creating the perfect whoopie pie.

List of Ingredients

– 2 cups all-purpose flour

– 1 teaspoon baking powder

– 1 teaspoon baking soda

– 1 teaspoon ground cinnamon

– 1/2 teaspoon ground nutmeg

– 1/4 teaspoon salt

– 1/2 cup unsalted butter, softened

– 1 cup brown sugar, packed

– 1 large egg

– 1 teaspoon vanilla extract

– 1 cup apple cider

– 1/2 cup applesauce

– 1 cup powdered sugar

– 3 ounces cream cheese, softened

– 1 tablespoon maple syrup (for filling)

These ingredients combine to create soft, spiced cookies filled with a creamy, sweet filling. The apple cider adds moisture and flavor. The spices make each bite feel like fall.

When I bake, I always double-check my ingredients. This helps ensure each whoopie pie turns out just right. Using fresh ingredients is key, especially the apple cider.

For the best results, measure carefully. Use a scale if you have one. This helps maintain the right balance of flavors and textures.

For the full recipe, you can check the detailed guide. Enjoy baking!

Step-by-Step Instructions

Preheating and Preparing

– Preheat the oven to 350°F (175°C) and line baking sheets with parchment paper.

– In a medium bowl, whisk together 2 cups of flour, 1 teaspoon baking powder, 1 teaspoon baking soda, 1 teaspoon ground cinnamon, 1/2 teaspoon ground nutmeg, and 1/4 teaspoon salt. This mix gives the whoopie pies their flavor and structure.

Making the Batter

– In a large bowl, use a hand mixer to beat 1/2 cup softened butter and 1 cup brown sugar. Mix until it becomes light and fluffy, which takes about 2-3 minutes.

– Next, add 1 large egg and 1 teaspoon vanilla extract. Mix well until everything combines smoothly.

– Gradually add the dry mixture to the butter mix, alternating with 1 cup apple cider and 1/2 cup applesauce. Start and end with the dry mix. Be careful not to overmix.

Baking the Whoopie Pies

– Drop rounded tablespoons of the dough onto the prepared baking sheets. Leave space between each dollop.

– Bake for 12-15 minutes. The edges should turn lightly golden. After baking, cool them on the sheets for 5 minutes. Then, transfer to wire racks to cool completely.

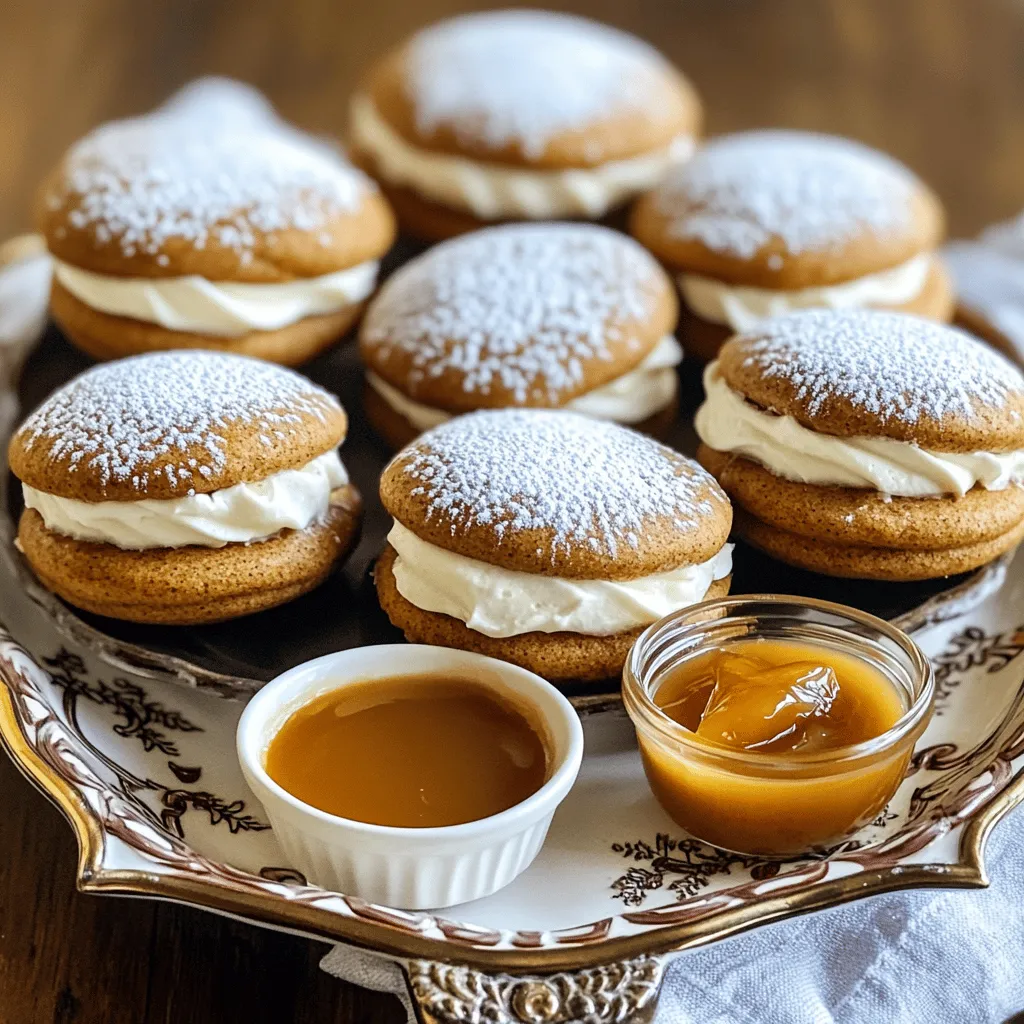
– For the filling, blend 3 ounces cream cheese, 1 cup powdered sugar, and 1 tablespoon maple syrup until smooth. Spread this filling on one cookie and top with another. Repeat until all cookies are filled.

These steps will lead you to tasty Apple Cider Whoopie Pies. For more details, see the Full Recipe.

Tips & Tricks for Perfect Whoopie Pies

Measuring Ingredients Accurately

Accurate measuring is key to great whoopie pies. If you add too much flour, the pies will be dry. Use a kitchen scale for best results. Spoon flour into a measuring cup and level it off with a knife. This method ensures you don’t pack the flour down. Measuring liquids like apple cider is simple. Use a clear liquid measuring cup and check at eye level. This gives you the right amount every time.

Achieving the Right Texture

The right mixing technique makes a big difference in texture. Start by creaming the butter and sugar until it looks light. This step adds air, making your whoopie pies fluffy. When adding eggs and vanilla, mix just until combined. Overmixing can lead to dense pies. When you add the dry ingredients, do this in parts. Alternate with the apple cider and applesauce. This method keeps your batter light and airy.

Cooling and Assembling

Cooling the whoopie pies properly is very important. Let them cool on the baking sheet for about five minutes first. Then, transfer them to a wire rack. This prevents sogginess. For assembling, pick two similar-sized pies. Spread a generous tablespoon of cream cheese filling on one pie. Top it with the other pie to make a sandwich. This method keeps your filling from spilling out. Enjoy your delicious treats with friends or family!

Variations of Apple Cider Whoopie Pies

Flavor Additions

You can easily add spices or extracts to enhance the taste. Try adding ground ginger, cardamom, or cloves. Each spice brings a unique flavor. Vanilla or almond extract also works well. Just add a teaspoon to the batter. This small change makes a big difference!

Dietary Adjustments

If you need gluten-free options, use a gluten-free flour blend. Many blends work great in this recipe. For a vegan version, substitute the egg with a flax egg. Mix one tablespoon of flaxseed meal with three tablespoons of water. Let it sit until it thickens. You can also replace butter with coconut oil. These swaps do not change the taste much.

Seasonal Twists

Incorporating seasonal flavors can be fun! Add pumpkin puree to the batter for a fall twist. It makes the whoopie pies moist and adds flavor. You can also drizzle caramel sauce inside for a sweet surprise. This adds richness and pairs well with apple cider. Mixing in chopped nuts like pecans or walnuts adds crunch too.

Storage Info

Short-Term Storage

To store your whoopie pies at room temperature, place them in an airtight container. Keep them away from direct sunlight and heat. This helps maintain their soft and moist texture. Line the container with parchment paper to prevent sticking. Your whoopie pies will stay fresh for up to three days this way.

Long-Term Storage Tips

For longer storage, freezing whoopie pies is a great option. Wrap each pie tightly in plastic wrap. Then, place them in a freezer-safe bag or container. Make sure to label the bag with the date. You can freeze them for up to three months. When you want to enjoy them, let them thaw in the fridge overnight. This keeps them tasty and fresh.

Shelf Life Expectations

When stored properly, whoopie pies can last a while. At room temperature, they stay fresh for about three days. In the fridge, they can last up to a week. If frozen, they can keep for up to three months. Always check for any signs of spoilage before eating. Proper storage helps you enjoy these treats longer. For the full recipe, check the earlier sections.

FAQs about Apple Cider Whoopie Pies

Can I make these whoopie pies ahead of time?

Yes, you can make these whoopie pies ahead of time. It’s easy and fun! After you bake the cookies, let them cool completely. Then, store them in an airtight container at room temperature. If you wait to fill them, keep the cookies plain. Fill them with cream cheese filling just before serving. This keeps them fresh and soft.

What can I use as a substitute for cream cheese?

If you need a substitute for cream cheese, try using Greek yogurt. It gives a nice tang. You can also use whipped coconut cream for a dairy-free option. Silken tofu blended until smooth works well too. These options keep the texture creamy and tasty.

How do I know when the whoopie pies are done baking?

To check if the whoopie pies are done, look for golden edges. The center should be set but still soft. You can gently press the top; it should spring back. If they look too wet in the middle, give them a few more minutes. Remember, they will continue to cook a bit while cooling.

What is the origin of whoopie pies?

Whoopie pies have a fun history! They likely started in New England in the 1920s. Some say they came from the Amish community. The name comes from the joyful shout of children when they got one. They are a beloved treat in many parts of the U.S. and have become a classic dessert.

Can I use different types of cider?

Yes, you can use different types of cider. Flavored cider adds a twist. Try using apple pie or spiced cider for extra flavor. Hard cider can work too, but it changes the taste and texture. Just remember, the better the cider, the better the whoopie pies!

Apple cider whoopie pies are fun and easy to make. We talked about the ingredients, steps, and tips to get them just right. Remember to measure carefully for the best texture and taste. These pies are perfect for any season with tasty variations you can try. Store them well to keep them fresh for later. Get creative with flavors and enjoy these treats anytime. You’re now ready to bake your own delicious apple cider whoopie pies!

To make these tasty treats, gather these simple ingredients. Each one plays a role in creating the perfect whoopie pie. - 2 cups all-purpose flour - 1 teaspoon baking powder - 1 teaspoon baking soda - 1 teaspoon ground cinnamon - 1/2 teaspoon ground nutmeg - 1/4 teaspoon salt - 1/2 cup unsalted butter, softened - 1 cup brown sugar, packed - 1 large egg - 1 teaspoon vanilla extract - 1 cup apple cider - 1/2 cup applesauce - 1 cup powdered sugar - 3 ounces cream cheese, softened - 1 tablespoon maple syrup (for filling) These ingredients combine to create soft, spiced cookies filled with a creamy, sweet filling. The apple cider adds moisture and flavor. The spices make each bite feel like fall. When I bake, I always double-check my ingredients. This helps ensure each whoopie pie turns out just right. Using fresh ingredients is key, especially the apple cider. For the best results, measure carefully. Use a scale if you have one. This helps maintain the right balance of flavors and textures. For the full recipe, you can check the detailed guide. Enjoy baking! - Preheat the oven to 350°F (175°C) and line baking sheets with parchment paper. - In a medium bowl, whisk together 2 cups of flour, 1 teaspoon baking powder, 1 teaspoon baking soda, 1 teaspoon ground cinnamon, 1/2 teaspoon ground nutmeg, and 1/4 teaspoon salt. This mix gives the whoopie pies their flavor and structure. - In a large bowl, use a hand mixer to beat 1/2 cup softened butter and 1 cup brown sugar. Mix until it becomes light and fluffy, which takes about 2-3 minutes. - Next, add 1 large egg and 1 teaspoon vanilla extract. Mix well until everything combines smoothly. - Gradually add the dry mixture to the butter mix, alternating with 1 cup apple cider and 1/2 cup applesauce. Start and end with the dry mix. Be careful not to overmix. - Drop rounded tablespoons of the dough onto the prepared baking sheets. Leave space between each dollop. - Bake for 12-15 minutes. The edges should turn lightly golden. After baking, cool them on the sheets for 5 minutes. Then, transfer to wire racks to cool completely. - For the filling, blend 3 ounces cream cheese, 1 cup powdered sugar, and 1 tablespoon maple syrup until smooth. Spread this filling on one cookie and top with another. Repeat until all cookies are filled. These steps will lead you to tasty Apple Cider Whoopie Pies. For more details, see the Full Recipe. Accurate measuring is key to great whoopie pies. If you add too much flour, the pies will be dry. Use a kitchen scale for best results. Spoon flour into a measuring cup and level it off with a knife. This method ensures you don’t pack the flour down. Measuring liquids like apple cider is simple. Use a clear liquid measuring cup and check at eye level. This gives you the right amount every time. The right mixing technique makes a big difference in texture. Start by creaming the butter and sugar until it looks light. This step adds air, making your whoopie pies fluffy. When adding eggs and vanilla, mix just until combined. Overmixing can lead to dense pies. When you add the dry ingredients, do this in parts. Alternate with the apple cider and applesauce. This method keeps your batter light and airy. Cooling the whoopie pies properly is very important. Let them cool on the baking sheet for about five minutes first. Then, transfer them to a wire rack. This prevents sogginess. For assembling, pick two similar-sized pies. Spread a generous tablespoon of cream cheese filling on one pie. Top it with the other pie to make a sandwich. This method keeps your filling from spilling out. Enjoy your delicious treats with friends or family! {{image_2}} You can easily add spices or extracts to enhance the taste. Try adding ground ginger, cardamom, or cloves. Each spice brings a unique flavor. Vanilla or almond extract also works well. Just add a teaspoon to the batter. This small change makes a big difference! If you need gluten-free options, use a gluten-free flour blend. Many blends work great in this recipe. For a vegan version, substitute the egg with a flax egg. Mix one tablespoon of flaxseed meal with three tablespoons of water. Let it sit until it thickens. You can also replace butter with coconut oil. These swaps do not change the taste much. Incorporating seasonal flavors can be fun! Add pumpkin puree to the batter for a fall twist. It makes the whoopie pies moist and adds flavor. You can also drizzle caramel sauce inside for a sweet surprise. This adds richness and pairs well with apple cider. Mixing in chopped nuts like pecans or walnuts adds crunch too. To store your whoopie pies at room temperature, place them in an airtight container. Keep them away from direct sunlight and heat. This helps maintain their soft and moist texture. Line the container with parchment paper to prevent sticking. Your whoopie pies will stay fresh for up to three days this way. For longer storage, freezing whoopie pies is a great option. Wrap each pie tightly in plastic wrap. Then, place them in a freezer-safe bag or container. Make sure to label the bag with the date. You can freeze them for up to three months. When you want to enjoy them, let them thaw in the fridge overnight. This keeps them tasty and fresh. When stored properly, whoopie pies can last a while. At room temperature, they stay fresh for about three days. In the fridge, they can last up to a week. If frozen, they can keep for up to three months. Always check for any signs of spoilage before eating. Proper storage helps you enjoy these treats longer. For the full recipe, check the earlier sections. Yes, you can make these whoopie pies ahead of time. It’s easy and fun! After you bake the cookies, let them cool completely. Then, store them in an airtight container at room temperature. If you wait to fill them, keep the cookies plain. Fill them with cream cheese filling just before serving. This keeps them fresh and soft. If you need a substitute for cream cheese, try using Greek yogurt. It gives a nice tang. You can also use whipped coconut cream for a dairy-free option. Silken tofu blended until smooth works well too. These options keep the texture creamy and tasty. To check if the whoopie pies are done, look for golden edges. The center should be set but still soft. You can gently press the top; it should spring back. If they look too wet in the middle, give them a few more minutes. Remember, they will continue to cook a bit while cooling. Whoopie pies have a fun history! They likely started in New England in the 1920s. Some say they came from the Amish community. The name comes from the joyful shout of children when they got one. They are a beloved treat in many parts of the U.S. and have become a classic dessert. Yes, you can use different types of cider. Flavored cider adds a twist. Try using apple pie or spiced cider for extra flavor. Hard cider can work too, but it changes the taste and texture. Just remember, the better the cider, the better the whoopie pies! Apple cider whoopie pies are fun and easy to make. We talked about the ingredients, steps, and tips to get them just right. Remember to measure carefully for the best texture and taste. These pies are perfect for any season with tasty variations you can try. Store them well to keep them fresh for later. Get creative with flavors and enjoy these treats anytime. You’re now ready to bake your own delicious apple cider whoopie pies!

Apple Cider Whoopie Pies

Indulge in the cozy flavors of fall with these delicious Apple Cider Whoopie Pies! These soft, spiced cookies filled with creamy maple-infused cream cheese are perfect for any occasion. With simple ingredients and easy steps, you'll impress family and friends in no time. Click through to discover the full recipe and create these delightful treats that bring warmth and joy to your kitchen!

Ingredients
  

2 cups all-purpose flour

1 teaspoon baking powder

1 teaspoon baking soda

1 teaspoon ground cinnamon

1/2 teaspoon ground nutmeg

1/4 teaspoon salt

1/2 cup unsalted butter, softened

1 cup brown sugar, packed

1 large egg

1 teaspoon vanilla extract

1 cup apple cider

1/2 cup applesauce

1 cup powdered sugar

3 ounces cream cheese, softened

1 tablespoon maple syrup (for filling)

Instructions
 

Preheat your oven to 350°F (175°C). Line two baking sheets with parchment paper.

    In a medium bowl, whisk together flour, baking powder, baking soda, cinnamon, nutmeg, and salt. Set aside.

      In a large bowl, using a hand mixer, beat together the softened butter and brown sugar until light and fluffy, about 2-3 minutes.

        Add in the egg and vanilla extract. Mix until well combined.

          Gradually add the dry ingredients to the butter mixture, alternating with the apple cider and applesauce. Begin and end with the dry mixture, mixing just until combined.

            Drop rounded tablespoons of the dough onto the prepared baking sheets, leaving space between each cookie.

              Bake for 12-15 minutes or until the edges are lightly golden. Allow to cool on the baking sheets for 5 minutes before transferring to wire racks to cool completely.

                For the filling, in a mixing bowl, beat together the cream cheese, powdered sugar, and maple syrup until smooth and creamy.

                  Once the cookies have cooled, spread a generous tablespoon of the cream cheese filling on the flat side of one cookie, then top with another cookie to form a sandwich.

                    Repeat until all cookies are filled.

                      Prep Time: 20 minutes | Total Time: 50 minutes | Servings: 12 whoopie pies

                        - Presentation Tips: Arrange the whoopie pies on a decorative platter, and dust with powdered sugar for an elegant touch. Serve them alongside a small bowl of caramel sauce for an extra indulgent treat!

                          WANT TO SAVE THIS RECIPE?