Are you ready to make your very own homemade dill pickles? This simple and crunchy recipe will show you how to craft flavorful pickles right in your kitchen. With fresh cucumbers, loads of dill, and a few key spices, you’ll be amazed at how easy it is to create that perfect crunch. Let’s dive into the ingredients and get started on this tasty adventure!
Ingredients
Essential Ingredients for Homemade Dill Pickles
– Cucumbers and their varieties: Choose firm cucumbers for the best crunch. I like using pickling cucumbers, but you can use any fresh cucumber. The size matters too! Smaller cucumbers yield a better texture.
– The importance of fresh dill: Fresh dill gives your pickles their signature taste. Dried dill can work, but fresh dill brings a bright flavor. Look for sprigs that are vibrant and fragrant.
– Spices and flavor enhancers: You need basic spices for great flavor. Garlic adds a nice punch. Mustard seeds and dill seeds give a unique taste. Black peppercorns add warmth, while red pepper flakes can spice things up.
Measuring and Substitutions
– Adjusting quantities for different batch sizes: This recipe makes about one quart. If you want more, just double the ingredients. Keep the same ratios for brine and spices.
– Potential substitutes for common ingredients: If you run out of sea salt, table salt works too. For vinegar, apple cider vinegar can be a good choice. Just remember, it might change the flavor a bit.
Step-by-Step Instructions
Preparing the Cucumbers
Start by washing your cucumbers well. Use cool water to remove dirt and pesticides. I like to scrub them gently with a vegetable brush. This step helps keep your pickles clean and fresh. Next, slice the cucumbers. You can cut them into spears or rounds based on your preference. I usually opt for spears as they fit nicely in jars and are easy to grab.
Crafting the Pickling Brine
To make the brine, gather a medium saucepan. Combine water, distilled white vinegar, sea salt, and granulated sugar. Bring this mix to a boil over medium heat. Stir until the salt and sugar dissolve completely. This step is key for a balanced flavor. Once it boils, remove it from heat and let it cool to room temperature. Cooling the brine prevents cooking the cucumbers when you pour it over them.
Filling the Jars Efficiently
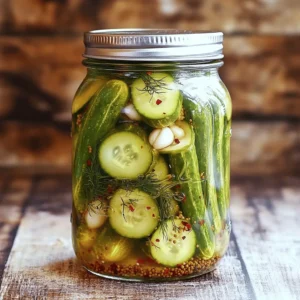
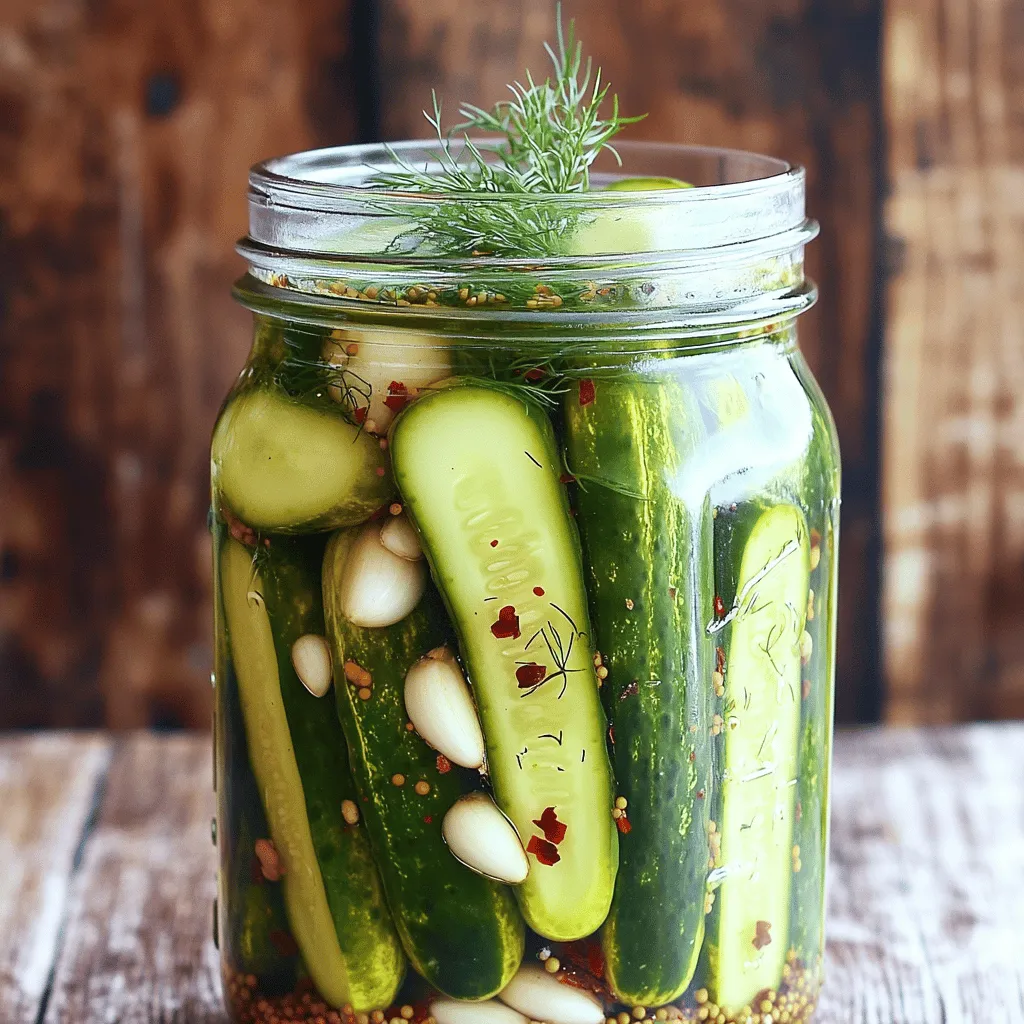
Grab clean mason jars for your pickles. Start by placing garlic cloves, dill seeds, mustard seeds, black peppercorns, and optional red pepper flakes at the bottom. This layering adds great flavor. Next, pack the cucumber slices tightly in the jar. Make sure they fit snugly without too much space. Packing tightly helps the cucumbers stay crisp and absorb the brine better.
Fermentation Timing
Once your jars are filled, it’s time to add the brine. Pour the cooled brine over the cucumbers until they are fully submerged. You might need to use a spoon to push them down. This ensures all cucumbers are covered. Seal the jars with lids and refrigerate them. Let them sit for at least 24 hours, but for the best taste, aim for 3 to 5 days. The longer they sit, the better the flavor! Enjoy your homemade dill pickles, which can last for months when stored properly. For the complete process, refer to the Full Recipe.
Tips & Tricks
Achieving Perfect Crunchiness
To get crunchy pickles, start with fresh cucumbers. Look for firm, small ones. The skin should be bright and smooth. Chill your cucumbers in ice water for an hour before making pickles. This helps them stay crisp. Another trick is to add a few grape leaves or a piece of horseradish to the jar. These ingredients contain tannins that help keep pickles crunchy.
Customization for Flavor
You can mix flavors to make your pickles unique. Try adding sliced jalapeños for a spicy kick. If you like garlic, add more cloves to the jar. You can also use fresh herbs like thyme or oregano for a different taste. Experiment with spices, like coriander or dill weed. The more you play with flavors, the more fun your pickles will be!
Troubleshooting Common Issues
Sometimes pickles can turn out too salty or too soft. If your pickles are too salty, you can soak them in fresh water for a few hours. This will draw out some salt. For soggy pickles, check your brine. Use a higher vinegar ratio next time. Remember, refrigerate your pickles for at least 24 hours for best flavor. If you follow these tips, you’ll make great pickles every time!
Variations
Classic Dill Pickles vs. Spicy Dill Pickles
You can make classic dill pickles or spice things up with heat. For spicy dill pickles, add red pepper flakes or sliced jalapeños to the brine. The spice level is up to you! Start with half a teaspoon of red pepper flakes, and adjust to your taste. This heat adds a fun kick to your pickles and pairs well with sandwiches or burgers.
Sweet Dill Pickles
If you have a sweet tooth, sweet dill pickles are a great choice. Just add more sugar to the brine. Start with an extra tablespoon of sugar. Taste the brine first, then add more if you like it sweeter. Sweet dill pickles work well as a snack or as a side with barbecue dishes. They balance savory meals nicely.
Other Flavor Profiles
Get creative with other flavors. Try garlic dill pickles by adding more smashed garlic to the brine. For lemon dill pickles, add lemon slices along with the cucumbers. You can also use fresh herbs, like thyme or coriander, to infuse unique flavors. Each variation brings its own twist, making your pickling adventure exciting. Explore different herbs and spices to find your favorite blend as you enjoy the full recipe.
Storage Info
Best Practices for Refrigeration
To keep your dill pickles fresh, store them in the fridge. Use clean glass jars with tight lids. This way, they stay crunchy and tasty. Make sure the cucumbers stay submerged in the brine. If some float up, press them down with a clean spoon. Always check the jars for any leaks. If they leak, transfer the pickles to another jar.
Shelf Life Expectations
Homemade dill pickles last about 1 to 3 months in the fridge. They taste best when you eat them within the first month. Over time, they may lose crunchiness. If you want to enjoy them longer, consider canning them for shelf storage. But remember, once you open a jar, eat them within a month for the best flavor.
Signs of Spoilage
Look for signs that your pickles may be bad. If you see mold on the surface, it’s time to toss them. A bad smell is also a sign that they are spoiled. If the brine changes color or if the cucumbers become mushy, discard them. Always trust your senses; if something seems off, don’t eat them.
FAQs
How long do homemade dill pickles last?
Homemade dill pickles last about 1 to 3 months in the fridge. Keep them sealed in a jar and fully submerged in the brine. The vinegar helps preserve them. If you notice any odd smell or change in color, it’s best to toss them.
Can I use other vegetables for pickling?
Yes, you can use other vegetables like carrots, radishes, or green beans. Each veggie adds its own flavor and crunch. Just keep in mind that different vegetables may need different pickling times. Experiment and find what you like best!
Is pickling safe and can I can them for long-term storage?
Pickling is safe when done right. Always use clean jars and fresh ingredients. For long-term storage, you can use a water bath canning method. This seals the jars so they last longer outside the fridge. Remember to follow safe canning guidelines to avoid spoilage.
What should I serve with homemade dill pickles?
Homemade dill pickles pair well with sandwiches, burgers, and charcuterie boards. They add a nice crunch and tangy flavor. You can also enjoy them as a snack or side dish with cheese or crackers. The options are endless! For more ideas, check out the Full Recipe.
Homemade dill pickles are a fun and tasty project. You learned about essential ingredients, like cucumbers and fresh dill. I shared tips on crafting the perfect brine and filling jars. You now know how to achieve crunchy pickles and customize flavors. Remember to store your pickles correctly to keep them fresh. With this knowledge, you can enjoy delicious pickles and impress your friends. Happy pickling!